
Introduction
In this HashiCorp Nomad tutorial, learn how to use the entire HashiStack, that is Terraform, Vault, Consul, and Nomad to run an application. The focus is showing how to orchestrate an application using Nomad and how the other HashiCorp tools integrate nicely for a secure deployment.
Video
Below is a video explanation and demo.
Overview
This is Part 4 and the final post of our Webblog app series. In this post, we make use of the entire HashiStack. This is similar to the previous setup used in Part 3, except that we swap Kubernetes for Nomad as our orchestrator.
As a quick recap, my goal was to learn the different HashiCorp tools by developing a web app called the Webblog app.
- In Part 1, we discussed Infrastructure as Code and Policy as Code concepts. We also showed how to prepare the infrastructure for the app using Terraform. We built a Vault cluster backed by a Consul cluster for storage. This was all built on Google’s Kubernetes Engine (GKE) using Terraform providers.
- In Part 2, we looked at the typical crawl, walk, run phases of adopting HashiCorp Vault as a centralized Secrets Management solution.
- In Part 3, we used the Consul Connect Service Mesh to connect the python app to the MongoDB database.
Pre-requisites
The following accounts are required to follow along:
- Google Cloud Platform – Free tier (additional costs may be incurred)
- Terraform Cloud – Free
- Github – Free
HashiStack in Action
Below is a summary of how the entire HashiStack was used for this app. In this blog post, we will cover each of the 4 HashiCorp tools (Terraform, Vault, Nomad, and Consul) and how they work together to deliver our app.
- Terraform to deploy a Nomad and a Consul cluster using Packer images
- Terraform used to configure Vault and to run jobs in Nomad
- Vault used to supply dynamic database secrets to the application in addition to encrypting the content of my posts
- Nomad used to orchestrate and run the application
- Consul used for all things networking including running a service mesh
Terraform and Packer – Infrastructure Provisioning
I forked the work done by Gruntwork in this repo into my own terraform google nomad repo. This was because I wanted to create one mono repo with both the app and the infrastructure that supports the app. Gruntwork created Packer configs to deploy images in GCP containing both Consul and Nomad clients and servers. These images are used by Terraform to create the VMs in GCP. More information on infrastructure deployment is found below.
Infrastructure Deployment Workflow
The infrastructure deployment of this Hashistack is quite simple. Below are the tools used:
- Github is used for version control.
- HashiCorp Packer is used for creating images in Google Cloud.
- Terraform is used to build 3 VMs from the Packer created images.
Terraform Cloud is tied to Github so upon a commit and a push into Github, Terraform Cloud deploys the 3 VMs into Google Cloud. These VMs are for the following:
- 1 VM acts as both a Nomad and a Consul server.
- 2 VMs are used as both Nomad and Consul clients.
We make use of the Vault cluster that was already deployed in Part 1 to keep things simple.
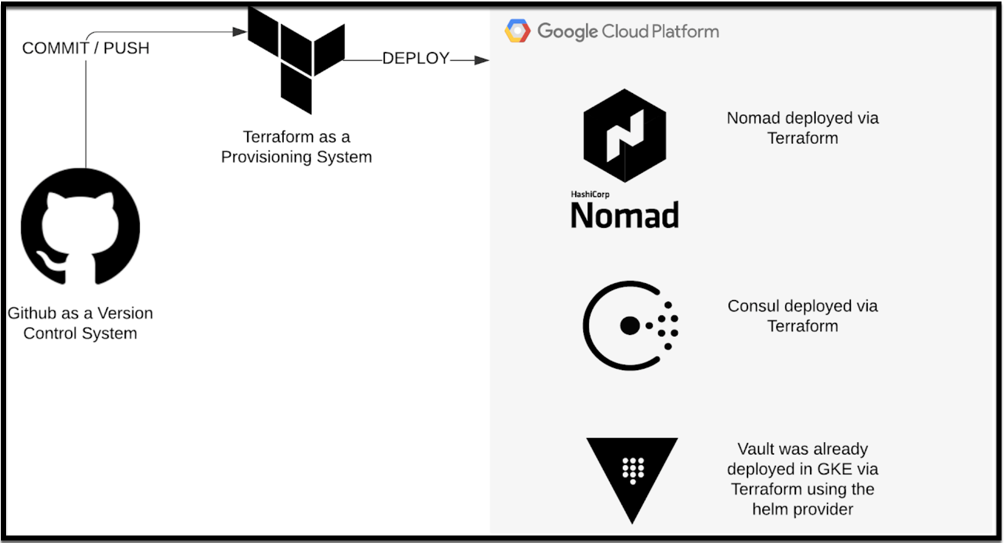
Infrastructure Deployment Workflow
Application Deployment Workflow
If you recall, the Webblog app is a simple Python/Flask app that talks to a MongoDB database. Both the Python app and MongoDB are containerized.
The application workflow is as follows:
- Commit and push code to Github
- Terraform uses the Nomad provider to deploy or update the Python app and MongoDB into Nomad
- Consul takes care of networking between the Python app and MongoDB
- The Python app requests MongoDB credentials from Vault
- Vault generates dynamic credentials in MongoDB and passes them to the Python app
- The Python app encrypts the content of the blog posts via the Vault Encryption as a Service API
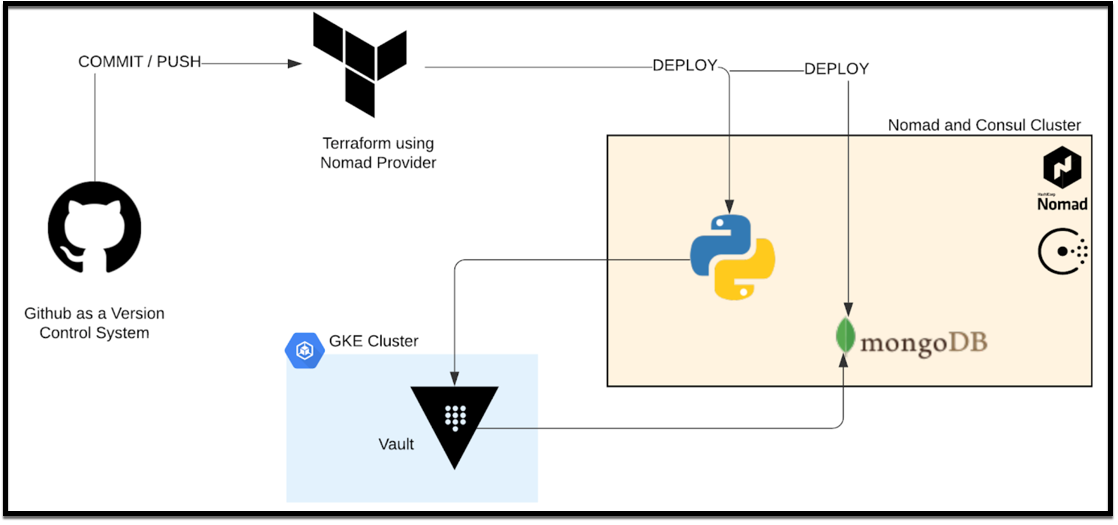
Application Deployment Workflow
Vault – Secrets Management
As mentioned above, we are re-using the Vault cluster that was created in Part 2 via Terraform in Google’s Kubernetes Engine. We also use the Vault Terraform provider to configure Vault to work in our new HashiStack setup. Vault is configured to use a new MongoDB database secrets engine. However, we are utilizing the existing transit engine for encryption. Below are the relevant code sections to this new set up. You can see the updated repo here.
In vault.tf we added the following:
resource "vault_mount" "db_nomad" {
  path = "mongodb_nomad"
  type = "database"
  description = "Dynamic Secrets Engine for WebBlog MongoDB on Nomad."
}

resource "vault_database_secret_backend_connection" "mongodb_nomad" {
  backend       = vault_mount.db_nomad.path
  name          = "mongodb_nomad"
  allowed_roles = ["mongodb-nomad-role"]

  mongodb {
    connection_url = "mongodb://${var.DB_USER}:${var.DB_PASSWORD}@${var.DB_URL_NOMAD}/admin"

  }
}

resource "vault_database_secret_backend_role" "mongodb-nomad-role" {
  backend             = vault_mount.db_nomad.path
  name                = "mongodb-nomad-role"
  db_name             = vault_database_secret_backend_connection.mongodb_nomad.name
  default_ttl         = "10"
  max_ttl             = "86400"
  creation_statements = ["{ \"db\": \"admin\", \"roles\": [{ \"role\": \"readWriteAnyDatabase\" }, {\"role\": \"read\", \"db\": \"foo\"}] }"]
}
We added an additional policy to the webblog_policy.hcl file below:
path "mongodb_nomad/creds/mongodb-nomad-role" {
  capabilities = [ "read" ]
}
Nomad – Orchestration
Let’s take a look at how Nomad works in conjunction with the rest of the HashiStack.
Nomad Terraform Provider
As mentioned earlier, we use the Nomad Terraform provider to deploy Nomad jobs. We need to specify the NOMAD_TOKEN as an environment variable since we’re using Access Control Lists (ACLs) in the Nomad cluster. We define this in Terraform Cloud as a sensitive environment variable.
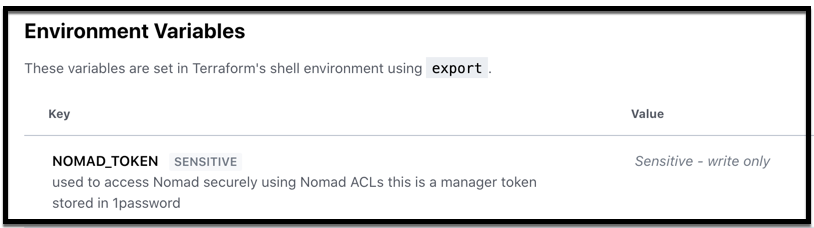
Terraform Environment Variables to Access Nomad
Below is an image of the Terraform configuration used to deploy the Nomad job. You can see the nomad job file in the Github repo.
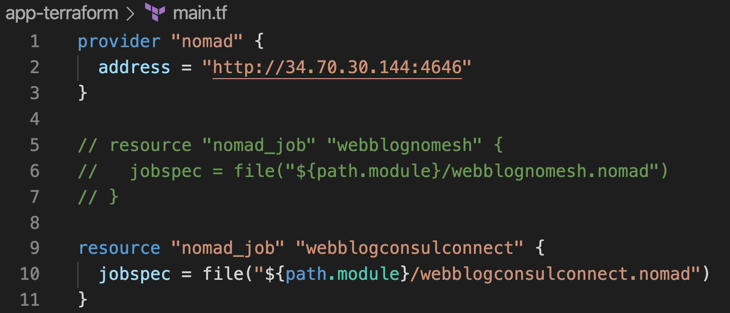
Terraform Config to Deploy a Nomad Job
Nomad Dashboard
Once Terraform deploys the Nomad job, you can see it running in the Nomad dashboard as shown below.
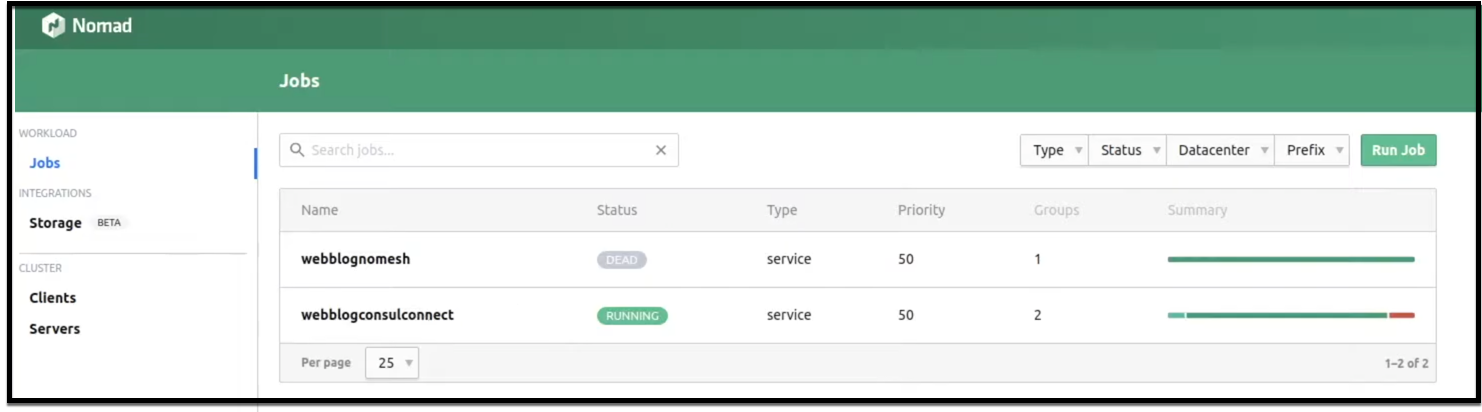
Nomad Dashboard
Nomad ACLs
ACLs are used by Nomad to secure the system. There are three major components to the ACL system: tokens, policies, and capabilities. The components are illustrated in the diagram below and you can find more in this learn guide.
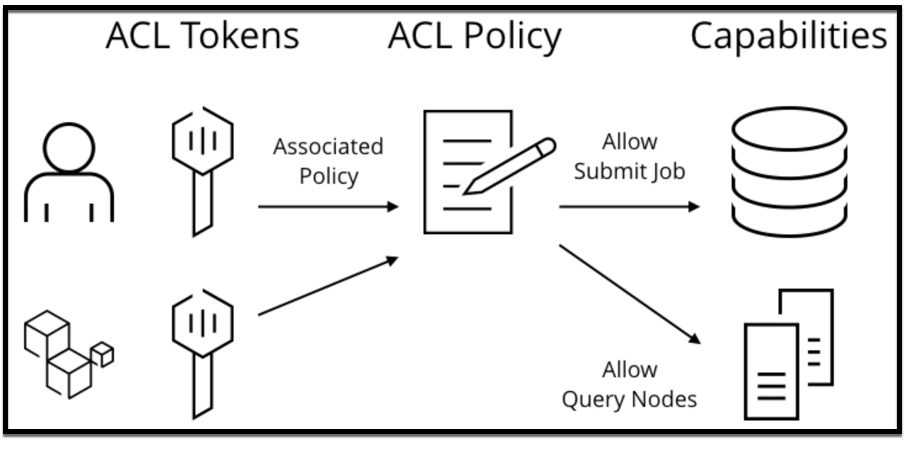
Nomad ACL System Components
The config file for Nomad servers and clients needs to have the ACL stanza and some more configuration items according to the Nomad ACL Bootstrap guide. Below is a simple example for the ACL stanza in the config file for Nomad servers and clients:
acl {
  enabled = true
}
After bootstrapping the Nomad cluster, you need to create policies. Check out how to create a policy for an app developer to deploy jobs. Below is the policy config I used in my app, however, for a production app, you will need to be more restrictive with the policy.
namespace "default" {
  policy = "write"
}
You then need to apply the policy as follows:
nomad acl policy apply -description "Application Developer policy" app-dev app-dev.policy.hcl
and finally, create a token:
nomad acl token create -name="Test app-dev token" -policy=app-dev -type=client | tee app-dev.token
Nomad CNI Plugins
Nomad needs Container Network Interface (CNI) plugins. It doesn’t come installed with the Packer images we used. I installed it manually after the images were deployed. Use the below to install it:
#curl -L -o cni-plugins.tgz https://github.com/containernetworking/plugins/releases/download/v0.8.4/cni-plugins-linux-amd64-v0.8.4.tgz
#sudo mkdir -p /opt/cni/bin
#sudo tar -C /opt/cni/bin -xzf cni-plugins.tgz
Nomad Docker Driver
Similar to the CNI plugins, Docker is not installed by default in the Packer images. So make sure you have it installed so that the Nomad Docker driver works.
Nomad Vault Config
You need to add the following config on the Nomad Servers to allow connections to Vault. I used the Vault root token for this demo, however, this is definitely not recommended in production. You can read more about the Nomad Vault integration in this document.
vault {
  enabled = true
  address = "http://<your_vault_url>:8200"
  token = "xxxxx"
}
Similarly, use the following on Nomad clients. Notice that you don’t need to specify the token for the clients.
vault {
  enabled = true
  address = "http://<your_vault_url>:8200"
}
Nomad Consul Config
To allow Nomad to connect to Consul, you will need the following config in the Nomad server and client config files. Notice the use of the token here since we’re using ACLs in Consul.
consul {
  address = "127.0.0.1:8500"
  token   = "xxxxx"
}
Nomad Host Volumes
Nomad host volumes can manage storage for stateful workloads running inside a Nomad cluster. In my app, I used host volumes as per this guide. Nomad also supports Container Storage Interface (CSI), however, it’s currently in beta as of the time of writing this blog post.
The configuration needed on the Nomad clients for enabling a host volume is found below:
client {
  enabled = true
  host_volume "mongodb" {
    path      = "/opt/mongodb/data"
    read_only = false
  }
}
Troubleshooting Nomad
I found this guide very useful in troubleshooting Nomad jobs.
Nomad vs Kubernetes
Below are some points, in my opinion, where using Nomad makes sense over Kubernetes. You can find more comparison details here.
When to choose Nomad:
- When you need to orchestrate non-containerized workloads or a combination of both containerized and non-containerized workloads. Nomad supports a variety of task drivers.
- For teams that are new to the microservices and containers world and need a simple solution. K8s has a steeper learning curve.
- When a simple architecture is needed. Nomad is a single binary, both for clients and servers, and requires no external services for coordination or storage. You can think of K8s as a solution with batteries included, but that sometimes adds unnecessary complexity. Nomad has the philosophy of build as you go.
Consul – Networking
Consul behaves the same way as when we used it with Kubernetes in Part 3. Let’s take a look at how it works with Nomad.
Consul Service Mesh
As we did in Part 3, here we will also use Consul Connect Service Mesh for networking. Below is a diagram showing the control plane and the data plane for Consul Connect. You can also reference the Understand Consul Service Mesh guide to learn more about Consul Connect.
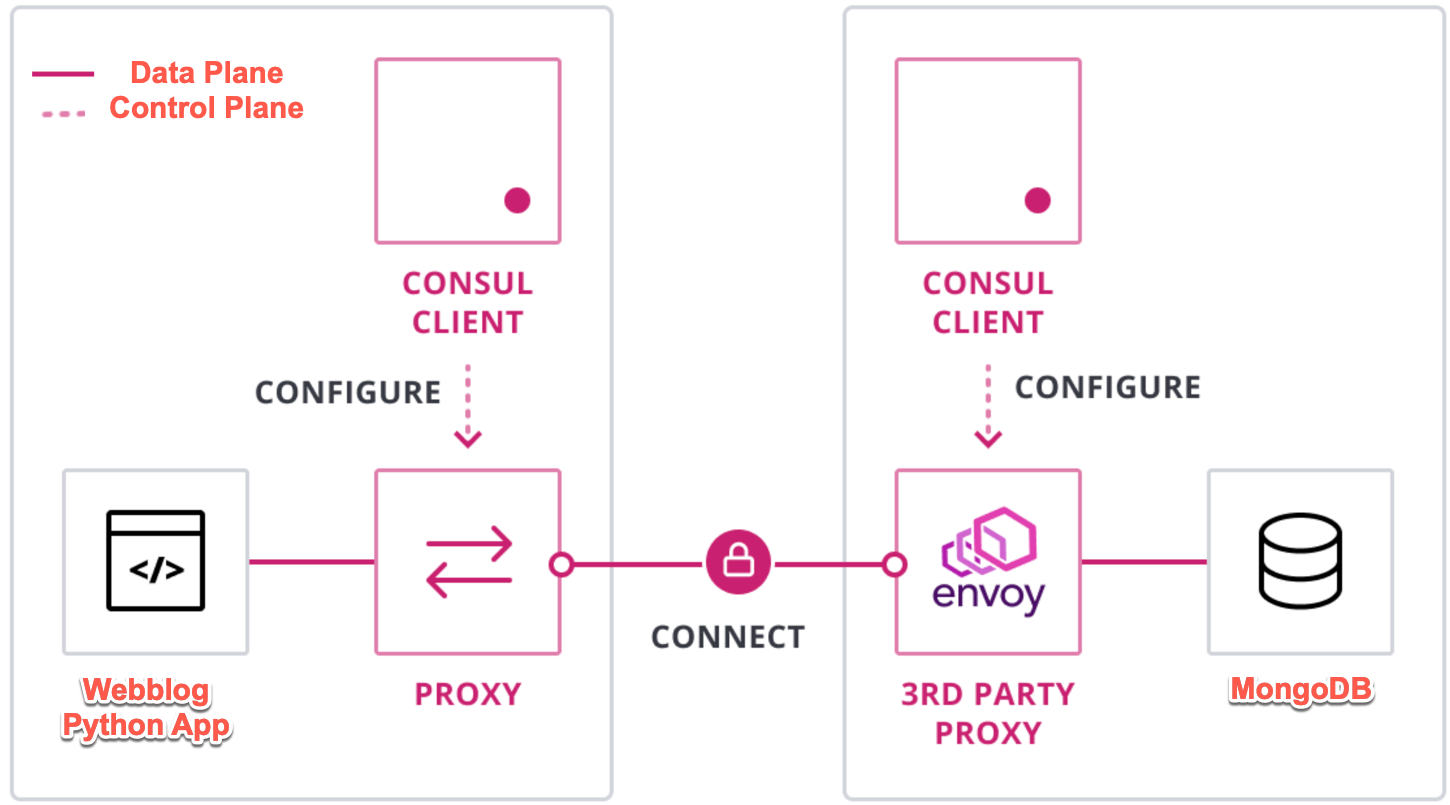
Webblog App using Consul Connect Service Mesh
Consul Dashboard
You can see how Nomad is tightly integrated with Consul. A MongoDB service along with a sidecar proxy service is automatically created when Nomad creates a job. Also, the Python frontend service with a sidecar proxy is created.
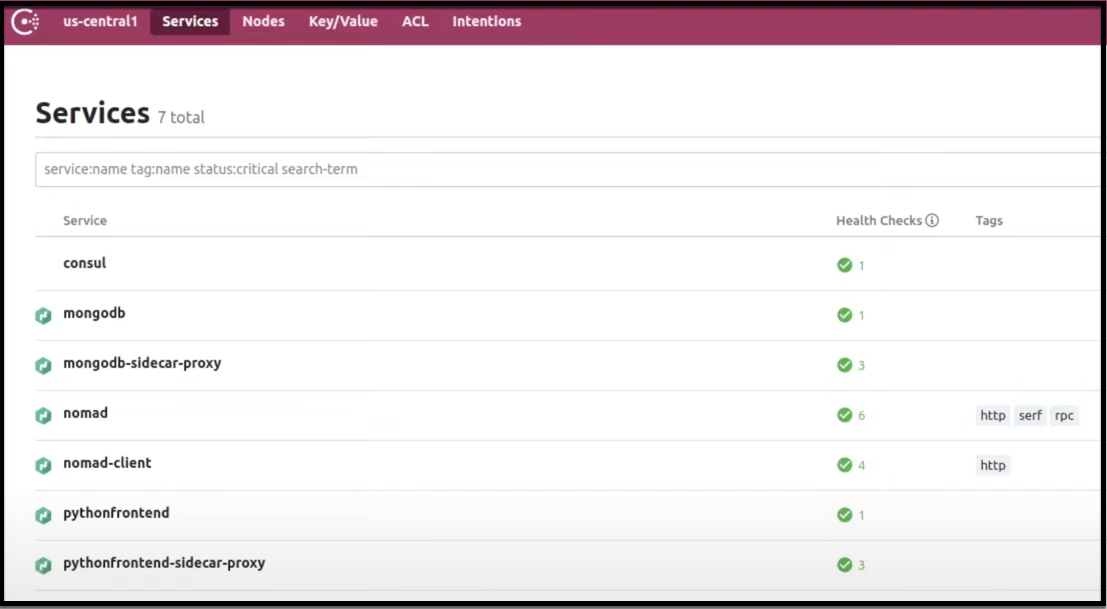
Consul Dashboard
Consul Intentions
When using Consul Connect with ACLs, it’s best practice to explicitly define Intentions to avoid any confusion. You can find out more here.
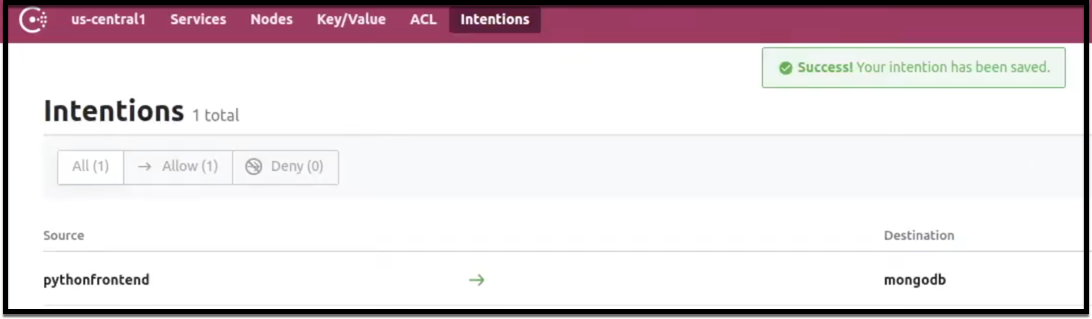
Consul Intentions
Consul ACLs
ACLs are used in Consul to secure access to the UI, API, CLI, service, and agent communications. It’s fine to run Consul with no ACLs in a test/dev environment, however, in production, it is a must.
Consul clients and servers need the following ACL stanza in the config file to enable ACLs. HashiCorp learn has a good guide on ACLs.
In JSON:
"acl": {
  "enabled": true,
  "default_policy": "deny",
  "enable_token_persistence": true
  }
In HCL:
acl = {
  enabled = true
  default_policy = "deny"
  enable_token_persistence = true
}
Here is a good guide showing how Consul ACLs work with Nomad.
Conclusion
It’s been a fun and educational journey exploring the different HashiCorp products in this four-part series of blogs. I hope that, from a developer’s perspective, you learned the reason to use these tools just as I have.
Below you’ll find my key learnings from using the entire HashiStack:
- All the HashiCorp tools within the HashiStack work seamlessly together
- Terraform is an elegant provisioning tool for infrastructure deployments, for Nomad job deployments, and for Vault configurations. Terraform Cloud’s integration with various version control systems improves workflow tremendously.
- Vault is a swiss army knife when it comes to secrets management. The database dynamic secrets engine along with the transit engine secured my application by significantly reducing the attack surface
- Vault and Consul are first-class citizens in a K8s environment just as in a Nomad one
- Choose Nomad over K8s when you need a simple lightweight orchestrator for containerized and non-containerized workloads
- Consul Connect Service Mesh is a joy to work with and makes connectivity of microservices in both Nomad and K8s environments very simple and straightforward
Finally, I hope you’ve enjoyed this journey as much as I have and I encourage you to explore the HashiStack in more depth as I surely will.
Suggested Reading
- Creating a vSphere On-Premises HashiCorp Nomad Cluster with Packer, Terraform, Ansible, and GitLab
- Jenkins, Vault, Terraform, Ansible, and Consul Delivering an End-to-End CI/CD Pipeline
- HashiCorp Packer to Build a Ubuntu 22.04 Image Template in VMware vSphere
- Build a Kubernetes k3s Cluster in vSphere with Terraform and Packer
- HashiCorp Packer for VMware Ubuntu Templates and Terraform for building VMs
- Migrate Secrets from AWS Secrets Manager to HashiCorp Vault with Python, Docker, and GitLab
Code
Hi and Welcome!
Join the Newsletter and get FREE access to all my Source Code along with a couple of gifts.