
Introduction
Learn how to work with Jenkins, Vault, Terraform, Ansible, and Consul to deliver an application.
Video
Below is a video explanation and demo.
Video Chapters
You can skip to the relevant chapters below:
- 00:00 – Introduction
- 02:54 – Agenda
- 04:24 – Overall Goal
- 05:48 – Topics To Learn
- 07:05 – Development Workflow
- 10:07 – Jenkins Build Stages
- 12:39 – Demo Steps
- 13:42 – Demo Starts
- 14:19 – Update App and Rerun Pipeline
- 16:01 – Jenkins Build
- 17:35 – Terraform Walkthrough
- 28:52 – Ansible Walkthrough
- 40:34 – Vault Dynamic DB Secrets
- 42:21 – Vault Encryption as a Service
- 43:31 – Consul Service Mesh
Overview
We’ve come to the fourth and final post in the blog post series called End-to-End Infrastructure and Application Deployment. Today we bring together all the concepts discussed in the three prior blog posts.
Here is what we’ve covered so far:
– In part 1, we discussed the HashiCorp Vault Azure Secrets Engine. That was the first step in securely automating our CI/CD pipeline. The purpose was to deliver Azure credentials dynamically for provisioning resources in Azure.
– In part 2, we looked at how to build our Jenkins VM to be used as our CI/CD pipeline using HashiCorp Packer, Terraform, Docker, and Ansible
– In part 3, we learned about the Secret Zero problem. In our case, it was the secure delivery of the Vault token. We discussed how to do so for both our Jenkins pipeline and for our application via the Vault agent.
Now let’s turn our focus to what we will cover in today’s post:
- Review the Jenkins build stages
- Terraform configuration
- Ansible as a configuration management tool
- Consul service mesh configuration
- Updates and redeployment of the Webblog app
- Vault dynamic database secrets for MongoDB
- Encryption with Vault’s transit secrets engine
As a reminder, the goal of this series is to learn best practices around the automation of infrastructure provisioning and application deployment. We cover the concepts of Infrastructure as Code, configuration management tools, CI/CD, automation tools, secrets management, dynamic secrets, the secret zero problem, service mesh, and more.
Hopefully, by understanding how each tool is used, you will understand jenkins vs ansible vs terraform and so on.
Pre-requisites
The following is required to follow along:
Overview of the End-to-End Infrastructure and Deployment Blog Series
As a reminder, let’s take a look at the big picture of this blog series.
Break-Up
Below is an overview diagram of this 4 part blog series.
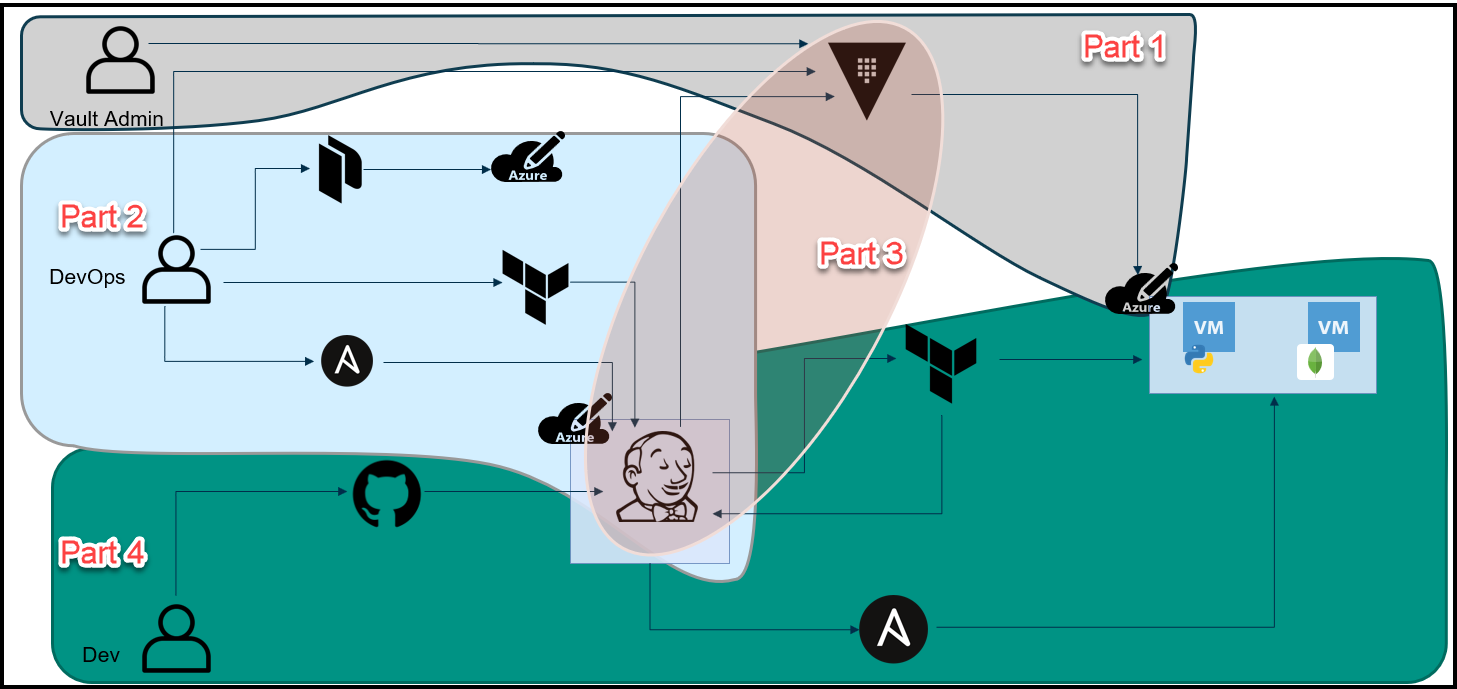
Break-Up of the Blog Series
We’ve broken up this blog series into 4 parts:
Part 1: HashiCorp Vault Azure Secrets Engine
This is the first step to secure our pipeline. The purpose here is to create dynamic short-lived credentials for Azure. We will then use these credentials to provision the Jenkins VM and app VMs in Azure. The credentials are only valid for 1 day and they expire after that.
Part 2: HashiCorp Packer, Terraform, and Ansible to Set Up Jenkins
Here we used a few tools to build a Jenkins VM that will be used as our CI/CD pipeline. Below are the high-level steps:
1. Packer to create an Azure image that has Docker installed.
2. Create a Docker container image that contains Jenkins, Vault, Terraform, and Ansible.
3. Use HashiCorp Vault to retrieve Azure credentials that have a 1 day TTL to use with Terraform
4. Run Terraform to build a VM in Azure based on the Packer image that will host our Jenkins pipeline.
5. Ansible then configures the Azure VM to:
– Add necessary packages
– Pull the Jenkins Docker image
– Start the Jenkins container
Part 3: The Secret Zero Problem Solved for HashiCorp Vault
This is where we discuss the secret zero problem and how to solve it. This is often referred to as Vault secure introduction. The issue is that we need to provide the Vault authentication token to our Jenkins pipeline and to our application. Once we have the token, then we can access secrets in Vault. The challenge is how to deliver this Vault token securely. We address secure introduction by using Vault AppRoles, response wrapping, and the Vault agent.
Part 4: Jenkins, Vault, Terraform, Ansible, and Consul End-to-End CI/CD Pipeline
Finally, we get to this blog post where we put everything together. Now that we have the Jenkins VM running and we’ve addressed the secret zero problem, we can finally run the pipeline to build our application. Below is the workflow:
1. A developer commits and pushes code into GitHub
2. The Jenkins pipeline automatically starts due to a webhook from GitHub to Jenkins
3. Jenkins retrieves Azure credentials from Vault
4. Jenkins runs Terraform with these credentials
5. Terraform builds 3 VMs:
– A Consul server
– The Python Webblog app server
– A MongoDB server
6. Terraform completes the provisioning and passes the 3 VMs’ fully qualified domain names (FQDNs) to Ansible
7. Ansible configures these VMs to do the following:
– Download and install the Consul and Envoy binaries for the service mesh
– Pulls the MongoDB Docker image and starts the container
– Downloads the Python dependencies for the Webblog app and starts the application
Some Tools Used in this Series
- HashiCorp Packer
- HashiCorp Terraform*
- HashiCorp Vault*
- HashiCorp Consul*
- Jenkins*
- Ansible*
- Microsoft Azure*
Topics to Learn in this Blog Series
-
Vault Azure Secrets Engine
-
Packer Images in Azure
-
Terraform Building VMs in Azure based on Packer Images
-
Ansible to Configure an Azure VM
-
The Secret Zero Problem and Vault Secure Introduction
-
Vault AppRole
-
Vault Dynamic Database Secrets for MongoDB*
-
Vault Transit Secrets Engine*
-
Advanced CI/CD Pipeline Workflow using:*
- GitHub(VCS)
- Jenkins(CI/CD)
- Terraform(IaC)
- Ansible(Config Mgmt)
- Vault(Secrets Mgmt)
-
Consul Service Mesh*
*Featured in this post
End-to-End CI/CD Pipeline
Alright, so let’s take a look at two things:
1. The development workflow with regards to our current CI/CD pipeline
2. The Jenkins build stages that enables this workflow
Development Workflow
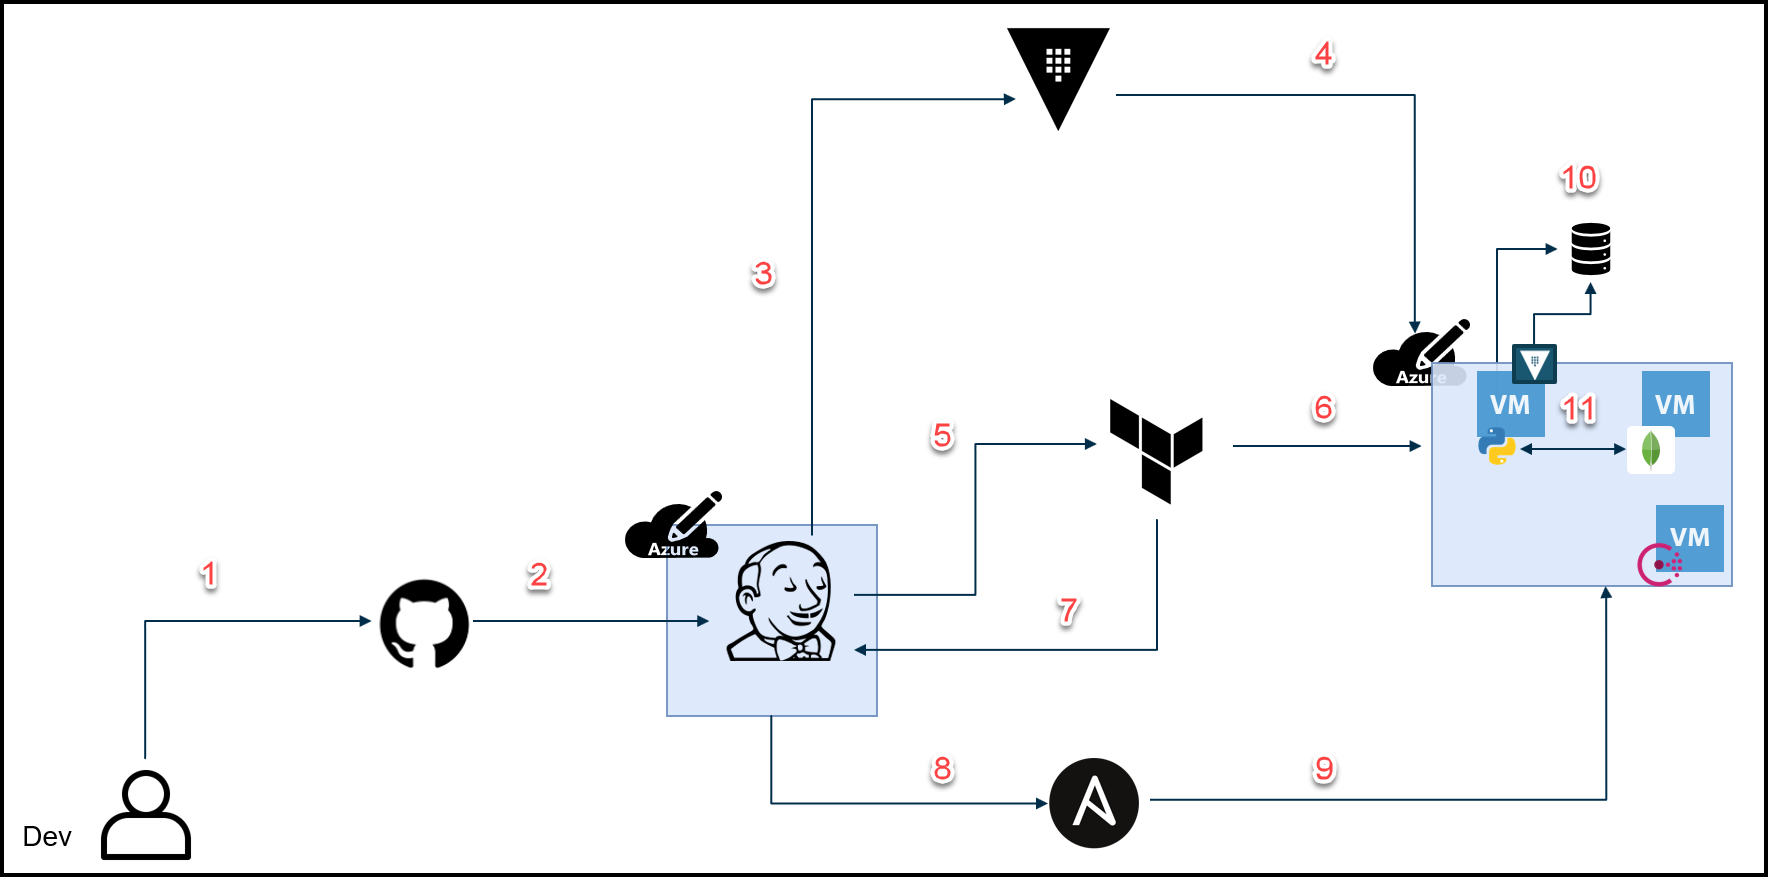
Development Workflow
As you see in the image above, our development workflow has the following steps:
-
A developer commits and pushes code into GitHub
-
The Jenkins pipeline automatically starts due to a webhook from GitHub to Jenkins
-
Jenkins requests Azure credentials from Vault
-
Vaults creates dynamic Azure credentials and passes them back to Jenkins
-
Jenkins runs Terraform with these Azure credentials
-
Terraform provisions 3 VMs:
- A Consul server
- The Python Webblog app server
- A MongoDB server
-
Terraform completes the provisioning and passes the 3 VMs’ fully qualified domain names (FQDNs) to Jenkins
-
Jenkins writes the FQDNs to an Ansible playbook and runs it
-
Ansible configures these VMs to do the following:
- Download and install the Consul and Envoy binaries for the service mesh
- Pulls the MongoDB Docker image and starts the container
- Downloads the Python dependencies for the Webblog app and starts the application
-
Vault agent handles auto authentication
-
Consul Connect service mesh connects MongoDB to the Python Webblog app
Note: We’ve intentionally removed the secure introduction steps from the diagram above for simplicity, however, secure introduction is part of the process.
Jenkins Build Stages
For completeness, we’ve included a screenshot of the Jenkins build stages below. We’ve seen the Jenkinsfile before in the previous blog post. You can also find it in the GitHub repo here.
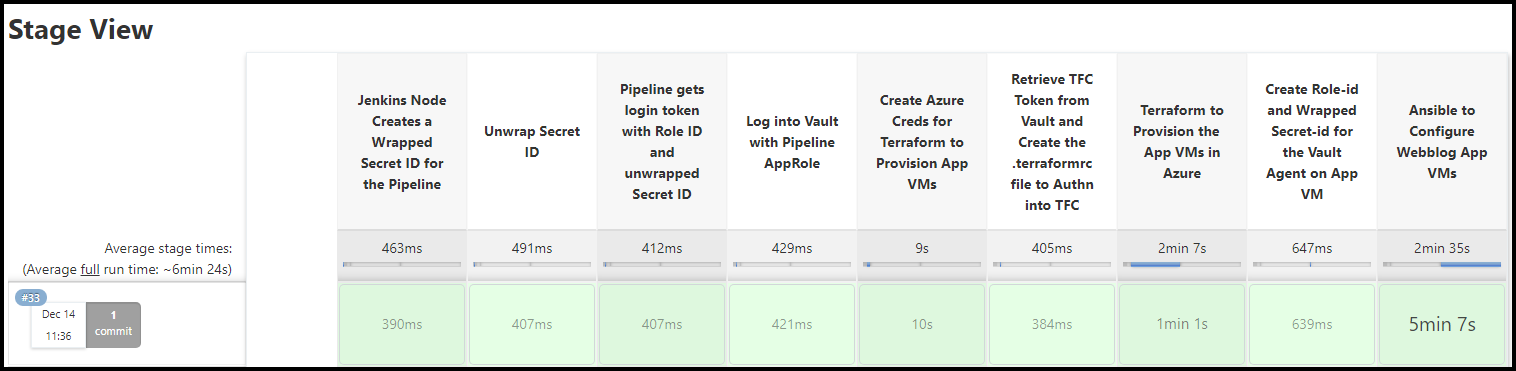
Jenkins Build Stages
Configuration
In this section, we go over the configuration for the following components:
- Terraform
- Ansible
- Consul
Terraform Configuration
Let’s take a look at the Terraform configuration that provisions the 3 VMs in Azure.
Some Notes on the Terraform Configuration
You can view the Terraform folder in the GitHub repo in the ProvisionAppVMs folder.
Below are some notes to keep in mind:
- Jenkins uses Terraform Cloud with the CLI-driven run workflow.
- Jenkins retrieves the Terraform Cloud token from Vault and creates a
.terraformrcfile to authenticate into Terraform Cloud. - Jenkins creates the Azure Creds for Terraform dynamically from Vault and populates 2 variable files:
client_id.auto.tfvarsandclient_secret.auto.tfvars. - Our Webblog app will run on port 8080 so we include that in our security group.
- MongoDB is exposed on port 27017 out to the Internet. This should not be done in production. We did this because Vault needs to talk to MongoDB to create dynamic database credentials and we’re re-using an existing Vault cluster in GCP. In production environments, the database and Vault should live in a secure network segment.
- It’s always a good practice to pin your provider version to a specific version.
- We use
for_eachinstead ofcountto iterate over the 3 VMs we create. We found thatcountdoesn’t necessarily assign the disk and NICs of the same index to the VMs. So you may end up with NIC-3 attached to VM-1 for example. - Make sure you are using the same resource group that was specified in Vault’s scope so that the Azure credentials would work.
- Change the
id_rsa.pubfile to thepublic_keyfile that you would like to use in your VMs so that Ansible cansshinto it from the Jenkins VM. - Jenkins replaces the placeholders present in the Ansible inventory file with the FQDNs output from Terraform.
The Variables Files
There are a few variables files used here:
- The
variables.tffile is used to declare our variables - The
vars.auto.tfvarsfile is used to assign variables - The
client_id.auto.tfvarsand theclient_secret.auto.tfvarsfiles are generated by Jenkins and are used to authenticate to Azure
variables.tf:
variable "subscription_id" {
  description = "Azure subscription_id"
}
variable "tenant_id" {
  description = "Azure tenant_id"
}
variable "client_secret" {
  description = "Azure client_secret"
}
variable "client_id" {
  description = "Azure client_id"
}
variable "prefix" {
  description = "This prefix will be included in the name of most resources."
  default     = "samg"
}
variable "app-prefix" {
  description = "This prefix will be included in the name of most resources for the webblog app."
  default     = "webblog"
}
variable "location" {
  description = "The region where the virtual network is created."
  default     = "centralus"
}
variable "address_space" {
  description = "The address space that is used by the virtual network. You can supply more than one address space. Changing this forces a new resource to be created."
  default     = "10.1.0.0/16"
}
variable "subnet_prefix" {
  description = "The address prefix to use for the subnet."
  default     = "10.1.10.0/24"
}
variable "vm_size" {
  description = "Specifies the size of the virtual machine."
  default     = "Standard_A0"
}
variable "node_count" {
  description = "Number of VMs"
  default     = 2
}
variable "adminuser" {
  description = "Specifies the admin username."
  default     = "adminuser"
}
variable "vm_names" {
  description = "Names of the VMs"
  type        = set(string)
  default     = ["samg-webblog-01", "samg-webblog-02", "samg-webblog-03"]
}
vars.auto.tfvars:
vm_size         = "Standard_B2s"
node_count      = 3
adminuser       = "adminuser"
tenant_id       = "0eec2e88-8caf-41ca-b4da-e3b33b6c52ec"
subscription_id = "14532f20-9428-451b-8298-102ed4e39c2a"
The Main File
main.tf:
terraform {
  backend "remote" {
    organization = "HashiCorp-Sam"
    workspaces {
      name = "end-to-end-infra-app-deployment-webblog-app-azure"
    }
  }
  required_providers {
    azurerm = {
      source  = "hashicorp/azurerm"
      version = "2.36.0"
    }
  }
}

provider "azurerm" {
  subscription_id = var.subscription_id
  client_id       = var.client_id
  client_secret   = var.client_secret
  tenant_id       = var.tenant_id
  features {}
}

locals {
  se-region = "AMER - Canada"
  owner     = "sam.gabrail"
  purpose   = "demo for end-to-end infrastructure and application deployments"
  ttl       = "-1"
  terraform = "true"
}

locals {
  # Common tags to be assigned to all resources
  common_tags = {
    se-region = local.se-region
    owner     = local.owner
    purpose   = local.purpose
    ttl       = local.ttl
    terraform = local.terraform
  }
}

// Using the same resource group because our Vault Azure secrets is tied to this specific resource group

data "azurerm_resource_group" "jenkinsresourcegroup" {
  name = "${var.prefix}-jenkins"
}

data "azurerm_image" "docker-image" {
  name                = "samg-Docker"
  resource_group_name = data.azurerm_resource_group.jenkinsresourcegroup.name
}

resource "azurerm_virtual_network" "vnet" {
  name                = "${var.prefix}-${var.app-prefix}-vnet"
  location            = data.azurerm_resource_group.jenkinsresourcegroup.location
  address_space       = [var.address_space]
  resource_group_name = data.azurerm_resource_group.jenkinsresourcegroup.name
}

resource "azurerm_subnet" "subnet" {
  name                 = "${var.prefix}-${var.app-prefix}-subnet"
  virtual_network_name = azurerm_virtual_network.vnet.name
  resource_group_name  = data.azurerm_resource_group.jenkinsresourcegroup.name
  address_prefixes     = [var.subnet_prefix]
}

resource "azurerm_network_security_group" "webblog-sg" {
  name                = "${var.prefix}-${var.app-prefix}-sg"
  location            = var.location
  resource_group_name = data.azurerm_resource_group.jenkinsresourcegroup.name

  security_rule {
    name                       = "HTTP"
    priority                   = 100
    direction                  = "Inbound"
    access                     = "Allow"
    protocol                   = "Tcp"
    source_port_range          = "*"
    destination_port_range     = "8080"
    source_address_prefix      = "*"
    destination_address_prefix = "*"
  }

  security_rule {
    name                       = "Mongo"
    priority                   = 102
    direction                  = "Inbound"
    access                     = "Allow"
    protocol                   = "Tcp"
    source_port_range          = "*"
    destination_port_range     = "27017"
    source_address_prefix      = "*"
    destination_address_prefix = "*"
  }

  security_rule {
    name                       = "Consul"
    priority                   = 103
    direction                  = "Inbound"
    access                     = "Allow"
    protocol                   = "Tcp"
    source_port_range          = "*"
    destination_port_range     = "8300-8600"
    source_address_prefix      = "*"
    destination_address_prefix = "*"
  }

  security_rule {
    name                       = "Envoy"
    priority                   = 105
    direction                  = "Inbound"
    access                     = "Allow"
    protocol                   = "Tcp"
    source_port_range          = "*"
    destination_port_range     = "21000-21255"
    source_address_prefix      = "*"
    destination_address_prefix = "*"
  }

  security_rule {
    name                       = "SSH"
    priority                   = 101
    direction                  = "Inbound"
    access                     = "Allow"
    protocol                   = "Tcp"
    source_port_range          = "*"
    destination_port_range     = "22"
    source_address_prefix      = "*"
    destination_address_prefix = "*"
  }
}

resource "azurerm_network_interface" "webblog-nic" {
  // count               = var.node_count
  for_each            = var.vm_names
  name                = each.key
  location            = var.location
  resource_group_name = data.azurerm_resource_group.jenkinsresourcegroup.name

  ip_configuration {
    name                          = "${var.prefix}-${var.app-prefix}-ipconfig"
    subnet_id                     = azurerm_subnet.subnet.id
    private_ip_address_allocation = "Dynamic"
    public_ip_address_id          = azurerm_public_ip.webblog-pip[each.key].id
  }
}

resource "azurerm_subnet_network_security_group_association" "webblog_subnet_nsg_association" {
  subnet_id                 = azurerm_subnet.subnet.id
  network_security_group_id = azurerm_network_security_group.webblog-sg.id
}

resource "azurerm_public_ip" "webblog-pip" {
  // count               = var.node_count
  for_each            = var.vm_names
  name                = "${each.key}-ip"
  location            = var.location
  resource_group_name = data.azurerm_resource_group.jenkinsresourcegroup.name
  allocation_method   = "Dynamic"
  domain_name_label   = each.key
}

resource "azurerm_linux_virtual_machine" "webblog" {
  // count               = var.node_count
  for_each            = var.vm_names
  name                = each.key
  location            = var.location
  resource_group_name = data.azurerm_resource_group.jenkinsresourcegroup.name
  size                = var.vm_size
  admin_username      = "adminuser"

  tags = local.common_tags

  network_interface_ids = [azurerm_network_interface.webblog-nic[each.key].id]
  // Add a public key to the same folder as the main.tf script (we use Ansible to send the private key to the Jenkins machine)
  admin_ssh_key {
    username   = var.adminuser
    public_key = file("id_rsa.pub")
  }

  source_image_id = data.azurerm_image.docker-image.id

  os_disk {
    name                 = "${each.key}-osdisk"
    storage_account_type = "Standard_LRS"
    caching              = "ReadWrite"
  }
}
The Outputs File
This is the output file that prints out the FQDN that Jenkins uses to populate the inventory file for the Ansible playbook.
outputs.tf:
output "webblog_public_dns" {
  value = {
  for ip in azurerm_public_ip.webblog-pip:
  ip.name => ip.fqdn
  }
}
Ansible Configuration
In this section, we’ll take a look at the Ansible configuration that is run from Jenkins. You can find the configuration in the GitHub repo under the Ansible WebblogApp folder.
Ansible Configuration File
In this file, we make sure that host_key_checking is disabled. We do this so Ansible doesn’t complain and error out when it checks for the host key. Please make sure that this directory is not world-wide writable for this to take effect.
ansible.cfg:
[defaults]
host_key_checking = False
Inventory File
This is the inventory file that Jenkins runs with the playbook. Notice the placeholders that Jenkins will replace with the output of the Terraform run. We’re also assigning the variables for the Vault and Consul versions to be installed.
inventory:
consul_clients
consul_server
ansible_user=adminuser
ansible_python_interpreter=/usr/bin/python3
vault_version=1.6.0
consul_version=1.9.0
[consul_clients]
webblog-app-vm ansible_host=<placeholder_app>
webblog-db-vm ansible_host=<placeholder_db>
[consul_server]
webblog-consul-server ansible_host=<placeholder_consul_server>
Playbook
Below you’ll find the playbook. It’s pretty straight-forward to read and understand what it’s doing. We’d like to draw your attention to a few points:
- Jenkins runs the Ansible playbook using this command:
ansible-playbook -i inventory --extra-vars "mongo_root_user=$(vault kv get -field=username internal/webblog/mongodb) mongo_root_password=$(vault kv get -field=password internal/webblog/mongodb)" appPlaybook.yaml
Notice that Jenkins is grabbing the MongoDB root credentials from Vault and passing them to Ansible as variables. Ansible will then use these credentials to bootstrap a MongoDB docker container on the MongoDB host VM.
– Ansible copies multiple Systemd service files to different VMs and then starts Consul, Envoy, Vault agent, and the Python Webblog app. These service files are found in the SystemdServices folder.
– Ansible registers the Webblog app service and the MongoDB service with the Consul service mesh via the Envoy proxy.
appPlaybook.yaml:
- hosts: all
  become_user: root
  become: true
  tasks:
    # adding retries and delays for apt to catch up otherwise you get this error: Could not get lock /var/lib/dpkg/lock-frontend
    - name: Install pip3, unzip, and Envoy Dependencies
      apt:
        update_cache: yes
        pkg:
        - python3-pip
        - unzip
        - apt-transport-https
        - ca-certificates
        - curl
        - gnupg-agent
        - software-properties-common
      register: result
      until: result is not failed
      retries: 20
      delay: 30
    - name: Download and install consul binary
      unarchive:
        src: "https://releases.hashicorp.com/consul/{{ consul_version }}/consul_{{ consul_version }}_linux_amd64.zip"
        dest: /usr/local/bin/
        remote_src: True
    - name: Create consul config directory
      file: state=directory path=/etc/consul.d
    - name: Copy consul service to server and clients
      copy: src=SystemdServices/consul.service dest=/etc/systemd/system/consul.service
    - name: Add an Apt signing key
      apt_key:
        url: https://getenvoy.io/gpg
        state: present
    - name: Add Envoy repository into sources list
      apt_repository:
        repo: deb [arch=amd64] https://dl.bintray.com/tetrate/getenvoy-deb bionic stable
        state: present
    - name: Install Envoy
      apt:
        name: getenvoy-envoy
        update_cache: yes

- hosts: consul_server
  become_user: root
  become: true
  tasks:
    - name: Copy consul server config to server
      copy: src=ConsulConfig/consul_server_config.hcl dest=/etc/consul.d
    - name: Start consul service
      systemd:
        state: restarted
        name: consul
        daemon_reload: yes

- hosts: consul_clients
  become_user: root
  become: true
  tasks:
    - name: Copy consul client config to clients
      copy: src=ConsulConfig/consul_client_config.hcl dest=/etc/consul.d
    - name: Start consul service
      systemd:
        state: restarted
        name: consul
        daemon_reload: yes

- hosts: webblog-db-vm
  become_user: root
  become: true
  tasks:
    - name: Install Docker module for Python
      pip:
        name: docker
    - name: Pull the Mongo Docker image
      docker_image:
        name: "mongo:4.2.7"
        source: pull
        state: present
        force_source: yes
    - name: Create Mongo container
      docker_container:
        name: "mongo"
        image: "mongo:4.2.7"
        state: started
        ports:
          - "27017:27017"
        env:
          MONGO_INITDB_ROOT_USERNAME: "{{ mongo_root_user }}"
          MONGO_INITDB_ROOT_PASSWORD: "{{ mongo_root_password }}"
        volumes:
          - mongo_data:/data/db
    - name: Copy Mongo service to server
      copy: src=WebblogServices/mongo_service.json dest=/etc/consul.d
    - name: Restart consul service
      systemd:
        state: restarted
        name: consul
        daemon_reload: yes
    - name: Copy Mongo Envoy service to server
      copy: src=SystemdServices/envoy_mongo.service dest=/etc/systemd/system/envoy_mongo.service
    - name: Start Register Mongo Service with Envoy
      systemd:
        state: restarted
        name: envoy_mongo
        daemon_reload: yes

- hosts: webblog-app-vm
  become_user: root
  become: true
  tasks:
    - name: Download and install vault binary
      unarchive:
        src: "https://releases.hashicorp.com/vault/{{ vault_version }}/vault_{{ vault_version }}_linux_amd64.zip"
        dest: /usr/local/bin/
        remote_src: True
    - name: Create vault config directory
      file: state=directory path=/etc/opt/vault/
    - name: Copy vault config to server
      copy: src=VaultConfig/vault_agent_config.hcl dest=/etc/opt/vault/
    - name: Copy role_id for Vault Agent
      copy: src=/tmp/app_role_id dest=/tmp/webblog_role_id
    - name: Copy wrapped_secret_id for Vault Agent
      copy: src=/tmp/app_wrap_secret_id dest=/tmp/webblog_wrapped_secret_id
    - name: Copy vault service to server
      copy: src=SystemdServices/vault.service dest=/etc/systemd/system/vault.service
    - name: Start vault service
      systemd:
        state: started
        name: vault
        daemon_reload: yes
    - pause:
        seconds: 15
    - name: Copy Webblog App
      copy: src=../../Application/app dest=/home/adminuser/
    - name: Install Webblog Python Dependencies
      pip:
        requirements: /home/adminuser/app/requirements.txt
    - name: Copy Webblog App service to server
      copy: src=SystemdServices/webblog.service dest=/etc/systemd/system/webblog.service
    - name: Start Webblog App service
      systemd:
        state: restarted
        name: webblog
        daemon_reload: yes
    - name: Copy Webblog App service to server
      copy: src=WebblogServices/webblog_app_service.json dest=/etc/consul.d
    - name: Restart consul service
      systemd:
        state: restarted
        name: consul
        daemon_reload: yes
    - name: Copy Webblog App service to server
      copy: src=SystemdServices/envoy_webblog.service dest=/etc/systemd/system/envoy_webblog.service
    - name: Start Register Webblog Service with Envoy
      systemd:
        state: restarted
        name: envoy_webblog
        daemon_reload: yes
Consul Configuration
Let’s take a look at the Consul server and client configurations in addition to the Consul service definitions for the service mesh.
Consul Server Configuration
Ansible places the configuration file below into the proper place on the Consul server VM.
consul_server_config.hcl:
datacenter = "canada-central1"
data_dir = "/etc/consul.d/data"
performance {
  raft_multiplier = 1
}
server = true
bootstrap_expect = 1
ui = true
client_addr = "0.0.0.0"
// advertise_addr = "samg-jenkins.centralus.cloudapp.azure.com"
bind_addr = "{{ GetPrivateInterfaces | include \"network\" \"10.0.0.0/8\" | attr \"address\" }}"
connect {
  enabled = true
}
ports {
  grpc = 8502
}
Consul Client Configuration
Ansible places the Consul client configuration file below into the proper places on the Webblog app VM and the MongoDB VM.
consul_client_config.hcl:
datacenter = "canada-central1"
data_dir = "/etc/consul.d/data"
performance {
  raft_multiplier = 1
}
server = false
ui = true
client_addr = "0.0.0.0"
retry_join = ["samg-webblog-03.centralus.cloudapp.azure.com"]
bind_addr = "{{ GetPrivateInterfaces | include \"network\" \"10.0.0.0/8\" | attr \"address\" }}"
connect {
  enabled = true
}
ports {
  grpc = 8502
}
Webblog App Service Definition
Notice the connect block in the service definition for the Webblog app service. This is how we connect the Webblog app service to the service mesh. Also, notice the upstream block points to the mongo service on port 27017.
webblog_app_service.json:
{
    "service": {
      "name": "webblog_app",
      "tags": [
        "Python",
        "production"
      ],
      "port": 8080,
      "connect": {
        "sidecar_service": {
          "proxy": {
            "upstreams": [
              {
                "destination_name": "mongo",
                "local_bind_port": 27017
              }
            ]
          }
        }
      },
      "check": {
        "id": "webblog",
        "name": "Webblog App TCP on port 8080",
        "tcp": "localhost:8080",
        "interval": "10s",
        "timeout": "1s"
      }
    }
  }
Now since I have a service mesh running, I can easily reference the MongoDB service on localhost or 127.0.0.1 in my Python code for the Webblog app. You can see this in my .env file below and in the GitHub repo.
.env:
PORT=8080
DB_SERVER="127.0.0.1"
DB_PORT=27017
VAULT_URL=http://vault.hashidemos.tekanaid.com:8200
MongoDB Service Definition
Notice the connect block in the service definition for the MongoDB service also allows this service to be part of the service mesh. There is no upstream definition because the MongoDB service doesn’t need to initiate connections anywhere.
mongo_service.json:
{
    "service": {
      "name": "mongo",
      "tags": [
        "database",
        "production"
      ],
      "port": 27017,
      "connect": { "sidecar_service": {} },
      "check": {
        "id": "mongo",
        "name": "mongo TCP on port 27017",
        "tcp": "localhost:27017",
        "interval": "10s",
        "timeout": "1s"
      }
    }
  }
Additional Topics
Let’s explore three more topics:
1. How to make updates to our source code for the application
2. Vault dynamic database secrets that are used to secure our application
3. Encryption of the content of our blog posts using Vault’s transit secrets engine
Updates and Redeployment of the Application
Now that our pipeline is operational, you can run it multiple times when making changes and updates to the application. The Terraform section will be skipped when there are no changes made to the infrastructure. Ansible will also skip over tasks that have already been implemented. You can watch this section of the video to see how we made a small change in the source code and re-run the pipeline to redeploy the application.
Vault Dynamic Database Secrets for MongoDB
The main two reasons for using dynamic database secrets are:
- Auto-rotation of the MongoDB credentials with a time-to-live (TTL)
- A unique set of credentials that could be traced back to the requestor app
Here is the documentation for the dynamic MongoDB database secrets engine.
A couple of things to note:
– We configured the dynamic secret to have a TTL of 10 seconds to show well in the demo. This is too short for a production app as you will need to restart the connection pool every time.
– The app has the logic to request a new secret from Vault when authentication to the Database fails (which is every 10 seconds in this case).
For more details on this topic, you can visit our blog post called: Webblog App Part 2 – Secrets Development Phases with Vault.
Encryption with Vault’s Transit Secrets Engine
Below are the steps to encrypt the blog post content:
- The app makes an API call to Vault with the plain-text and an encryption key name that it wants to use. The encryption key should have already been configured in Vault beforehand.
- Vault responds with cipher-text
- The app writes the cipher-text to MongoDB
Below is what the content post data looks like when not encrypted
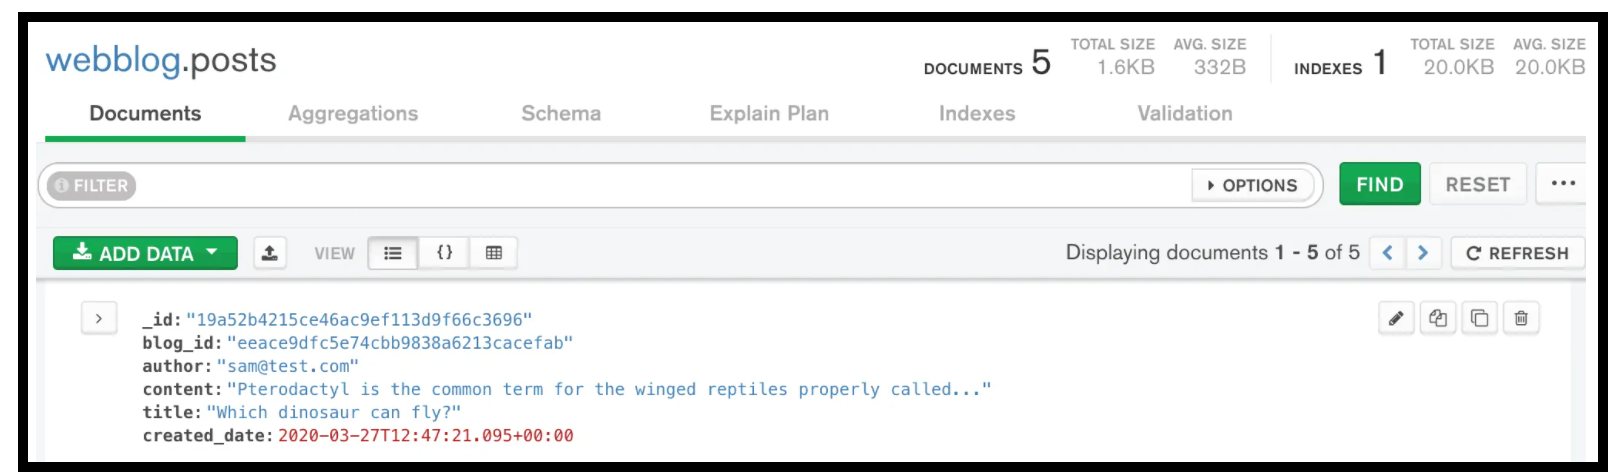
Post Content Data not Encrypted in MongoDB
And here is what it looks like when encrypted
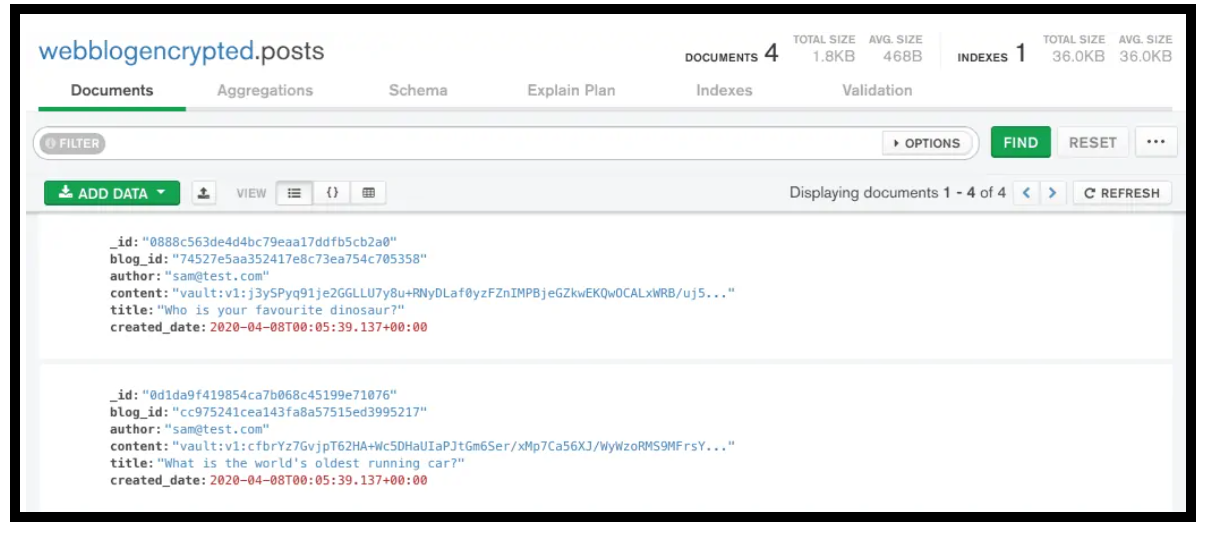
Post Content Data Encrypted in MongoDB
You can find the code to use the Vault transit engine in the GitHub repo here.
Conclusion
In this blog post, we discussed in detail how to automate infrastructure provisioning and application deployment. We covered the configuration of the various elements in the Jenkins CI/CD pipeline including Terraform, Ansible, and Consul.
This concludes our End-to-End Infrastructure and Application Deployment blog series. Below are some takeaways:
-
Automation takes time upfront, but once implemented, it will save your organization countless hours later.
-
Security needs to be carefully considered as part of the pipeline. Secure introduction is very important as it delivers your first secret (secret zero) to your pipeline and application. Security scanning of code vulnerabilities should also be taken into consideration.
-
Use the best-of-breed tools to get the job done:
- Terraform excels at Infrastructure as Code and provisioning resources
- Ansible shines at configuration management
- Vault is a Swiss Army knife when it comes to secrets management
- Jenkins provides a versatile CI/CD pipeline
- Packer is essential to build VM images
- Consul offers a secure and easy-to-implement service mesh that goes beyond containers and microservices to VMs and legacy environments
-
A deeper understanding of Ansible vs Jenkins vs Terraform and how each tool is used.
References
- HashiCorp Tools – Webblog App Series YouTube Playlist
- Webblog App Part 4 – HashiStack – Nomad Consul Vault Terraform
- Vault MongoDB Database Secrets Engine
- Vault Transit Secrets Engine
- Consul Service Mesh
- GitHub repo for the blog series
- HashiCorp Vault API Tutorial and Pro Tips
Suggested Reading
- Webblog App Part 3 – Consul Connect Service Mesh
- HashiCorp Packer for VMware Ubuntu Templates and Terraform for building VMs
- Terraform vs Ansible – Learn the Differences – Part 1
- Crossplane: Unveiling a New Horizon in Cloud Infrastructure Management
Code
Hi and Welcome!
Join the Newsletter and get FREE access to all my Source Code along with a couple of gifts.