
Introduction
Learn how to build a Kubernetes k3s cluster in vSphere with Terraform and Packer.
Video
Below is a video explanation and demo.
Video Chapters
You can skip to the relevant chapters below:
- 00:00 – Introduction
- 00:26 – Pre-requisites
- 01:57 – Workflow Diagram
- 02:14 – Demo Starts
- 03:16 – Diagram Walk-through
- 11:17 – Configuration Walk-through
- 36:48 – Takeaways
- 37:42 – Demo Results
- 40:04 – Conclusion
Overview
In a previous post called HashiCorp Packer to Build a Ubuntu 20.04 Image Template in VMware, we built a Ubuntu 20.04 image with Packer in vSphere. In this post, we will use this image to build an entire Kubernetes k3s cluster in vSphere. This is a very common workflow used when deploying infrastructure in cloud environments. Similarly, we use the same workflow to deploy in a vSphere on-premises environment.
Here are some of the tools used in this post:
– vSphere
– Terraform Cloud
– GitLab
– HashiCorp Vault
– Kubernetes (k3s)
– Docker
Pre-requisites
The following is required to follow along:
- Access to a vSphere instance (tested on vSphere v6.7)
- Terraform Cloud for Business (you could also modify the code to use Terraform OSS or Terraform Cloud Free Tier)
- HashiCorp Vault OSS
- Docker
- GitLab Free Account
A Word on k3s vs K8s
K3s and K8s are both container orchestration platforms, with K8s being the more well-known and widely used of the two. The main difference between the two is their size and complexity. K8s is a more complex and feature-rich platform, designed to manage large-scale containerized applications across Kubernetes clusters of servers. It requires a lot of resources and expertise to set up and maintain. On the other hand, K3s is a lightweight version of K8s, designed for smaller-scale deployments and simpler use cases. It is easier to install and operate than K8s, making it a good choice for developers and teams who need a streamlined solution for container orchestration. However, it may not be suitable for more complex applications that require the full range of features provided by K8s.
Workflow
Below is our workflow diagram.
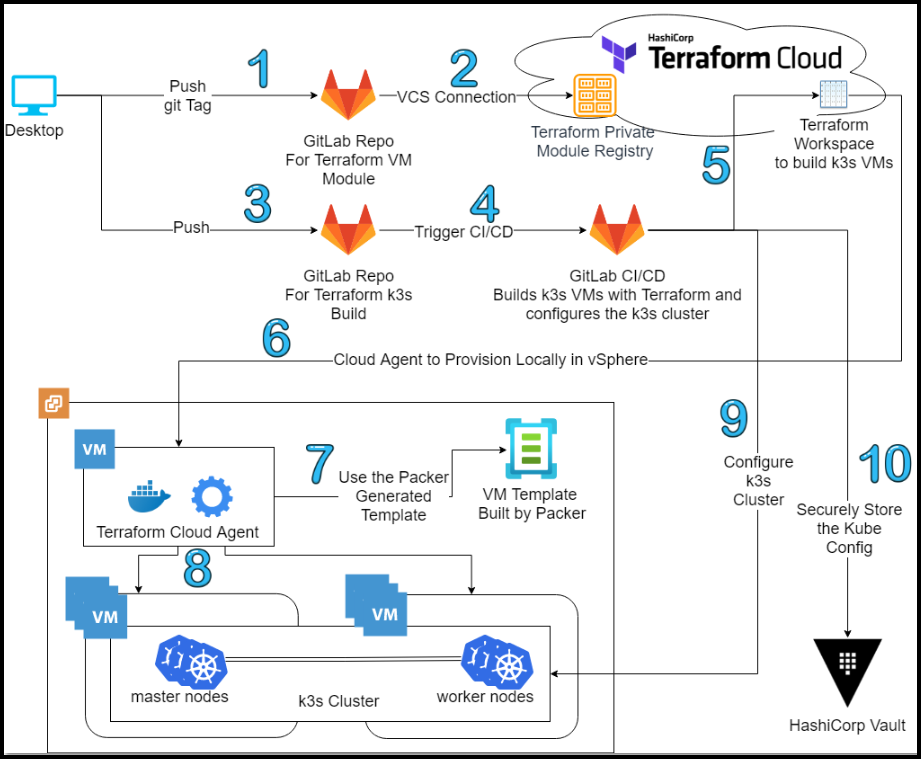
Flow Diagram
-
Add a tag to the GitLab repo for Terraform VM module and push it to GitLab to update the VM module in Terraform.
-
The VCS connection between GitLab and Terraform Cloud (TFC) kicks in and the VM module is updated in the Private Module Registry in TFC.
-
Commit and push your source code to the GitLab repo for Terraform k3s build.
-
A CI/CD pipeline in GitLab is triggered automatically.
-
The pipeline talks to a Terraform workspace in TFC that was configured ahead of time with the
Execution Modeset toAgentunder theSettings>Generaltab. Moreover, the variables section of the workspace contains the following sensitive variables:- ssh_password
- ssh_username
- vsphere_password
- vsphere_user
- vsphere_vcenter
-
There is a cloud agent docker container already running in the local VMware environment. This cloud agent polls the TFC workspace for any jobs that are ready to provision. The cloud agent finds a new job and starts provisioning locally.
-
Terraform via the cloud agent uses the Packer-generated template to build our VMs.
-
Terraform builds the 6 VMs to be used as master and worker nodes for the k3s instances.
-
Once Terraform finishes building the VMs, the CI/CD pipeline configures the k3s cluster to have 3 master nodes and 3 worker nodes for a highly available Kubernetes cluster.
-
After the cluster is built, the CI/CD pipeline drops the kube config file into a KV Vault secret. The user then can use this file to access the cluster.
Configuration
Let’s take a look at the most important configuration pieces needed.
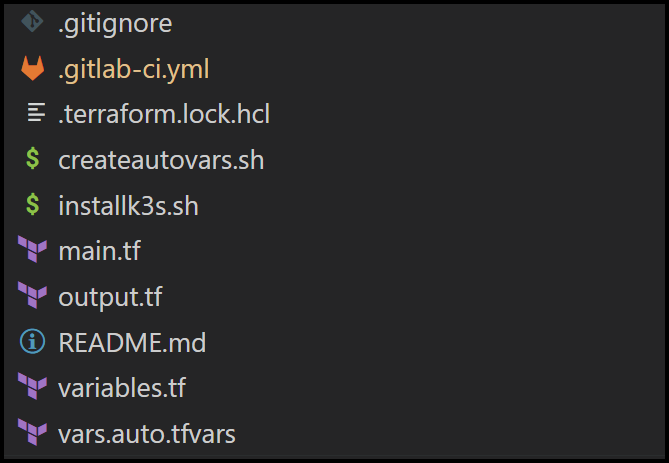
Folder Structure
Below is the structure of the repo folder.
Folder Structure
Terraform Cloud Agent
We use a cloud agent to allow Terraform cloud to provision resources locally in an on-premises environment. The agent polls Terraform cloud regularly waiting for jobs. The agent reaches outbound on port 443 so there is no need to open any firewalls inbound, making it an easier conversation with the security team. Check the documentation for more details. Now we are all set for our Kubernetes on-premise VMware cluster. Below is what you will need to run to get the agent ready.
export TFC_AGENT_TOKEN=<your_agent_token>
export TFC_AGENT_NAME=homeLab
docker run -d --name TFCagent -e TFC_AGENT_TOKEN -e TFC_AGENT_NAME hashicorp/tfc-agent:latest
VM Terraform Module
Terraform offers the ability to use modules for code re-use among other things. We created a module for a VM in vSphere that we use for the 6 VMs we will create for this project. Below is the main.tf file for the VM module that we stored in the TFC private module registry.
locals {
  templatevars = {
    name         = var.name,
    ipv4_address = var.ipv4_address,
    ipv4_gateway = var.ipv4_gateway,
    dns_server_1 = var.dns_server_list[0],
    dns_server_2 = var.dns_server_list[1]
  }
}

# Define VMware vSphere
data "vsphere_datacenter" "dc" {
  name = var.vsphere-datacenter
}

data "vsphere_datastore" "datastore" {
  name          = var.vm-datastore
  datacenter_id = data.vsphere_datacenter.dc.id
}

data "vsphere_compute_cluster" "cluster" {
  name          = var.vsphere-cluster
  datacenter_id = data.vsphere_datacenter.dc.id
}

data "vsphere_network" "network" {
  name          = var.vm-network
  datacenter_id = data.vsphere_datacenter.dc.id
}

data "vsphere_virtual_machine" "template" {
  name          = "/${var.vsphere-datacenter}/vm/${var.vsphere-template-folder}/${var.vm-template-name}"
  datacenter_id = data.vsphere_datacenter.dc.id
}

resource "vsphere_virtual_machine" "vm" {
  name             = var.name
  resource_pool_id = data.vsphere_compute_cluster.cluster.resource_pool_id
  datastore_id     = data.vsphere_datastore.datastore.id

  num_cpus             = var.cpu
  num_cores_per_socket = var.cores-per-socket
  memory               = var.ram
  guest_id             = var.vm-guest-id

  network_interface {
    network_id   = data.vsphere_network.network.id
    adapter_type = data.vsphere_virtual_machine.template.network_interface_types[0]
  }

  disk {
    label            = "${var.name}-disk"
    thin_provisioned = data.vsphere_virtual_machine.template.disks.0.thin_provisioned
    eagerly_scrub    = data.vsphere_virtual_machine.template.disks.0.eagerly_scrub
    size             = var.disksize == "" ? data.vsphere_virtual_machine.template.disks.0.size : var.disksize
  }

  clone {
    template_uuid = data.vsphere_virtual_machine.template.id
  }
  extra_config = {
    "guestinfo.metadata"          = base64encode(templatefile("${path.module}/templates/metadata.yaml", local.templatevars))
    "guestinfo.metadata.encoding" = "base64"
    "guestinfo.userdata"          = base64encode(file("${path.module}/templates/userdata.yaml"))
    "guestinfo.userdata.encoding" = "base64"
  }
  lifecycle {
    ignore_changes = [
      annotation,
      clone[0].template_uuid,
      clone[0].customize[0].dns_server_list,
      clone[0].customize[0].network_interface[0]
    ]
  }
}
Below are a few things to notice about the main.tf file above:
– The VM template we’re cloning is the one built by Packer in our previous post.
– We don’t rely on Linux customization, instead, we use cloud-init to configure the VM. This is found in the extra_config section and it references two files: metadata.yaml and userdata.yaml. I want to give a shout-out to my colleague Kalen Arndt for his help here with the cloud-init configuration.
GitLab CI/CD Pipeline
Let’s break up the CI/CD pipeline script into multiple sections to explain each.
GitLab Pipeline Variables Section
variables:
  USER_K3S: ubuntu
  K3S_VERSION: v1.21.4+k3s1
  K3S_CONTEXT: k3s-vmware-test
  MASTER_NAMES: "master-test-1 master-test-2 master-test-3"
  WORKER_NAMES: "worker-test-1 worker-test-2 worker-test-3"
  MASTER_IPS: "192.168.1.93 192.168.1.94 192.168.1.95"
  WORKER_IPS: "192.168.1.96 192.168.1.97 192.168.1.98"
  VAULT_ADDR: http://vault-raft-active.vault-raft.svc.cluster.local:8200
  KUBERNETES_SERVICE_ACCOUNT_OVERWRITE: gitlab-public-gitlab-runner
  KUBERNETES_POD_ANNOTATIONS_1: "vault.hashicorp.com/agent-inject=true"
  KUBERNETES_POD_ANNOTATIONS_2: "vault.hashicorp.com/agent-inject-token=true"
  KUBERNETES_POD_ANNOTATIONS_3: "vault.hashicorp.com/agent-pre-populate-only=true"
  KUBERNETES_POD_ANNOTATIONS_4: "vault.hashicorp.com/role=externalapps"
  KUBERNETES_POD_ANNOTATIONS_5: "vault.hashicorp.com/secret-volume-path=/app/secrets/"
Below are some notes on the variables we use:
– We define the names and IPs of the master and worker nodes as variables inside the GitLab pipeline. These will get passed into Terraform and the k3s instance installation script.
– The kube config is sent to Vault at the end of the pipeline run. This config is sensitive as it gives access to the k3s cluster and that’s why we securely store it in Vault. We specify the VAULT_ADDR as a variable.
– In regards to the variables starting with KUBERNETES_POD_ANNOTATIONS_, the GitLab pipeline runs inside of another K8s cluster. This cluster has the Vault agent injector running and is configured with the K8s authentication method in Vault. Once the Vault agent injector sees certain K8s annotations for the pipeline’s pod, it will inject an init container with a Vault agent that logs into Vault and drops a Vault token into a shared volume inside the pod at the path /app/secrets. Now the GitLab runner container has access to the Vault token and can access Vault directly.
GitLab Pipeline Terraform Build Section
The first stage of the GitLab pipeline is for Terraform to provision the 6 VMs we’ll use for the k3s cluster. Below is the GitLab configuration for this build stage.
terraform-build-k3s:
  stage: build
  script:
    - export USER=$(whoami)
    - echo USER=${USER} > build.env
    - mkdir -p /home/${USER}/.terraform.d
    - |-
      cat > /home/${USER}/.terraform.d/credentials.tfrc.json <<-EOF
      {
        "credentials": {
          "app.terraform.io": {
            "token": "${TFC_TOKEN}"
          }
        }
      }
      EOF
    # We need to make sure the command below passes entire lists so you have to surround them with quotes " "
    - ./createautovars.sh "${MASTER_NAMES}" "${WORKER_NAMES}" "${MASTER_IPS}" "${WORKER_IPS}"
    - terraform init -backend-config="token=${TFC_TOKEN}"
    - terraform fmt
    - terraform validate
    - terraform apply --auto-approve
    - terraform output -json
  # Use artifacts.reports.dotenv to pass variables in build.env from this job to the next
  artifacts:
    reports:
      dotenv: build.env
  tags: [inK8s]
Below are some notes regarding this portion of the pipeline configuration:
– To pass variables between GitLab stages, you can write them to a dotenv file and pass this file as an artifact at the end of one stage and the variables get picked up at the beginning of the next stage. In our case, we’re just passing the user into the build.env file. You could also use it to pass Terraform outputs between stages. We don’t need to here.
– Since we’re using Terraform Cloud, we have to create a credentials file with a TFC_TOKEN. This token is stored inside GitLab’s CI/CD variables section. We could have also used Vault to store the TFC_TOKEN.
– Terraform cloud doesn’t allow the use of a terraform.tfvars file, so we generate an auto.tfvars file dynamically using the createautovars.sh script that we will see in a later section.
Main Terraform File
Since the build stage of the pipeline triggers Terraform, let’s take a look at our Terraform files. Below is the main.tf file.
terraform {
  required_providers {
    vsphere = {
      source  = "hashicorp/vsphere"
      version = "2.0.2"
    }
  }
  backend "remote" {
    organization = "HashiCorp-Sam"
    token        = TFC_TOKEN

    workspaces {
      name = "vmware-k3s-infra"
    }
  }
}

# Connect to VMware vSphere vCenter
provider "vsphere" {
  vim_keep_alive = 30
  user           = var.vsphere_user
  password       = var.vsphere_password
  vsphere_server = var.vsphere_vcenter

  # If you have a self-signed cert
  allow_unverified_ssl = var.vsphere-unverified-ssl
}

# Master VM
module "vsphere_vm_master" {
  for_each               = var.master_nodes
  source                 = "app.terraform.io/HashiCorp-Sam/vsphere_vm-public/vsphere"
  version                = "0.2.3"
  vsphere_user           = var.vsphere_user
  vsphere_password       = var.vsphere_password
  vsphere_vcenter        = var.vsphere_vcenter
  ssh_username           = var.ssh_username
  ssh_password           = var.ssh_password
  name                   = each.key
  cpu                    = var.master_cpu
  cores-per-socket       = var.master_cores-per-socket
  ram                    = var.master_ram
  disksize               = var.master_disksize
  vm-template-name       = var.vm-template-name
  vm-guest-id            = var.vm-guest-id
  vsphere-unverified-ssl = var.vsphere-unverified-ssl
  vsphere-datacenter     = var.vsphere-datacenter
  vsphere-cluster        = var.vsphere-cluster
  vm-datastore           = var.vm-datastore
  vm-network             = var.vm-network
  vm-domain              = var.vm-domain
  dns_server_list        = var.dns_server_list
  ipv4_address           = each.value
  ipv4_gateway           = var.ipv4_gateway
  ipv4_netmask           = var.ipv4_netmask
}

# Worker VM
module "vsphere_vm_worker" {
  for_each               = var.worker_nodes
  source                 = "app.terraform.io/HashiCorp-Sam/vsphere_vm-public/vsphere"
  version                = "0.2.3"
  vsphere_user           = var.vsphere_user
  vsphere_password       = var.vsphere_password
  vsphere_vcenter        = var.vsphere_vcenter
  ssh_username           = var.ssh_username
  ssh_password           = var.ssh_password
  name                   = each.key
  cpu                    = var.worker_cpu
  cores-per-socket       = var.worker_cores-per-socket
  ram                    = var.worker_ram
  disksize               = var.worker_disksize
  vm-template-name       = var.vm-template-name
  vm-guest-id            = var.vm-guest-id
  vsphere-unverified-ssl = var.vsphere-unverified-ssl
  vsphere-datacenter     = var.vsphere-datacenter
  vsphere-cluster        = var.vsphere-cluster
  vm-datastore           = var.vm-datastore
  vm-network             = var.vm-network
  vm-domain              = var.vm-domain
  dns_server_list        = var.dns_server_list
  ipv4_address           = each.value
  ipv4_gateway           = var.ipv4_gateway
  ipv4_netmask           = var.ipv4_netmask
}
Below are some notes on the main.tf file:
– We’re using for_each for both the master and worker modules. Since we are provisioning 3 master nodes and 3 worker nodes, the module vsphere_vm_master will run 3 times and so will the module vsphere_vm_worker.
– In both module statements, we’re referencing our VM Terraform module in the private module registry at app.terraform.io/HashiCorp-Sam/vsphere_vm-public/vsphere
Variables files
Below we have a static auto.vars file and a dynamically created one, let’s explore both.
Static auto.vars File
This file is straightforward, notice the use of the Ubuntu-2004-Template-100GB-Thin image that was built with Packer.
master_cpu              = 4
master_cores-per-socket = 1
master_ram              = 4096
master_disksize         = 100 # in GB

worker_cpu              = 4
worker_cores-per-socket = 1
worker_ram              = 4096
worker_disksize         = 650 # in GB

vm-guest-id            = "ubuntu64Guest"
vsphere-unverified-ssl = "true"
vsphere-datacenter     = "Datacenter"
vsphere-cluster        = "Cluster01"
vm-datastore           = "Datastore1_SSD"
vm-network             = "VM Network"
vm-domain              = "home"
dns_server_list        = ["192.168.1.80", "8.8.8.8"]
ipv4_gateway           = "192.168.1.254"
ipv4_netmask           = "24"
vm-template-name       = "Ubuntu-2004-Template-100GB-Thin"
Script to Dynamically Create an auto.vars File
#!/usr/bin/bash

arrMASTER_NAMES=($1)
arrWORKER_NAMES=($2)
arrMASTER_IPS=($3)
arrWORKER_IPS=($4)

echo master_nodes = { > ips.auto.tfvars
for (( i=0; i<${#arrMASTER_NAMES[@]}; i++ ))
    do
        echo ${arrMASTER_NAMES[i]} = \"${arrMASTER_IPS[i]}\" >> ips.auto.tfvars
    done
echo } >> ips.auto.tfvars
echo worker_nodes = { >> ips.auto.tfvars
for (( i=0; i<${#arrWORKER_NAMES[@]}; i++ ))
    do
        echo ${arrWORKER_NAMES[i]} = \"${arrWORKER_IPS[i]}\" >> ips.auto.tfvars
    done
echo } >> ips.auto.tfvars
The above script is used to generate an auto.vars file called ips.auto.tfvars that looks like the below:
master_nodes = {
master-test-1 = "192.168.1.93"
master-test-2 = "192.168.1.94"
master-test-3 = "192.168.1.95"
}
worker_nodes = {
worker-test-1 = "192.168.1.96"
worker-test-2 = "192.168.1.97"
worker-test-3 = "192.168.1.98"
}
This file is generated dynamically based on the following:
– Number of master and worker nodes needed
– Names of the master and worker nodes
– IP addresses of the master and worker nodes.
These variables are defined in the variables section of the GitLab pipeline that we discussed earlier.
GitLab Pipeline k3s Deployment Section
The final stage of the GitLab pipeline is to deploy the k3s cluster. At this point, we should have 6 VMs provisioned. Now let’s take a look at how we deploy the k3s cluster. Below is the deployment stage of the pipeline:
deploy-k3s:
  stage: deploy
  script:
    - export VAULT_TOKEN=$(cat /app/secrets/token)
    - export VAULT_ADDR=${VAULT_ADDR}
    - mkdir -p /home/${USER}/.kube
    - touch /home/${USER}/.kube/config
    - mkdir -p /home/${USER}/.ssh
    - cp ${id_rsa} /home/${USER}/.ssh
    # We need to make sure the command below passes entire lists so you have to surround them with quotes " "
    - ./installk3s.sh "${MASTER_NAMES}" "${WORKER_NAMES}" "${MASTER_IPS}" "${WORKER_IPS}" "${USER_K3S}" "${K3S_VERSION}" "${K3S_CONTEXT}"
    # Store the kube config file in Vault
    - cat /home/${USER}/.kube/config | base64 | vault kv put external/k3sdemo k3s_config_base64=-
    # Use the command below to get it ready to be sent out of the pipeline as artifact...this is HIGHLY INSECURE
    # - cp /home/${USER}/.kube/config .
  needs:
    - job: terraform-build-k3s
      artifacts: true
  # If you don't have vault set up, you can use the artifacts stanza below to get the kube config file...this is HIGHLY INSECURE
  # artifacts:
  #     public: false
  #     paths:
  #       - config
  #     expire_in: 1 hour
  tags: [inK8s]
Below are some notes on the deployment stage of the pipeline:
– In the first two lines of the script, we set our Vault environment variables for the address and token
– Next, we create two directories: a .kube and a .ssh one.
– To ssh into the VMs, we need to use the private key associated with the public key that we stored in the VMs via Packer. Therefore, we copy the id_rsa key that is stored in the GitLab CI/CD variables (could also be stored in Vault) to the .ssh directory.
– To store the kube config file in Vault, we first base64 encode it then store it in the KV secrets engine.
– As mentioned earlier, we use Vault to store the kube config. If you’re just testing things out, you could create the config as a GitLab artifact and download it from the pipeline. However, this is HIGHLY INSECURE and should not be used in production.
– We run the installk3s.sh script to install and configure k3s. Let’s take a look at this script next.
k3s Installation Script
This script relies on k3sup to install k3s on our VMs. k3sup needs to access the VMs using ssh and this is why we had to copy the private key into the pipeline. Below is the process:
– Installs k3s on the first VM and this will become our first master node.
– Loop through the other master VMs and join them to the first master node to become the second and third master nodes.
– Loop through the three worker VMs and join them to the cluster.
– Loop through the three master nodes and taint them so that we can’t schedule any jobs on them.
#!/usr/bin/bash
arrMASTER_NAMES=($1)
arrWORKER_NAMES=($2)
arrMASTER_IPS=($3)
arrWORKER_IPS=($4)
USER_K3S=$5
K3S_VERSION=$6
K3S_CONTEXT=$7

curl -sLS https://get.k3sup.dev | sh
sudo install k3sup /usr/local/bin/

k3sup install --ip ${arrMASTER_IPS[0]} --local-path ~/.kube/config --k3s-version ${K3S_VERSION} --context ${K3S_CONTEXT} --user ${USER_K3S} --cluster
sleep 20

ssh-add ~/.ssh/id_rsa

for (( i=1; i<${#arrMASTER_IPS[@]}; i++ ))
    do
        k3sup join --ip ${arrMASTER_IPS[i]} --server-ip ${arrMASTER_IPS[0]} --user ${USER_K3S} --k3s-version ${K3S_VERSION} --server
    done

sleep 20
for (( i=0; i<${#arrWORKER_IPS[@]}; i++ ))
    do
        k3sup join --ip ${arrWORKER_IPS[i]} --server-ip ${arrMASTER_IPS[0]} --user ${USER_K3S} --k3s-version ${K3S_VERSION}
    done

sleep 20
kubectl get nodes -owide

for (( i=0; i<${#arrMASTER_NAMES[@]}; i++ ))
    do
        kubectl taint nodes ${arrMASTER_NAMES[i]} key=value:NoSchedule || true
    done

kubectl get nodes -o json | jq '.items[].spec.taints'
Final Result
We should have a running k3s cluster with 3 master nodes for an HA cluster and 3 worker nodes.
Run the commands below to test your new shiny cluster:
export VAULT_TOKEN=<your_vault_token>
export VAULT_ADDR=<your_vault_addr>
vault kv get -field k3s_config_base64 external/k3sdemo | base64 --decode > mytestconfig
export KUBECONFIG=mytestconfig
kubectl get nodes -owide
kubectl get all --namespace kube-system
Output:
NAME            STATUS   ROLES                       AGE   VERSION        INTERNAL-IP    EXTERNAL-IP   OS-IMAGE             KERNEL-VERSION     CONTAINER-RUNTIME
master-test-1   Ready    control-plane,etcd,master   15m   v1.21.4+k3s1   192.168.1.93   <none>        Ubuntu 20.04.3 LTS   5.4.0-89-generic   containerd://1.4.9-k3s1
master-test-2   Ready    control-plane,etcd,master   14m   v1.21.4+k3s1   192.168.1.94   <none>        Ubuntu 20.04.3 LTS   5.4.0-89-generic   containerd://1.4.9-k3s1
master-test-3   Ready    control-plane,etcd,master   13m   v1.21.4+k3s1   192.168.1.95   <none>        Ubuntu 20.04.3 LTS   5.4.0-89-generic   containerd://1.4.9-k3s1
worker-test-1   Ready    <none>                      12m   v1.21.4+k3s1   192.168.1.96   <none>        Ubuntu 20.04.3 LTS   5.4.0-89-generic   containerd://1.4.9-k3s1
worker-test-2   Ready    <none>                      12m   v1.21.4+k3s1   192.168.1.97   <none>        Ubuntu 20.04.3 LTS   5.4.0-89-generic   containerd://1.4.9-k3s1
worker-test-3   Ready    <none>                      12m   v1.21.4+k3s1   192.168.1.98   <none>        Ubuntu 20.04.3 LTS   5.4.0-89-generic   containerd://1.4.9-k3s1
NAME                                          READY   STATUS      RESTARTS   AGE
pod/coredns-7448499f4d-2zcls                  1/1     Running     0          14m
pod/helm-install-traefik-crd-99sbn            0/1     Completed   0          14m
pod/helm-install-traefik-zz45n                0/1     Completed   1          14m
pod/local-path-provisioner-5ff76fc89d-2rkzb   1/1     Running     0          14m
pod/metrics-server-86cbb8457f-zsfzv           1/1     Running     0          14m
pod/svclb-traefik-4wxzl                       2/2     Running     0          12m
pod/svclb-traefik-l5cxt                       2/2     Running     0          11m
pod/svclb-traefik-ld5ts                       2/2     Running     0          13m
pod/svclb-traefik-svsd9                       2/2     Running     0          11m
pod/svclb-traefik-w5lrl                       2/2     Running     0          12m
pod/svclb-traefik-wvn2m                       2/2     Running     0          11m
pod/traefik-97b44b794-v4phc                   1/1     Running     0          13m

NAME                     TYPE           CLUSTER-IP      EXTERNAL-IP                                                                     PORT(S)                      AGE
service/kube-dns         ClusterIP      10.43.0.10      <none>                                                                          53/UDP,53/TCP,9153/TCP       14m
service/metrics-server   ClusterIP      10.43.249.97    <none>                                                                          443/TCP                      14m
service/traefik          LoadBalancer   10.43.115.112   192.168.1.93,192.168.1.94,192.168.1.95,192.168.1.96,192.168.1.97,192.168.1.98   80:32387/TCP,443:32376/TCP   13m

NAME                           DESIRED   CURRENT   READY   UP-TO-DATE   AVAILABLE   NODE SELECTOR   AGE
daemonset.apps/svclb-traefik   3         3         3       3            3           <none>          13m

NAME                                     READY   UP-TO-DATE   AVAILABLE   AGE
deployment.apps/coredns                  1/1     1            1           14m
deployment.apps/local-path-provisioner   1/1     1            1           14m
deployment.apps/metrics-server           1/1     1            1           14m
deployment.apps/traefik                  1/1     1            1           13m

NAME                                                DESIRED   CURRENT   READY   AGE
replicaset.apps/coredns-7448499f4d                  1         1         1       14m
replicaset.apps/local-path-provisioner-5ff76fc89d   1         1         1       14m
replicaset.apps/metrics-server-86cbb8457f           1         1         1       14m
replicaset.apps/traefik-97b44b794                   1         1         1       13m

NAME                                 COMPLETIONS   DURATION   AGE
job.batch/helm-install-traefik       1/1           38s        14m
job.batch/helm-install-traefik-crd   1/1           35s        14m
(⎈ |k3s-vmware-test:kube-system)
Gabrail-Windows:sam:~/Deployment_Linux/Terraform/vmware-k3s-infra-public$kubectl get all --namespace kube-system
NAME                                          READY   STATUS      RESTARTS   AGE
pod/coredns-7448499f4d-2zcls                  1/1     Running     0          14m
pod/helm-install-traefik-crd-99sbn            0/1     Completed   0          14m
pod/helm-install-traefik-zz45n                0/1     Completed   1          14m
pod/local-path-provisioner-5ff76fc89d-2rkzb   1/1     Running     0          14m
pod/metrics-server-86cbb8457f-zsfzv           1/1     Running     0          14m
pod/svclb-traefik-4wxzl                       2/2     Running     0          13m
pod/svclb-traefik-l5cxt                       2/2     Running     0          11m
pod/svclb-traefik-ld5ts                       2/2     Running     0          13m
pod/svclb-traefik-svsd9                       2/2     Running     0          12m
pod/svclb-traefik-w5lrl                       2/2     Running     0          12m
pod/svclb-traefik-wvn2m                       2/2     Running     0          11m
pod/traefik-97b44b794-v4phc                   1/1     Running     0          13m

NAME                     TYPE           CLUSTER-IP      EXTERNAL-IP                                                                     PORT(S)                      AGE
service/kube-dns         ClusterIP      10.43.0.10      <none>                                                                          53/UDP,53/TCP,9153/TCP       14m
service/metrics-server   ClusterIP      10.43.249.97    <none>                                                                          443/TCP                      14m
service/traefik          LoadBalancer   10.43.115.112   192.168.1.93,192.168.1.94,192.168.1.95,192.168.1.96,192.168.1.97,192.168.1.98   80:32387/TCP,443:32376/TCP   13m

NAME                           DESIRED   CURRENT   READY   UP-TO-DATE   AVAILABLE   NODE SELECTOR   AGE
daemonset.apps/svclb-traefik   3         3         3       3            3           <none>          13m

NAME                                     READY   UP-TO-DATE   AVAILABLE   AGE
deployment.apps/coredns                  1/1     1            1           14m
deployment.apps/local-path-provisioner   1/1     1            1           14m
deployment.apps/metrics-server           1/1     1            1           14m
deployment.apps/traefik                  1/1     1            1           13m

NAME                                                DESIRED   CURRENT   READY   AGE
replicaset.apps/coredns-7448499f4d                  1         1         1       14m
replicaset.apps/local-path-provisioner-5ff76fc89d   1         1         1       14m
replicaset.apps/metrics-server-86cbb8457f           1         1         1       14m
replicaset.apps/traefik-97b44b794                   1         1         1       13m

NAME                                 COMPLETIONS   DURATION   AGE
job.batch/helm-install-traefik       1/1           38s        14m
job.batch/helm-install-traefik-crd   1/1           35s        14m
Conclusion
In this blog post, we showed how to use an existing vSphere template built by Packer to create a Kubernetes k3s cluster on vSphere.
Below are some key takeaways:
– Infrastructure as code works just as well in an on-premises environment as it does in the cloud.
– You can use Vault to secure your builds by integrating it with your GitLab pipelines.
– We can leverage all the benefits of Terraform Cloud in an on-premises environment using the Terraform cloud agents running locally.
References
- GitLab repo for this post
- GitLab repo for the VM Terraform module
- HashiCorp Packer to Build a Ubuntu 20.04 Image Template in VMware
Suggested Reading
- Crossplane: Unveiling a New Horizon in Cloud Infrastructure Management
- Jenkins, Vault, Terraform, Ansible, and Consul Delivering an End-to-End CI/CD Pipeline
- HashiCorp Packer to Build a Ubuntu 22.04 Image Template in VMware vSphere
- HashiCorp Packer for VMware Ubuntu Templates and Terraform for building VMs
- AWS Lambda – Terraform Example with API Gateway
- HashiCorp Vault PKI Secrets Engine Demo for Certificate Management
- HashiCorp Vault Backup and Restore Raft Snapshots from Kubernetes to AWS S3
- Mastering Azure DevOps: The Ultimate Guide for Beginners
Code
Hi and Welcome!
Join the Newsletter and get FREE access to all my Source Code along with a couple of gifts.