
Introduction
Don’t get overwhelmed by all the bells and whistles that HashiCorp Vault has to offer. Here you can learn about some secrets development phases for a web application. We discuss the crawl, walk, and run phases.
Video
Below is a video explanation and demo.
Overview
This is Part 2 of our Webblog app series where we discuss secrets development phases. As a reminder, my goal was to learn the different HashiCorp tools by developing a web app called the Webblog app. In Part 1, we discussed Infrastructure as Code and Policy as Code concepts. We also showed how to prepare the infrastructure for the app using Terraform. We built a Vault cluster backed by a Consul cluster for storage. This was all built on Google’s Kubernetes Engine (GKE) using Terraform providers.
In this post, we will discuss 4 secrets development phases for the Webblog app. These phases are very common among organizations as they adopt a centralized Secrets Management solution such as Vault. We’ll call these phases:
- Secrets in a Configuration File – No Vault
- Crawl – Vault Static Key/Value (KV) Secrets
- Walk – Vault Dynamic Secrets
- Run – Vault Encryption as a Service (EaaS)
Pre-requisites
The following accounts are required to follow along:
- Google Cloud Platform – Free tier (additional costs may be incurred)
- Terraform Cloud – Free (need a paid plan for using Sentinel)
- GitLab – Free
Webblog App Deployment Workflow
The Webblog app is a simple Python/Flask app that talks to a MongoDB datastore. We used GitLab as our Version Control System (VCS) and as a Continuous Integration/Continuous Deployment (CI/CD) system to develop the Webblog app. We used GitLab’s internal docker registry to host the docker container for the app. On every commit and push to the master branch, GitLab builds a docker image for the app and pushes it to the GitLab docker registry. For simplicity, I created a GitLab runner on my local computer. You could build GitLab runners as VMs using Terraform or you could run the GitLab runners as containers within a K8s cluster.
I used helm to deploy MongoDB ahead of the Webblog app. In a later iteration, I may build a helm chart to encapsulate both the Python/Flask app and the MongoDB datastore. The CI/CD workflow in this latter case would be a simple upgrade to the helm chart.
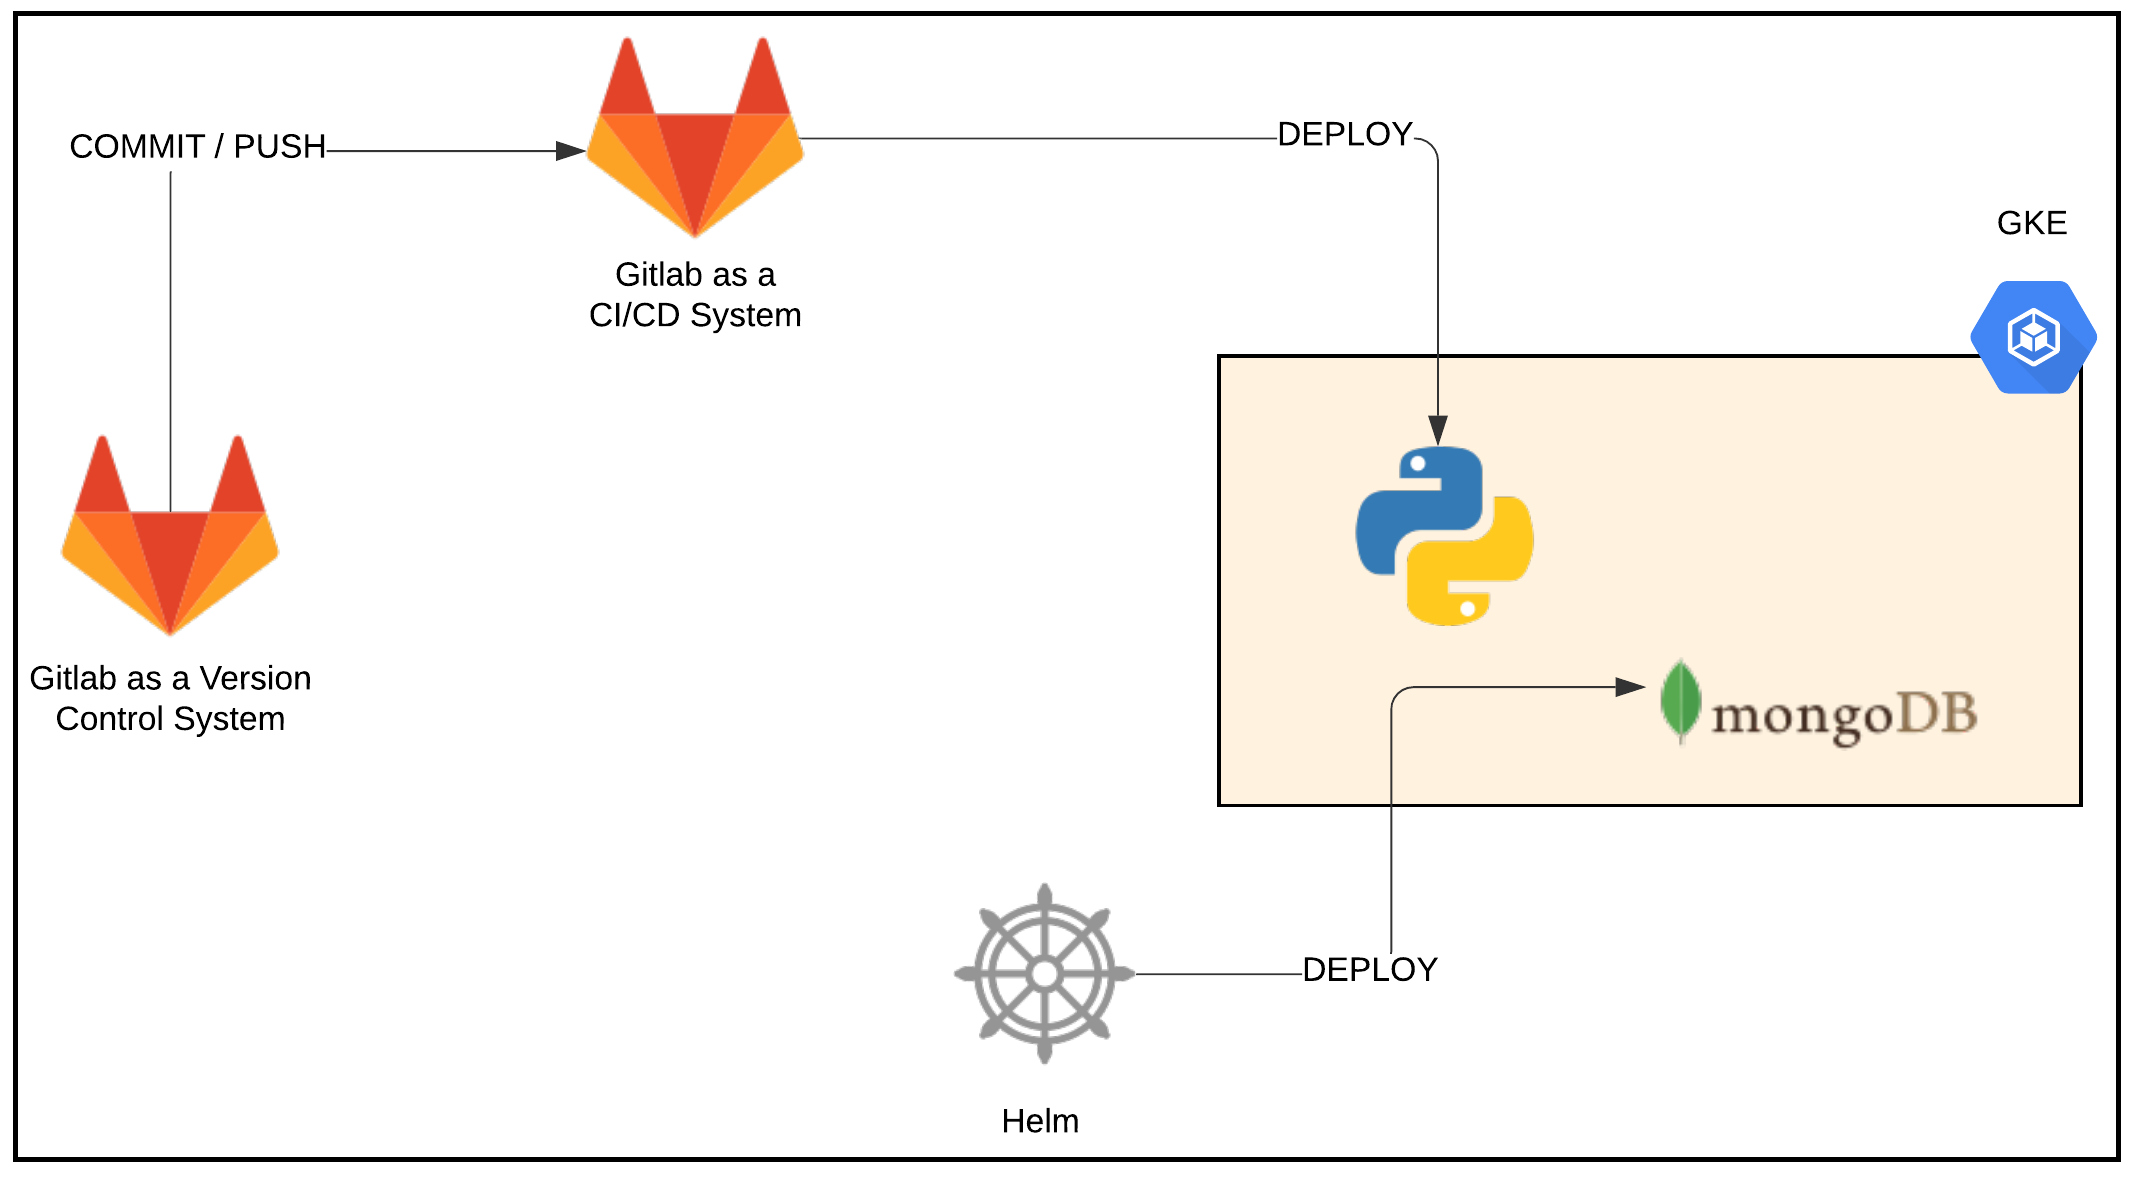
Webblog App Deployment Workflow
Here is what the Webblog app looks like when deployed:
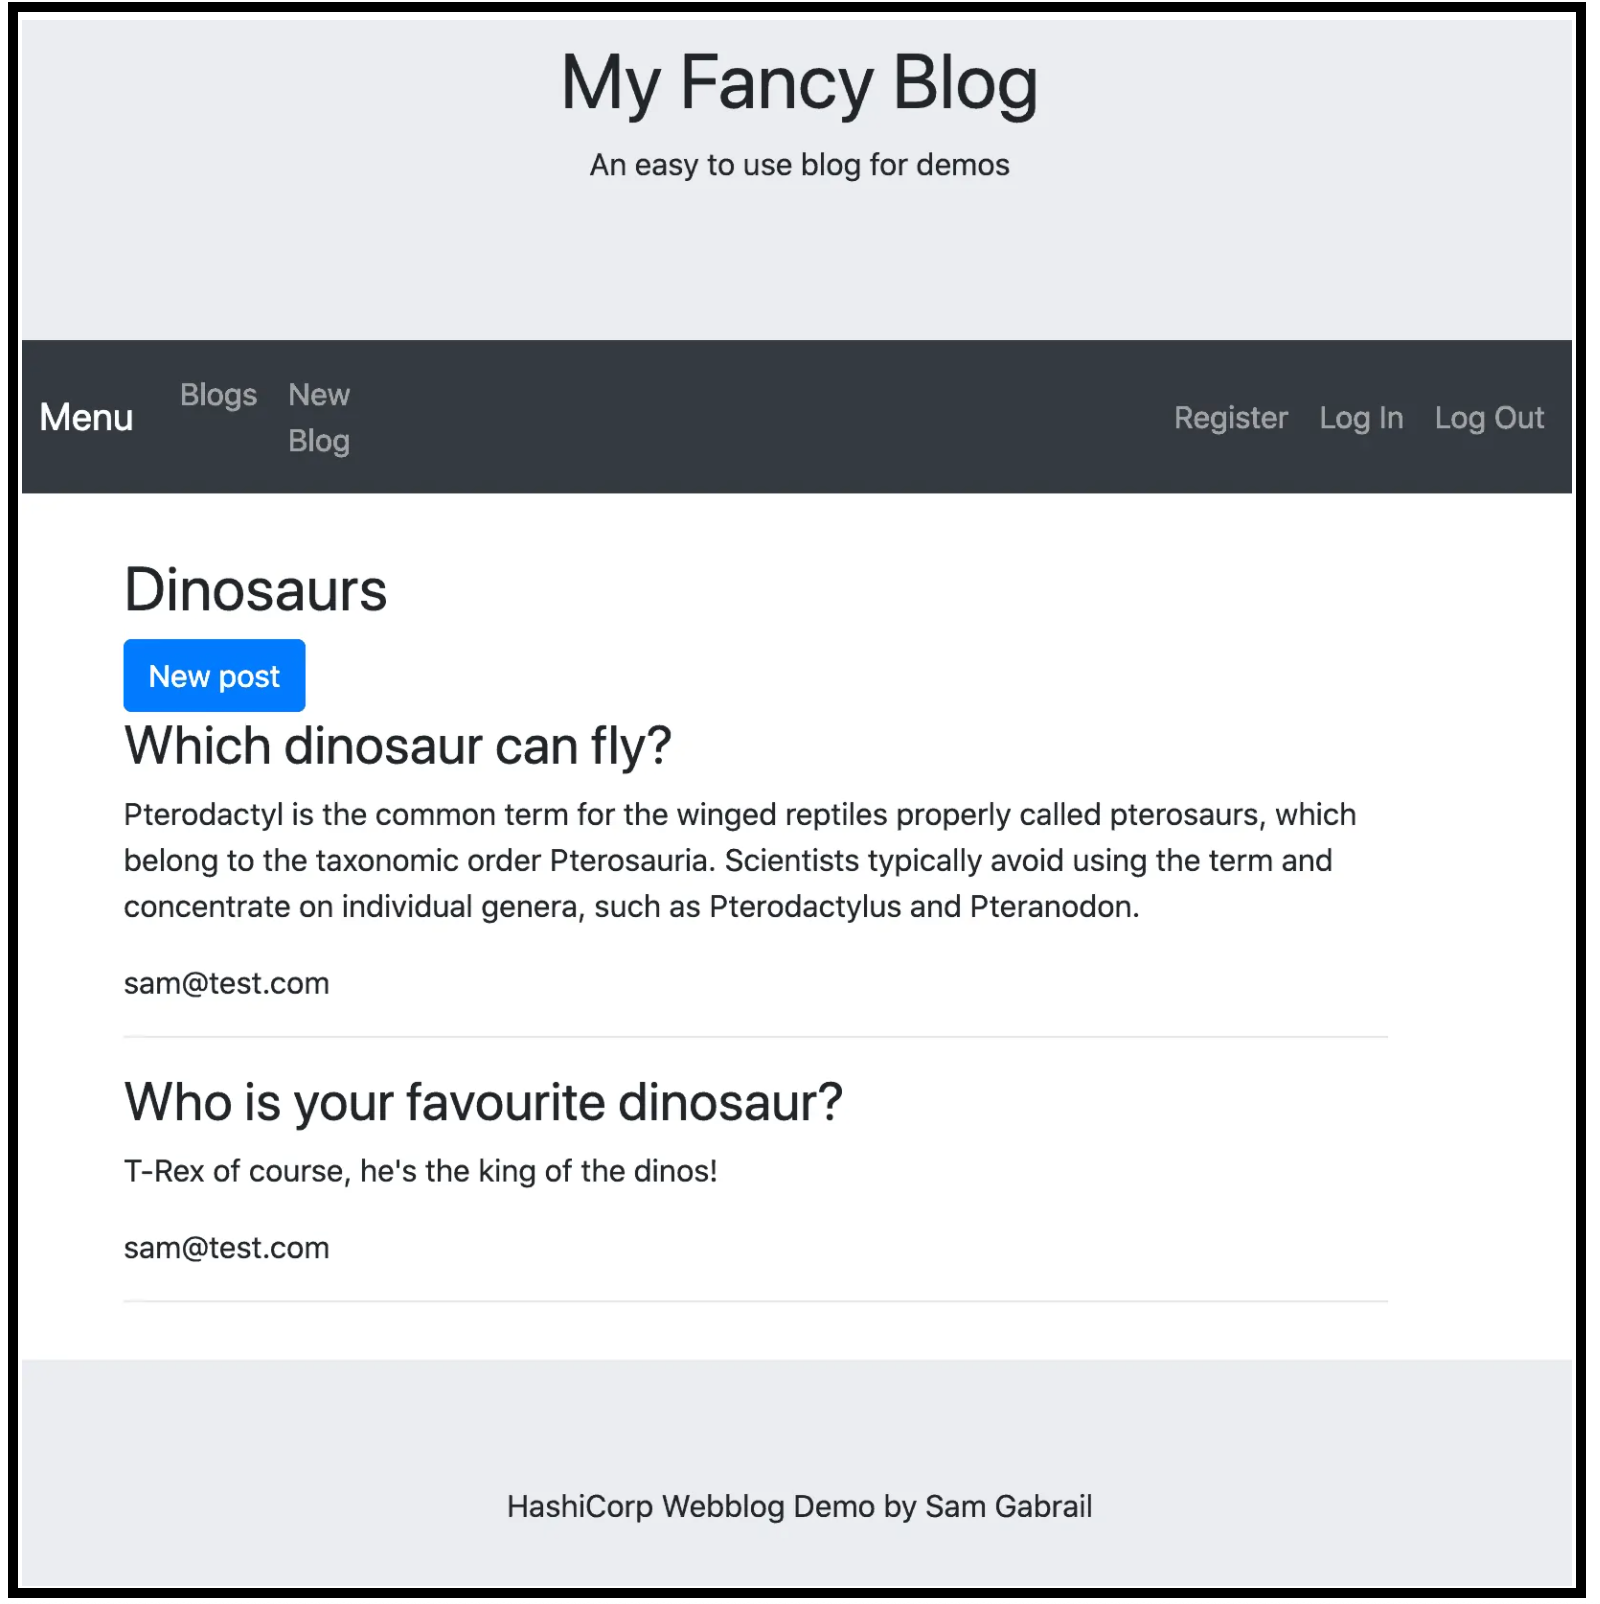
Webblog App Screenshot
Vault Configuration
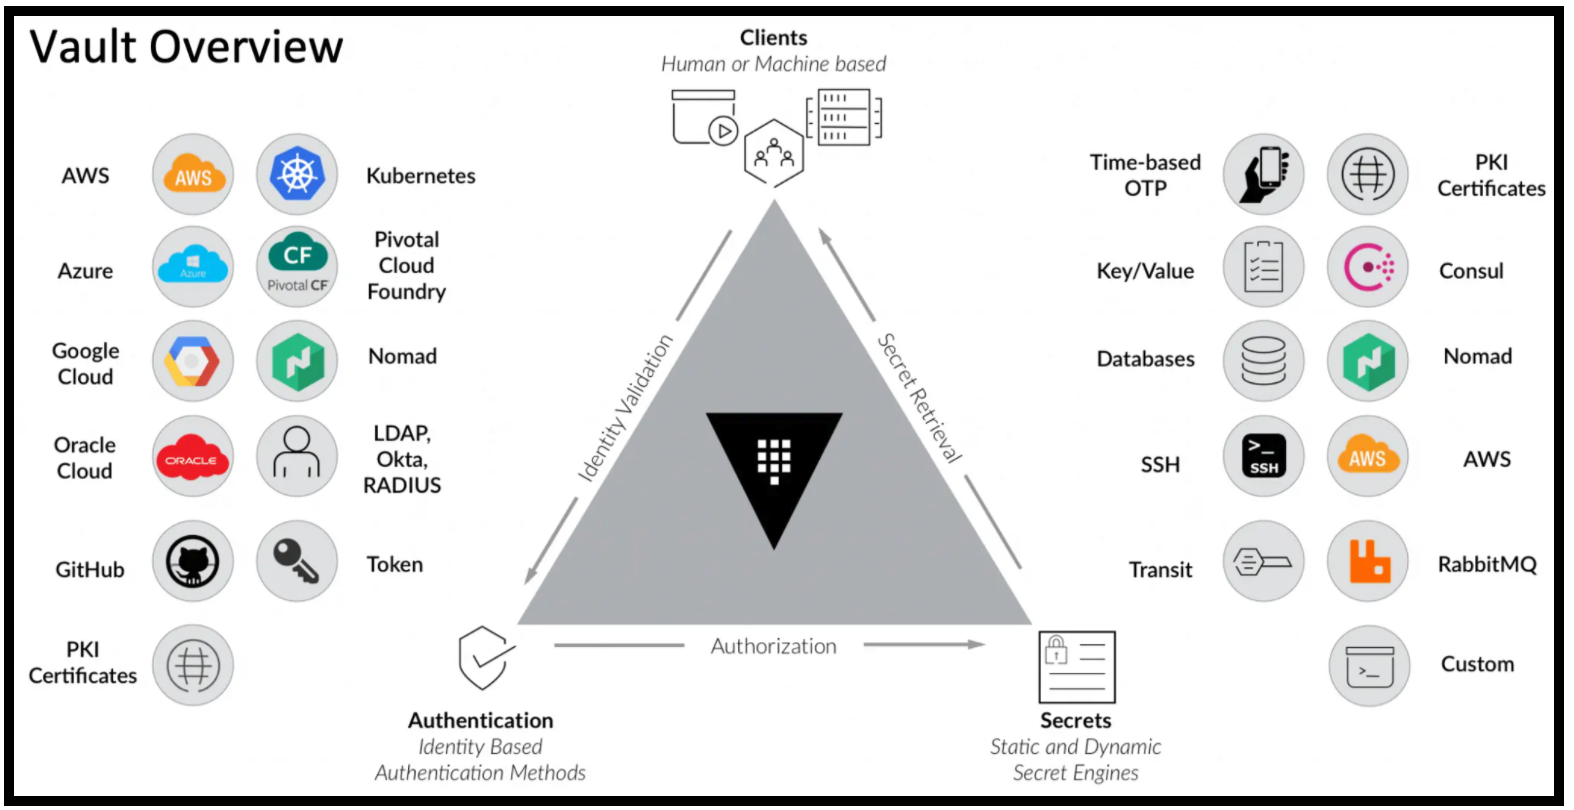
To start using Vault, there are two steps; the first step is authentication, and the second step is the retrieval of secrets.
Vault Overview
A. Vault Authentication
To retrieve secrets from Vault, we first need to authenticate. Vault brokers the authentication to a third party. That third party validates the request. Upon successful authentication, Vault confirms authorization to resources and provides a token that allows access to those resources.
There are multiple authentication methods that Vault supports. We used the Kubernetes one for our app.
B. Retrieval of Vault Secrets
Once the app is authenticated to Vault, it receives a token. This token is tied to a policy that gives the app authorization to do certain things such as list/read/update secrets for a certain secrets engine. Vault has many secrets engines that you could choose from depending on your use case. In this post, we make use of the KV secrets engine, the dynamic MongoDB database secrets engine and the Transit secrets engine.
Applying the Vault Configuration via Terraform
We used Terraform to apply the necessary configuration for Vault as mentioned in Part 1 in the Vault config section. If you followed along in Part 1 and applied the Terraform plan for the Vault configuration, then you’re all set to proceed. Otherwise, please go back and do so now.
Make sure to run the following command inside the Vault container after you run Terraform apply. This is an easier way to properly set up the K8s authentication backend since it will automatically capture the kubernetes_host, the kubernetes_ca_cert, and the token_reviewer_jwt variables from within the K8s environment.
vault write auth/kubernetes/config \
   token_reviewer_jwt="$(cat /var/run/secrets/kubernetes.io/serviceaccount/token)" \
   kubernetes_host="https://$KUBERNETES_PORT_443_TCP_ADDR:443" \
   kubernetes_ca_cert=@/var/run/secrets/kubernetes.io/serviceaccount/ca.crt
Secrets Development Phases
Now let’s take a look at the 4 secrets development phases that we went through as we developed this app.
1. Secrets in a Configuration File – No Vault
Before I heard of Vault, I simply defined the MongoDB credentials in a .env file and the app pulled these credentials from that file. I then had to add the .env file to .gitignore to avoid checking it into the VCS. This was risky because it’s easy to accidentally push the creds to a public VCS repo. I have seen some organizations pushing creds to private repos. However, when you have a large organization with many repos. You don’t know who has access to what repos. Moreover, the rotation of these creds is difficult as there is no centralized place to do so.
2. Crawl – Vault Static Key/Value (KV) Secrets
This phase usually occurs when folks are first introduced to Vault. That’s what happened to me. I saw how the KV secrets engine was pretty simple to use, so I started with that.
It works as follows:
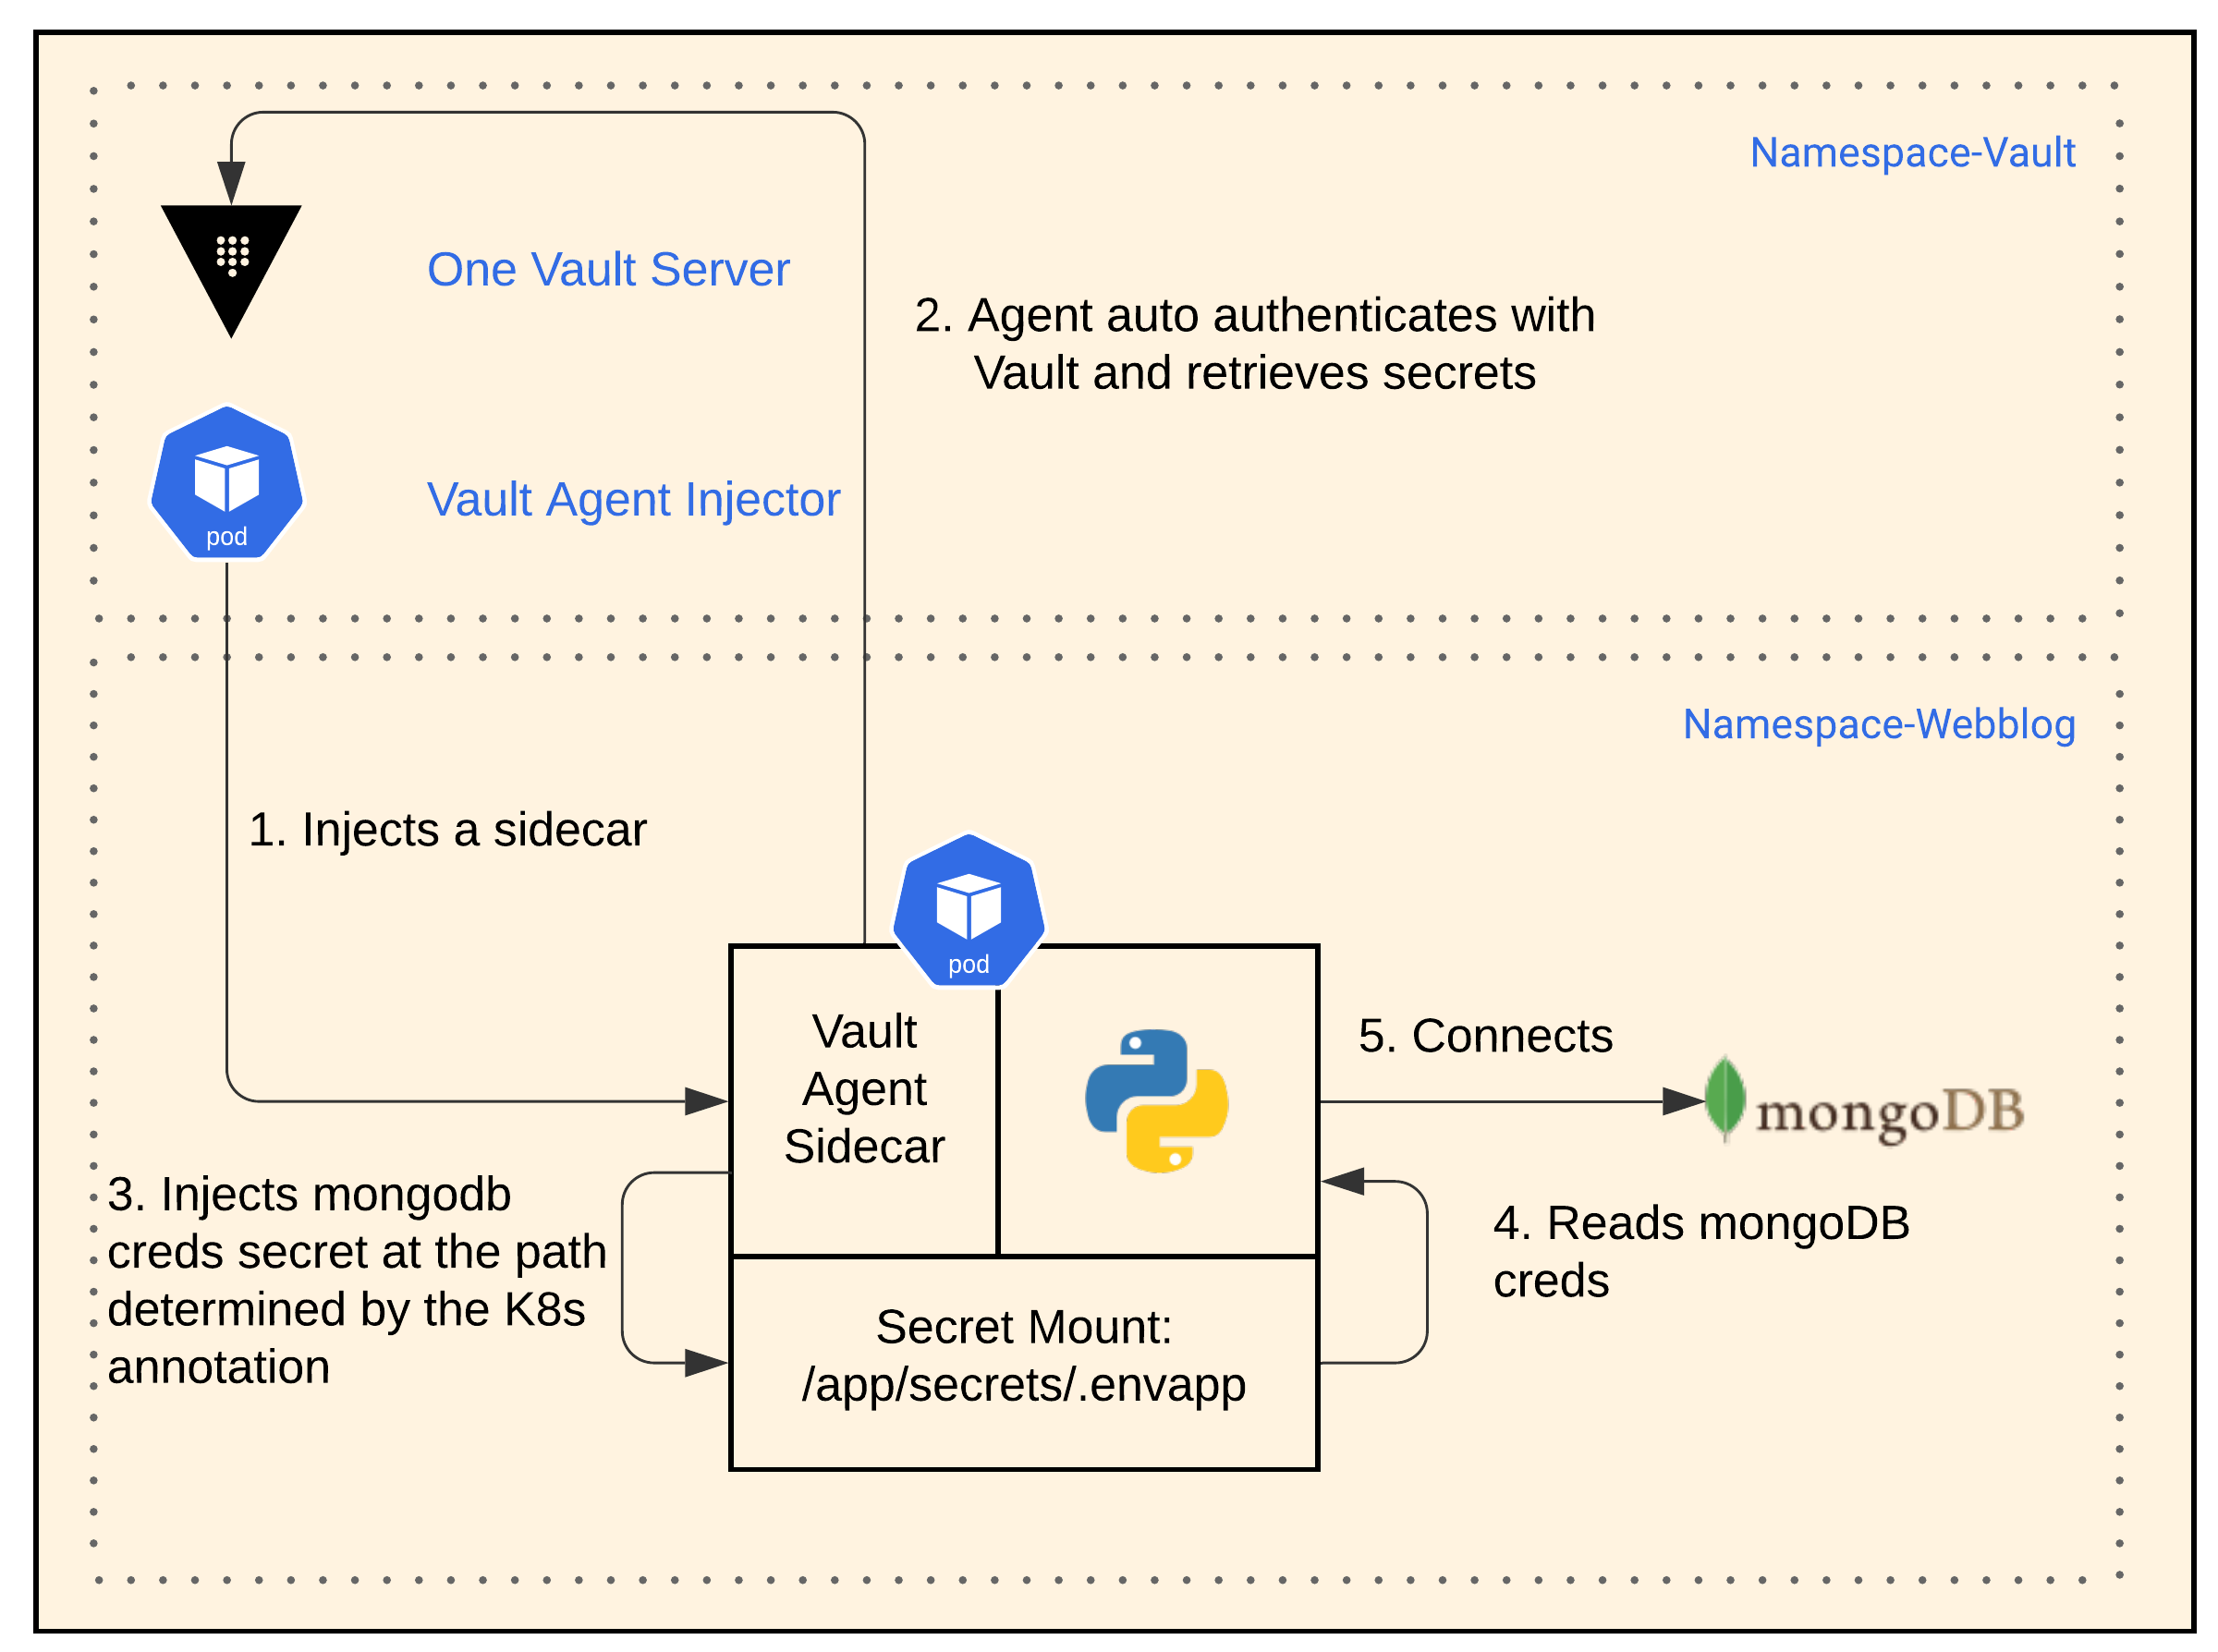
KV Secret App Workflow
- When helm installed Vault, it installed it with a Vault Agent Injector. This Vault Agent Injector creates a sidecar with a Vault agent for any pod based on K8s annotations that you specify with a deployment.
- The Vault agent sidecar auto-authenticates with Vault and retrieves the KV secret.
- Vault agent sidecar then automatically injects the KV secret into the app pod at the file path of:
/app/secrets/.envapp. - We modified the app slightly to pick up the secret MongoDB credentials from the file path. The app is still unaware of Vault.
- The app then connects to MongoDB using the credentials it obtained.
Below is the configuration section for the K8s app deployment showing the K8s annotations used
...
  template:
    metadata:
      annotations:
        prometheus.io/port: "9117"
        prometheus.io/scrape: "true"
        vault.hashicorp.com/agent-inject: "true"
        vault.hashicorp.com/agent-inject-status: "update"
        vault.hashicorp.com/agent-inject-token: "true"
        vault.hashicorp.com/agent-limits-cpu: "250m"
        vault.hashicorp.com/agent-limits-mem: "64Mi"
        vault.hashicorp.com/agent-requests-cpu: "128m"
        vault.hashicorp.com/agent-requests-mem: "32Mi"
        vault.hashicorp.com/role: "webblog"
        vault.hashicorp.com/secret-volume-path: "/app/secrets/"
        vault.hashicorp.com/agent-inject-secret-.envapp: "internal/data/webblog/mongodb"
        vault.hashicorp.com/agent-inject-template-.envapp: |
          {{- with secret "internal/data/webblog/mongodb" -}}
          DB_USER={{ .Data.data.username }}
          DB_PASSWORD={{ .Data.data.password }}
          {{- end -}}
      creationTimestamp: null
...
3. Walk – Vault Dynamic Secrets
Now that we got our app utilizing Vault as a centralized secrets management system, I figured we could do better. So the 2 reasons for this next phase were:
- Auto-rotation of credentials with a time-to-live (TTL)
- A unique set of credentials that could be traced back to the requestor app
Let’s now discuss the next phase of our secrets development journey. Here is how the dynamic MongoDB database secrets engine works:
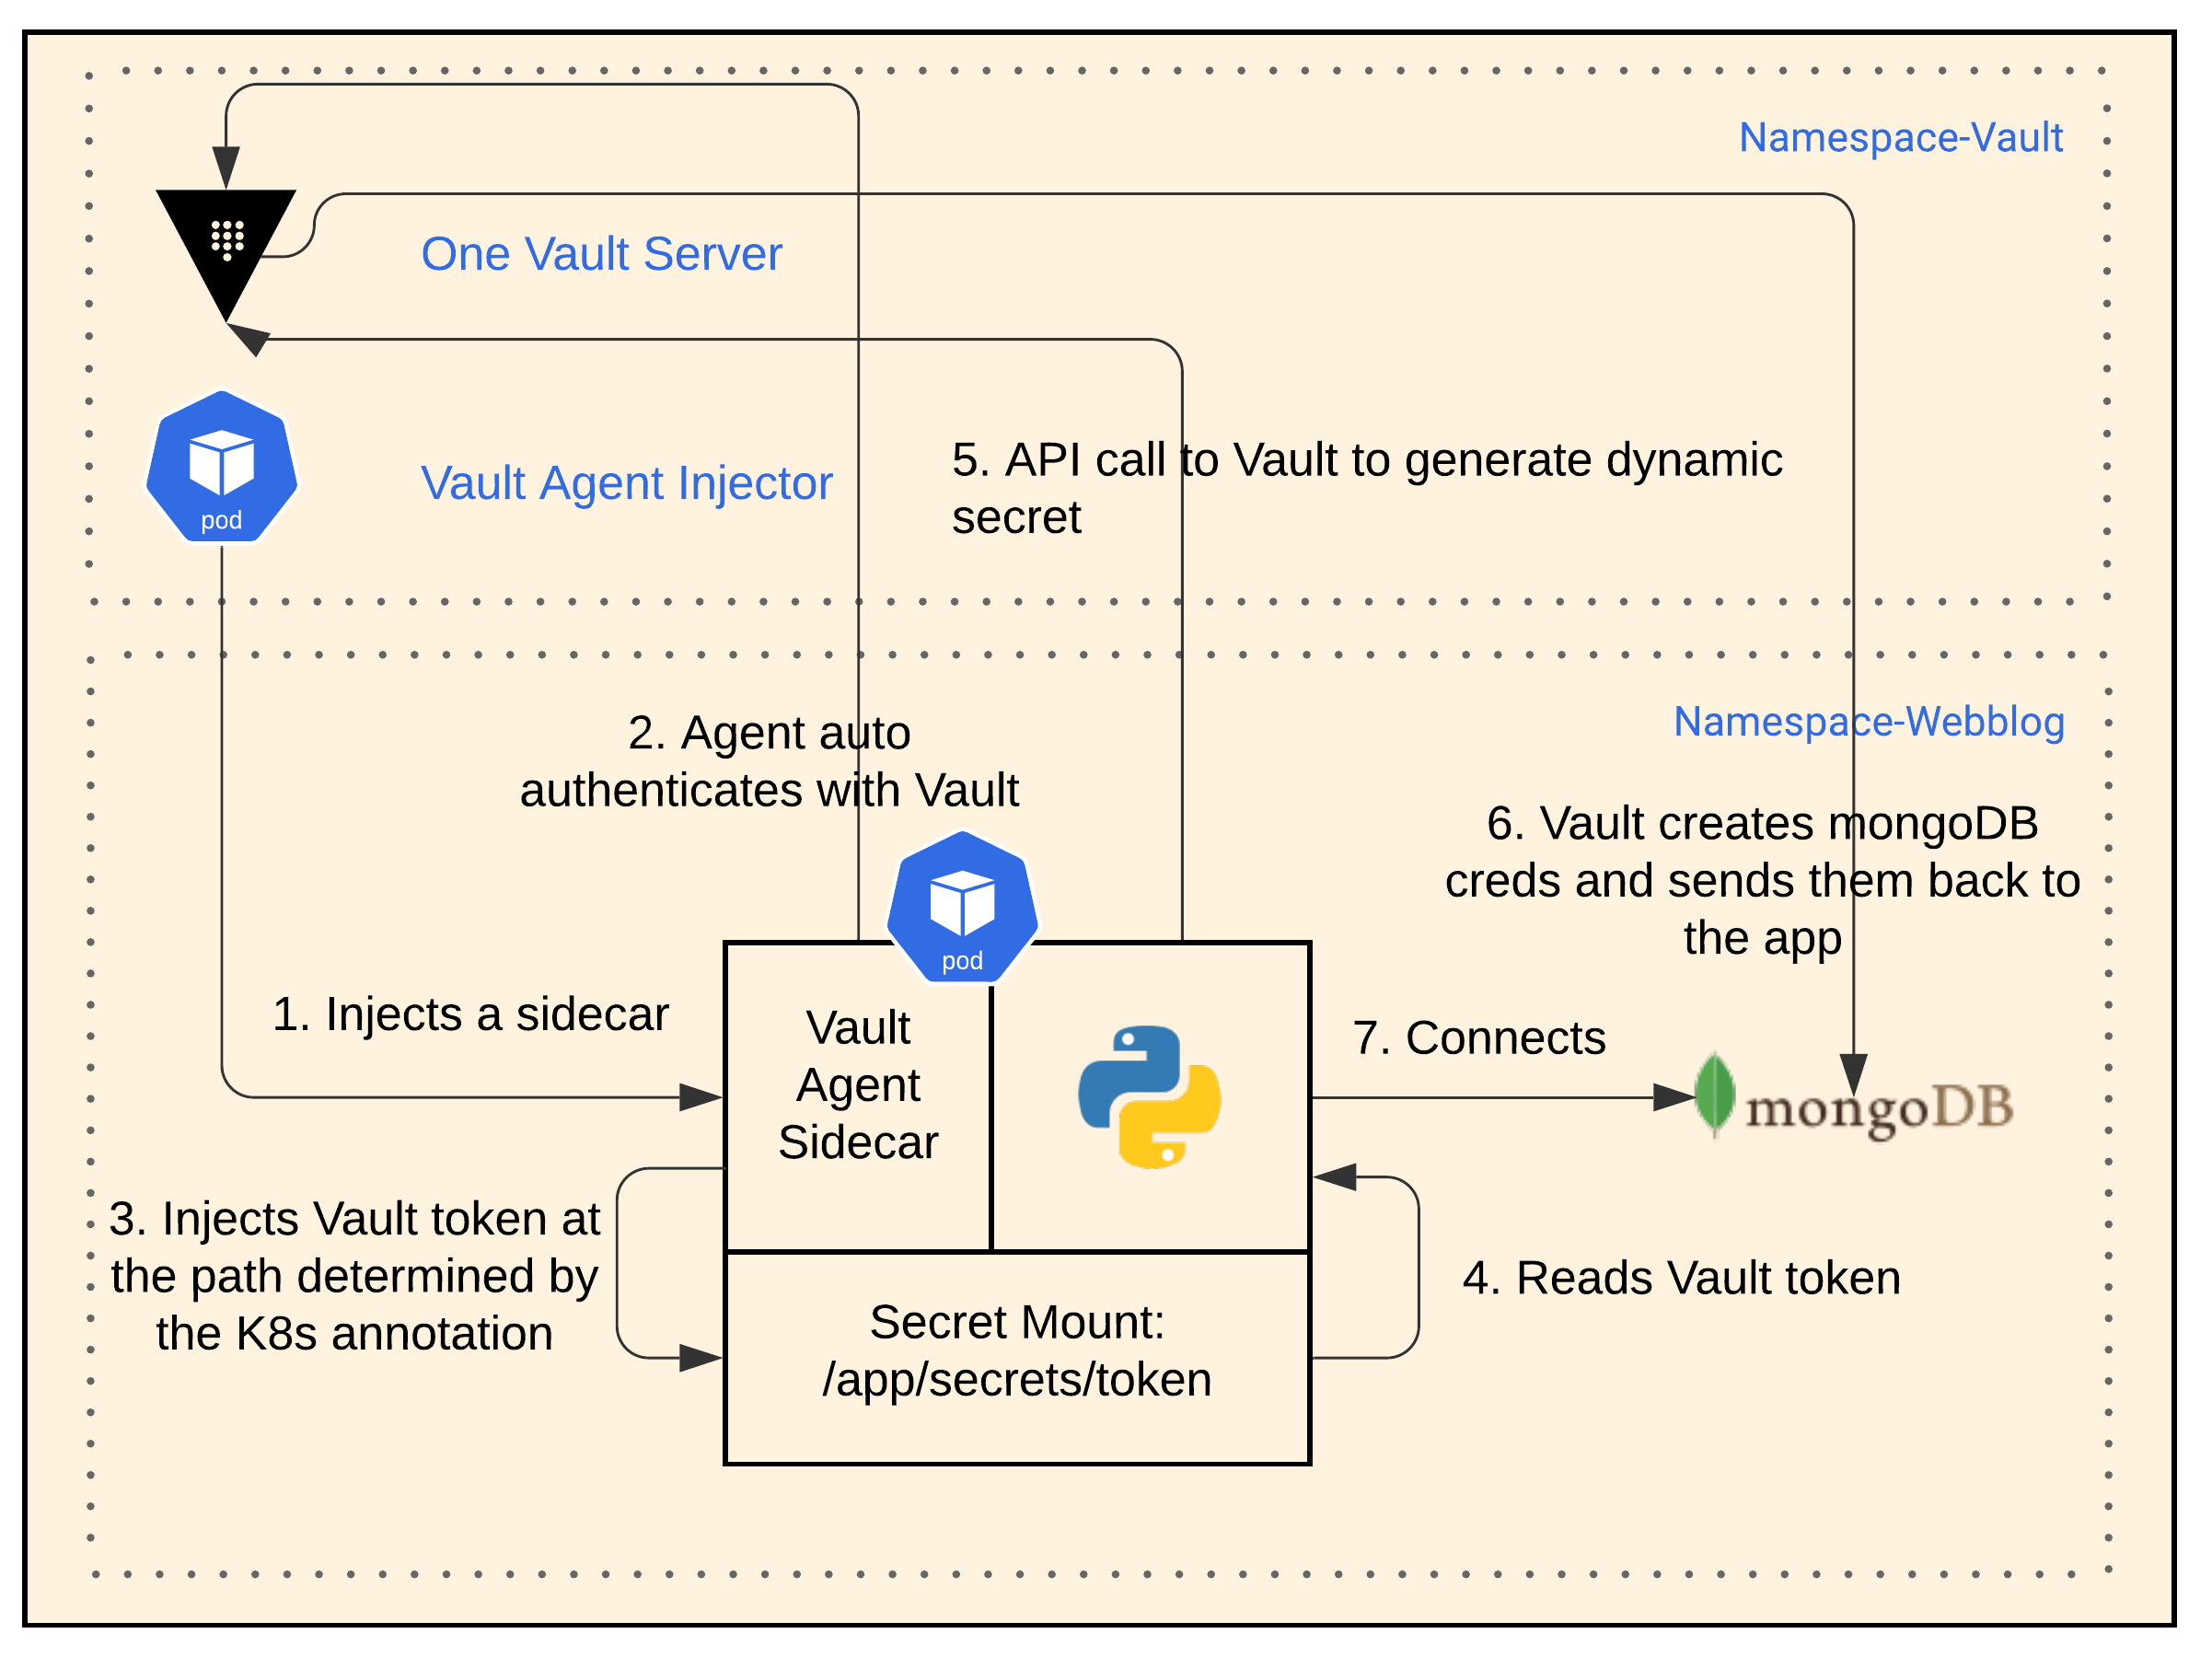
Dynamic DB Secret App Workflow
- Once again, the Vault Agent Injector creates a sidecar with a Vault agent for any pod based on K8s annotations that you specify with a deployment.
- The Vault agent sidecar auto-authenticates with Vault.
- The Vault agent sidecar injects a Vault token into the file path
/app/secrets/tokeninside the app’s pod. - The app reads the Vault token from the file path.
- We modified the app to use the Vault API. The app now requests a dynamic secret from Vault
- Vault creates username and passwords creds in MongoDB and passes these creds back to the app.
- The app connects to MongoDB.
Additional Notes:
- We configured the dynamic secret to have a TTL of 10 seconds, to show well in the demo.
- The app has the logic to request a new secret from Vault when authentication to the Database fails.
- The app is now Vault aware and required some changes in the code.
4. Run – Vault Encryption as a Service (EaaS)
Now that we’ve elegantly solved the MongoDB secret creds problem, could we do better? I heard of an EaaS offering from Vault that is a simple API call. It’s basically another secrets engine called: Vault transit engine. I decided to use it to encrypt the content of the posts in MongoDB. This will ensure that if a hacker somehow gains access to my database, he/she will only see encrypted data for the content of the blog posts. This is also useful if you don’t want your DBAs to see certain data in your database.
I liked Vault’s Encryptions as a Service because as a developer, I don’t need to worry about these things:
- Finding and maintaining a library in Python that does proper encryption/decryption
- Managing the life cycle of the encryption keys. This is a real headache.
Encryption Workflow
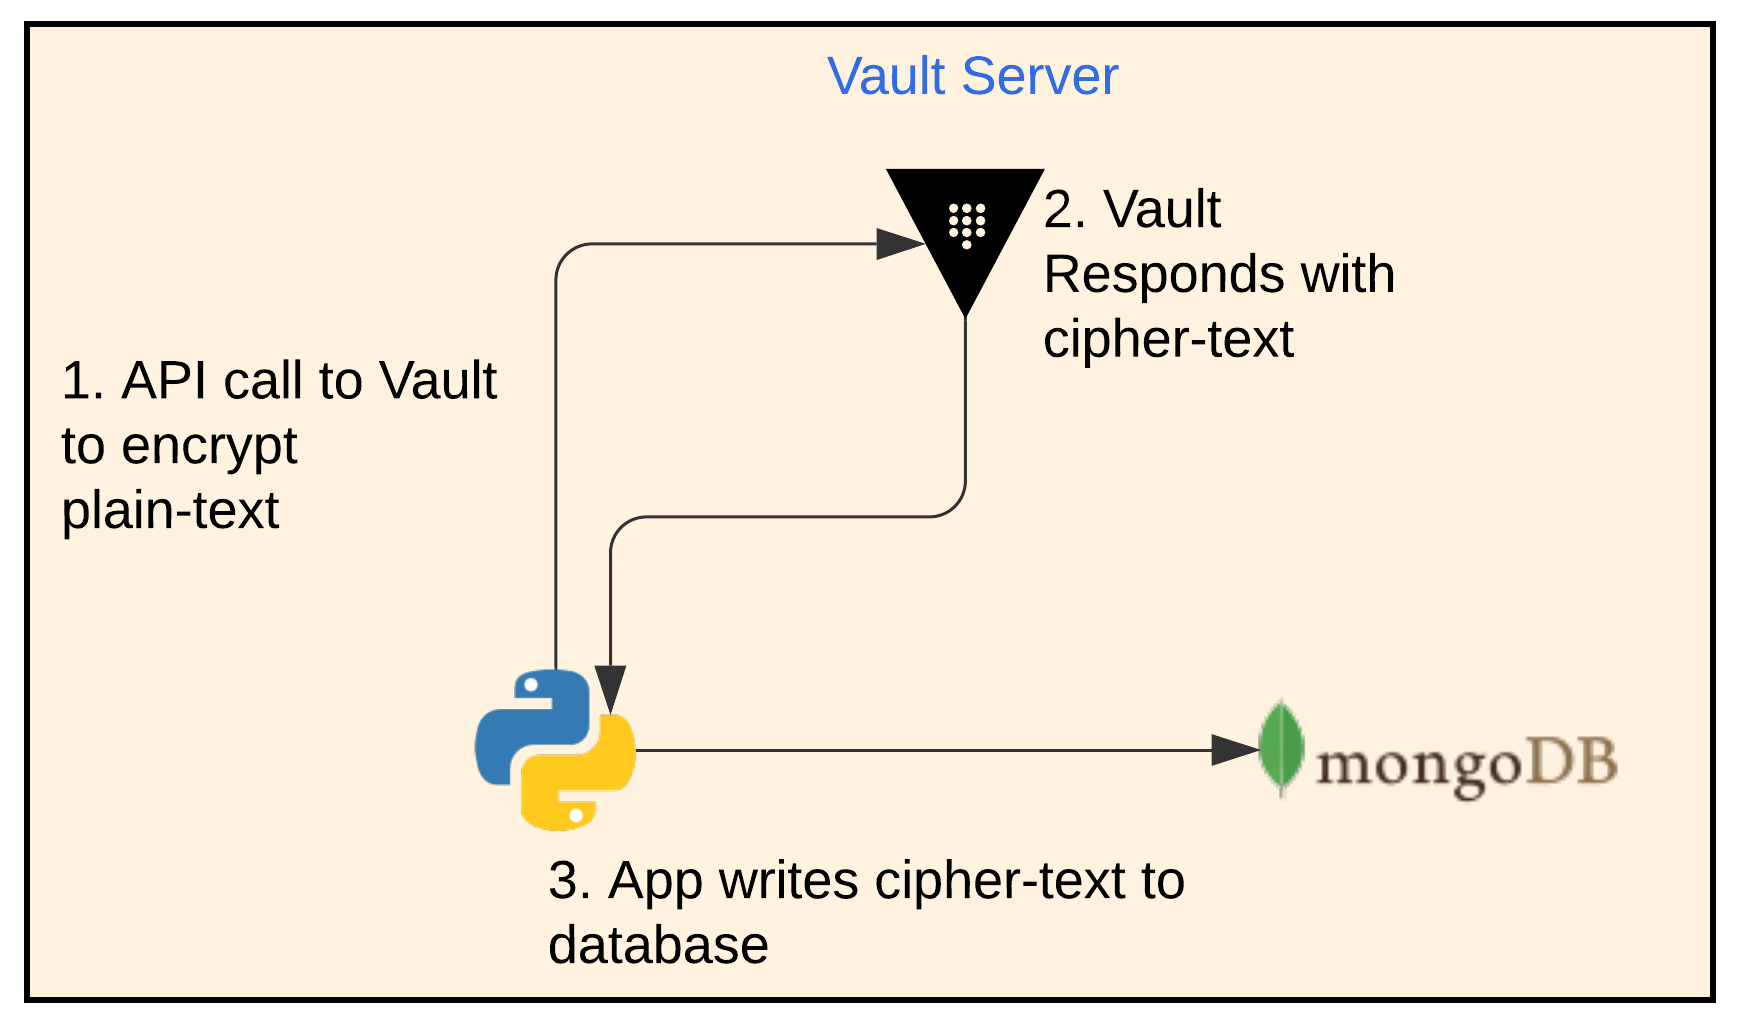
App Encryption Workflow
- The app makes an API call to Vault with the plain-text and an encryption key name that it wants to use. The encryption key should have already been configured in Vault beforehand.
- Vault responds with cipher-text
- The app writes the cipher-text to MongoDB
Below is what the content post data looks like when not encrypted
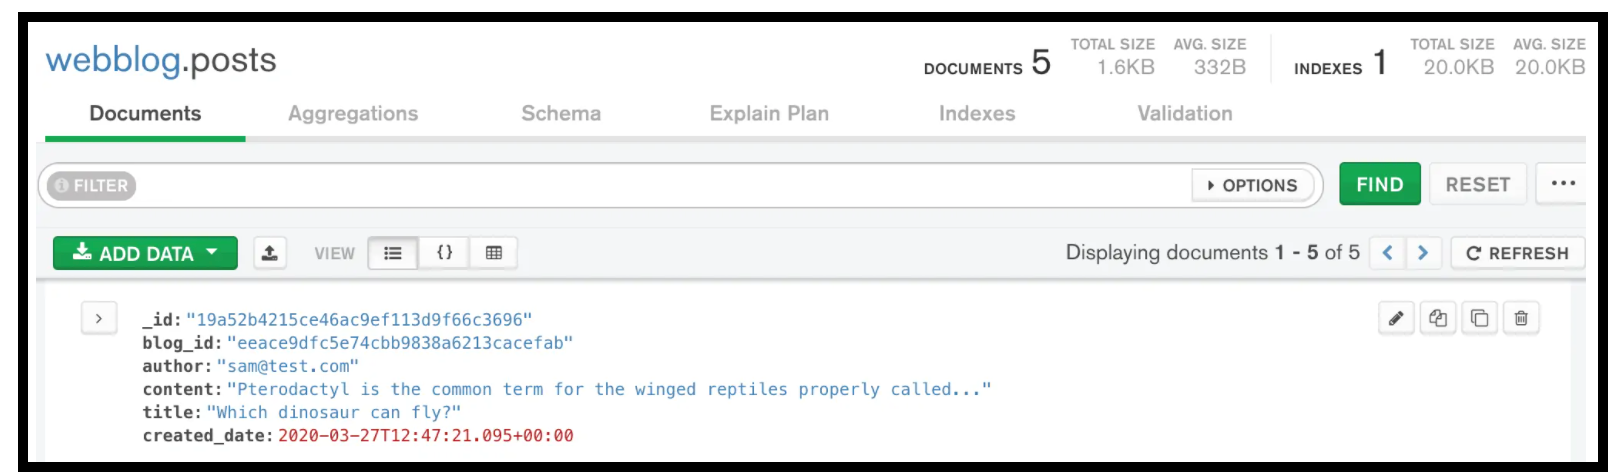
Post Content Data not Encrypted in MongoDB
And here is what it looks like when encrypted
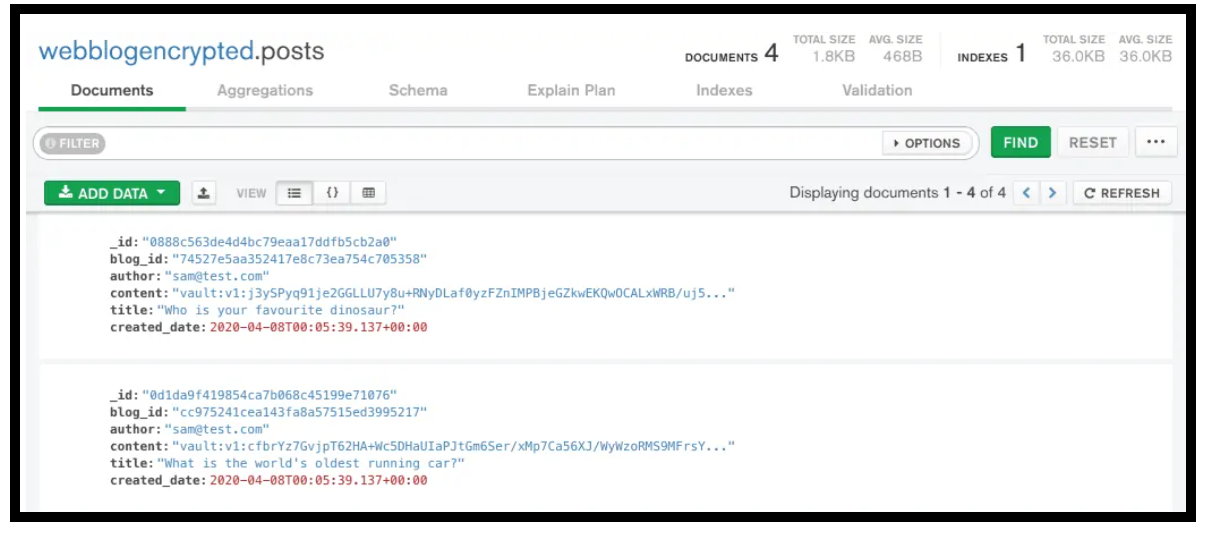
Post Content Data Encrypted in MongoDB
Decryption Workflow
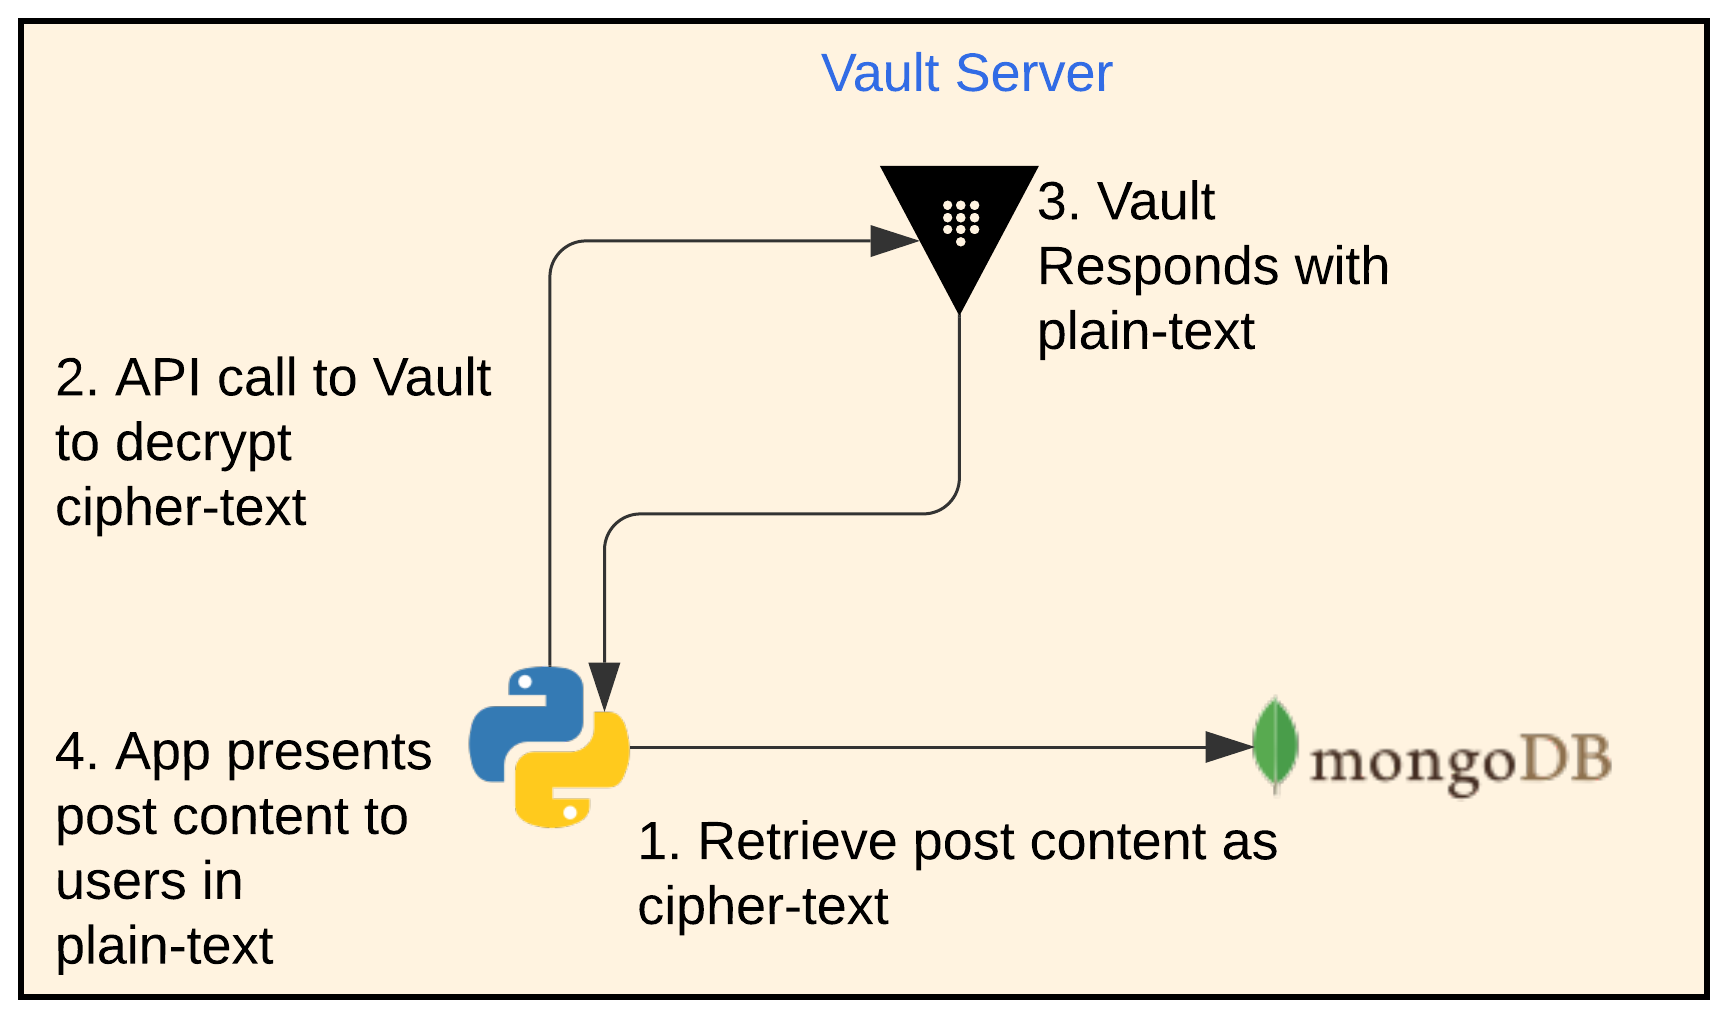
App Decryption Workflow
- The app retrieves the post content from MongoDB as cipher-text
- The app then makes an API call to Vault with the cipher-text and the same key name it used for encryption.
- Vault responds with the plain-text
- The app presents the content of the posts in plain-text. The user doesn’t notice anything about the encryption and decryption process.
Conclusion
In this second part of our Webblog App series, we discussed the 4 phases of secrets development that we went through. We’ve found Vault to be a security swiss army knife that has many useful functions. We explored the following 3 secrets engines: KV secrets engine, the dynamic MongoDB database secrets engine and the Transit secrets engine.
Join us in Part 3 as we move the app to use Consul Connect’s, Service Mesh.
Suggested Reading
- Migrate Secrets from AWS Secrets Manager to HashiCorp Vault with Python, Docker, and GitLab
- HashiCorp Vault API Tutorial and Pro Tips
- HashiCorp Vault Backup and Restore Raft Snapshots from Kubernetes to AWS S3
- HashiCorp Vault PKI Secrets Engine Demo for Certificate Management
Code
Hi and Welcome!
Join the Newsletter and get FREE access to all my Source Code along with a couple of gifts.