
Introduction
Learn the basics of Infrastructure as Code with Terraform. Moreover, this is part one of a four-part series that goes through the HashiCorp stack of tools.
Video
Below is a video explanation and demo.
Overview
I’d like to share my story of how I started learning different HashiCorp tools. Over the next 4 posts, I describe my journey of developing a demo web application called Webblog. We’ll explore together the different phases of development of the Webblog app and how various HashiCorp tools helped improve the app. We will discuss some best practices along the way. These practices include Infrastructure as Code, Policy as Code, centralized Secrets Management, Service Mesh, and others.
I’ve broken this journey into the following 4 parts:
- The first part, which is the topic of this post, talks about the provisioning of the infrastructure using Terraform.
- The second part describes 4 versions of the app as I adopt the use of Vault.
- The third part uses Consul Connect’s service mesh within Kubernetes for the Webblog app to talk to MongoDB.
- The fourth and final part explains how I moved the app from Kubernetes to Nomad and Consul.
Pre-requisites
The following accounts are required to follow along:
- Google Cloud Platform – Free tier (additional costs may be incurred)
- Terraform Cloud – Free (need a paid plan for using Sentinel)
- GitLab – Free
Infrastructure as Code
The first step in building an application that requires infrastructure is to build that infrastructure. Adopting Infrastructure as Code is considered best practice when building an environment. That’s what I set out to do. So, I first needed to learn about HashiCorp’s tool called Terraform. I would like to give credit to Jacob Mammoliti from Arctiq for helping me understand how to use the Terraform provider for Vault. You can view his talk about Managing Vault with Terraform. This is what inspired me to use the same approach to build the infrastructure that will host the Webblog.
Below is a diagram of the end result when the entire infrastructure is deployed.
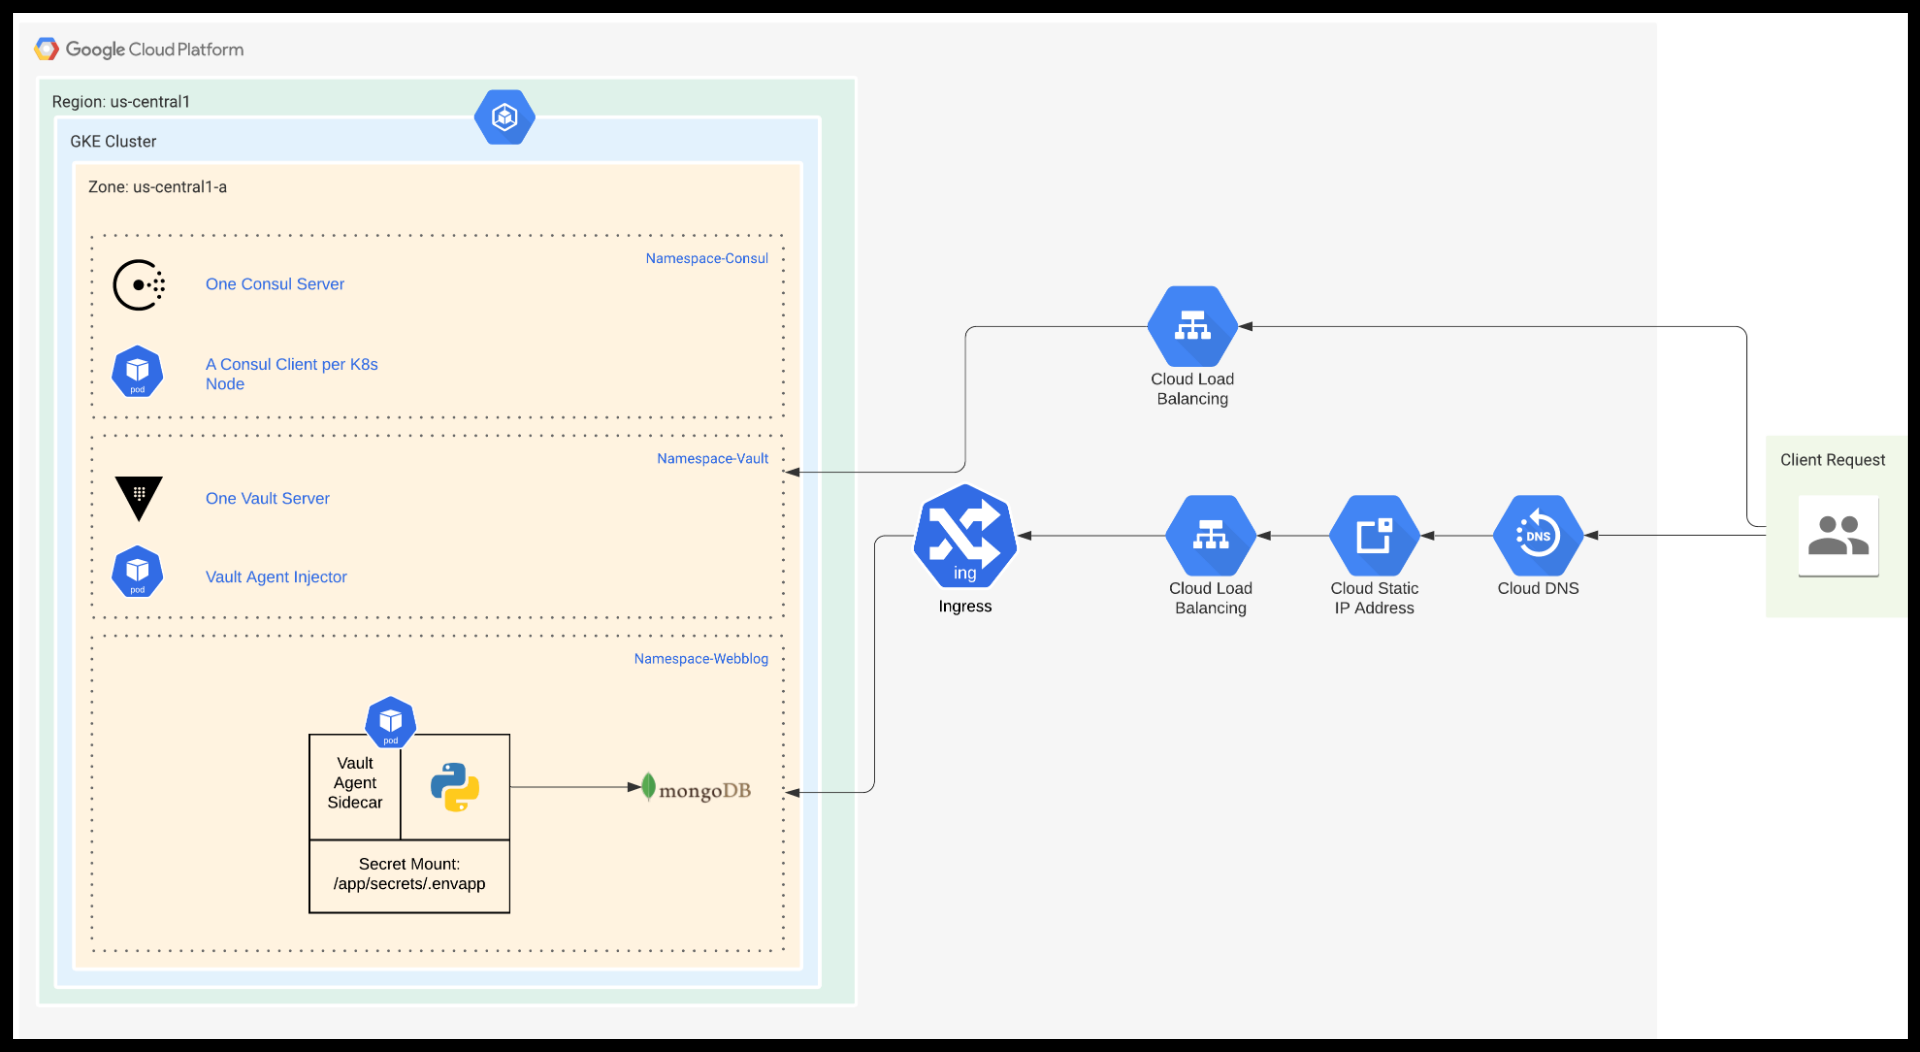
Webblog App Complete Infrastructure in GKE
Infrastructure to be Built
Our Webblog needs to run in a K8s environment. It will also require Vault for secrets management. Vault 1.4 introduced integrated storage to avoid dependence on other third party systems for storage. However, we will use Consul as our backend storage for Vault. The reason for this is that we will later use Consul to introduce service mesh to our app. Therefore, having Consul already configured makes it convenient. Terraform will build the following infrastructure in the order below:
- A GKE cluster of 2 nodes using the Google Terraform Provider
- A Consul cluster of 1 node using the Helm and Kubernetes Terraform providers
- A Vault cluster of 1 node using the Helm and Kubernetes Terraform providers
The preparation of our environment involves two phases. The first phase is deploying the entire infrastructure. We call it the Terraform Vault Deployment phase. The second phase has to do with the configuration of Vault. This is an ongoing process whenever we need to make changes to Vault as we develop our application. We call this phase the Terraform Vault Configuration phase. Let’s take a look at these two phases next.
Phase 1 – Terraform Vault Deployment
Infrastructure Deployment Workflow
The workflow for the Terraform Vault deployment is shown in the diagram below. Notice the use of Sentinel for Policy as Code to run checks before deploying the infrastructure. More on Sentinel can be found in the Policy as Code section below.

Infrastructure Deployment Workflow
Workspace Creation and Connection to VCS
The first thing we’ll want to do is to create a workspace in Terraform Cloud (TFC). This workspace is for the Vault deployment phase. We then connect the workspace to our Version Control System (VCS). Below you can see that we’ve set the trigger to only trigger runs when files in the terraform-vault-deployment folder change.

TFC – VCS setup for Vault Deployment Phase
Configuration of Variables
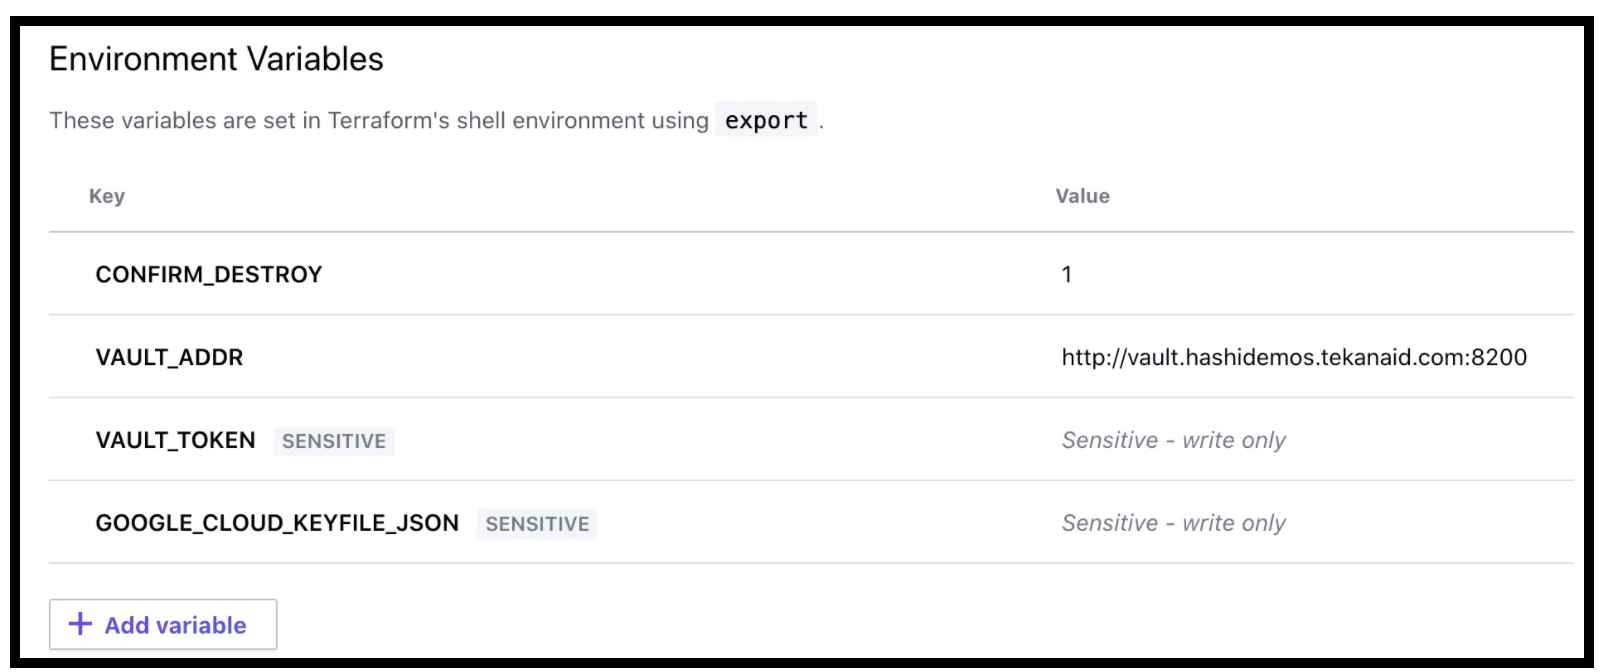
Once we do that we can now configure our variables. Here is what my variables page looks like for the Vault deployment workspace:
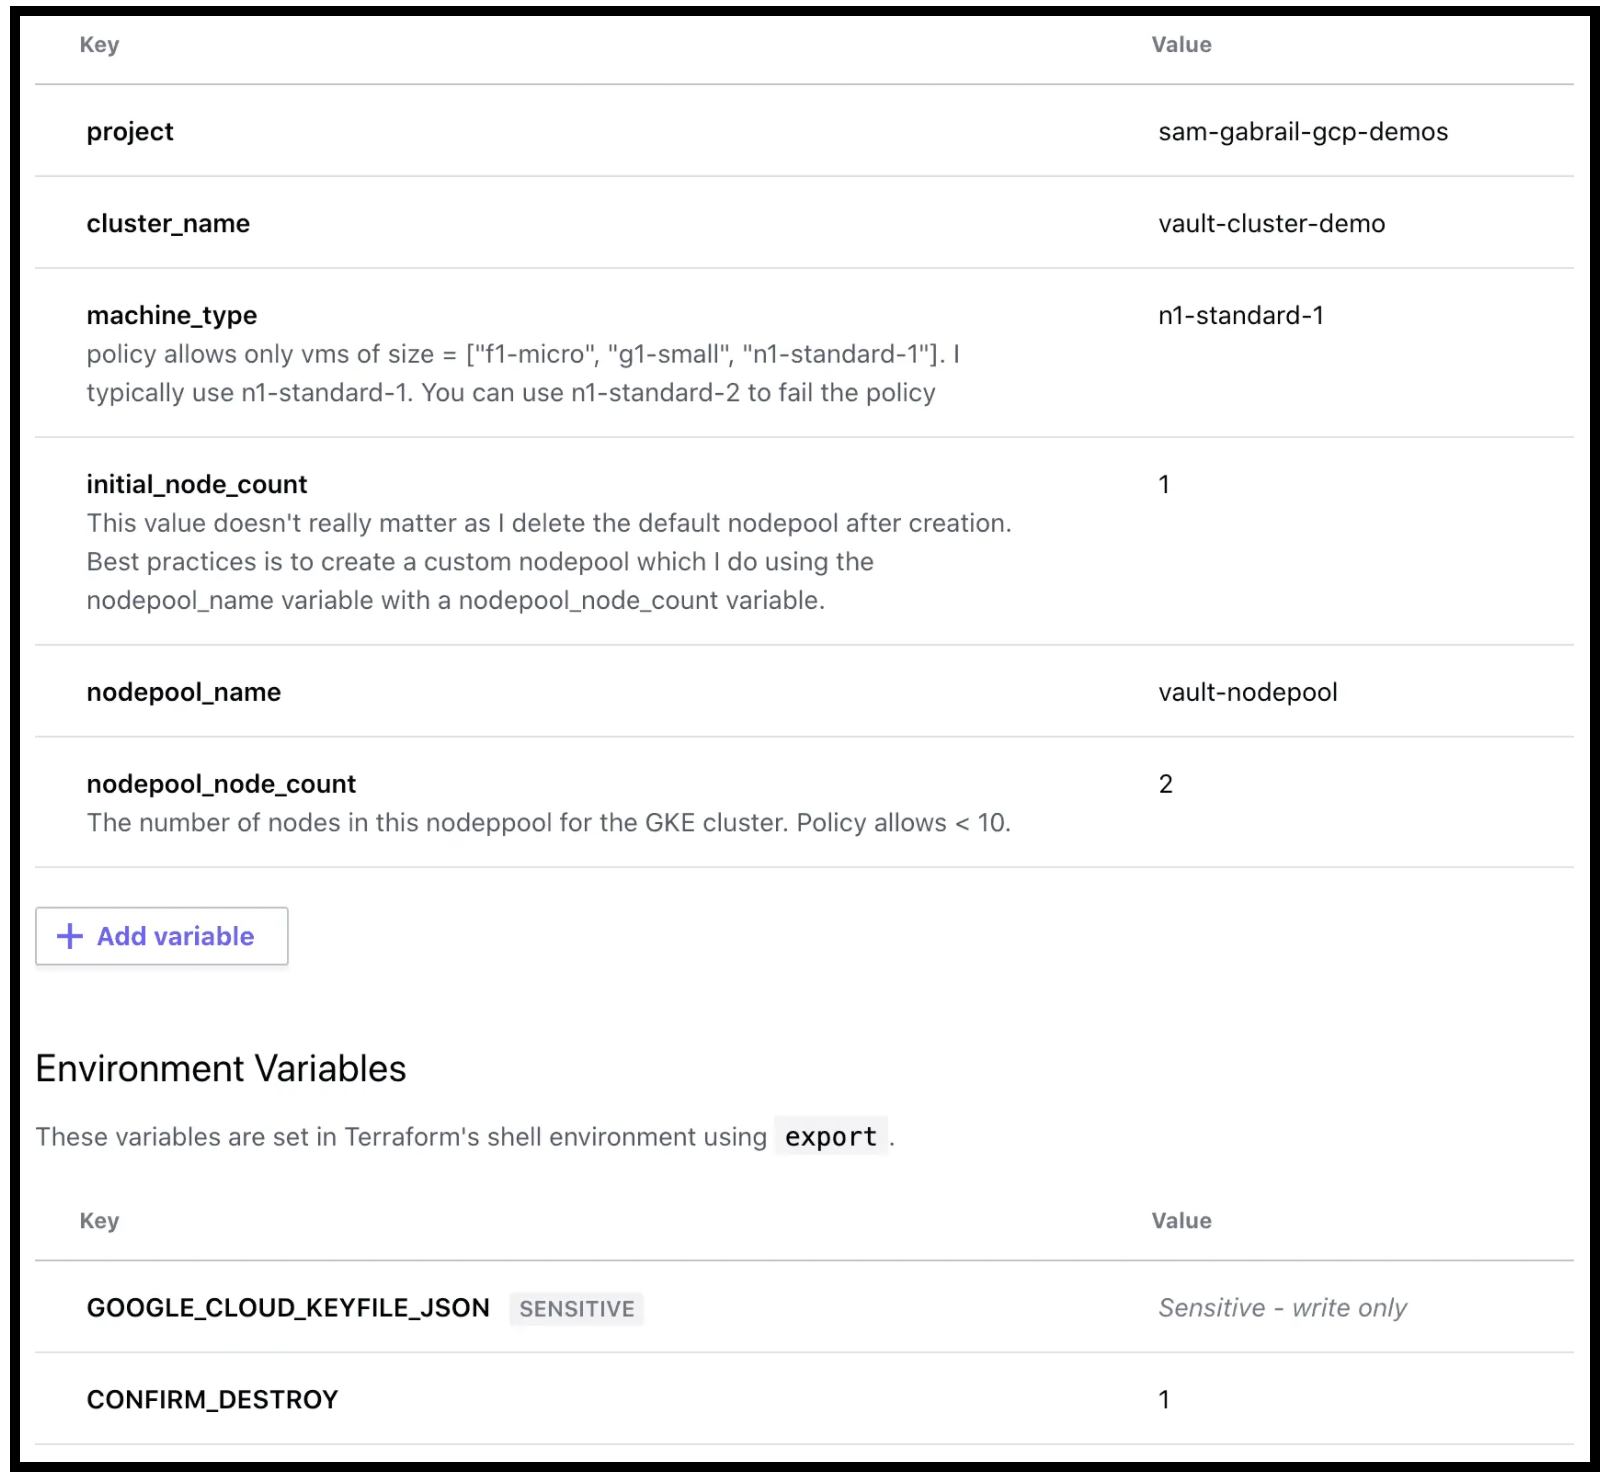
Variables Configuration for the Deployment Phase in TFC
Note: the GOOGLE_CLOUD_KEYFILE_JSON environment variable needs to be all on one line. So use your favourite text editor to make sure that’s the case before loading it into TFC.
Queue the Plan
Once we’ve configured the workspaces and connected them to our VCS, we can now Queue a plan. We can do so by clicking in the upper right-hand corner of the TFC screen. Please note that committing and pushing code in our VCS will also automatically trigger TFC to run.
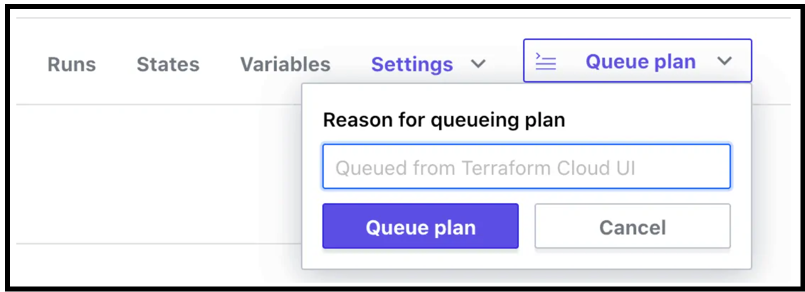
Queue a Plan in TFC
Phase 2 – Terraform Vault Configuration
Initializing and Unsealing Vault
At this point, the GKE cluster is provisioned with both Consul and Vault clusters. We can now initialize the Vault cluster manually as it’s best practice to do so from a security point of view. We can do so by running the following commands from our workstation. (We’ll need to have the Vault binary installed on our workstation, or we could kubectl exec into the Vault pod in the Vault namespace and run these commands.)
export VAULT_ADDR=<vault_url_output_from_terraform>
vault operator init
We get 5 unseal keys and a root token. Keep these in a safe place. It’s best practice to revoke the root token after configuring some authentication mechanisms to Vault. For this demo and simplicity, we’ll use the root token as the method of authentication for Terraform.
We then go ahead and unseal Vault using the unseal keys and the command below:
vault operator unseal
Note: In a production system, we would definitely leverage the auto-unseal feature of Vault. This is especially important in a K8s environment because if the Vault pod gets restarted, it will come back in a sealed state. If we didn’t have auto-unseal configured, then we would have to manually unseal Vault every time.
Now that we’ve unsealed Vault, we can move on to the next section to configure Vault using the Terraform Vault provider. Once again the code can be found in the GCP infrastructure GitLab repo (sign up to our newsletter and get access to the source code) under the terraform-vault-configuration folder.
Vault Configuration Workflow
The Terraform Vault provider is considered one of the best practices method of configuring Vault. It’s not the only way, but I like it because it follows the Infrastructure as Code principle. Whenever we need to add a Vault policy or an authentication backend or a secrets engine, we could do so from within Terraform. We then have our Vault configuration written as code and easy to understand and modify. Below is a diagram for the workflow to configure elements within Vault. We will use this quite a bit to update the Vault configuration as we transition through the different versions of the Webblog app.
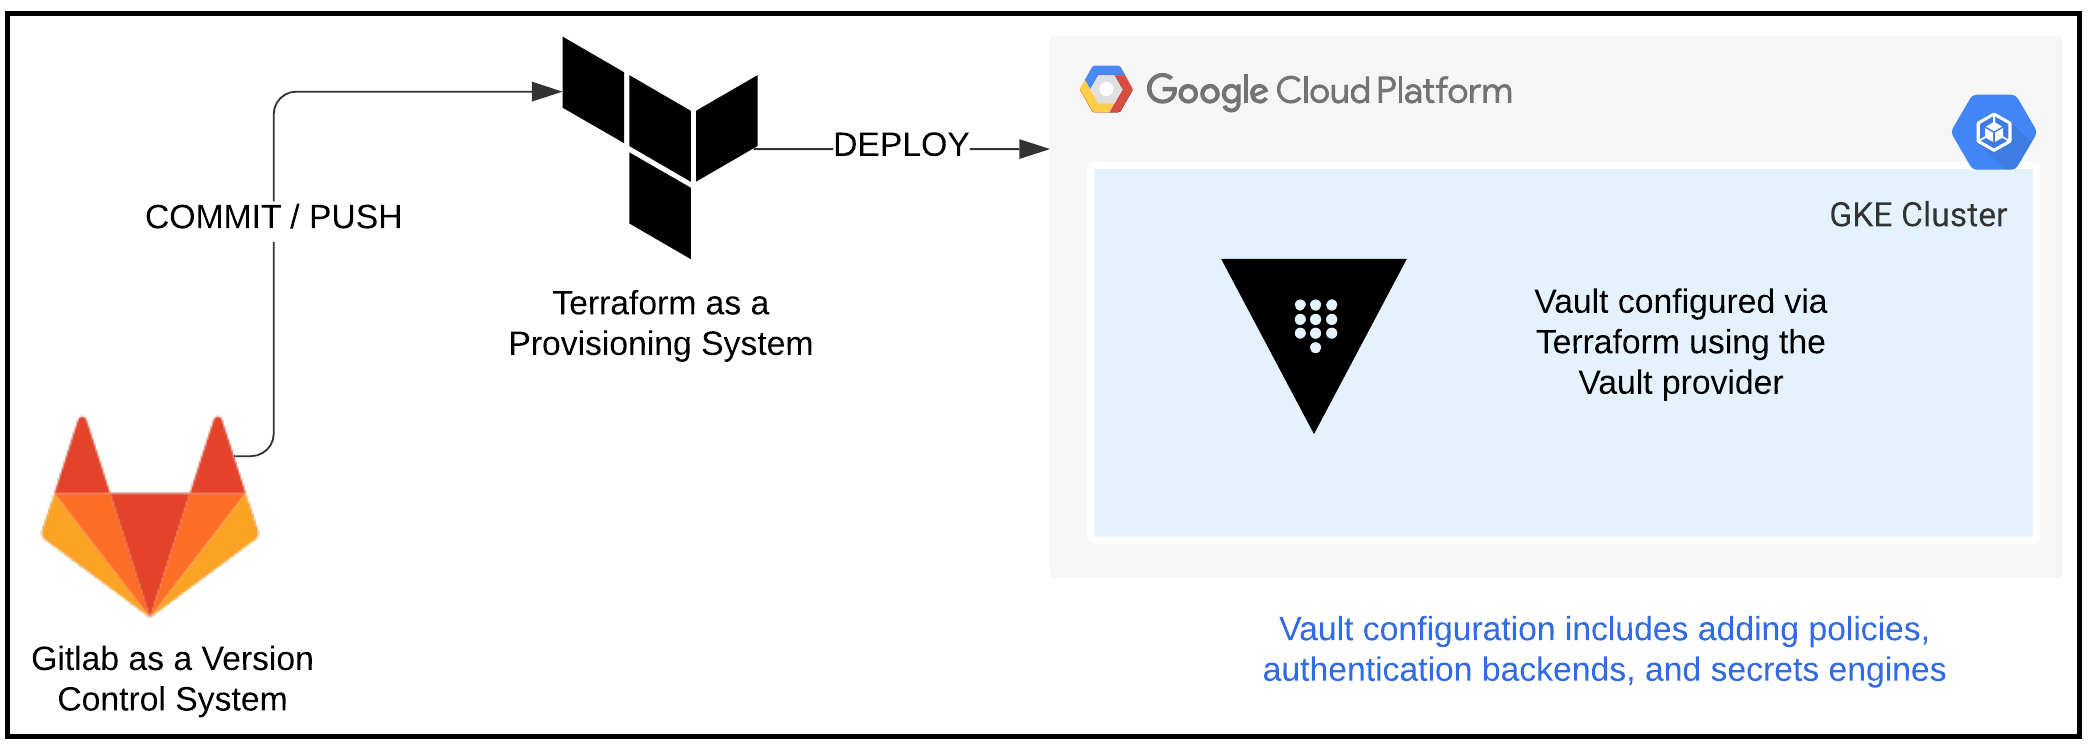
Vault Configuration Workflow
Workspace Creation and Connection to VCS
Now let’s create another workspace in Terraform Cloud (TFC). This workspace is for the Vault configuration phase. We then connect the workspace to our Version Control System (VCS). This time we set the trigger to only trigger runs when files in the terraform-vault-configuration folder change.

TFC – VCS setup for Vault Configuration Phase
Configuration of Variables
Now it’s time to configure variables. Two key variables we’ll need are:
Vault_ADDR(get it from the output of the terraform apply from Phase 1)Vault_TOKEN(we could use the root token for demo purposes but it’s best practice to revoke the root token and create a new token specifically for Terraform). You can find a guide to creating a new token here.
Here is what my variables page looks like for the Vault configuration workspace:
Variables Configuration for the Configuration Phase in TFC
Queue the Plan
Once we’ve configured the workspaces and connected them to our VCS, we can now Queue a plan. This will configure Vault with everything needed for our Webblog App. In the next post, we will talk about some specifics.
Policy as Code
Explanation and Examples
HashiCorp offers an in-depth explanation of Policy as Code. Policy as Code provides governance and compliance to organizations. It creates guardrails for developers and operators deploying infrastructure. HashiCorp created a Policy as Code language called Sentinel. Below are some basic examples of policies to configure:
- Do not allow deployments to production after 5 pm on Fridays
- No public AWS S3 buckets are allowed to be deployed
- Only allow certain VM sizes to be deployed into either of AWS, GCP, or Azure
For our example the two policies in effect are:
- GCP allowed_vm_sizes = ["f1-micro", "g1-small", "n1-standard-1"]
- GKE node pool count
<=9
Setup of a Policy Set
To use Sentinel, we need to attach a VCS repo to a Policy Set in TFC. In our case, we have the Terraform Sentinel Policy in this Github repo attached to a police set we called tfe_policies_gke. We can apply this policy set to all workspaces in our organization or to a subset of workspaces. In our case, we applied it to the workspace for our Vault Deployment Phase.
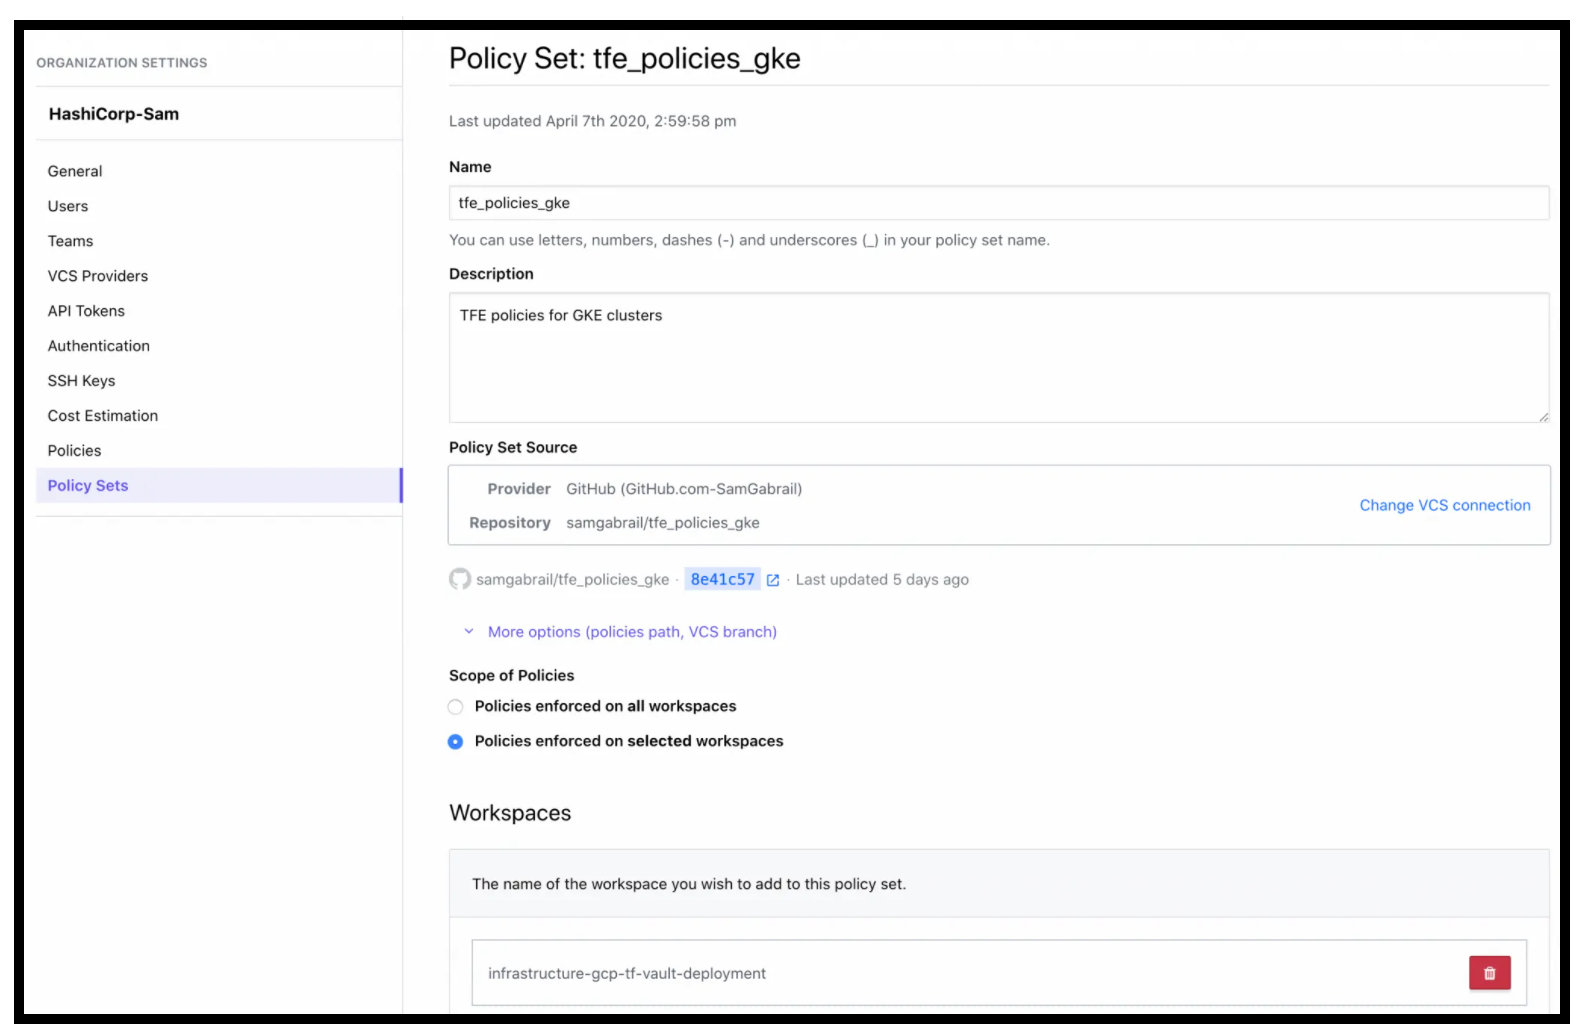
Sentinel Policy Set Applied to the Vault Deployment Workspace
To test the policy, I changed the variables in the Vault Deployment workspace to the following:
machine_type = n1-standard-2nodepool_node_count = 10
Policy Check Failure
Now we can queue the plan once again for the Vault Deployment workspace and we’ll see the following policy check failure:
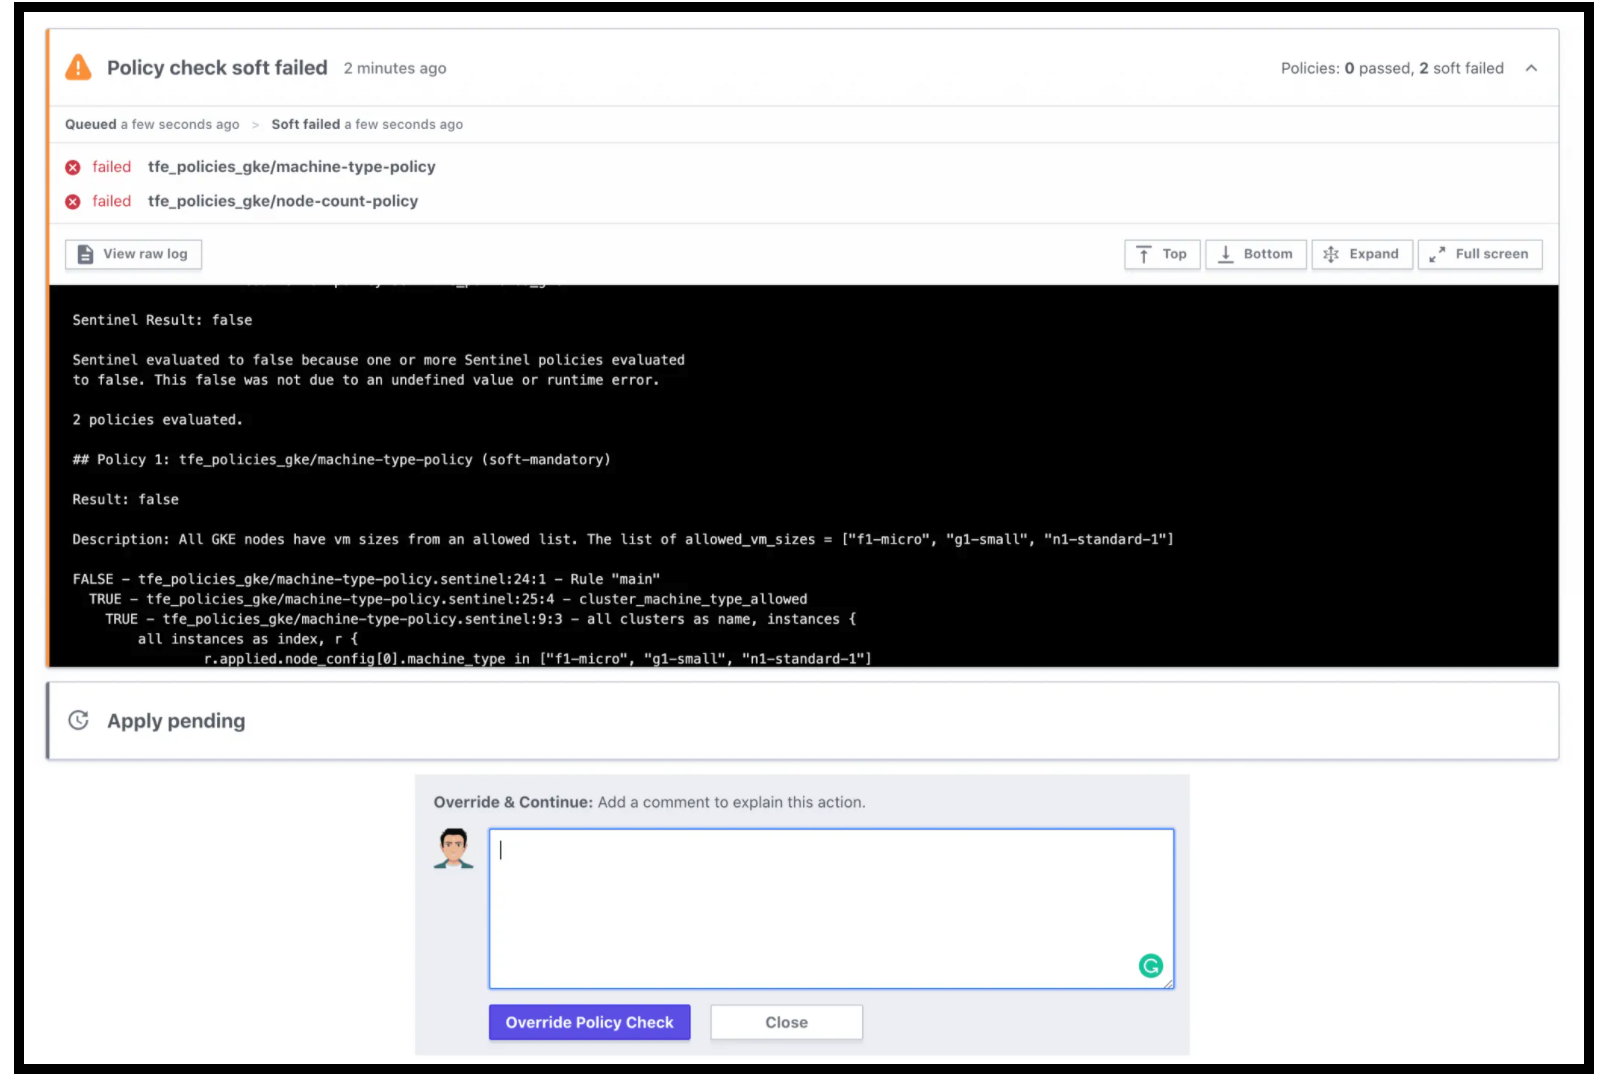
Sentinel Policy Check Failed
Notice that there is an option to override the policy. There are 2 modes to set for a policy: soft-mandatory, and hard-mandatory. You can override a soft-mandatory and the event is captured in the audit trail. The hard-mandatory policy fails to deploy the infrastructure right away with a notification to the user.
By introducing Sentinel into our Terraform workflow, we now have governance in place to ensure we don’t violate operations and security policies. We can also keep an eye on our cloud spend.
Conclusion
As I started my journey to learn the different HashiCorp products, I decided to build a simple app to use these products. In this post I described the first part of this journey; that is the deployment of the environment.
Infrastructure as Code is considered a best practice approach to deploying infrastructure. Terraform is the tool of choice to deploy such infrastructure. We used Terraform to first deploy a GKE cluster then deploy a Consul cluster, and finally deploy a Vault cluster. Terraform is also a good choice to use to configure Vault. Finally, we talked about the benefits of using Sentinel for Policy as Code to build guardrails for users.
Join me in Part 2 of this journey as we describe the Webblog app’s development phases with Vault.
Suggested Reading
- AWS Lambda – Terraform Example with API Gateway
- Jenkins, Vault, Terraform, Ansible, and Consul Delivering an End-to-End CI/CD Pipeline
- HashiCorp Vault API Tutorial and Pro Tips
- Build a Kubernetes k3s Cluster in vSphere with Terraform and Packer
- Webblog App Part 3 – Consul Connect Service Mesh
- HashiCorp Packer to Build a Ubuntu 22.04 Image Template in VMware vSphere
Code
Hi and Welcome!
Join the Newsletter and get FREE access to all my Source Code along with a couple of gifts.