
Introduction
Have you heard of Istio for service mesh? This post will teach you how to use Consul Connect Service Mesh and show you how easy it is to connect your services.
Video
Below is a video explanation and demo.
Overview
We’ve reached Part 3 of our Webblog app series. In this post, we show how to use Consul Connect Service Mesh with our Webblog app. As a reminder, my goal was to learn the different HashiCorp tools by developing a web app called the Webblog app.
- In Part 1, we discussed Infrastructure as Code and Policy as Code concepts. We also showed how to prepare the infrastructure for the app using Terraform. We built a Vault cluster backed by a Consul cluster for storage. This was all built on Google’s Kubernetes Engine (GKE) using Terraform providers.
- In Part 2, we looked at the typical crawl, walk, run phases of adopting HashiCorp Vault as a centralized Secrets Management solution.
In this post, we will move our simple application to use a service mesh to connect the Python app to the MongoDB database.
Pre-requisites
The following accounts are required to follow along:
- Google Cloud Platform – Free tier (additional costs may be incurred)
- Terraform Cloud – Free (need a paid plan for using Sentinel)
- GitLab – Free
Quick Overview of Consul
HashiCorp Consul is a service networking solution that enables teams to manage secure network connectivity between services and across on-prem and multi-cloud environments and runtimes. Consul offers service discovery, service mesh, traffic management, and automated updates to network infrastructure devices.
One of the main use cases for Consul is service discovery, which allows applications to locate and communicate with other services in a dynamic infrastructure. Consul provides a central registry that tracks services, updates, and health statuses in real-time. Services can discover each other using DNS or the HTTP API.
Another use case for Consul is proxy configuration, which enables Consul to control the behavior of proxies that are deployed as part of the service mesh. Consul can configure proxies to enforce zero trust networking with mutual TLS encryption, authorization policies, and traffic routing rules. Consul supports various proxy integrations, such as Envoy and HAProxy.
Consul also requires an agent to run on every node that is part of the service mesh. The consul agent is responsible for registering services, performing health checks, forwarding queries, and participating in the consensus protocol. The agent can run in either client or server mode, depending on the role and responsibility of the node.
Consul observability is another feature that helps users monitor and troubleshoot their service mesh. Consul provides a built-in UI that visualizes the service topology, health status, and configuration details. Consul also integrates with various application performance monitoring (APM) tools, such as Datadog, Prometheus, and Zipkin.
Finally, Consul can be compared with Istio, another popular service mesh solution. Both Consul and Istio provide similar functionalities, such as service discovery, traffic management, and security. However, when it comes to Consul vs Istio, Consul has some advantages over Istio, such as:
- Consul is multi-platform and can run on any environment and runtime, including Kubernetes, Nomad, and VMs. Istio is mainly designed for Kubernetes.
- Consul is simpler and easier to install and operate than Istio. Istio has a complex architecture that requires multiple components and dependencies.
- Consul is more flexible and extensible than Istio. Consul allows users to choose their own proxy integration, data plane implementation, and APM tool. Istio imposes some limitations on these aspects.
Moving to Consul Connect Service Mesh
Before the Service Mesh
If you recall, the Webblog app is a simple Python/Flask app that talks to a MongoDB database. Both the Python app and MongoDB are containerized and orchestrated via Kubernetes. So far, this app talked to MongoDB using the native K8s service definition using CoreDNS. While this is fine for this simple app, in an environment with 100s of microservices, a service mesh solution is needed.
After the Service Mesh
We will now move the app to use the Consul Service Mesh. Below is a diagram showing the control plane and the data plane for Consul Connect. You can also reference the Understand Consul Service Mesh guide to learn more about Consul Connect.
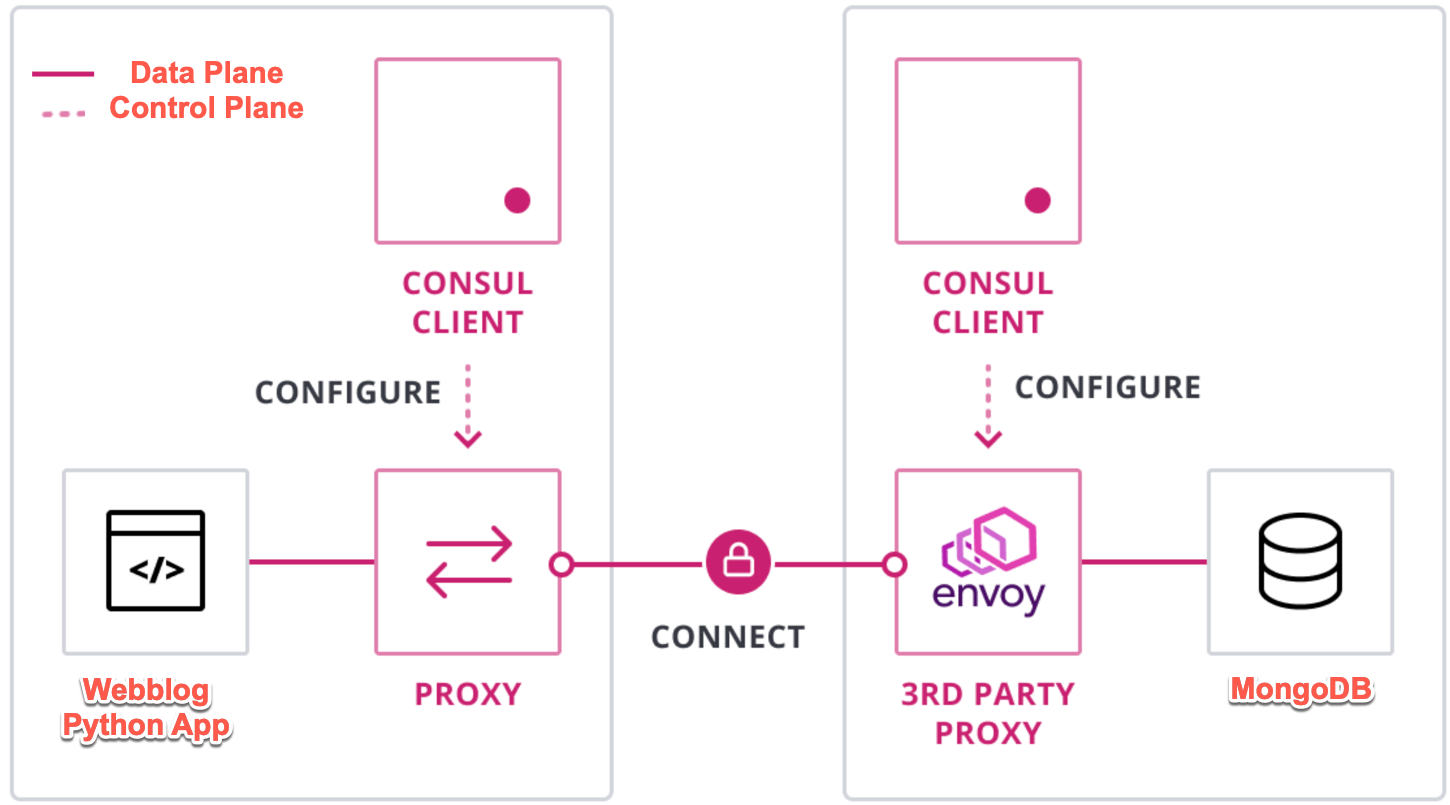
Webblog App using Consul Connect Service Mesh
Consul Connect Configuration
Let’s take a look at how to configure Consul Connect for our application.
Consul Connect Injector
We need to add K8s annotations to allow the Consul Connect Injector to inject the Envoy proxy as a sidecar into our pods. This injector is basically a K8s mutating admission controller webhook. Below is an image showing the pods running in my Consul namespace in K8s. You can see a Consul server, two Consul clients, and the Consul Connect Injector Webhook.

Consul Connect Injector Webhook
K8s Annotations for the Consul Connect Injector
The configuration needed to allow Consul Connect to inject the envoy proxy into our python flask app is very simple.
- First, we need to enable it with the “true” flag.
- Second, we need to tell our app how to connect to MongoDB by specifying the upstream.
The format for the upstream looks like this:
<Consul Service to connect to>:<Port>:<Consul Data Centre>
Below is an image showing the configuration:

Python Flask App K8s Annotations for the Consul Injector
On the MongoDB side, we only need to add the annotation to enable connect-inject. Since MongoDB doesn’t go out to connect to anything, therefore, we don’t need to add the upstream annotation. Below is an example of that in the MongoDB helm chart’s values.yaml file.

MongoDB K8s Annotations for the Consul Injector
As a result, we now have multiple sidecars as shown in the image below.

Multiple Sidecars Added to Our Pods
App Code Changes
All we need to do now is make a simple change to our Python app to tell it how to communicate with its proxy. The proxies then route the traffic between themselves seamlessly. In our .env file, we add the following:
DB_SERVER="127.0.0.1"
DB_PORT=27017
As you see, you just put the localhost or 127.0.0.1 for the app to talk to its local proxy which eventually connects to MongoDB. As a developer, Consul Connect really simplifies connectivity as I don’t have to worry about embedding the destination IP in my code.
Consul Connect Service Mesh in Action
Envoy Proxies Injected
We can now check our Consul dashboard. As you can see in the image below, we have our services registered along with their proxy sidecars.
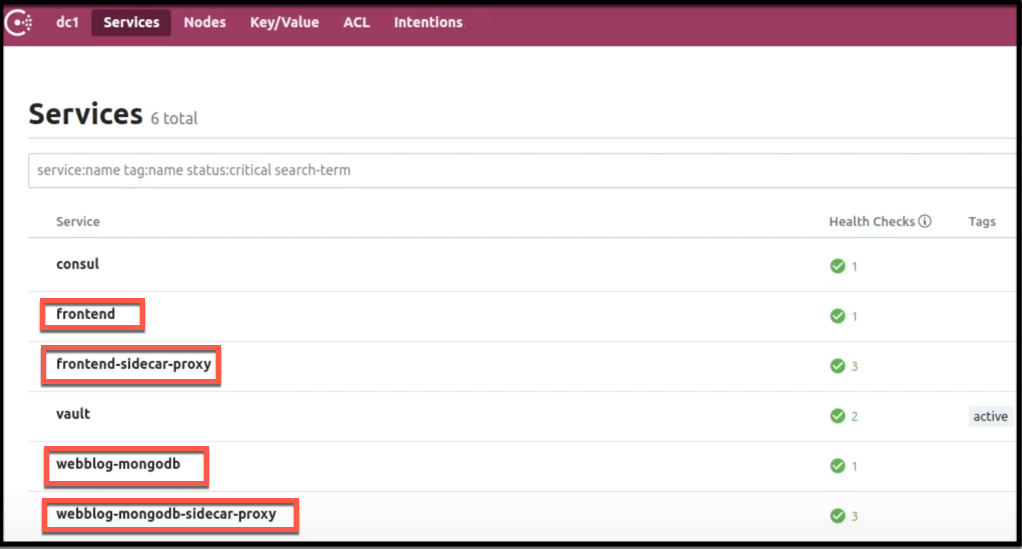
Consul Dashboard Showing Registered Services with their Sidecar Proxies
Intentions
Think of Intentions as a way to define access control for services via Connect. They are used to control which services may establish connections to which other services. Consul along with Intentions enables the transition from a host-based static IP model to a service-based dynamic IP model as highlighted in the Cloud Operating Model. You can read more about Intentions in the official documentation.
In the image below, we explicitly allow the frontend Python app to access the MongoDB service. The default intention behaviour is defined by the default ACL policy. If the default ACL policy is allow all, then all Connect connections are allowed by default. If the default ACL policy is deny all, then all Connect connections are denied by default. We will see this behaviour in part 4 of this series when we enable ACLs. In our case here, we don’t have any ACLs enabled so the default behaviour for Intentions is to allow all. I like to explicitly define intentions so things are clear.

Allowing the Python App Frontend to talk to MongoDB via Intentions
Envoy Mutual Transport Layer Security (mTLS)
A very important feature of Consul Connect’s Service Mesh is securing the communication between microservices via mTLS. Consul Connect handles this for us out of the box with the built-in CA. There is also an option to make use of HashiCorp Vault for certificate management. To learn more, check out the documentation for certificate management with Consul Connect.
In the image below we see the Envoy certificate. It’s worth mentioning the short expiration date of the certificate. This is great security-wise and the added benefit is that we don’t need to manage the life-cycle of these certificates.
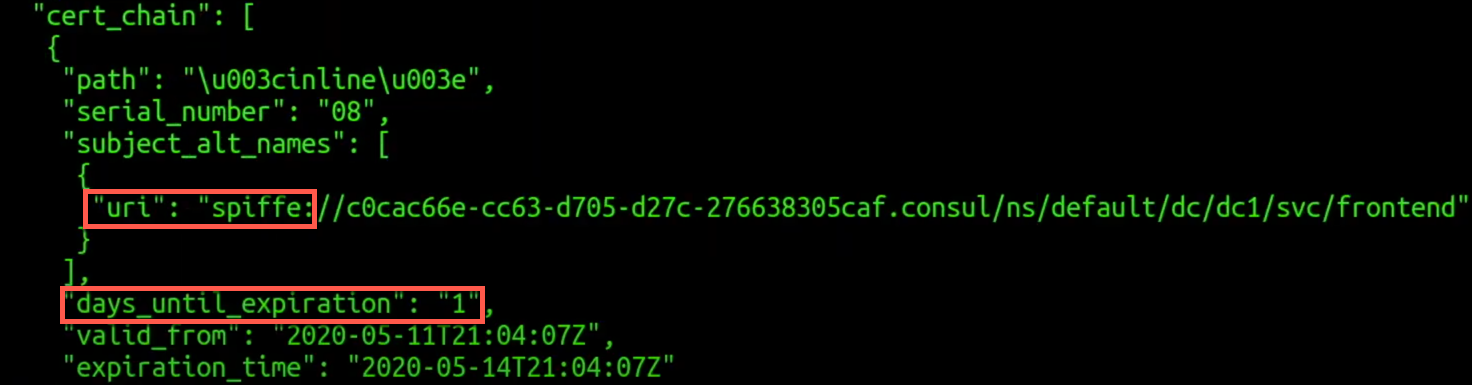
mTLS Certificate used for Communication between Services
Conclusion
There is a lot to cover when it comes to Consul Connect Service Mesh. Below are some key takeaways from our discussion:
- Using Intentions, it’s very simple to define which services are allowed to communicate to which other services. This further enhances security. As a developer, Consul Connect really simplifies connectivity as I don’t have to worry about the IP addresses of various microservices
- A very important feature of Consul Connect’s Service Mesh is securing the communication between microservices using mTLS. Consul Connect handles this for us out of the box using the built-in CA.
- Using Intentions, it’s very simple to define which services are allowed to communicate to which other services. This further enhances security.
To learn more about Consul Connect’s other features such as Layer 7 Traffic Management, the different available gateways, such as the newer consul API gateway, observability, and other topics, please refer to the documentation.
You can also check out this article for a K8s Service Mesh comparison and see how Consul Connect compares to other Service Mesh offerings.
Up to this point, we saw how our Webblog app is running in a Consul Connect Service Mesh in K8s making use of Vault and built via Terraform. Join us in Part 4 of this journey as we explore how to use the entire HashiStack to run our Webblog app. We’ll see how we’ll replace K8s with Nomad as the orchestrator.
Suggested Reading
- HashiCorp Vault PKI Secrets Engine Demo for Certificate Management
- Crossplane: Unveiling a New Horizon in Cloud Infrastructure Management
Code
Hi and Welcome!
Join the Newsletter and get FREE access to all my Source Code along with a couple of gifts.