
Introduction
In our last blog post, Andrew at Money Leaves Bank decided to use Terraform to migrate their secrets hosted in AWS Secrets Manager to HashiCorp Vault. However, he got some push-back from the security team regarding secrets showing up in the Terraform state file. Money Leaves Bank hired you as a consultant to write a script to run the migration securely. You decide to use Python for the script, Docker to package it, and GitLab to automate the testing and packaging. Learn more in this blog post.
Video
This is a full 2-hour course video on how to migrate secrets from AWS secrets manager to HashiCorp Vault with Python. You will learn the following:
– How to build a Python script step-by-step
– Create some unit tests in Python
– Packaging the script with Docker along with some best practices for the Dockerfile
– Build a CI/CD pipeline with GitLab to automate the testing of the Python script and automate the containerization of the script with Docker
Video Chapters
You can skip to the relevant timestamps below:
- 00:00 – Introduction
- 01:28 – Agenda
- 01:47 – Requirements
- 02:29 – Build the Python Script
- 1:16:51 – Create Unit Tests
- 1:24:10 – Containerize the Script with Docker
- 1:39:16 – Build a GitLab CI/CD Pipeline
- 2:11:09 – Closing Remarks
Overview
In our previous blog post called Migrate Secrets from AWS Secrets Manager to HashiCorp Vault with Terraform, we saw how Andrew considered a couple of options to migrate their secrets:
1. He could use a multi-purpose language such as Python to get the secrets from AWS Secrets Manager and populate them in HashiCorp Vault
2. Use a wide-spread domain-specific language such as Terraform to do the same task
While both options were valid, he considered the expertise within his platform engineering team and found that his team was more comfortable with Terraform. Moreover, they were adopting a multi-cloud strategy. They had just started adding apps to Azure and within 6 months the dev team will build some apps in Google cloud to leverage GCP’s machine learning services. He wanted to encourage his team to continue working with Terraform.
Andrew understood the downside of using Terraform for this task; that the secrets will show up in Terraform’s state file. He had decided to use Terraform Cloud to store the state file securely. Once the secrets were moved successfully he would destroy the Terraform workspace to remove all traces of these secrets.
However, the security team wasn’t comfortable with Andrew’s approach and rejected it. Andrew reached out to you as a consultant to help write a script for their team since they don’t have the expertise in-house. Check the requirements below.
DISCLAIMER:
Money Leaves Bank is a fictitious bank created for demo purposes.
![]()
Money Leaves Bank Logo
Pre-requisites
The following is required to follow along:
- A free GitLab account
- Access to an AWS account, we’ll be running within the 12 month free tier
- A Vault server that you could self-host – OSS is fine (I’ll use HCP Vault for this)
- Python
- Docker
Understand the Requirements
- You are a consultant working for Money Leaves Bank
- Money Leaves Bank just acquired HashiCorp Vault and wants to migrate its secrets from AWS Secrets Manager
- Build a script to run the migration securely
- Package the script to run in the customer’s own environment
- Automate both the testing of the code and the packaging of the script
Python Script Diagram
Below is a high-level diagram of the Python script. We basically need to get the secrets from AWS Secrets Manager and then create these secrets in HashiCorp Vault.
We will use the boto3 Python library to interact with the AWS API, whereas the hvac Python library will be used to interact with HashiCorp Vault.
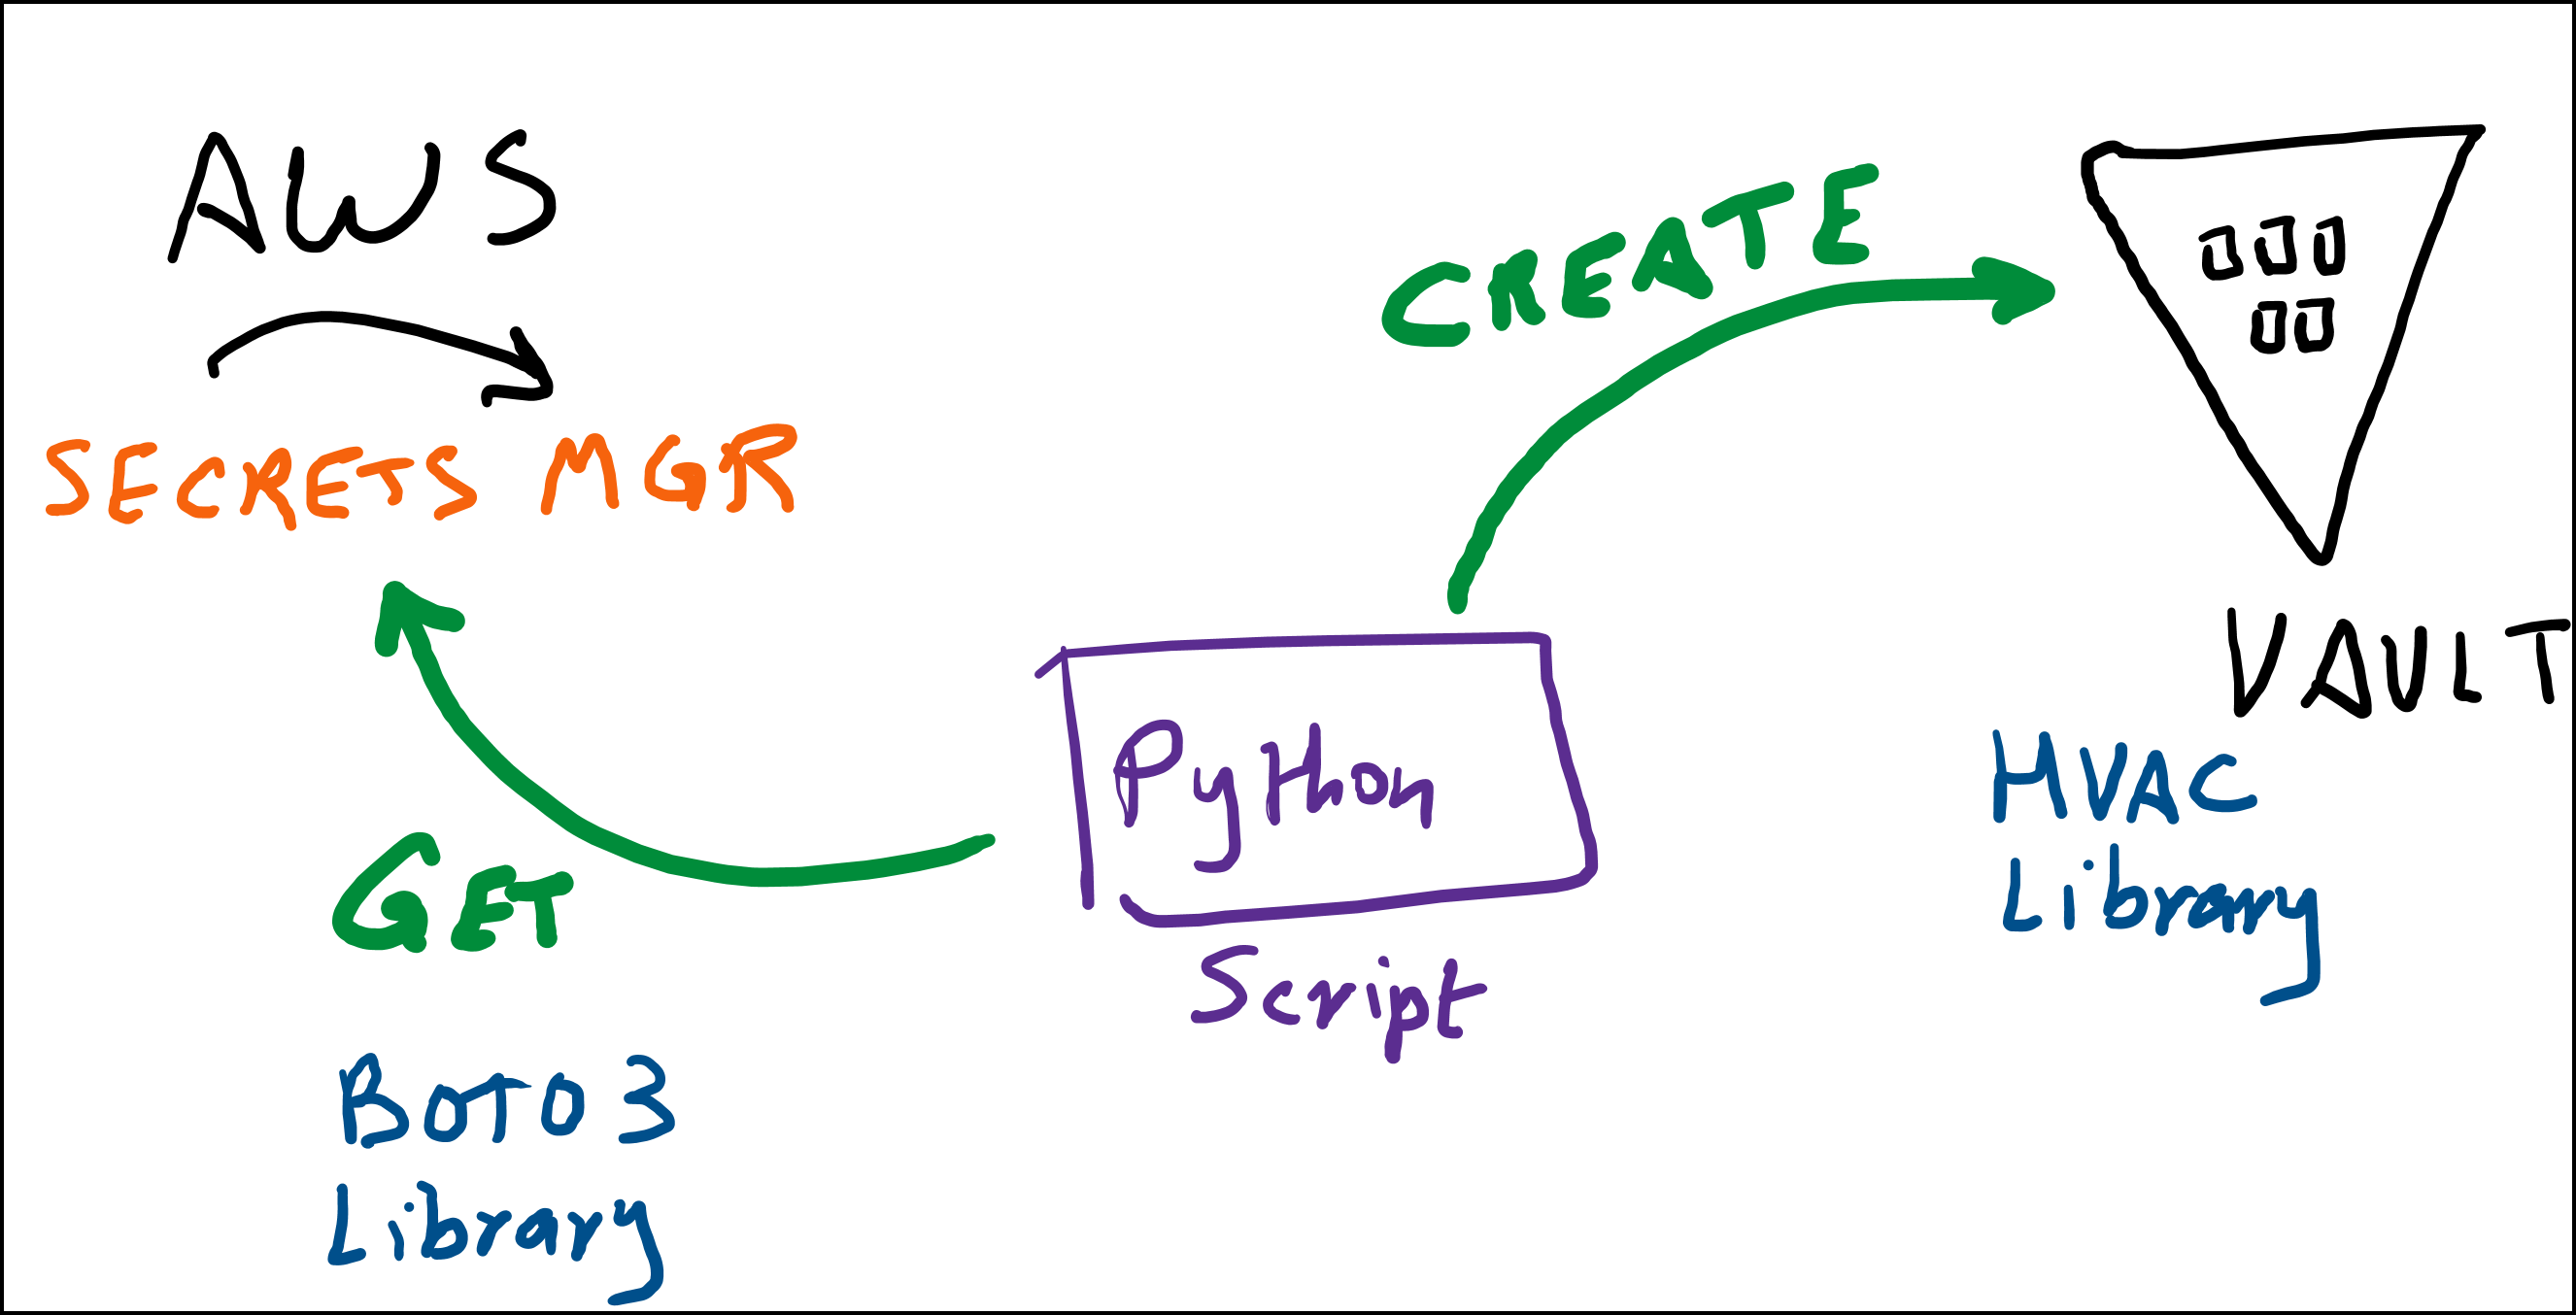
Python Script Diagram
Secrets in AWS Secrets Manager
For the purpose of this blog post, we have a few secrets in AWS Secrets Manager, which is a secrets management tool. If you’d like to learn how to create these secrets step-by-step, check it out in our previous post.
Below are the three secrets we have in AWS Secrets Manager:
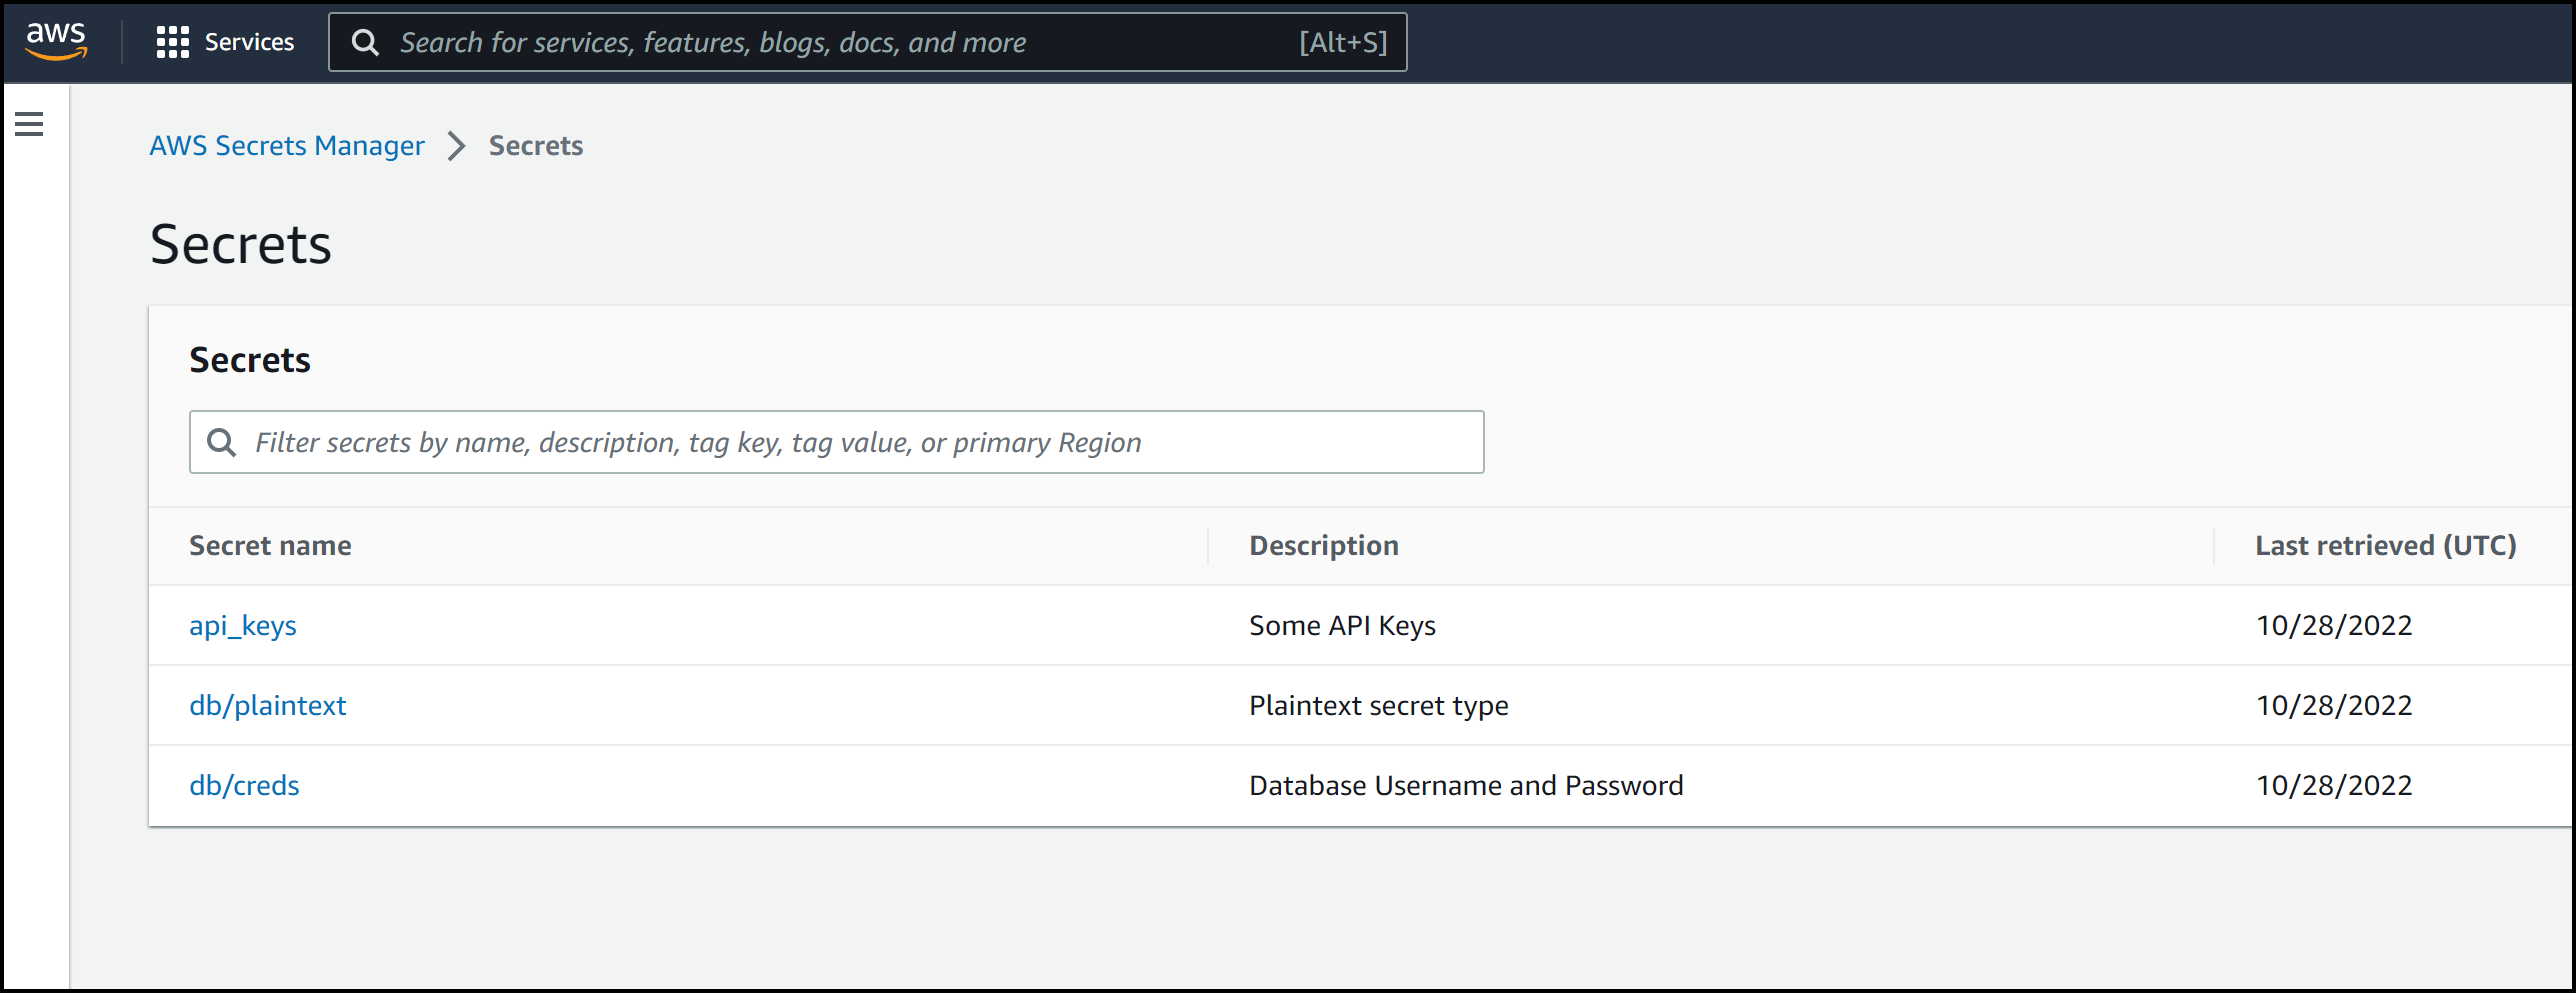
Three AWS Secrets
The api_keys and the db/creds secrets are Key/Value pairs, whereas the db/plaintext is a plaintext secret. The content of the api_keys secret is shown in the image below:
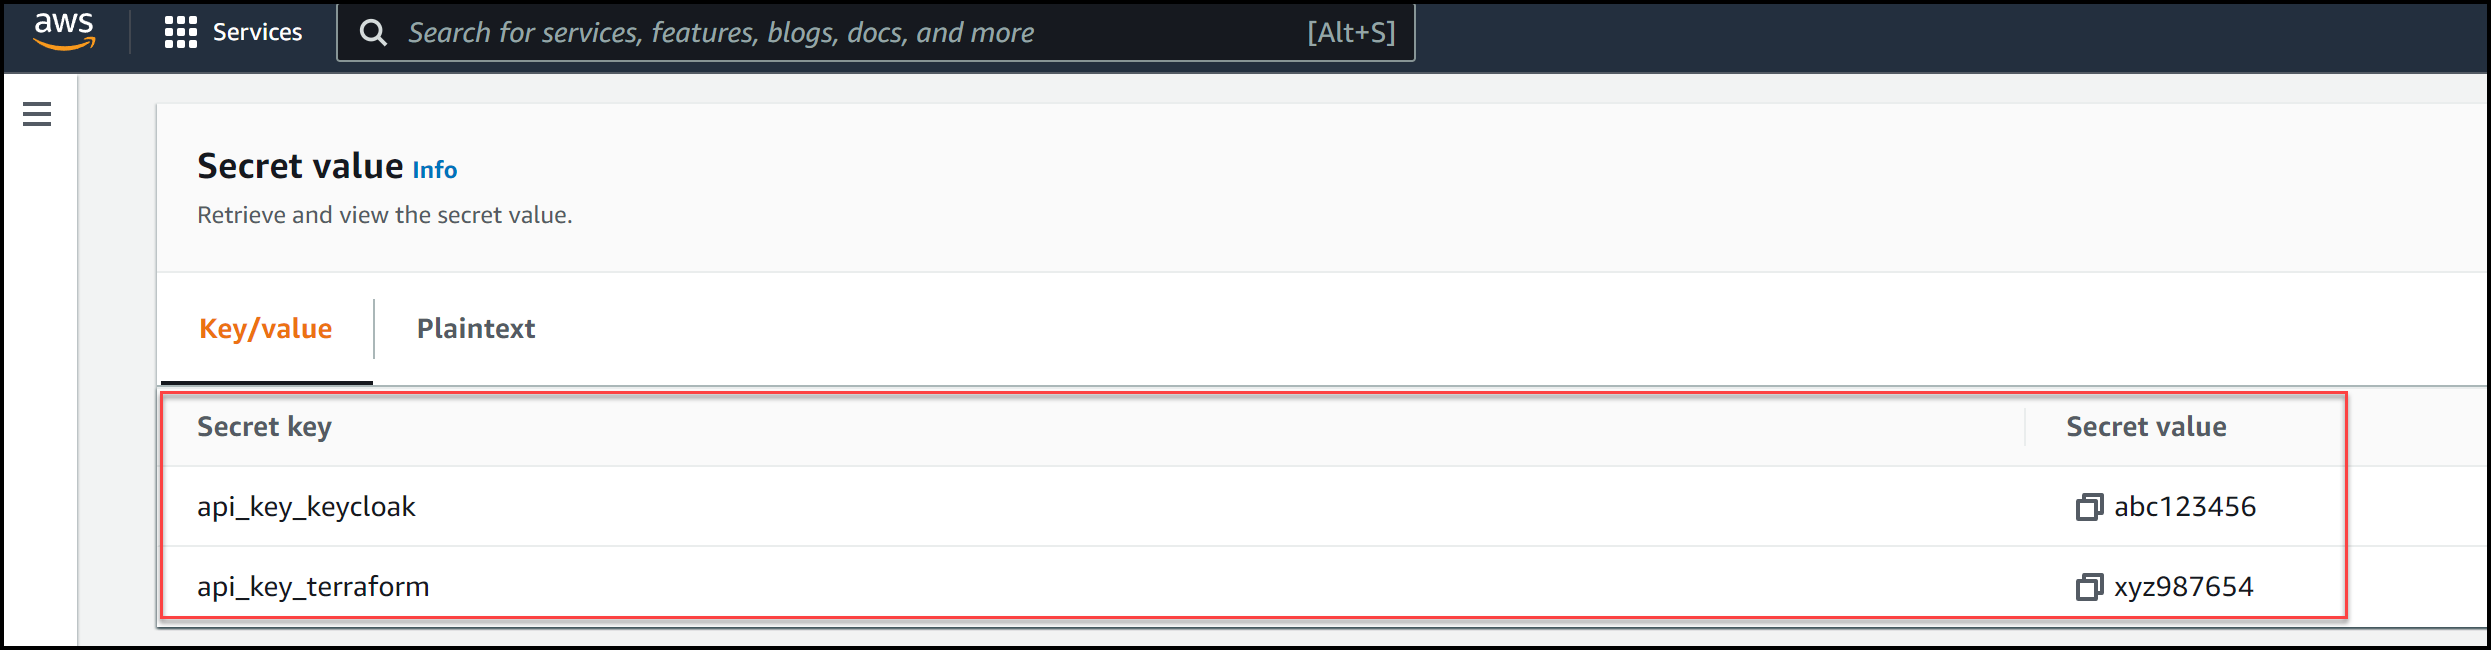
Content of the API keys Secret
HashiCorp Vault Setup
For this blog post, I’m using HashiCorp Cloud Platform (HCP) Vault. You can also use HCP vault, you get some credits when you sign up. Alternatively, you can use a self-hosted enterprise Vault or Vault open source.
As you can see in the 2 screenshots below, I have the secret/ path running the K/V version 2 secrets engine under the admin namespace.
There are currently no secrets under the secret/ path.
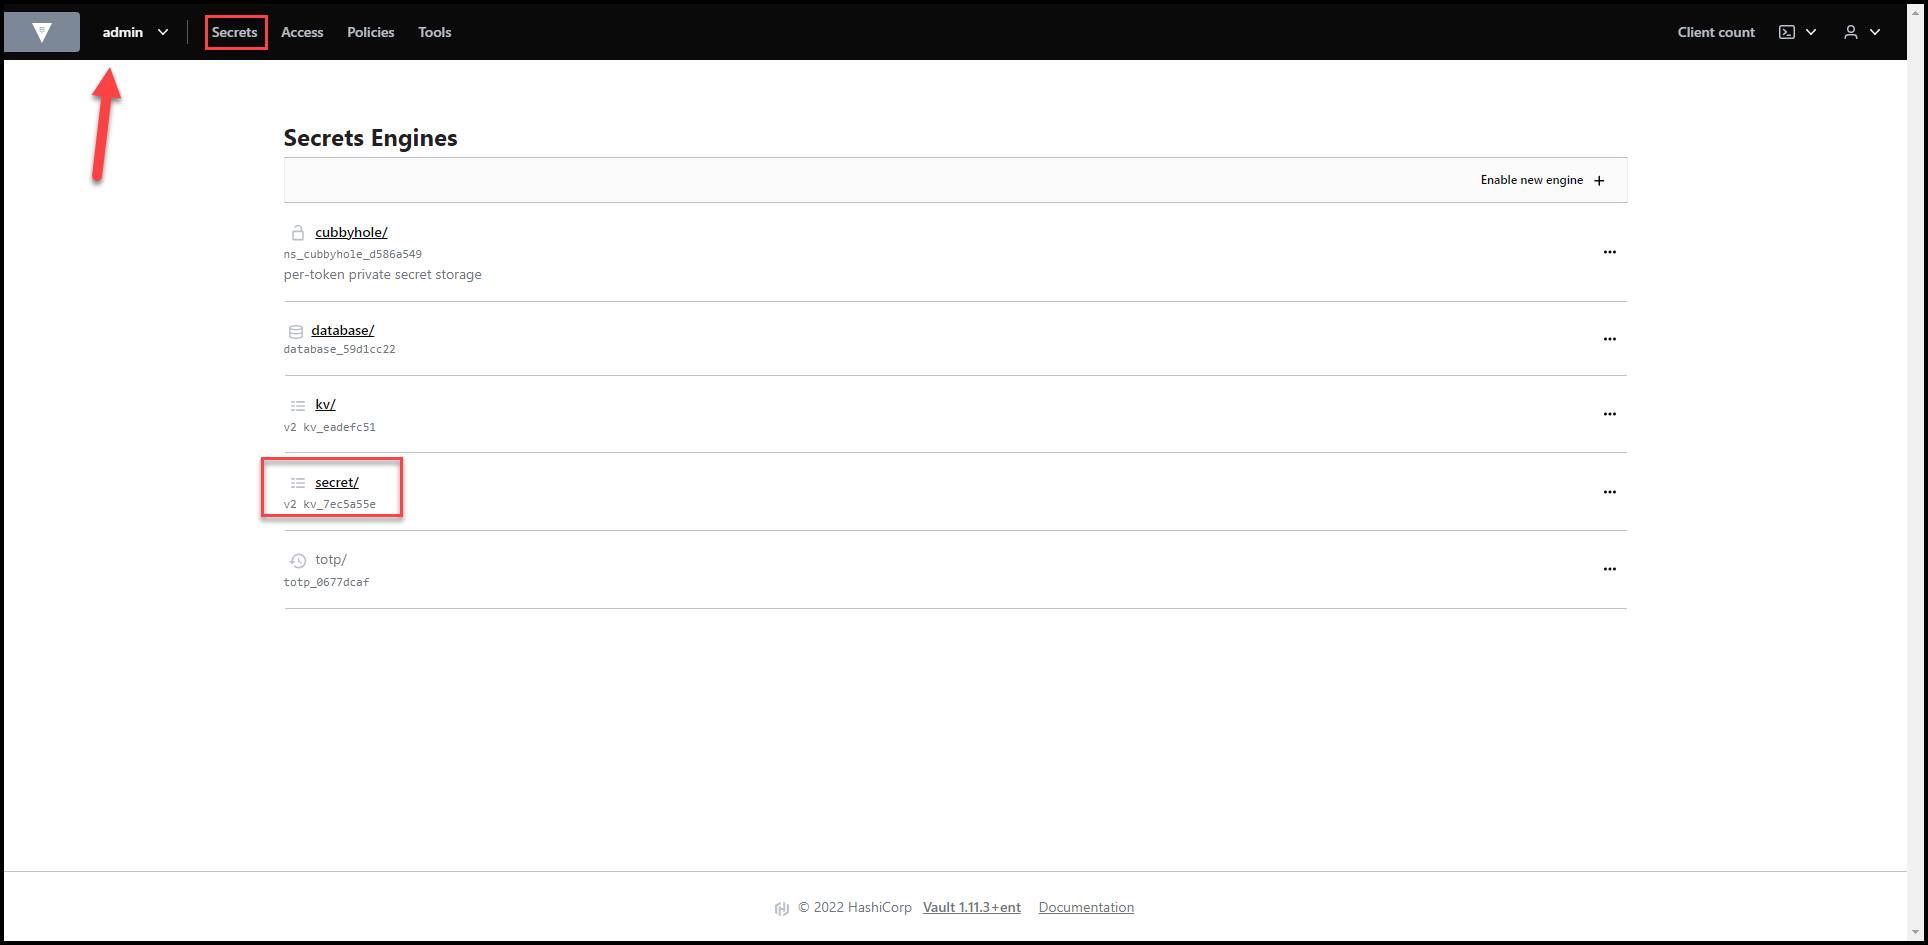
Vault Secrets Engines View
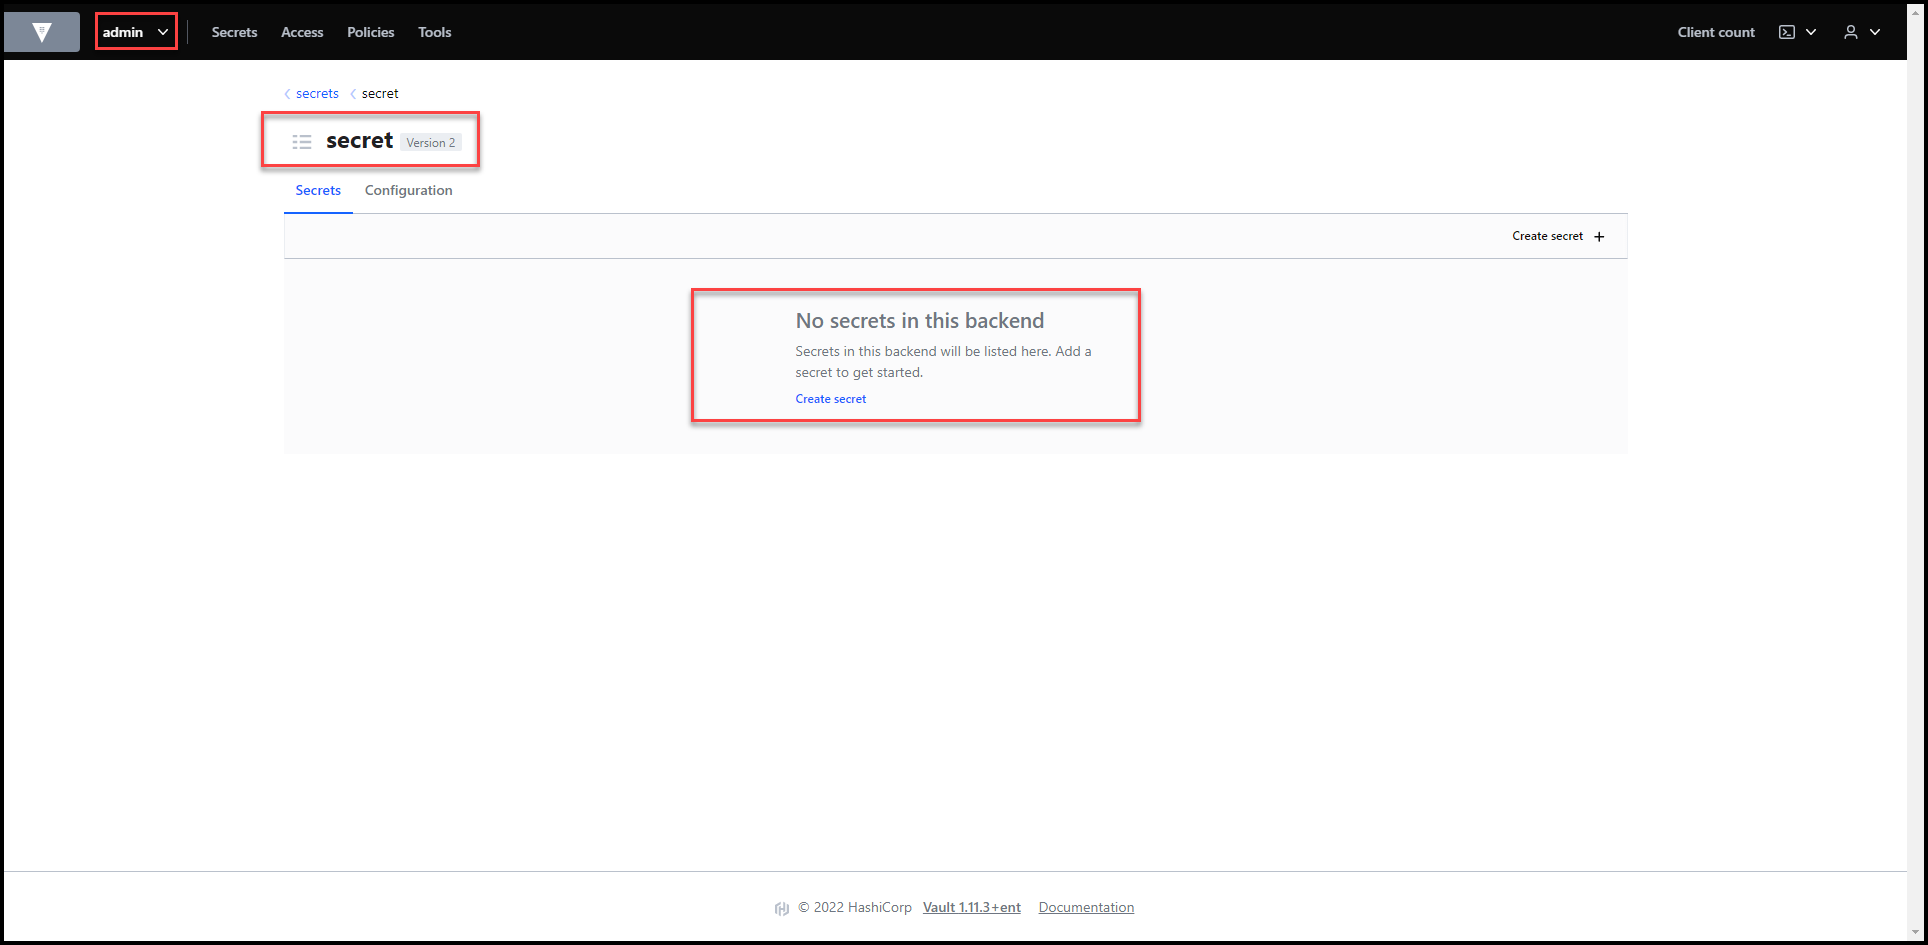
No Secrets Yet
You will need to create a Vault token with a policy that allows this token to access the KV secrets engine at the secret mount point. For demo purposes, I use the admin token from Vault HCP, but this is NOT RECOMMENDED in production environments. To learn more about tokens and policies, consider enrolling in my HashiCorp Vault 101 – Certified Vault Associate Course.
Build the Python Script
In this section, we will build the Python script together.
Folder Structure
Below is the final folder structure of our GitLab repo. We will build these files as we go.

Folder Structure
Main Python File
Our main Python file is main.py. Let’s break it down here:
1. Import Dependencies
import json
import hvac
import boto3
from botocore.exceptions import ClientError
import os
import csv
We will need to import the above libraries for our script. Notice boto3 and botocore are needed to interact with AWS, whereas hvac is needed to interact with Vault.
2. Get Secret Function
Below is the get_secret() function used to get the secrets from AWS Secrets Manager. It’s quite straightforward. It takes two inputs: secret_name which is the name of the secret in AWS and region_name which is the region where this secret lives. The function then returns a dictionary of the secret values in the form of key/value pairs.
- First, we need to create a client session for the
secretsmanagerservice. - Then get the secret response by name
- Finally we test to make sure that the secret is of type key/value, otherwise, we print an error that we can only accept key/value pairs and not plain text secrets from AWS Secrets Manager. Note, this only tests if the returned value of the secret is a JSON to be converted to a dictionary. So if the secret is of type plain text and formatted as JSON, then the exception won’t fire and this will work.
def get_secret(secret_name: str, region_name: str) -> dict:
    # Create a Secrets Manager client
    session = boto3.session.Session()
    client = session.client(
        service_name='secretsmanager',
        region_name=region_name
    )
    try:
        get_secret_value_response = client.get_secret_value(
            SecretId=secret_name
        )
    except ClientError as e:
        raise e
    secret = get_secret_value_response['SecretString']
    try:
        secret = json.loads(secret)
        return secret
    except json.decoder.JSONDecodeError as e:
        print('[ERROR] Make sure that the AWS secret is a Key/Value pair and not plain text', e)
        return False
3. Create Path Function
The create_path() function builds a path to store the secret in HashiCorp Vault. It takes two inputs: secret_path and secret_name then combines them with a / and returns the resulting string.
def create_path(secret_path: str, secret_name: str) -> str:
    return secret_path + '/' + secret_name
4. Store Secret Function
The store_secret() function creates and stores a secret in HashiCorp Vault. It takes the following inputs:
– secret_value: dict
– secret_name: str
– secret_path: str
– secret_mountpoint: str
The function creates a vault client using the following environment variables:
– VAULT_ADDRESS
– VAULT_TOKEN
– VAULT_NAMESPACE
Then it creates/updates a KV version 2 secret in Vault. The path used is built using the create_path() function mentioned above.
def store_secret(secret_value: dict, secret_name: str, secret_path: str, secret_mountpoint: str):
    client = hvac.Client(url=os.environ['VAULT_ADDRESS'], token=os.environ['VAULT_TOKEN'], namespace=os.environ['VAULT_NAMESPACE'])

    client.secrets.kv.v2.create_or_update_secret(
        mount_point=secret_mountpoint,
        path=create_path(secret_path, secret_name),
        secret=secret_value,
    )
5. The Main Function
The main() function is where the script starts. It opens an input.csv file to read the inputs. The inputs file has four columns:
– aws_region
– secret_name_in_aws
– vault_mount_point
– vault_secret_path
and below is an inputs example that we use in this blog post’s demo and you can also find it in the input.csv file.
aws_region,secret_name_in_aws,vault_mount_point,vault_secret_path
us-east-1,db/creds,secret,myapp
us-east-1,db/plaintext,secret,myapp
us-east-1,api_keys,secret,myapp
The main function reads the input.csv file line by line. It first calls the get_secret() function to get the secret from AWS Secrets Manager and then calls the store_secret() function to create/update the secret in Vault. Finally, some logs are printed for the user to know how many secrets have been processed.
def main():
    with open('input.csv') as csv_file:
        csv_reader = csv.reader(csv_file, delimiter=',')
        line_count = 0
        for row in csv_reader:
            if line_count == 0:
                print(f'[INFO] Column names are {", ".join(row)}')
                line_count += 1
            else:
                print(f'[INFO] Working on secret name: {row[1]}')
                secret = get_secret(row[1], row[0])
                if secret:
                    store_secret(secret, row[1], row[3], row[2])
                print(f'Processed {line_count} secrets.')
                line_count += 1
6. Initializing the Script
The below piece of code is at the end of our main.py file to initialize and start our script.
if __name__ == "__main__":
    main()
Run the Script
Now let’s run the script to see it in action.
It’s common practice to create a virtual environment when developing with Python. I prefer to use pipenv. You can find more details about it here.
Once you install pipenv, you can create a new virtual environment by running pipenv shell. You should have all the dependencies installed into the virtual environment based on the Pipfile and the Pipfile.lock. You could always add new dependencies by installing them with pipenv install directly or add them to the Pipfile under [packages] and then run pipenv update.
Now you could run python main.py, however, you’ll run into errors trying to connect to AWS and Vault.
We need to provide environment variables to the script to enable us to connect to AWS and Vault.
I usually create a simple shell script called start.sh that contains the environment variables and the command to run the Python script. Since this script will have sensitive information, I don’t commit it to git. However, I provide an example. You can find the example file called: start-example.sh. Rename this file to start.sh and populate it with your own environment variables. Here is an example of its content (the secrets here are not active):
#!/usr/bin/bash
export VAULT_TOKEN=s.r57K1KG90OUiznpb6CHXJdjm
export VAULT_ADDRESS=https://127.0.0.1:8200/
export VAULT_NAMESPACE=admin
export AWS_ACCESS_KEY_ID=BEIA2JG98FHOI453ABCK
export AWS_SECRET_ACCESS_KEY=p1WECm6G3wcFk+abc2d98z18b5wev1235YQAYf+W
python main.py
So now make sure you’re in the root folder of the repo and then run the command: ./start.sh.
Expected Output:
Gabrail-Windows:sam$./start.sh
[INFO] Column names are aws_region, secret_name_in_aws, vault_mount_point, vault_secret_path
[INFO] Working on secret name: db/creds
Processed 1 secrets.
[INFO] Working on secret name: db/plaintext
[ERROR] Make sure that the AWS secret is a Key/Value pair and not plain text Extra data: line 2 column 1 (char 15)
Processed 2 secrets.
[INFO] Working on secret name: api_keys
Processed 3 secrets.
Now taking a look inside Vault, we can see the two secrets that were migrated successfully:
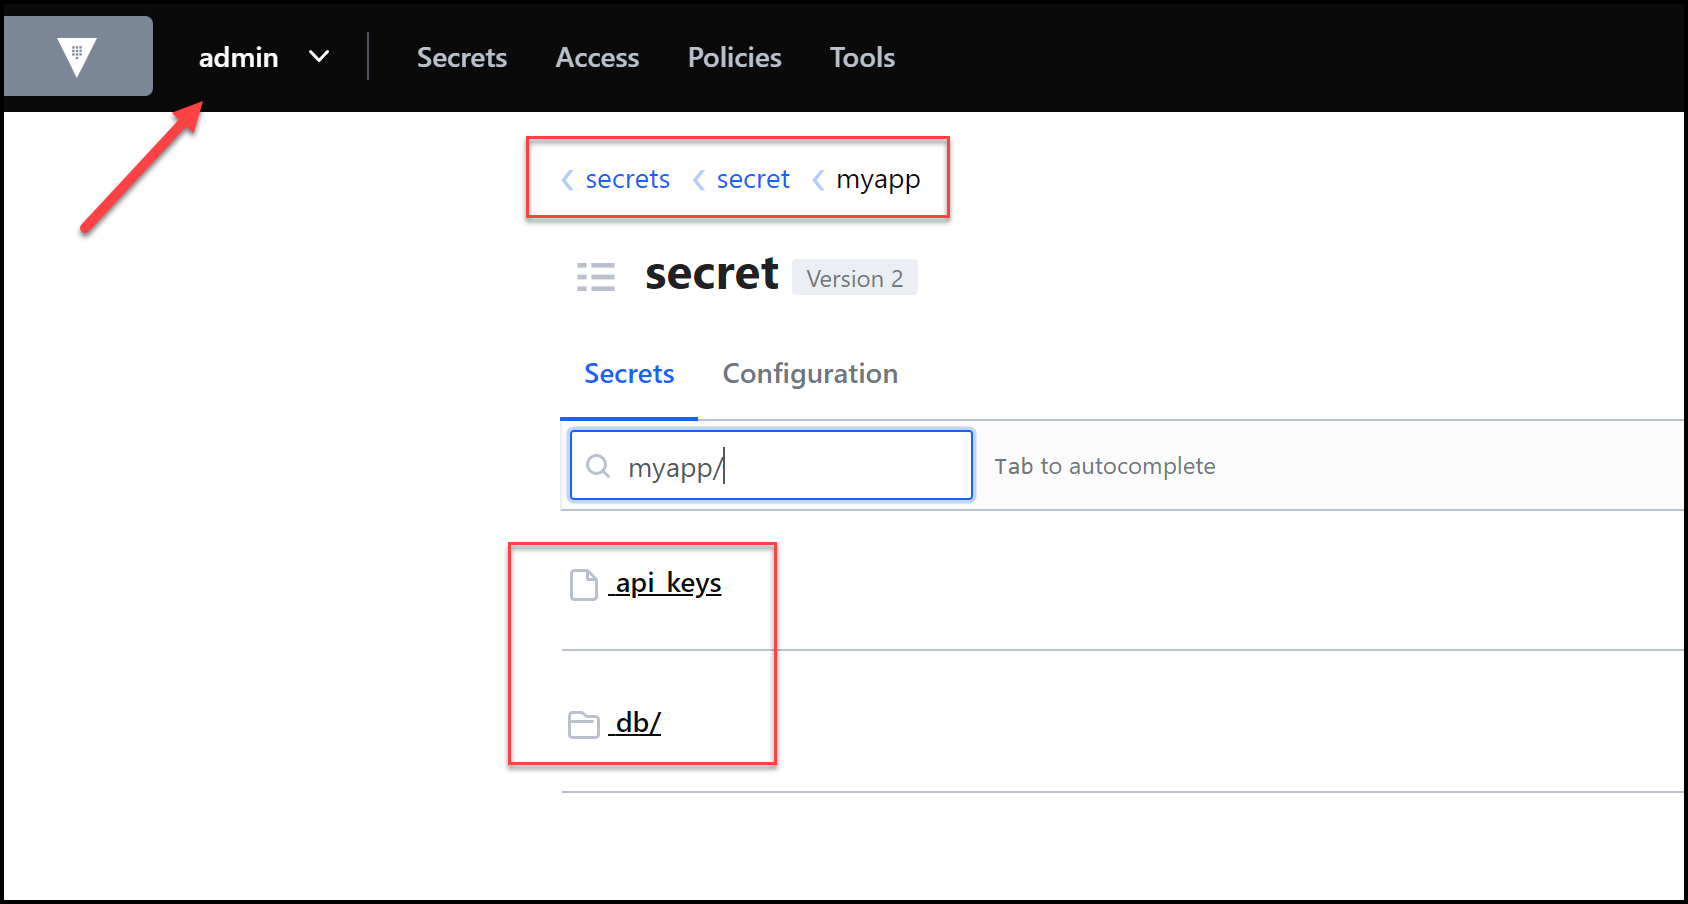
Secrets Migrated to Vault
and below is the content of the api_keys secret. It’s the same as when we saw it inside AWS Secrets Manager. The migration was successful.
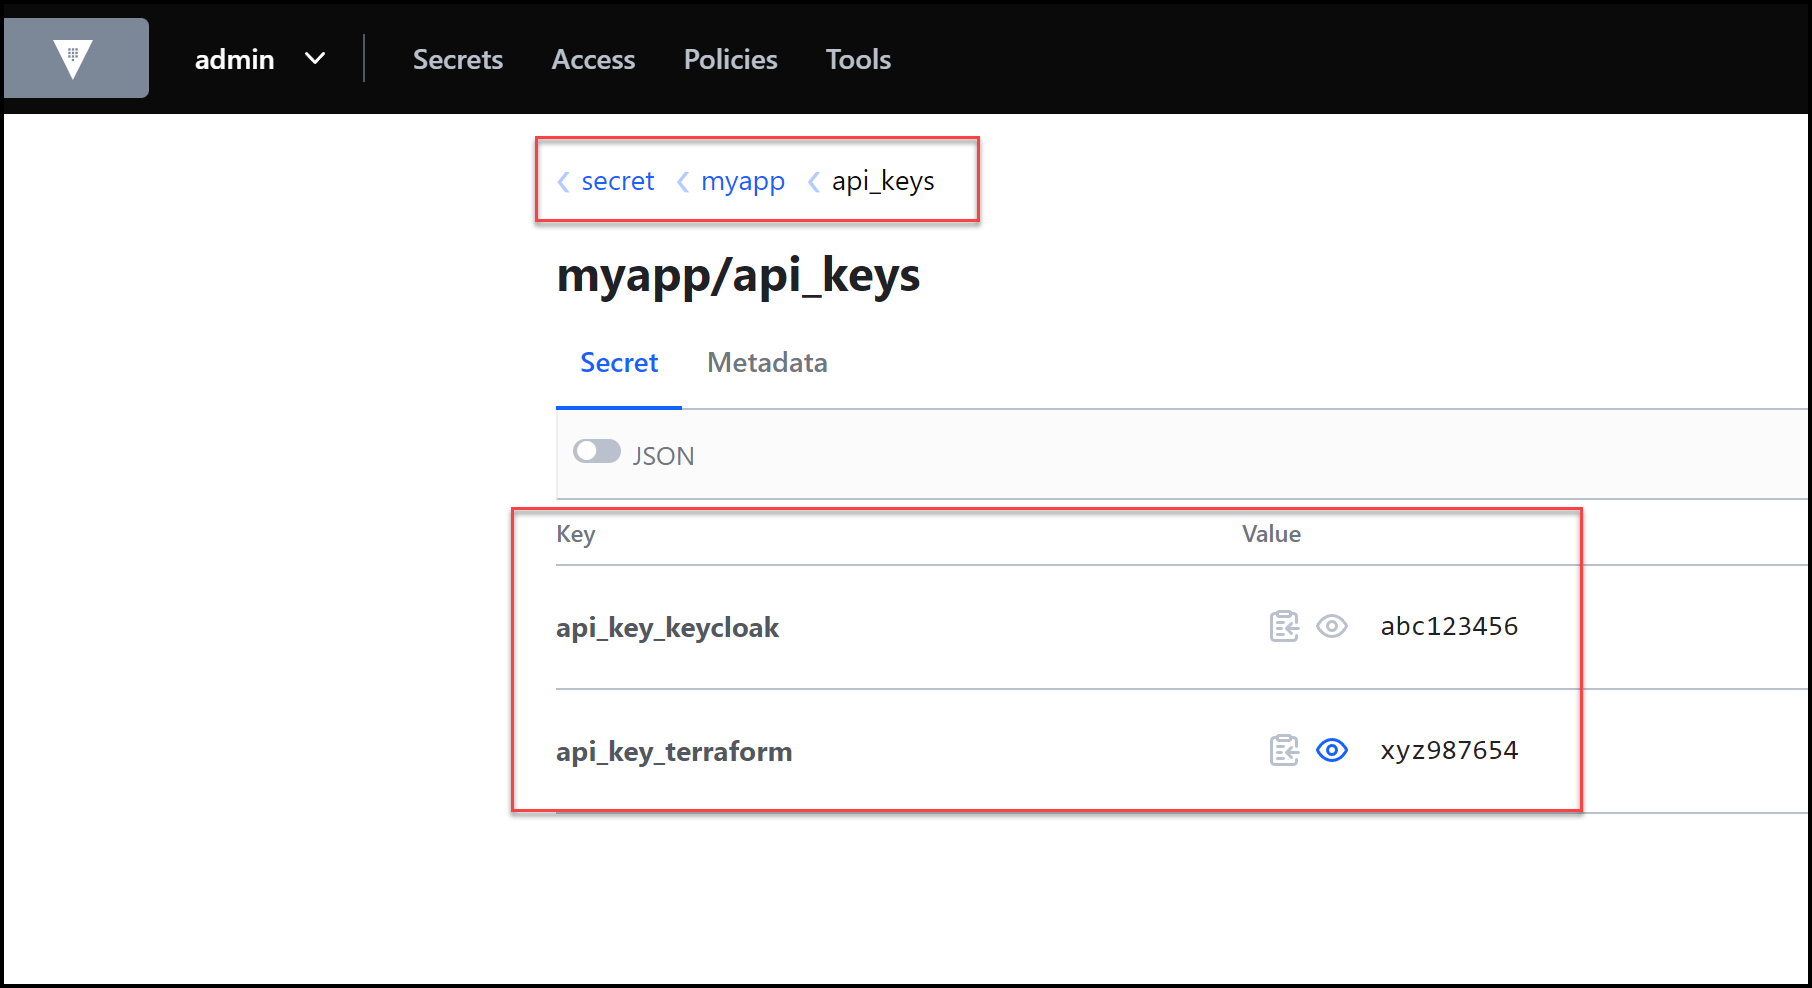
api_keys Secret Content
Create Unit Tests
In this section, we’ll add a couple of unit test examples. Unit tests are very important as they ensure that all code meets quality standards before getting deployed. This ensures a reliable engineering environment.
Over the course of the product development life cycle, unit testing saves time and money and helps developers write better code more efficiently. Unit tests isolate a function, class or method and only test that piece of code.
Test Main File
Our single test file for unit testing is called test_main.py. Let’s break it down here:
1. Import Dependencies
We need to import the unittest dependency along with main:
import unittest
import main
2. Main Test Class
Below is one way to run unit tests in Python using the unittest library. We created two simple tests for the create_path() function in main.py. These tests are found in the methods of the mainTests class.
- The first test is called
test_create_path_stringand it tests that the returned type from thecreate_path()function is astring. - The second test is called
test_create_pathand it tests to make sure that thecreate_path()function correctly merges thesecret_pathwith thesecret_nameseparated by a/.
class mainTests(unittest.TestCase):
    """
    Test Vault Path
    """

    def test_create_path_string(self):
        path = main.create_path('myapp', 'db/creds')
        self.assertIs(type(path), str)

    def test_create_path(self):
        path = main.create_path('myapp', 'db/creds')
        self.assertEqual(path, 'myapp/db/creds', 'Path value failed')
You can run the tests using this command:
python3 -m unittest discover
You should get the following expected output:
..
----------------------------------------------------------------------
Ran 2 tests in 0.000s

OK
The 2 dots .. above mean that both tests succeeded.
Now you could try to see what happens when the tests fail by updating the create_path() function in the main.py file as shown below. As you can see the function will now return a list and the separator between the secret_path and secret_name is now a - instead of a /.
def create_path(secret_path: str, secret_name: str) -> str:
    return [secret_path + '-' + secret_name]
Running python3 -m unittest discover again results in:
FF
======================================================================
FAIL: test_create_path (test_main.mainTests)
----------------------------------------------------------------------
Traceback (most recent call last):
  File "/home/sam/Development_Linux/infrastructure-software/vault-secrets-migration-python/test_main.py", line 15, in test_create_path
    self.assertEqual(path, 'myapp/db/creds', 'Path value failed')
AssertionError: ['myapp-db/creds'] != 'myapp/db/creds' : Path value failed

======================================================================
FAIL: test_create_path_string (test_main.mainTests)
----------------------------------------------------------------------
Traceback (most recent call last):
  File "/home/sam/Development_Linux/infrastructure-software/vault-secrets-migration-python/test_main.py", line 11, in test_create_path_string
    self.assertIs(type(path), str)
AssertionError: <class 'list'> is not <class 'str'>

----------------------------------------------------------------------
Ran 2 tests in 0.001s

FAILED (failures=2)
As you can see the two FF are for two failures and you can read the description for each.
Containerize the Script with Docker
Containerization has many benefits. The main benefit for us here is portability. Docker allows us to package our Python script and ship it to our customer without asking the customer to install a certain version of Python with certain dependencies. All the customer needs is docker running in their environment. Docker is quite ubiquitous now so that shouldn’t be an issue. This avoids the “it works on my machine” argument which we often see when the code runs well on a developer’s machine but not so much in a production environment.
The Dockerfile
Below is the Dockerfile content. You can also find it in the Dockerfile file in the repo.
FROM python:3.8.15-slim-buster
LABEL maintainer="Sam Gabrail"
RUN useradd -ms /bin/bash appuser
WORKDIR /home/appuser/app
COPY . .
RUN apt-get update && pip install -r requirements.txt
USER appuser
CMD [ "python", "-u", "main.py" ]
Notice some best practices in this Dockerfile:
1. Create and use a USER that is not root. Here we created the appuser user.
2. Use a small base image. We used slim-buster. This not only reduces the size of the final image preserving bandwidth when pushing and pulling the image, it also reduces the vulnerabilities in the image. So now we are using a secure python docker image.
The reason we ended up with the
python:3.8.15-slim-busterbase image was recommendations from Snyk. Snyk is now an embedded scanner that ships with docker. So we randocker scan python:3.8and saw the results of the scan that it is recommended to usepython:3.8.15-slim-bustersince it had much fewer vulnerabilities.
Remember how we used pipenv while developing the script? When building the docker image, we need a requirements.txt file. We can easily generate one using this command: pipenv lock -r > requirements.txt.
Docker Ignore File
The .dockerignore is important to use to further minimize the docker image. We add all the unnecessary files to build the container here. See the content of this file below:
.gitignore
Dockerfile
input.csv
Pipfile*
start.sh
test*
Now we need to build the image and push it to the registry
Build the Docker Image
The command below builds the docker image and tags it with my Docker Hub username and a name in this form: docker build -t <dockerhub_username/image_name>. You would need to substitute my Docker Hub username with yours. Make sure you’re in the root folder of the repo when you run the command below.
docker build -t samgabrail/secretsmigration:latest .
Push the Docker Image
You will need to be logged into Docker Hub to push the image to your Docker Hub account. If you aren’t already, then use docker login [OPTIONS] [SERVER]
Use the docker push command below to push the image to your Docker Hub account:
docker push samgabrail/secretsmigration:latest
Test the Docker Image
Now let’s run the container to test that it works. The -e flag is used to supply environment variables and the -v flag is to map the input.csv file from your host machine to the container.
docker run -it \
    -e VAULT_TOKEN=<your_vault_token> \
    -e VAULT_ADDRESS=<your_vault_server_address> \
    -e VAULT_NAMESPACE=<your_vault_namespace> \
    -e AWS_ACCESS_KEY_ID=AKIA2JGEIFHOITGOE25K \
    -e AWS_SECRET_ACCESS_KEY=p1TS2m6G3wcFk+4eJeMpRk18b5bw3EH35YQAYf+W \
    -v <path_on_your_computer_to_input.csv_file>:/home/appuser/app/input.csv \
    samgabrail/secretsmigration:latest
Example:
docker run -it \
    -e VAULT_TOKEN=s.r57K1KG90OUiznpb6CHXJdjm \
    -e VAULT_ADDRESS=https://127.0.0.1:8200/ \
    -e VAULT_NAMESPACE=admin \
    -e AWS_ACCESS_KEY_ID=BEIA2JG24FHOI453ABCK \
    -e AWS_SECRET_ACCESS_KEY=p1WECm6G3wcFk+abc2e14z18b5wev1235YQAYf+W \
    -v /home/sam/vault-secrets-migration-python/input.csv:/app/input.csv \
    samgabrail/secretsmigration:latest
You should get the same results you saw earlier when you ran it directly from Python using the start.sh script.
Build a GitLab CI/CD Pipeline
A CI/CD pipeline is very important to automate the testing of our Python code and the packaging (containerization) of our script with Docker. Instead of running our tests manually every time we make a change to our code, upon a commit and a push, our pipeline can automatically run.
Not only does this speed up the development process, but it also helps speed up the build/packaging process. After the test job runs successfully, a second job runs to build the docker container and push it to our docker registry with proper tags ready to be deployed in the customer’s environment.
GitLab pipelines are defined in a yaml file called .gitlab-ci.yml. Let’s see how to build this pipeline made up of two stages:
stages:
  - test
  - build
GitLab Runners
GitLab uses agents called runners to run its pipelines. GitLab provides its own free runners that we could use. These runners run in Docker. You can build your own runners in the form of VMs or docker containers or even on Kubernetes. These runners need to be registered with the central GitLab server. This GitLab server can be either self-hosted or you could use their SaaS offering on gitlab.com.
For this blog post, we will use gitlab.com as our GitLab server and use GitLab’s free runners to build our pipeline.
1. Test Stage
In this first stage, we test our application.
- We tell GitLab that we’d like to use a runner with the docker image:
python:3.8.15-slim-buster. This is the same image that we use for the docker container that we saw earlier. - We also run a command in the
before_scriptwhich runs before our main script to get our dependencies ready:pip3 install -r requirements.txt. - Finally, we run our script to test what we saw before:
python3 -m unittest discover.
run_tests:
  stage: test
  image: python:3.8.15-slim-buster
  before_script:
    - pip3 install -r requirements.txt
  script:
    - python3 -m unittest discover
2. Build Stage
In this second stage, we build a docker container and push it to Docker Hub.
The image that we use here is a docker image to run docker in docker. This is needed to use a docker container to build a docker image. The image attribute below defines the docker client’s image, whereas the services attribute defines the docker server daemon’s image.
The DOCKER_TLS_CERTDIR variable is necessary for the communication between the docker client and the docker server.
We also define the docker container image using the CONTAINER_IMAGE variable.
We need to log into Docker Hub, so we use the CI/CD variables section in github.com to define our username and password for Docker Hub. Then we call these values in the before_script below.
Our script is quite simple, it builds the image and gives it two tags. The latest tag along with a tag that we create and push into the repo. The CI_COMMIT_REF_NAME is the variable used to grab this tag from the repo.
Notice that we only allow this job to run if there is a tag pushed into the repo. This is to ensure that we only have tagged images pushed to Docker Hub. We define this using the only.refs.tags setting.
run_build:
  stage: build
  image: docker:20.10.21
  services:
    - docker:20.10.21-dind
  variables:
    DOCKER_TLS_CERTDIR: "/certs"
    CONTAINER_IMAGE: samgabrail/secretsmigration
  before_script:
    - echo ${CI_COMMIT_REF_NAME}
    - docker login -u ${DOCKERHUB_USER} -p ${DOCKERHUB_PASSWORD}
  script:
    - docker build -t ${CONTAINER_IMAGE} .
    - docker tag ${CONTAINER_IMAGE} ${CONTAINER_IMAGE}:latest
    - docker tag ${CONTAINER_IMAGE} ${CONTAINER_IMAGE}:${CI_COMMIT_REF_NAME}
    - docker push ${CONTAINER_IMAGE}:latest
    - docker push ${CONTAINER_IMAGE}:${CI_COMMIT_REF_NAME}
  # Below condition will only trigger the build on the master branch with tags in the form of v*
  only:
    refs:
      - tags
Protected Tags
In order to use tags for docker images that were pushed to the repo, you need to add a protected tag with the wildcard: v* as shown in the image below:

Protected Tags Setting
Pipeline in Action
Here you can see that we ran 2 pipelines. The first one had one stage which is the testing stage. The second pipeline had two stages because we pushed the v0.2.2 tag to the repo.
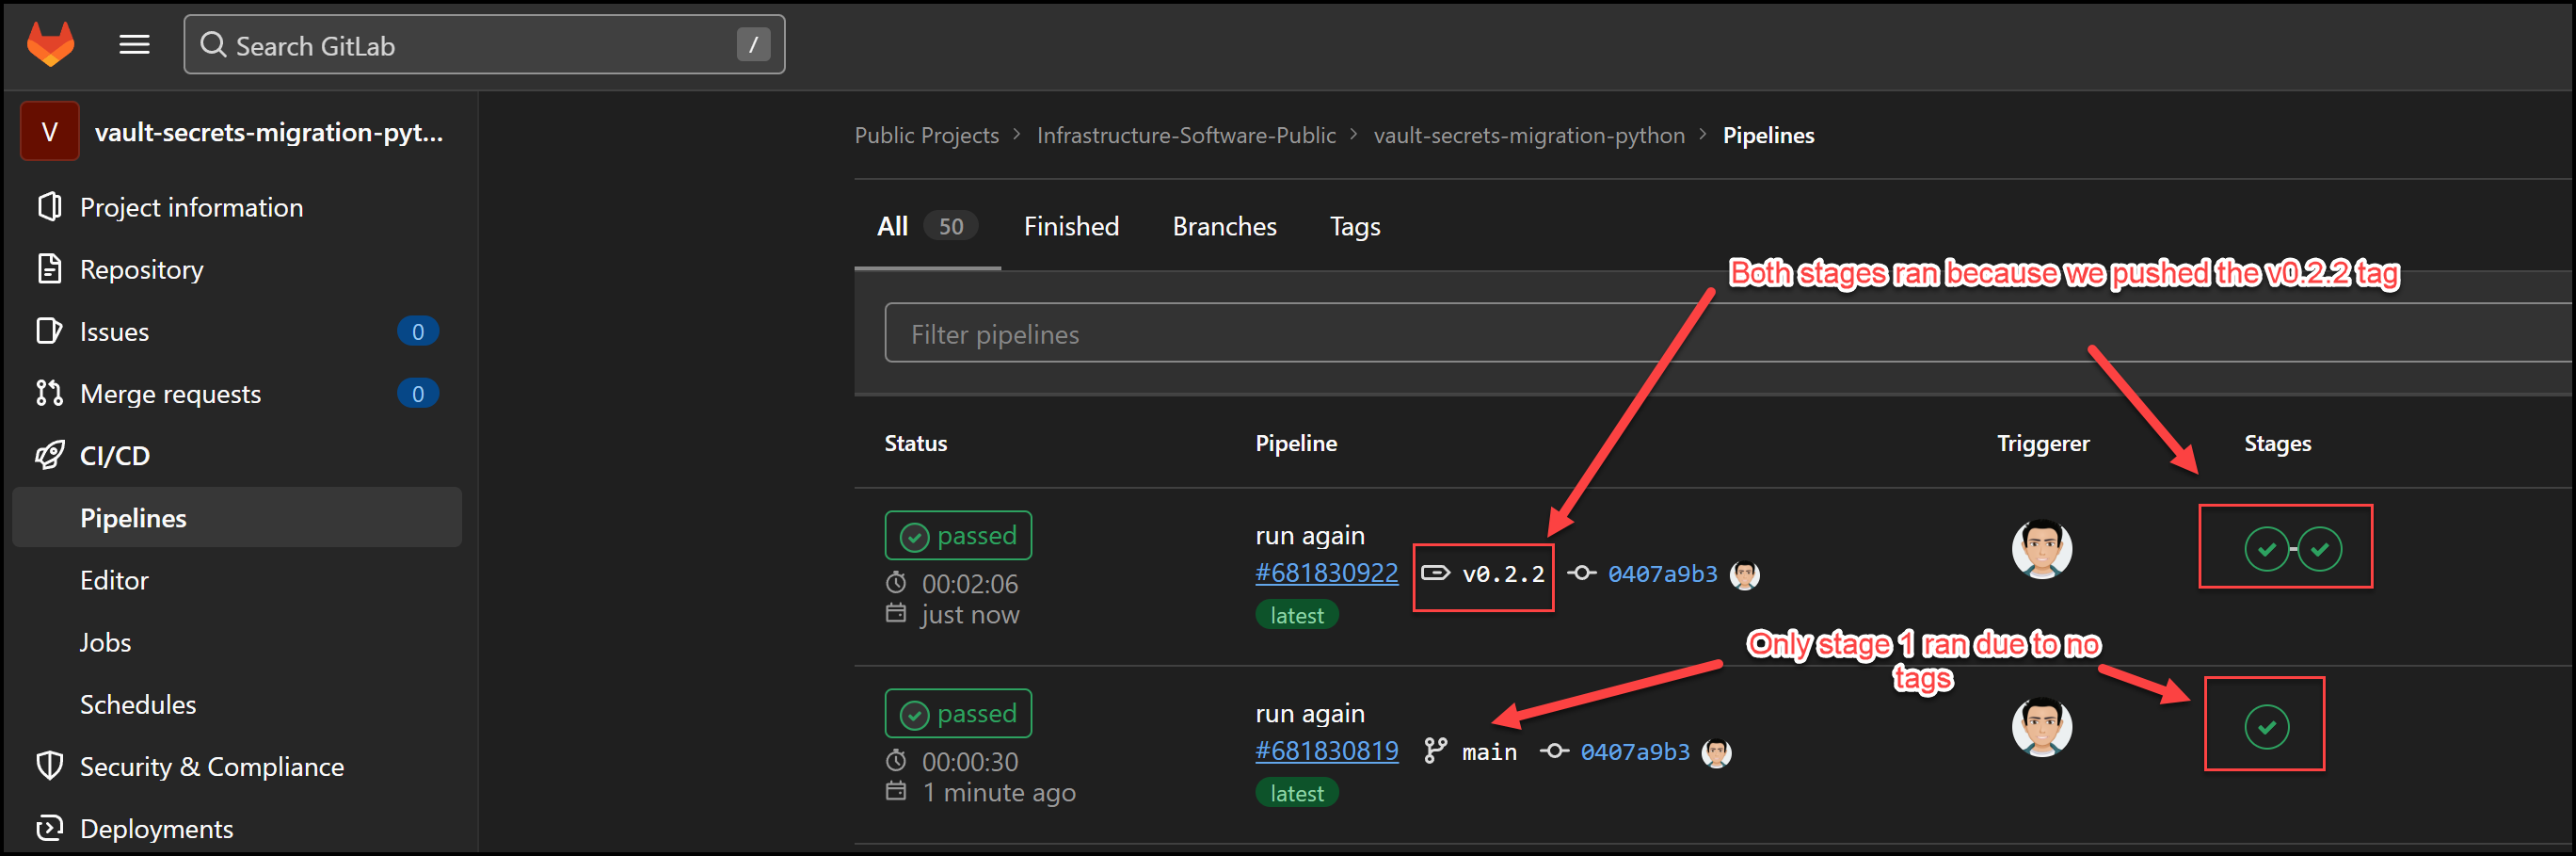
Gitlab Pipeline
Docker Hub View
And now you can see the two images and their tags pushed into Docker Hub from our GitLab pipeline.

Images in Docker Hub
Failed Test Stage
The beauty of using stages in pipelines like this, is that if a stage fails, the next stage won’t run. This saves time and ensures that we don’t get images that are broken. Below is a screenshot of a pipeline failing the test stage. You can see that the build stage was skipped.
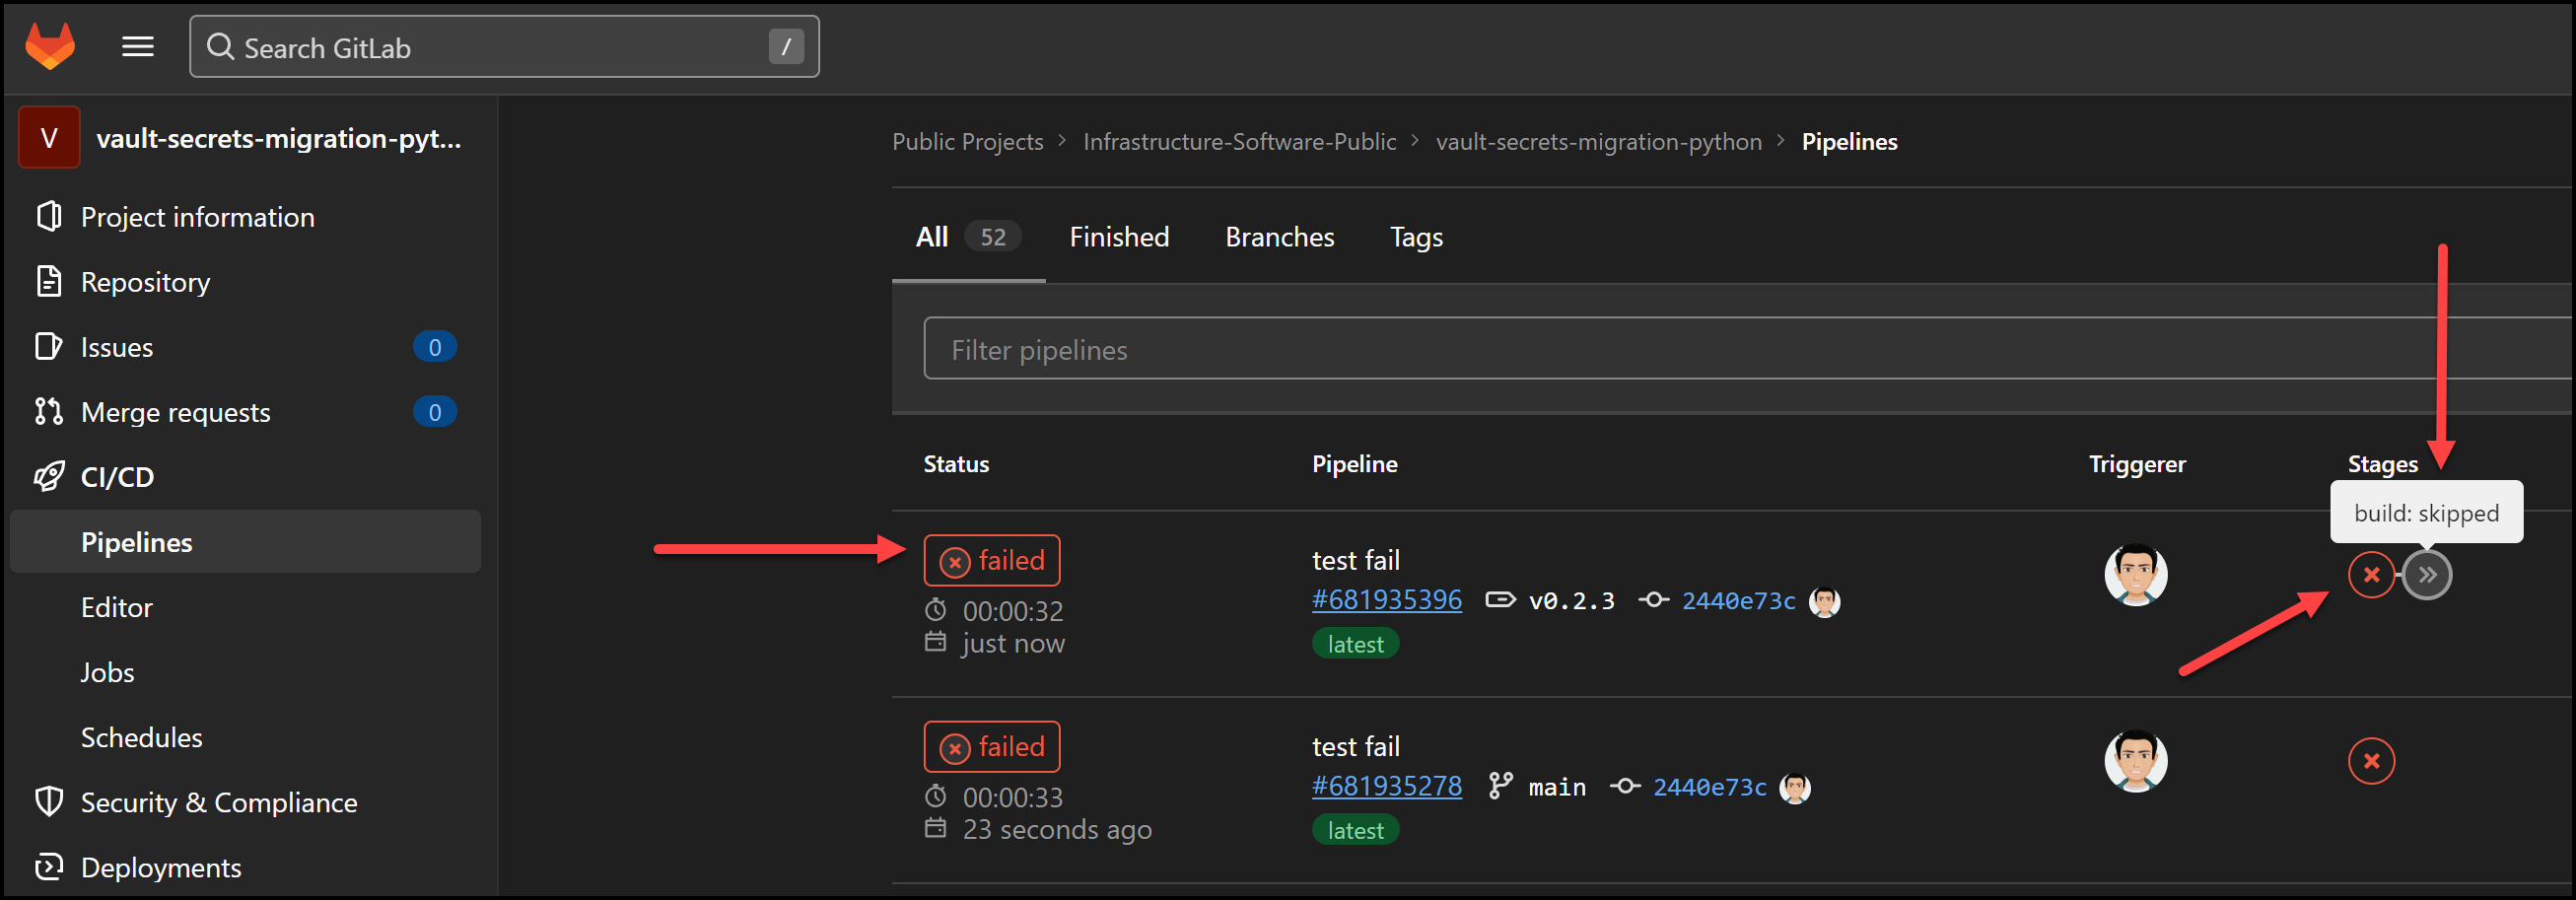
Gitlab Pipeline Test Stage Failed
Conclusion
In this post, we learned quite a few things. Let’s recap what we did:
- Built a Python script to migrate secrets from AWS Secrets Manager to HashiCorp Vault
- Created unit tests
- Packaged our script with Docker
- Automated the testing and packaging of the script with GitLab CI/CD
- Learned some best practices along the way
If you’d like to learn more about HashiCorp Vault, I have a beginners 101 course that gets you ready to take the associate certification exam. I also have a 201 course to get you working with Vault for apps in Kubernetes. You can find them in the references below. In case you’re also looking to become HashiCorp certified in Terraform and looking to write the Terraform associate certification exam, take a look at this Terraform 101 – Certified Terraform Associate course.
References
- Code for this post
- Vault 101 – Certified Vault Associate Course
- Vault 201 – Vault for Apps in Kubernetes
- Python SDK documentation for AWS Secrets Manager
- Vault Python Library Documentation
Suggested Reading
- HashiCorp Vault PKI Secrets Engine Demo for Certificate Management
- Terraform Import Example – AWS EC2 Instance
- Webblog App Part 3 – Consul Connect Service Mesh
- HashiCorp Vault API Tutorial and Pro Tips
- AWS Lambda – Terraform Example with API Gateway
- HashiCorp Vault Backup and Restore Raft Snapshots from Kubernetes to AWS S3
Code
Hi and Welcome!
Join the Newsletter and get FREE access to all my Source Code along with a couple of gifts.