

Introduction
Are you a DevOps enthusiast looking to create an on-premises Consul and HashiCorp Nomad cluster running in vSphere using the latest cloud-native technologies like Packer, Terraform, Ansible, and GitLab? Look no further! In this blog post, we will guide you through the step-by-step process of building an on-premises nomad cluster with Packer, Terraform, Ansible, and GitLab in vSphere. From running Packer and GitLab to configuring Terraform, deploying VMs, and running Ansible, we’ll cover everything you need to know to successfully build and manage your own nomad cluster. So, let’s get started!
Video
Below is a video explanation and demo.
Video Chapters
You can skip to the relevant chapters below:
- 00:00 – Introduction
- 00:35 – HashiTalks Starts
- 01:38 – Workflow
- 03:23 – Demo High-level Steps
- 06:01 – Demo Starts with Packer
- 08:16 – Terraform Demo Starts
- 10:10 – GitLab
- 17:27 – Ansible
- 19:10 – Consul and Nomad
- 21:06 – Terraform Config Explanation
- 22:46 – Nomad Job is Up
- 23:40 – Increasing the number of nodes and upgrading Consul and Nomad
- 25:00 – Ansible Config Explanation
- 28:40 – Packer Video for Ubuntu22.04
- 30:11 – Destroy the Environment
- 30:35 – Wrap-Up
Introduction to Our Tools
HashiCorp Nomad
HashiCorp Nomad is an open-source container orchestrator that enables the deployment and management of applications across a distributed infrastructure. It offers a flexible and scalable solution for deploying containerized and non-containerized workloads on any infrastructure, including public, private, and hybrid cloud environments. Nomad provides a simple, yet powerful interface for managing job lifecycles, resource allocation, and scheduling. With Nomad, users can deploy and manage microservices, batch jobs, and legacy applications with ease.
Nomad is designed to be lightweight and easy to use, while still providing enterprise-level features such as multi-tenancy, security, and high availability. It supports various operating systems and platforms, including Linux, macOS, Windows, and ARM-based systems. Nomad integrates seamlessly with other HashiCorp tools, including Terraform, Consul, and Vault, providing a complete solution for infrastructure automation and management. Its architecture is based on a distributed system of servers and clients, which allows for high availability, fault tolerance, and scalability. Overall, Nomad is a versatile container orchestrator that provides a simple yet powerful solution for managing applications at scale.
HashiCorp Consul
HashiCorp Consul is an open-source service mesh platform that provides a centralized control plane for managing microservices across distributed environments. It enables users to discover, connect, and secure services across any infrastructure, including on-premises data centers, public and private clouds, and hybrid environments. Consul’s key features include service discovery, service mesh, and security.
Consul’s service discovery capabilities allow users to automatically discover and register services, making it easier to locate and connect to services in a dynamic environment. The service mesh feature provides a flexible and scalable solution for managing service-to-service communication, enabling users to implement advanced traffic management strategies such as load balancing, circuit breaking, and fault tolerance. Consul’s security features include mutual TLS encryption, access control, and certificate management, ensuring that services are secure and protected.
Consul integrates with other HashiCorp tools, such as Terraform, Vault, and Nomad, to provide a comprehensive solution for infrastructure automation and management. Its architecture is based on a distributed system of agents, which communicate with each other to provide a highly available and fault-tolerant platform. Overall, Consul is a powerful service mesh platform that provides a unified solution for managing microservices across any environment.
Packer
Packer is an open-source tool for creating machine images, including virtual machines, containers, and cloud images. It provides a declarative language for defining machine image configurations, which allows users to create images that are consistent, repeatable, and portable across multiple platforms. Packer supports a wide range of platforms, including AWS, Azure, Google Cloud, Docker, and VMware.
GitLab
GitLab is a web-based Git repository manager that provides a complete DevOps platform for managing software development processes. It enables users to manage code repositories, CI/CD pipelines, issue tracking, project management, and more, all from a single platform. GitLab supports both self-hosted and cloud-based deployment options, providing flexibility and control for users.
One of the key features of GitLab is its Git-based version control system, which allows users to track changes to code over time and collaborate with other team members. GitLab also provides a complete CI/CD platform, enabling users to automate the build, test, and deployment process for their applications. This includes support for containerized deployments, auto-scaling, and monitoring. GitLab also provides an integrated issue-tracking system, project management tools, and a wiki, making it a complete DevOps platform for managing software development.
GitLab’s architecture is designed for scalability and high availability, with a distributed system of servers and a robust API that enables integration with other tools and services. GitLab also provides enterprise-level security features, including multi-factor authentication, access control, and audit logs. GitLab is a powerful DevOps platform that provides a complete solution for managing software development processes, from code management to deployment and monitoring. GitLab is the version control system and CI/CD platform for this demo.
One of the key benefits of Packer is that it enables users to automate the process of creating machine images, reducing the risk of errors and improving the consistency and reliability of infrastructure resources. Packer uses a builder model, where it creates a machine image in a temporary environment, runs provisioning scripts to configure the image, and then captures the image to use as a template for future deployments. This makes it easy to create new machine images from a known baseline configuration.
Packer also integrates with other infrastructure automation tools, such as Ansible, Terraform, and Docker, to provide a comprehensive solution for infrastructure management. Packer is a powerful tool for creating machine images that are consistent, repeatable, and portable across multiple platforms, enabling users to automate the process of creating infrastructure resources with ease.
Terraform
Terraform is an open-source infrastructure as code (IaC) tool that enables users to define, provision, and manage infrastructure across multiple cloud providers and on-premises data centers. It provides a declarative language for defining infrastructure resources, which allows users to specify the desired state of their infrastructure and Terraform will automatically create, modify, and delete resources to achieve that state. Terraform supports over 100 cloud providers, including AWS, Azure, Google Cloud, and VMware.
One of the key benefits of Terraform is that it enables users to manage infrastructure as code, which means that infrastructure resources are defined in a file, version controlled, and tested like any other software code. This makes it easier to collaborate and maintain infrastructure resources and ensures that changes to infrastructure are tracked, auditable, and reproducible. Terraform also provides a unified workflow for infrastructure management, which simplifies the process of provisioning, deploying, and updating infrastructure resources.
Terraform uses a plan-apply workflow, where users first create a plan that shows the changes that Terraform will make to the infrastructure, and then apply that plan to make the changes. Overall, Terraform is a powerful IaC tool that enables users to manage infrastructure resources across multiple cloud providers and on-premises data centers with a unified workflow and a declarative language.
Ansible
Ansible is an open-source automation tool that enables users to automate IT tasks such as configuration management, application deployment, and orchestration. It provides a simple, agentless architecture that makes it easy to deploy and manage automation tasks across multiple systems and environments. Ansible’s key features include declarative language, idempotency, and extensibility.
Ansible uses a declarative language called YAML to define the desired state of infrastructure resources. This makes it easy to define and maintain automation tasks and ensures that changes are consistent and reproducible. Ansible is also idempotent, which means that it can run repeatedly without changing the system state once it reaches the desired state. This reduces the risk of errors and makes it easier to maintain infrastructure resources over time.
Ansible is highly extensible, with a large library of modules that support a wide range of automation tasks. It also integrates with other automation tools and cloud providers, such as AWS, Google Cloud, and Azure, providing a comprehensive solution for infrastructure automation and management. Ansible’s architecture is based on a client-server model, where the client sends tasks to the server to execute on the target systems. It uses SSH or WinRM to communicate with target systems, which makes it easy to deploy and manage tasks across a wide range of environments. Overall, Ansible is a powerful automation tool that enables users to automate IT tasks with a simple, agentless architecture and a declarative language. When combining Ansible with Terraform, you end up with a very powerful solution to standup systems and then configure them.
Workflow
Before diving into the demo, let’s first take a look at the workflow.
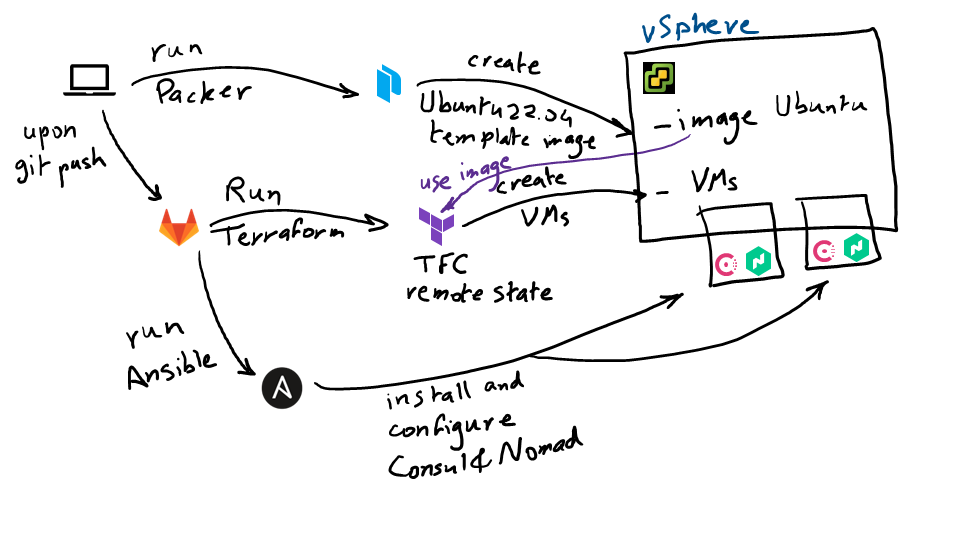
Workflow Diagram
- First, we will run Packer through our computer to create a template inside of vSphere.
- Then we will work with our GitLab repo, whereupon a git push, the GitLab CI/CD pipeline will run and trigger Terraform as the first stage of this pipeline.
- Terraform will reach out to the image created with Packer, grab it, and create a certain number of VMs inside of vSphere, which we will use to create our Nomad and Consul cluster.
- Next, GitLab will run Ansible, which will install and configure Consul and Nomad in the provisioned VMs.
- Then, we will run the countdash nomad job,
- Now assume we would like to add more Nomad and Consul servers for high availability. Also, assume we would like to upgrade the version of Nomad and Consul, so we simply update the GitLab CI file and run the pipeline.
- Finally, we will then update the GitLab CI file one last time to destroy our environment.
Running Packer: Creating a Ubuntu 22.04 Image inside of vSphere
First, we will run Packer on our computer to create a template image inside of vSphere. This template will be a Ubuntu 22.04 image that we will use to create our Nomad cluster. To do this, we need to change the directory to packer and run the packer build command
cd packer
packer build -force -on-error=ask -var-file variables.pkrvars100GBdisk.hcl -var-file vsphere.pkrvars.hcl ubuntu-22.04.pkr.hcl
This command executes a Packer build using the configuration file ubuntu-22.04.pkr.hcl. It specifies two variable files using the -var-file flag: variables.pkrvars100GBdisk.hcl and vsphere.pkrvars.hcl. These variable files are used to provide values for any variables defined in the Packer configuration file.
The command also includes the -force flag, which forces Packer to overwrite an existing image if it exists. The -on-error=ask flag tells Packer to ask for user input when an error occurs during the build process, giving the user the option to continue or stop the build.
This build process takes around 30 minutes. If you need more information, I have a blog post called Terraform to Create a Ubuntu 22.04 VM in VMware vSphere ESXi that can help you further.
Setting Up GitLab Pipelines
GitLab pipelines are used to automate the deployment process of your infrastructure. Once you have made changes to your codebase and committed them, GitLab pipelines will push your changes to GitLab. Then, you can use the VScode GitLab extension to check the latest pipeline that just got pushed.
We’ve configured a GitLab pipeline that has 2 stages:
- Stage 1 – provision: Runs Terraform to provision 6 VMs. 3 for the Nomad servers and 3 for the Nomad clients.
- Stage 2 – inst Runs Ansible to install Nomad and Consult to all 6 servers.
Upon a change in our repo, the pipeline will run automatically. You don’t need to run anything manually. You just need to setup ngrok as mentioned below.
Using Terraform: Creating VMs in vSphere
Now let’s dig deeper into our first stage which uses Terraform to create VMs inside of vSphere. To do this, we will use ngrok to create a tunnel, which will allow Terraform Cloud to access our private environment in vSphere. We will then go into Terraform Cloud, update our workspace by providing our vSphere credentials, and then commit and push our changes. Terraform will use the template image created in vSphere by Packer to create multiple VMs. Once Terraform is done, we will have a few VMs in vSphere on which we will run Ansible, install and configure both Consul and Nomad agents, and eventually create our Nomad cluster.
Since we’re using the free version of Terraform Cloud (TFC), we need a way for TFC to gain access into our vCenter environment. You can do that using TFC cloud agents, but it’s a paid feature. We will use a quick and dirty workaround using ngrok.
Make sure you have an ngrok account. Then you will need to authenticate your ngrok agent. You only have to do this once. The Authtoken is saved in the default configuration file.
Run the following CLI command from a server running in your environment:
ngrok config add-authtoken <your_ngrok_auth_token>
Now you’re ready to open a tunnel to the vCenter server.
Run ngrok using the following CLI command also on a server running in your environment.
ngrok http https://<the_FQDN_of_your_vCenter_server_or_the_IP>
Here is the output:
Session Status                online
Account                       Sam Gabrail (Plan: Free)
Update                        update available (version 3.1.1, Ctrl-U to update)
Version                       3.1.0
Region                        United States (us)
Latency                       36ms
Web Interface                 http://127.0.0.1:4040
Forwarding                    https://64b3-2001-1970-5641-ec00-00-7b04.ngrok.io -> https://the_FQDN_of_your_vCenter_server_or_the_IP:443

Connections                   ttl     opn     rt1     rt5     p50     p90
                              53      0       0.01    0.07    90.34   91.54
Now you can use the 64b3-2001-1970-5641-ec00-00-7b04.ngrok.io hostname as your vsphere_vcenter variable in Terraform.
Terraform Config
# =================== #
# Deploying VMware VM #
# =================== #
terraform {
  required_providers {
    vsphere = {
      source  = "hashicorp/vsphere"
      version = "2.0.2"
    }
  }
  backend "remote" {
    organization = "HashiCorp-Sam"
    token        = TFC_TOKEN

    workspaces {
      name = "vmware-nomad-infra"
    }
  }
}

# Connect to VMware vSphere vCenter
provider "vsphere" {
  vim_keep_alive = 30
  user           = var.vsphere_user
  password       = var.vsphere_password
  vsphere_server = var.vsphere_vcenter

  # If you have a self-signed cert
  allow_unverified_ssl = var.vsphere-unverified-ssl
}

# Master VM
module "vsphere_vm_master" {
  for_each               = var.master_nodes
  source                 = "app.terraform.io/HashiCorp-Sam/vsphere_vm-public/vsphere"
  version                = "0.2.3"
  vsphere_user           = var.vsphere_user
  vsphere_password       = var.vsphere_password
  vsphere_vcenter        = var.vsphere_vcenter
  ssh_username           = var.ssh_username
  ssh_password           = var.ssh_password
  name                   = each.key
  cpu                    = var.master_cpu
  cores-per-socket       = var.master_cores-per-socket
  ram                    = var.master_ram
  disksize               = var.master_disksize
  vm-template-name       = var.vm-template-name
  vm-guest-id            = var.vm-guest-id
  vsphere-unverified-ssl = var.vsphere-unverified-ssl
  vsphere-datacenter     = var.vsphere-datacenter
  vsphere-cluster        = var.vsphere-cluster
  vm-datastore           = var.vm-datastore
  vm-network             = var.vm-network
  vm-domain              = var.vm-domain
  dns_server_list        = var.dns_server_list
  ipv4_address           = each.value
  ipv4_gateway           = var.ipv4_gateway
  ipv4_netmask           = var.ipv4_netmask
}

# Worker VM
module "vsphere_vm_worker" {
  for_each               = var.worker_nodes
  source                 = "app.terraform.io/HashiCorp-Sam/vsphere_vm-public/vsphere"
  version                = "0.2.3"
  vsphere_user           = var.vsphere_user
  vsphere_password       = var.vsphere_password
  vsphere_vcenter        = var.vsphere_vcenter
  ssh_username           = var.ssh_username
  ssh_password           = var.ssh_password
  name                   = each.key
  cpu                    = var.worker_cpu
  cores-per-socket       = var.worker_cores-per-socket
  ram                    = var.worker_ram
  disksize               = var.worker_disksize
  vm-template-name       = var.vm-template-name
  vm-guest-id            = var.vm-guest-id
  vsphere-unverified-ssl = var.vsphere-unverified-ssl
  vsphere-datacenter     = var.vsphere-datacenter
  vsphere-cluster        = var.vsphere-cluster
  vm-datastore           = var.vm-datastore
  vm-network             = var.vm-network
  vm-domain              = var.vm-domain
  dns_server_list        = var.dns_server_list
  ipv4_address           = each.value
  ipv4_gateway           = var.ipv4_gateway
  ipv4_netmask           = var.ipv4_netmask
}
A main.tf file showed above is used with the vSphere provider, which is used to create vSphere VMs. The backend is remote using a TFC token, and a workspace is in Terraform Cloud.
In the vars.auto.tf vars file the server and client definitions can be defined, you can access the entire code here.
Using Ansible: Configure the VMs
In our second stage of the pipeline, we use Ansible, so let’s spend some time here. For Ansible, you need an inventory file that is automatically populated after running the GitLab CI pipeline. The playbook runs two roles: one for Consul and the other for Nomad. Within the roles, we can see defaults, variables, handlers and tasks. The roles come with several preset variables you can modify to meet your specific needs. The package installation process includes unzipping and downloading the tarball, creating the Consul directory, and unpacking the tarball. The service is then installed in systemd, and the necessary Consul data and configuration directories are created. Consul servers are configured and run using the Consul configuration file and input templates. The same applies to the Consul clients, with slight modifications.
There is also a Nomad role in Ansible. The installation process involves installing the Nomad dependencies, downloading the tarball, and creating directories. A Nomad configuration file and input templates are used to configure the server and the client. Finally, you need to install the Nomad service, running both the Nomad and Consul services at the same time.
Below is the playbook.yml file. Refer to the code repo for the rest of the code.
---
- hosts: all
  # vars_files:
  #   - secrets.yml
  become: yes
  gather_facts: true
  roles:
    - { role: ansible-role-consul, tags: [ 'consul' ] }
    - { role: ansible-role-nomad, tags: [ 'nomad' ] }
This is the command used by the GitLab pipeline to launch Ansible.
cd Ansible
ansible-playbook -i inventory playbook.yml
Once all is complete, you can take a look at the screenshots below for the Nomad and Consul Dashboards along with our countdash application.

Consul Dashboard
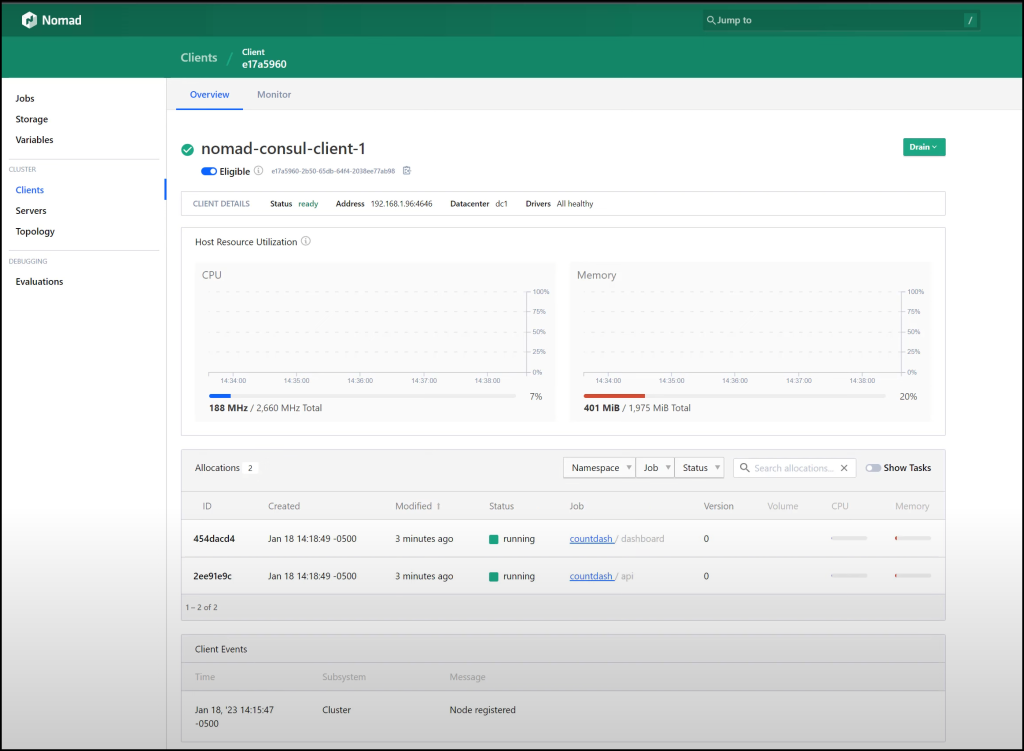
Nomad Dashboard

Count Dash Application
Updating and Upgrading Consul and Nomad Versions with Terraform and Ansible
Checking Nomad Job health
Before we start updating and upgrading, let’s first check the Nomad job health. We can do this by looking at the dashboard task. The dashboard task is running on a client with a specific IP address and port number, which we can access through a web browser.
Updating GitLab CI file
The next step is to update the GitLab CI file. We want to move to three servers and three clients and upgrade the version of Consul and Nomad. We can do this by commenting out the previous code and uncommenting the new code. Once we have done this, we can commit and sync the changes, which will trigger the pipeline again. Terraform will then add two more servers and two more clients, while Ansible will configure them, adding them to the Consul cluster and the Nomad cluster.
Cleaning Up
Once everything has been successfully upgraded, we can go back and destroy everything simply by commenting out the code and pushing it to GitLab. This will tell Terraform to destroy all the VMs.
Demo Steps
Below are the demo steps used in the video in a succinct manner.
- Run Packer to create our Ubuntu 22.04 template image in vSphere and check vSphere to see it there.
- Run
ngrokto give access to TFC to provision our local vSphere environment. - In the
.gitlab-ci.ymlfile, start with the following variables:
  SERVER_NAMES: "nomad-consul-server-1"
  CLIENT_NAMES: "nomad-consul-client-1"
  SERVER_IPS: "192.168.1.93"
  CLIENT_IPS: "192.168.1.96"
  # SERVER_NAMES: "nomad-consul-server-1 nomad-consul-server-2 nomad-consul-server-3"
  # CLIENT_NAMES: "nomad-consul-client-1 nomad-consul-client-2 nomad-consul-client-3"
  # SERVER_IPS: "192.168.1.93 192.168.1.94 192.168.1.95"
  # CLIENT_IPS: "192.168.1.96 192.168.1.97 192.168.1.99"
  CONSUL_VERSION: "1.14.1"
  NOMAD_VERSION: "1.4.1"
  CNI_VERSION: "1.1.1"
This will use Terraform to provision 2VMs. Then Ansible will configure 1 Nomad/Consul server and 1 Nomad/Consul client with the shown Consul and Nomad versions.
- Check vSphere to see that we have 2 VMs.
- Check Consul and Nomad by going to http://192.168.1.93:8500 and http://192.168.1.93:4646, respectively
- Run the Countdash Nomad job in Nomad and check that it comes up.
- Check which Nomad client the Dashboard task is running on and go to http://<nomad_client_ip>:9002
- Update the
.gitlab-ci.ymlfile, with the following variables:
  # SERVER_NAMES: "nomad-consul-server-1"
  # CLIENT_NAMES: "nomad-consul-client-1"
  # SERVER_IPS: "192.168.1.93"
  # CLIENT_IPS: "192.168.1.96"
  SERVER_NAMES: "nomad-consul-server-1 nomad-consul-server-2 nomad-consul-server-3"
  CLIENT_NAMES: "nomad-consul-client-1 nomad-consul-client-2 nomad-consul-client-3"
  SERVER_IPS: "192.168.1.93 192.168.1.94 192.168.1.95"
  CLIENT_IPS: "192.168.1.96 192.168.1.97 192.168.1.99"
  CONSUL_VERSION: "1.14.3"
  NOMAD_VERSION: "1.4.3"
  CNI_VERSION: "1.1.1"
This will use Terraform to provision 4 additional VMs. Then Ansible will configure 2 more Nomad/Consul servers and 2 more Nomad/Consul clients with the new upgraded Consul and Nomad versions shown.
- Check vSphere, Nomad, and Consul to see the increased number of VMs and the updated Nomad and Consul versions.
- Take a look at the count dashboard to see that it continues to run and count up as we scaled the number of nodes.
- Destroy the environment by using the following variables in the
.gitlab-ci.ymlfile:
  SERVER_NAMES: ""
  CLIENT_NAMES: ""
  SERVER_IPS: ""
  CLIENT_IPS: ""
  # SERVER_NAMES: "nomad-consul-server-1"
  # CLIENT_NAMES: "nomad-consul-client-1"
  # SERVER_IPS: "192.168.1.93"
  # CLIENT_IPS: "192.168.1.96"
  # SERVER_NAMES: "nomad-consul-server-1 nomad-consul-server-2 nomad-consul-server-3"
  # CLIENT_NAMES: "nomad-consul-client-1 nomad-consul-client-2 nomad-consul-client-3"
  # SERVER_IPS: "192.168.1.93 192.168.1.94 192.168.1.95"
  # CLIENT_IPS: "192.168.1.96 192.168.1.97 192.168.1.99"
  CONSUL_VERSION: "1.14.3"
  NOMAD_VERSION: "1.4.3"
  CNI_VERSION: "1.1.1"
Conclusion
In conclusion, using GitLab pipelines, Packer, Terraform, and Ansible provide us with a reliable and automated way of provisioning and installing servers. With this infrastructure in place, you can quickly create, deploy and manage your infrastructure, saving time and increasing efficiency.
Moreover, updating and upgrading Consul and Nomad with GitLab, Terraform, and Ansible is relatively straightforward. Update the GitLab CI file, use Ansible to configure your servers and clients, and you’re done!
Suggested Reading
- Webblog App Part 4 – HashiStack – Nomad Consul Vault Terraform
- Jenkins, Vault, Terraform, Ansible, and Consul Delivering an End-to-End CI/CD Pipeline
- 36 Top DevOps Questions to Get You Started in 2023
- Terraform for Beginners – Infrastructure as Code Intro
- Build a Kubernetes k3s Cluster in vSphere with Terraform and Packer
- HashiCorp Packer to Build a Ubuntu 20.04 Image Template in VMware
- Webblog App Part 3 – Consul Connect Service Mesh
- HashiCorp Packer for VMware Ubuntu Templates and Terraform for building VMs
Full Video Transcription
The cloud gets a lot of love, but what about on-premises environments? In this video, I’m going to teach you how to build a Consul and Nomad cluster running in vSphere with cloud-native technologies such as Packer, Terraform, Ansible, and GitLab. This is a talk that I delivered at HashiConf 2023. I hope you enjoy it, and if you like it, please remember to subscribe to my channel and like this video. Enjoy. Hi, welcome to this talk on Packer and Terraform and how to use them to build a Nomad cluster in vSphere. A number of technologies that we’re going to use in this talk, we’re going to of course use Packer and Terraform, but also GitLab, we’re going to use Ansible, Consul, and Nomad all to run on vSphere. And the reason why I chose vSphere is that there’s a lot of attention to AWS, Azure, you know, GCP, and the general public cloud, but I wanted to focus a little bit on the private cloud on-prem with vSphere. Hi, my name is Sam Gabriel, and I am the president of Techin8 Solutions, Inc., and we’re focused on building content in the DevOps space. Previously, I was a senior solutions engineer with HashiCorp, and you can follow me on Twitter, LinkedIn, YouTube, and my website is up there as well. So what we’re going to first take a look at is the workflow, and then we’re going to jump right into the demo. I only have one slide for the workflow, and then some steps as to how the demo is going to go. We’ll jump right in. We have a packed half hour, so we’ll make sure we go as fast as we can here. Okay, so the workflow here, we’re first going to run Packer through our computer. So that will basically create a template inside of vSphere. And this is a Ubuntu 22.04 image that will get created inside of vSphere. Then we’re going to work with our GitLab repo and upon a git push, the GitLab CICD pipeline is going to run and it’s going to run Terraform as the first stage of this pipeline. Now I am using Terraform Cloud to store the remote state. I’m using the free account and what will happen is Terraform is going to reach out to that image we just created with Packer, grab that image, and we’ll go ahead and create a number of VMs inside of vSphere and those VMs are what we’re going to use to create our Nomad cluster. Now after that, GitLab is going to go ahead and move on to the second stage and which is to run Ansible. Ansible is going to install and configure Consul and Nomad in those VMs that we just provisioned with Terraform. Now for our demo, we have a number of high-level steps. I want to walk you through those so you don’t get lost as to where we’re going. The first step of course is to run Packer from our desktop which will create the Ubuntu 22.04 template image in vSphere. Then we’re going to use a technology called ngrok. What this does is it allows Terraform Cloud to reach out into our private environment inside of vSphere and be able to provision inside of vSphere. Now if you are running with Terraform Enterprise, there are cloud agents that you can run inside your environment that will kind of do the same thing. Since we’re using the free tier, that’s why I’m going to be using ngrok for that. Number three here, we’re going to update the GitLab CI file, and that’s the pipeline file, and say that we want one server and one client that we’re going to use. We’re going to use an older version of Nomad and Consul, and we’ll see how we’re going to update that later. And step four, we’re going to push the change into Git, and that will trigger the pipeline, the first stage where Terraform is going to run and create the two VMs in vSphere. After that’s done, GitLab will start the second stage of the pipeline, which will run Ansible, and Ansible is going to go ahead and install and configure both Nomad and Consul agents into the two VMs that we just provisioned. Then we’re going to run a Nomad job called countdash. It’s a famous job that we’ve run for a number of tutorials. Then we’re going to update the GitLab CI file to add two additional servers and two additional clients. Plus, we’re going to update both the Nomad and Consul versions and see how that gets all taken care of with both Terraform and Ansible. Of course, we want to add two more servers because we want to have more high availability when it comes to running raft clusters with Consul and Nomad. Number nine here, we’re going to check the new versions that we just installed of Nomad and Consul and check that the countdash app is still running through the upgrade process. Finally, we’re going to update the GitLab CI file one last time to go ahead and destroy our environment. So why don’t we go ahead and start with Packer right now? Okay, so we are going to go into our Visual Studio code here. And really quickly before we run Packer, we have a number of folders, we’ve got an Ansible, a Nomad, a Packer and a Terraform folder. And we’ve got our GitLab CI file here. This is the pipeline, a very important file we’ll see a few times in this demo. So first things first, let’s go ahead and look at our readme file and take a look at it in Markdown right here. So the first thing we want to do is go into Packer. So let’s change the directory to Packer. Let’s actually see where we are. Okay, see Packer. All right. And let’s run this command, which will run or create our Packer template. And actually, before we run this, let me show you my vSphere environment. So let me bring this over here. So you can see that we currently don’t have a template for Ubuntu 22.04. And let’s make this a bit bigger. So as you can see here, I’ve got 16.04, 18.04, 20.04. But we’re going to create a new image here in just a second with Packer. All right, so let’s go ahead and run this command. Hit Run. Now, this takes about half an hour. So what we’re going to do, obviously, is going to pause this video and we’ll come back when it is complete. Okay, looks like we are done. And as you can see here, we’ve completed it in 32 minutes and 57 seconds, almost 33 minutes here. And if you want to take a look at vSphere, as you can see here, we now have this template, Ubuntu 22.04. And that is what we’re going to use for the VMs for both Consul and Nomad, both the servers and the clients. Okay, so the next step now is to run Terraform. So let’s go back here. And what we need to do is really run ngrok. And if you don’t know what ngrok is, google it, or ngrok.com, and you can create an account. And when you create an account, we’re going to run this command here, ngrok-http, and then the fully qualified domain name of your vCenter server. So in this case, what I’m going to do is I’m going to run ngrok-http, https, and vCenter.home. And that is going to create a tunnel for me. And what I’m going to do is grab the hostname here. And that hostname I need to feed into Terraform Cloud’s, one of the variables for Terraform Cloud. So if I go into Terraform Cloud, I have a workspace here. I’ll quickly show you what it looks like. VMware Nomad Infra is right here. And I have a number of variables. And the variable here that I want to update is vSphere vCenter. So that’s the fully qualified domain name or IP address. So I’m going to put the actual host name here that I have for ngrok. And once again, what this is going to do, it’s going to allow Terraform Cloud to come into my vSphere environment and provision. Okay, so I’ve got a vSphere user, the SSH password and username for the machines, vSphere vCenter, a fully qualified domain name or IP, as I mentioned, and a vSphere password as well. So really, these are the variables that I have for Terraform. And if I go back into Visual Studio Code, we can go into our another tab here. And actually, we don’t need that all we need to do is go into GitLab CI. And GitLab CI is just the pipeline that GitLab uses. And in this case, we have a number of variables that we want to update. And that really will get everything going for us. And I’ll explain that in just a little bit. But for now, we want to create two VMs. So let me uncomment this. And I’m going to comment this. So the server names are Nomad Consul server one client name for the IP or for the VM is Nomad Consul client one. And here are the IP addresses for those two servers. So remember, we’re going to start off with only two servers, sorry, one server, one client, and then we’re going to move to this which is three servers and three clients and their IP addresses. Also, Consul, I’m going to go with a lower version here and another older version of Nomad as well. We’ll see how we’re going to upgrade to the dot three versions in just a second. So save that. That is good to go. And now upon a commit and a push, we’re going to see our pipeline start to run. So let’s go ahead and say, start with two VMs. Okay. And we’re going to commit that. And we’re going to sync our changes, this is going to push our repo here is going to push what we just committed up to GitLab. And when that gets pushed, we can go and use the GitLab extension here and check to see the latest pipeline that just got pushed. And you can see here that this is the pipeline, it’s running. And there are two stages, the provisioning stage and the installation stage. The provisioning stage is right here where you can see Terraform provision servers, this is the first stage, and there’s a script that we’ll go and take a look at in just a bit. And then the second stage is the installation stage. That is where Ansible is going to kick in and go ahead and install Consul and Nomad for us. Now, there’s something called a GitLab runner, if you’re not familiar with that, this is a way for GitLab to provision or run pipelines. And I am running this GitLab runner inside of a Kubernetes environment that I have running in vSphere. So it’s outside the scope of this talk, but just know that the actual pipeline is running locally in vSphere. But of course, similar to what Terraform Cloud has in terms of agents, GitLab runners also can communicate with GitLab.com, the SaaS offering from GitLab, and that’s how it’s provisioning these resources. Okay, so let’s take a look at the first stage here. And this is the actual Terraform run. As you can see, we have two to plan, zero to change, and zero to destroy. So this is going to take a little bit of time to create our first two VMs for us. So while this runs, let’s go ahead and take a look at this pipeline in a little bit more detail. So these are variables, okay, so these variables we’re going to use within the pipeline. As you can see, the server names, client names, server IPs, client IPs, and so on. The Consul version, Nomad version, and CNI version for Nomad. Okay, we talked about two stages, provision and installation. In the first stage here, we store the current user in the user variable, we’re going to use that or reuse that user in the next stage. This is for us to this build.env is a way to pass variables between stages in GitLab. We’re creating a terraform.d directory here, and this is going to be used by terraform. We’re going to get the token as you can see the TFC token, this is where we’re going to store it in the terraform.d directory. So we’re doing that right here. And the TFC token, we that stored inside GitLab’s variables. So we’re grabbing that and we’re storing it in this folder, where GitLab is running in the GitLab runner. Okay, then we’re changing the directory into terraform. So as you saw before, we have multiple directories. So we’re going inside terraform here. And we’re going to run the script, and create autovars shell script or bash script. What this does is going to grab the variables that we have at the top here, server names, client names, server IPs, client IPs. So whether we have one or we have three, or however many servers and clients we want to define, we pass those as variables into the script. What this script does, is it iterates over those numbers of servers and clients and adds the name of the server and its IP into a file called IPs.auto.tfvars, which is a terraform variables file that that terraform is going to use. And we’re going to iterate over those different servers or VMs to create them inside of terraform. So really that’s all this shell script is doing. And then we’re going to terraform init with the backend config using the token tfc token that we talked about earlier. And then we’re going to run a number of terraform commands, terraform format, validate, and then terraform apply auto approve. Typically the peer review process happens at the GitLab merge request. And once that is merged, the pipeline goes ahead and automatically applies terraform. So once terraform is complete, the build.env file gets passed to the next stage. And as I mentioned before, that is just storing the user so I don’t have to rerun it again. Okay, so let’s see how far we’ve gone before we talk about the second stage. So let’s go back to our GitLab flow. And it seems like we’ve completed the provisioning of the VM. So you can see the job has succeeded to have been added. And I can double-check my vSphere Consul here. And sure enough, we have Nomad Consul client one, and Nomad Consul server one. So that looks great. And we are now in the second stage, where it hasn’t started yet, where Ansible is going to kick in. So let’s review the second stage here. So we’ve got, we’re making a directory where we’re storing the SSH keys, the ID RSA, private key, which we grabbed from the GitLab variables. And that is needed for Ansible to SSH into the different machines that we created in vSphere. So we’re passing that over, changing the permissions to tighten it up with 400. And then we’re changing the directory into Ansible. So inside the Ansible folder, as we saw before, in the Ansible folder, we have a bunch of roles, and the playbook, the inventory file, if we have time, we’ll cover all that. And basically, what we’re going to do is run this script, and update inventory.sh. And this script is similar to the other script that we saw. But this time for Ansible. So we’re updating the inventory file in Ansible. If you’re not familiar with Ansible, it needs an inventory file of the IP addresses of the different servers that you are going to configure. So we’re creating this inventory file or appending this inventory file with the different server names and IPs and also client names and IPs so that Ansible can configure that. So once again, it’s similar to the other script that we just saw that Terraform was using. Then we just quickly cat inventory to see what it looks like after this script has run. And finally, we’re running the Ansible playbook using the inventory file we just created and we’re passing a few variables in here. So the first variable is the Consul version, then the Nomad version, and then the CNI version. Okay, so that all gets passed over to the playbook. Let’s see how far we’ve gotten. Oh, looks like we have successfully finished this script. And as you can see, we have 30 changes and 29 changes. So everything looks great here. Now we just want to go ahead and verify that. So the way to verify that is, I know the two IPs here is the dot 96. And the second one is the dot 93. So if I open one into the 160, actually, it’s right here for me. 8500 is for Consul and then 4646 is for Nomad. So just give it a couple of seconds for the UI to show up. So this is Nomad, this is Consul. So right away in Consul, we see that Nomad has registered itself in Consul. So the Nomad client, Nomad. So these are the services that we’ve got. We’ve got the nodes here and we have one client node and one server node. As you can see, the Nomad Consul client, Nomad Consul server, and of course, there’s one leader. If you go to the overview, it’s going to give you a warning that you only have, you can’t really, there’s no HA. If this goes down, then Consul’s down, right? Over to Nomad now, we can see the servers right here. We’ve got one server and we’ve got one client right here and we don’t have any jobs yet. Why don’t we go ahead and run a job? Let’s grab a job that I have for us, the count dash job that I mentioned. That is over here. Let’s grab that and put it right here. We’re going to just plan that. We’re going to run it and just give it a minute or so for this to run. While that runs, just make sure that we’ve covered what we can cover in this short amount of time. We’ve covered everything here in the GitLab pipeline. The playbook, we’ll see if we have time to look through it. The Terraform piece, it’s straightforward. We got a main.tf file and that main.tf file is using the vSphere provider. It’s using the backend remote with the TFC token. And here is my workspace that I just showed you in Terraform Cloud. And it’s using the credentials for vSphere right here in the provider vSphere. And then it’s actually using two modules, the vSphere VM master here and vSphere VM worker. So all this is doing is it’s using for each and it’s going through the different server nodes and the different client nodes to call on this module that is also stored in Terraform Cloud. And this module basically goes ahead and creates the VMs for us. So we pass in a bunch of variables to these modules and it creates the VM for us. Now we come back, we don’t have outputs, we have a bunch of variables here that we can go through and also the vars.auto.tf vars file. This is where we define how big the instances are going to be. So the master CPU is one, the master RAM, the worker RAM and so on. So these are the server and client definitions. This is where we are defining the packer template that we just created with Ubuntu, the Ubuntu template 2204 and a bunch of IPs that we need here and also the vSphere specific parameters here, the data center, the cluster and so on. Okay, so let’s go back and see if our Nomad job is healthy. It is healthy. So we have a bunch of So let’s go back and see if our Nomad job is healthy. It is healthy. It is running. Looks great. I’m interested in the dashboard task. So going in here, I see it’s running on this client. That’s the only client I have. So we can go to the IP address of this and open a new tab. And this runs over 9002. And this is a simple counter that we can take a look at here. So it’s just counting up. So that’s great. Now what we want to do is continue with our demo. And in this case, let me just make sure that we’re following what we want to talk about. So the next step is to update our GitLab CI file. And we are going to now move to three servers and three clients, and update our Consul and Nomad versions. So we’re simulating, let’s say there’s growth, and we need to increase the number of servers, numbers of clients. And also while we’re at it, we want to upgrade the version of Consul, to the version of Nomad. So to do that, let’s go back to our CI pipeline. And I’m going to comment this out. And instead, you’ll uncomment this. And this will be the dot three, this will be the dot three, save that, go back to here where we’re going to say upgrade to three servers, and three clients. Let’s commit. And let’s sync the changes. And that will also trigger the pipeline again. So if we refresh that, we now see that the pipeline is going to run again, Terraform is going to add two more servers to more clients, and Ansible is going to go ahead and configure them. And they will get added to the Consul cluster and the Nomad cluster. All that will be done for us. Also, the upgrade will happen for us as well. So let’s leave that running for a bit and go back and continue our walkthrough here. So we kind of covered Terraform, and how that works. Let’s see if we can cover Ansible. So with Ansible, we have a number of roles. But before we get into the roles, you need an inventory file. This is the inventory file that gets populated automatically, as we saw when we talked about the GitLab CI pipeline. And then the playbook is really running two roles. There’s a Consul role and a Nomad role. And in the roles here, let’s take a look at the Consul role. We’ve got some defaults. These are some of the variables that we need to download and install. Consul, these are some handlers. So we can reload systemd, and reload the Consul service. The task really is the main file where all the different tasks are defined. So here, we’re going to see installing dependencies. So we’re unzipping or installing unzip basically because we’re going to use that. Downloading a tarball. So we’re downloading the Consul version, creating a Consul directory, uncompressing the tarball if it exists, unpacking the tarball here and installing Consul at the proper path, creating a Consul group, creating a Consul user, setting a cap net bind service, installing the service and systemd, adding a service user, creating the Consul data directory, creating a Consul configuration directory. Then there are two debugging tasks that I put in place here to find the IP address of the current Ansible running the current IPv4 address of whichever server or client, whichever node we’re running through, and also count the number of hosts in a group. So we can safely actually comment out or take out, but it’s good to see them in the output. Then configure the Consul servers, here’s where we go ahead and configure those servers and add the Consul server Jinja template where we’re going to put the configuration of Consul for the servers, and this one is for the clients. And we also have some variables that get injected into the template. All right, and the templates I was talking about are here. So this is the Consul configuration file, and I’m putting in the bind address as a variable, and also the retry rejoins to allow the different clients and servers to join the cluster. So that’s the client, and this is the server. Also, bootstrap expects, depending on how many servers, we expect one or expect three or what have you. And the Ansible role is very similar to the Consul role. So we’ve got the variables defined here. We’ve got the handlers, and we’ve got the tasks. And I’m not going to go through the tasks. Very similar to Consul, just a few tweaks here to install NOMAD. And the templates are very similar to what we saw with Consul, but these are the configuration files for NOMAD. And finally, I didn’t mention this, but this is the NOMAD service that gets passed in and also the Consul service for systemd to run both NOMAD and Consul. So that takes care of Ansible briefly. Under NOMAD, I have a few jobs where I really focused on the count-NOMAD job that we just saw. And Packer, there is a quite a few things to take a look at Packer that we won’t be able to have time to cover, but I do have dedicated videos for Packer and Terraform for vSphere, and you can check my YouTube channel for those. Okay, let’s go back and take a look and see where we’re at with the current run. It seems like we are still running here. So what I’ll do, I’ll pause the video and we’ll come back and see this when it’s done. All right, looks like both jobs have succeeded. The Terraform job has succeeded and added four additional VMs and also Ansible has succeeded as well. So let’s go and check and go back to our account dashboard. Seems like it’s still running. That is a good sign. If you go into Consul, refresh that. Notice the version should be 114.3 right there. There we go. So it’s updated to 114.3. We now have three servers and Nomad is 14.1. Let’s refresh. That should go to 14.3. Let’s take a look here. And that is correct. Everything is going well. The count dash is still running. No issues. The servers are right now three. One is the leader and the other two are followers. Count dash is still counting. No problem. No effect here. We have upgraded successfully and all looks great. And last thing is to go and destroy everything and that is just simply by commenting this out and uncommenting that and then run through the same process. Push to get. This will go ahead and destroy everything for us. We are running out of time so I wanted to thank you for watching and if you need or have any questions, you know where to reach me. Happy to answer those questions for you. Enjoy the rest of HashiTalks. Thank you. Well that’s it for the talk. I hope you enjoyed it and feel free to reach out if you have any questions. Also use the comments of this video. I do read through the comments. If you have any suggestions for new videos or have any generic feedback that would be great. I will catch you in another video.
Code
Hi and Welcome!
Join the Newsletter and get FREE access to all my Source Code along with a couple of gifts.