

Introduction
Learn how to use HashiCorp Packer to automate the creation of Ubuntu 22.04 Image Templates in VMware vSphere.
Video
Below is a video explanation and demo.
Video Chapters
You can skip to the relevant chapters below:
- 00:00 – Introduction
- 00:32 – Demo Starts
- 01:46 – Main Packer File
- 06:36 – Variable Files
- 08:21 – user-data
- 09:43 – Provisioning Scripts
- 11:41 – Packer Build Done
- 12:08 – Create VM from Template
- 13:53 – Test the VM
- 14:59 – Closing Remarks
Overview
Tools such as Packer and Terraform from HashiCorp have been widely used for Cloud environments. Private cloud teams are seeing the benefits of Infrastructure as Code (IaC) workflows used in cloud environments. As a result, these private cloud teams are also implementing IaC on-premises. In this blog post, we’ll see how to automate the creation of a Ubuntu 22.04 VMware template with Packer. In a subsequent blog post, we will see how to use Terraform to provision VMs by cloning this VMware template. Let’s now dive and see a packer vsphere example.
Pre-requisites
The following is required to follow along:
- Packer (tested on Packer version 1.8.4)
- Access to a vSphere instance (tested on vSphere v6.7)
Setup
Below is our setup diagram.
Setup Diagram
Configuration
Let’s take a look at the most important configuration pieces needed.
Folder Structure
Below is the structure of the repo folder.
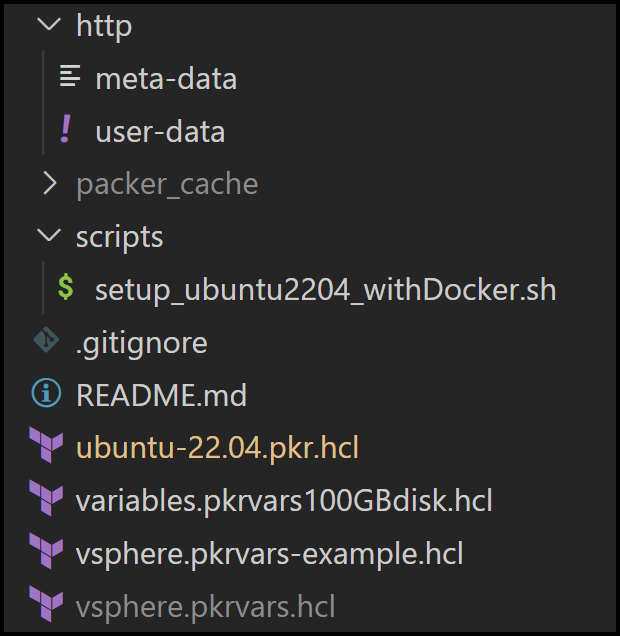
Folder Structure
Ubuntu Server Installer for 22.04 LTS
The new way to install Ubuntu is using something called subiquity server installer. The classic server debian-installer is discontinued. Therefore, we can’t rely on the preseed file that we used in the past. Instead, we will rely on CloudInit.
We did this exact thing for Ubuntu 20.04 in our blog post called HashiCorp Packer to Build a Ubuntu 20.04 Image Template in VMware.
CloudInit
CloudInit is installed in the official Ubuntu 22.04 live server image. CloudInit uses a user-data file to configure things such as the below:
– Setting a default locale
– Creating a hostname
– Generating ssh private keys
– Adding ssh keys to a user’s .ssh/authorized_keys so they can log in
– Setting up ephemeral mount points
More information is provided on the CloudInit page.
User-Data File
The user-data file is in the http folder along with an empty file called meta-data. This meta-data file is required. It’s used for cloud deployment, but since we are not deploying to the cloud we can leave it empty. Let’s take a look at what the user-data file looks like.
User-Data File Content
Below is the content of the file. Notice that we can install packages here. We’re also putting in the public key to be able to ssh into the machine later. We have the option to run both early and late commands. We’ve disabled ssh as an early-command because it interferes with Packer. Packer thinks that the process timed out and may result in an error.
#cloud-config
autoinst
    version: 1
    early-commands:
        # workaround to stop ssh for packer as it thinks it timed out
        - sudo systemctl stop ssh
    locale: en_US
    keyboard:
        layout: en
        variant: us
    packages: [open-vm-tools, openssh-server, net-tools, perl, open-iscsi, ntp, curl, vim, ifupdown, zip, unzip, gnupg2, software-properties-common, apt-transport-https, ca-certificates, lsb-release, python3-pip, jq]
    network:
        network:
            version: 2
            ethernets:
                ens192:
                    dhcp4: true
    identity:
        hostname: ubuntu-server
        username: ubuntu
        password: "$6$rounds=4096$ntlX/dlo6b$HXaLN4RcLIGaEDdQdR2VTYi9pslSeXWL131MqaakqE285Nv0kW9KRontQYivCbycZerUMcjVsuLl2V8bbdadI1"
    ssh:
        install-server: yes
        allow-pw: yes
        authorized-keys:
            - ssh-rsa AAAAB3NzaC1yc2EAAAADAQABAAABAQCb7fcDZfIG+SxuP5UsZaoHPdh9MNxtEL5xRI71hzMS5h4SsZiPGEP4shLcF9YxSncdOJpyOJ6OgumNSFWj2pCd/kqg9wQzk/E1o+FRMbWX5gX8xMzPig8mmKkW5szhnP+yYYYuGUqvTAKX4ua1mQwL6PipWKYJ1huJhgpGHrvSQ6kuywJ23hw4klcaiZKXVYtvTi8pqZHhE5Kx1237a/6GRwnbGLEp0UR2Q/KPf6yRgZIrCdD+AtOznSBsBhf5vqcfnnwEIC/DOnqcOTahBVtFhOKuPSv3bUikAD4Vw7SIRteMltUVkd/O341fx+diKOBY7a8M6pn81HEZEmGsr7rT [email protected]
    storage:
        layout:
            name: lvm
    user-data:
        disable_root: false
    late-commands:
        - echo 'ubuntu ALL=(ALL) NOPASSWD:ALL' > /target/etc/sudoers.d/ubuntu
        - curtin in-target --target=/target -- chmod 440 /etc/sudoers.d/ubuntu
User-Data Considerations
We need to generate a hashed password for the identity section in the user-data file.
We use the mkpasswd utility on Ubuntu, but first we install the whois package to get the mkpasswd utility as shown below.
apt-get install whois
mkpasswd -m sha-512 --rounds=4096
We run the command above and hit enter when the Password: prompt appears.
Example:
Password:
$6$KU2P9m78xF3n$noEN/CV.0R4qMLdDh/TloUplmJ0DLnqi6/cP7hHgfwUu.D0hMaD2sAfxDT3eHP5BQ3HdgDkKuIk8zBh0mDLzO1
Main Packer Files
The main packer file is called ubuntu-22.04.pkr.hcl.vsphere-iso is one of the Packer builders we will use. It’s pretty straightforward.
Notice the user-data and meta-data files are mounted as CDROM files below:
source "vsphere-iso" "linux-ubuntu-server" {
  ...truncated
  http_directory = var.http_directory
  boot_order = "disk,cdrom"
  boot_wait = var.vm_boot_wait
  cd_files = [
        "./${var.http_directory}/meta-data",
        "./${var.http_directory}/user-data"]
  cd_label = "cidata"
  boot_command = [
    "e<down><down><down><end>",
    " autoinstall ds=nocloud;",
    "<F10>"
  ]
  ...truncated
}
Also notice in the build section how we call on a shell provisioner to execute scripts.
build {
  sources = [
    "source.vsphere-iso.linux-ubuntu-server"]
  provisioner "shell" {
    execute_command = "echo '${var.ssh_password}' | {{.Vars}} sudo -S -E bash '{{.Path}}'"
    environment_vars = [
      "BUILD_USERNAME=${var.ssh_username}",
    ]
    scripts = var.shell_scripts
    expect_disconnect = true
  }
 }
We also feed in variables files. One is vCenter configuration-specific called vsphere.pkrvars.hcl and the other is VM specific and called variables.pkrvars100GBdisk.hcl
The vsphere.pkrvars.hcl contains sensitive information so I don’t push it into git. However, I have an example file that you can use called vsphere.pkrvars-example.hcl. Update it with your own info and save it as vsphere.pkrvars.hcl.
Provisioning Script
The file setup_ubuntu2204_withDocker.sh under the folder scripts is a script that is called during the provisioning phase. You can find the code for it here.
Build with Packer
Now that we have configured our files, it’s time to build with Packer.
Running Packer Build with HCL
packer build -force -on-error=ask -var-file variables.pkrvars100GBdisk.hcl -var-file vsphere.pkrvars.hcl ubuntu-22.04.pkr.hcl
Follow the Packer output logs to see the image successfully generated. You could also check what’s going on with the VM inside of your vSphere client.
Troubleshooting Tips
- If packer gets stuck on
Waiting for IPyou may want to check your DHCP server. I’m using a home router and it had too many leases from running packer many times. I had to flush inactive DHCP clients or reboot the router which is faster. - Open the vSphere web console and take a look at the output as the VM is getting created. This can give you some hints as to what is going on.
Conclusion
In this blog post, we demonstrated how to create a Ubuntu 22.04 image in VMware using HashiCorp Packer. As you saw, our configuration is all defined in code. There is no need to click around inside the vSphere client to generate this image. We’ve automated the task of building gold images in VMware vSphere. This makes the process repeatable and self-documented, just a couple of benefits of IaC.
The next step is to use Terraform to provision VMs by cloning this Packer generated image. This will be the topic of our next blog post.
References
- HashiCorp Packer to Build a Ubuntu 20.04 Image Template in VMware
- Boot Command for Ubuntu 22.04
-
GitLab repo for this post
Suggested Reading
- HashiCorp Packer for VMware Ubuntu Templates and Terraform for building VMs
- Build a Kubernetes k3s Cluster in vSphere with Terraform and Packer
- http://DevOps Engineer NOT on Linux?
- Terraform Import Example – AWS EC2 Instance
Code
Hi and Welcome!
Join the Newsletter and get FREE access to all my Source Code along with a couple of gifts.