
Introduction
How would you like to learn some best practices of Infrastructure as Code? This post will teach you how to use HashiCorp Packer, Terraform, and Ansible to build a Jenkins node to be used for CI/CD pipelines.
Video
Below is a video explanation and demo.
Video Chapters
You can skip to the relevant chapters below:
- 00:00 – Introduction
- 01:50 – Agenda
- 02:44 – Overall Goal
- 04:17 – Topics To Learn
- 05:26 – Set Up Jenkins Diagram
- 07:38 – Folder Structure
- 09:08 – Packer Demo
- 18:44 – Terraform Demo
- 20:56 – Retrieve Azure Creds from Vault
- 24:13 – Terraform Code Walk-through
- 31:14 – Ansible Demo
- 34:23 – Ansible Code Walk-through
- 36:39 – Dockerfile Walk-through
- 42:39 – Check Jenkins Machine
- 43:15 – Recap
Overview
Welcome to our second post in the blog post series called End-to-End Infrastructure and Application Deployment. In part 1, we discussed the HashiCorp Vault Azure Secrets Engine. That was the first step in securely automating our CI/CD pipeline. The purpose was to deliver Azure credentials dynamically for provisioning resources in Azure.
Our focus for this blog post is on the second step and that is to set up our CI/CD pipeline with Jenkins. This is done by following the steps below:
- Use Packer to build an Azure image that has Docker installed.
- Create a Docker container image that contains Jenkins, Vault, Terraform, and Ansible.
- Use HashiCorp Vault to retrieve Azure credentials to use with Terraform
- Run Terraform to build a Jenkins VM in Azure based on the Packer image.
- Use Ansible to configure the Jenkins VM by running the Docker container.
As a reminder, the goal of this series is to learn best practices around the automation of infrastructure provisioning and application deployment. We cover the concepts of Infrastructure as Code, CI/CD, secrets management, dynamic secrets, the secret zero problem, service mesh, and more.
Pre-requisites
The following is required to follow along:
- Microsoft Azure
- Terraform Cloud or Open Source
- An Installation of HashiCorp Vault
- Ansible
- Docker
- Packer
Overview of the End-to-End Infrastructure and Deployment Blog Series
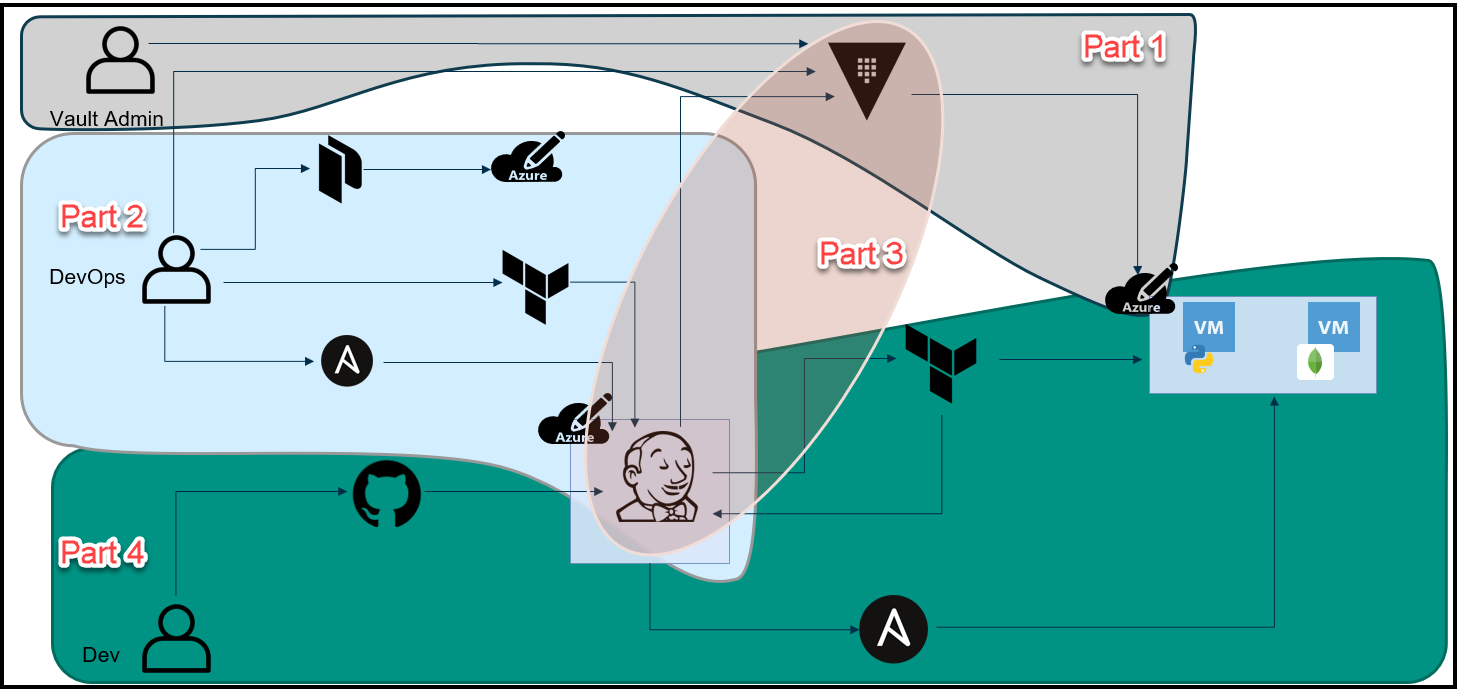
As a reminder, let’s take a look at the big picture of this blog series.
The Big Picture
Below is an overview diagram of this 4 part blog series.
Break-Up of the Blog Series
We’ve broken up this blog series into 4 parts:
Part 1: HashiCorp Vault Azure Secrets Engine
This is the first step to secure our pipeline. The purpose here is to create dynamic short-lived credentials for Azure. We will then use these credentials to provision the Jenkins VM and app VMs in Azure. The credentials are only valid for 1 day and they expire after that.
Part 2: HashiCorp Packer, Terraform, and Ansible to Set Up Jenkins
This is the topic of this blog post, we use a few tools to build a Jenkins VM that will be used as our CI/CD pipeline. Below are the high-level steps:
1. Packer to create an Azure image that has Docker installed.
2. Create a Docker container image that contains Jenkins, Vault, Terraform, and Ansible.
3. Use HashiCorp Vault to retrieve Azure credentials that have a 1 day TTL to use with Terraform
4. Run Terraform to build a VM in Azure based on the Packer image that will host our Jenkins pipeline.
5. Ansible is used as our configuration management tool that configures the Azure VM to:
– Add necessary packages
– Pull the Jenkins Docker image
– Start the Jenkins container
Part 3: The Secret Zero Problem Solved for HashiCorp Vault
Here we discuss the secret zero problem and how to solve it. This is often referred to as Vault secure introduction. The issue is that we need to provide the Vault authentication token to our Jenkins pipeline and to our application. Once we have the token, then we can access secrets in Vault. The challenge is how to deliver this Vault token securely. We address secure introduction by using Vault AppRoles, response wrapping, and the Vault-agent.
Part 4: Jenkins, Vault, Terraform, Ansible, and Consul End-to-End CI/CD Pipeline
Finally, we put everything together in this part. Now that we have the Jenkins VM running and we’ve addressed the secret zero problem, we can finally run the pipeline to build our application. Below is the workflow:
1. A developer commits and pushes code into GitHub
2. The Jenkins pipeline automatically starts due to a webhook from GitHub to Jenkins
3. Jenkins retrieves Azure credentials from Vault
4. Jenkins runs Terraform with these credentials
5. Terraform builds 3 VMs:
– A Consul server
– The Python Webblog app server
– A MongoDB server
6. Terraform completes the provisioning and passes the 3 VMs’ fully qualified domain names (FQDNs) to Ansible
7. Ansible configures these VMs to do the following:
– Download and install the Consul and Envoy binaries for the service mesh
– Pulls the MongoDB Docker image and starts the container
– Downloads the Python dependencies for the Webblog app and starts the application
Below are some tools that we use in this series along with topics to learn. You’ll find those relevant to this post in bold italics font.
Some Tools Used in this Series
- HashiCorp Packer*
- HashiCorp Terraform*
- HashiCorp Vault*
- HashiCorp Consul
- Jenkins
- Ansible*
- Microsoft Azure*
*Featured in this post
Topics to Learn in this Blog Series
-
Vault Azure Secrets Engine
-
Packer Images in Azure*
-
Terraform Building VMs in Azure based on Packer Images*
-
Ansible to Configure an Azure VM*
-
The Secret Zero Problem and Vault Secure Introduction
-
Vault App Role
-
Vault Dynamic Database Secrets for MongoDB
-
Vault Transit Secrets Engine
-
Advanced CI/CD Pipeline Workflow using:
- GitHub(VCS)
- Jenkins(CI/CD)
- Terraform(IaC)
- Ansible(Config Mgmt)
- Vault(Secrets Mgmt)
-
Consul Service Mesh
*Featured in this post
Setting Up Jenkins Overview
Now let’s focus on part 2 of this series and discuss how to set up Jenkins in an automated fashion.
Setting Up Jenkins
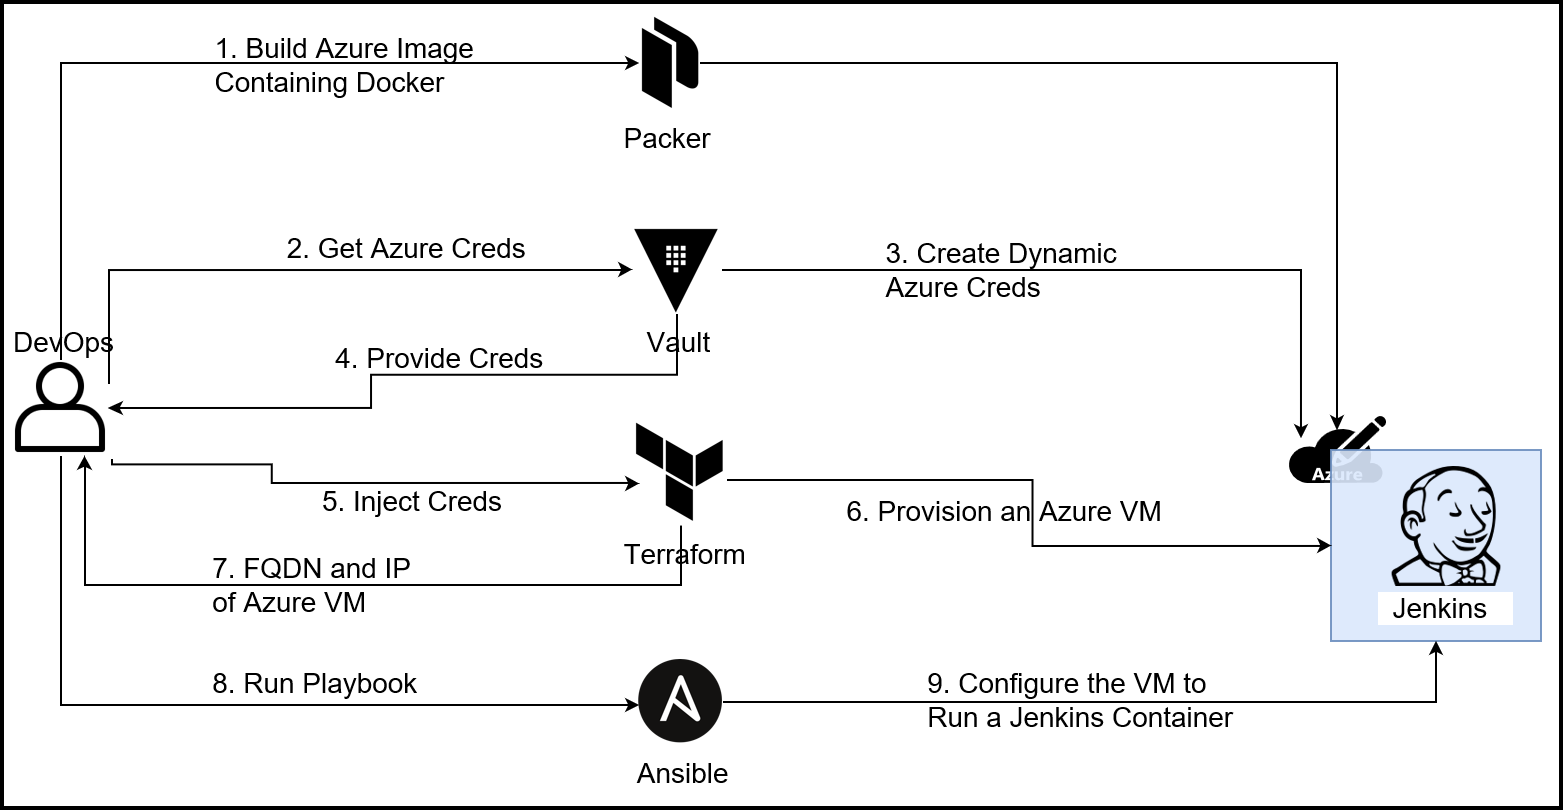
As seen in the diagram above, there are multiple steps to set up our Jenkins machine. The primary persona here is the DevOps engineer. Below are the steps involved:
- Create a Docker container that has the following binaries: Jenkins, Vault, Terraform, and Ansible
- Build an Azure image with Docker installed
- Request Azure credentials for the day from Vault
- Vault dynamically creates these credentials in Azure
- Vault provides the credentials to the DevOps engineer
- The DevOps engineer injects these credentials into Terraform variables
- Terraform provisions an Azure VM
- Terraform returns the Fully Qualified Domain Name (FQDN) of the Azure VM
- The DevOps engineer adds the FQDN into an inventory file and runs an Ansible playbook
- Ansible configures the Azure VM to pull the Docker image and run it
Next, we’ll take a look at the configuration of the Dockerfile, Packer, Terraform, and Ansible.
Dockerfile Configuration
Below is the dockerfile that we built to run Jenkins. It also contains the binaries of Vault, Terraform, and Ansible. Jenkins will use these binaries to build our app’s infrastructure and the app itself. You can also find this in the GitHub repo here.
FROM jenkins/jenkins:lts
USER root

RUN wget https://releases.hashicorp.com/vault/1.6.0/vault_1.6.0_linux_amd64.zip && unzip vault_1.6.0_linux_amd64.zip && mv vault /usr/local/bin && wget https://releases.hashicorp.com/terraform/0.13.5/terraform_0.13.5_linux_amd64.zip && unzip terraform_0.13.5_linux_amd64.zip && mv terraform /usr/local/bin && rm vault_1.6.0_linux_amd64.zip && rm terraform_0.13.5_linux_amd64.zip

RUN DEBIAN_FRONTEND=noninteractive apt-get update && \
    apt-get install -y gnupg2 python3-pip sshpass git openssh-client jq && \
    rm -rf /var/lib/apt/lists/* && \
    apt-get clean

RUN python3 -m pip install --upgrade pip cffi && \
    pip install ansible==2.10.3 && \
    pip install mitogen ansible-lint jmespath && \
    pip install --upgrade pywinrm

USER jenkins
Packer Configuration
You can check out the Packer folder in the GitHub repo for details.
Variables File
Add the Azure credentials to the variables.json file below and remember not to push this to GitHub.
variables.json:
{
  "client_id": "3849e308-77c8-4d60-b03c-326e599edb4f",
  "client_secret":"xxxxxx",
  "tenant_id":"0e3e2e95-8caf-41ca-b4da-e3b33b6c52ec",
  "subscription_id": "18392f20-9428-451b-8298-102ed4e39c2a",

  "myResourceGroup": "samg-jenkins",
  "myPackerImage": "samg-Docker",
  "vm_size": "Standard_A0",
  "location": "Central US",
  "image_sku": "18.04-LTS"
}
Note:
When using the Azure credentials, we couldn’t use the ones generated by Vault because they are specific to the samg-jenkins resource group. Packer for some reason uses a random Azure resource group when building. Therefore, it needs credentials that have a scope for any resource group. We used our regular service principal credentials.
Main Packer File
Now you can use the file below to build the Azure image:
ubuntu18.json:
{
  "builders": [
    {
      "type": "azure-arm",

      "client_id": "{{user `client_id`}}",
      "client_secret": "{{user `client_secret`}}",
      "tenant_id": "{{user `tenant_id`}}",
      "subscription_id": "{{user `subscription_id`}}",

      "managed_image_resource_group_name": "{{user `myResourceGroup`}}",
      "managed_image_name": "{{user `myPackerImage`}}",

      "os_type": "Linux",
      "image_publisher": "Canonical",
      "image_offer": "UbuntuServer",
      "image_sku": "{{user `image_sku`}}",

      "azure_tags": {
          "dept": "Engineering",
          "task": "Image deployment"
      },

      "location": "{{user `location`}}",
      "vm_size": "{{user `vm_size`}}"
    }
  ],
  "provisioners": [{
    "execute_command": "chmod +x {{ .Path }}; {{ .Vars }} sudo -E sh '{{ .Path }}'",
    "inline": [
      "apt-get update",
      "apt-get upgrade -y",
      "apt-get install python3-pip jq -y",
      "snap install docker",

      "/usr/sbin/waagent -force -deprovision+user && export HISTSIZE=0 && sync"
    ],
    "inline_shebang": "/bin/sh -x",
    "type": "shell"
  }]
}
Creating the Packer Image
To create the template image execute:
packer build -force -var-file variables.json ubuntu18.json
Terraform Configuration
Now let’s take a look at the Terraform configuration to build our Jenkins VM.
Retrieve Azure Credentials from Vault
- Make sure you’re logged into Vault then run the command below:
vault read azure/creds/jenkins
- Place the credentials into the Terraform variables section in Terraform Cloud (TFC) to store it securely. Remember that these credentials are valid for 1 day. You could also use a
terraform.tfvarsfile if you’re using Terraform open source.
Connect TFC to GitHub
We’ve connected a workspace in TFC to GitHub. So upon a commit and a push to GitHub, Terraform will start a run. You can do the same or use the open source Terraform. We recommend using TFC as it stores your variables and state file securely.
Some Notes on the Terraform Configuration
You can view the Terraform folder in the GitHub repo in the BuildJenkinsVM folder.
Below are some notes to keep in mind:
- Jenkins will run on port 8080 so we include that in our security group.
- It’s always a good practice to pin your provider version to a specific version.
- Make sure you are using the same resource group that was specified in Vault’s scope so that the Azure credentials would work.
- Change the
id_rsa.pubfile to thepublic_keyfile that you would like to use in your VM so you cansshinto it.
The Variables File
In this file, we declare our variables. You can use a terraform.tfvars file to assign values to these variables if you’re using Terraform open source. In our case, we use TFC to assign these variables. You can find a screenshot of the variables below.

Variables in TFC
variables.tf:
variable "subscription_id" {
  description = "Azure subscription_id"
}

variable "tenant_id" {
  description = "Azure tenant_id"
}

variable "client_secret" {
  description = "Azure client_secret"
}

variable "client_id" {
  description = "Azure client_id"
}

variable "prefix" {
  description = "This prefix will be included in the name of most resources."
  default     = "samg"
}

variable "location" {
  description = "The region where the virtual network is created."
  default     = "centralus"
}

variable "address_space" {
  description = "The address space that is used by the virtual network. You can supply more than one address space. Changing this forces a new resource to be created."
  default     = "10.0.0.0/16"
}

variable "subnet_prefix" {
  description = "The address prefix to use for the subnet."
  default     = "10.0.10.0/24"
}

variable "vm_size" {
  description = "Specifies the size of the virtual machine."
  default     = "Standard_A0"
}

variable "adminuser" {
  description = "Specifies the admin username."
  default     = "adminuser"
}
The Main File
This is the main Terraform file that contains the configuration to provision the Jenkins VM.
main.tf:
terraform {
  required_providers {
    azurerm = {
      source = "hashicorp/azurerm"
      version = "2.36.0"
    }
  }
}

provider "azurerm" {
  subscription_id = var.subscription_id
  client_id       = var.client_id
  client_secret   = var.client_secret
  tenant_id       = var.tenant_id
  features {}
}

locals {
  se-region = "AMER - Canada"
  owner     = "sam.gabrail"
  purpose   = "demo for end-to-end infrastructure and application deployments"
  ttl       = "-1"
  terraform = "true"
}

locals {
  # Common tags to be assigned to resources
  common_tags = {
    se-region = local.se-region
    owner     = local.owner
    purpose   = local.purpose
    ttl       = local.ttl
    terraform = local.terraform
  }
}

data "azurerm_resource_group" "myresourcegroup" {
  name = "${var.prefix}-jenkins"
}

data "azurerm_image" "docker-image" {
  name                = "samg-Docker"
  resource_group_name = data.azurerm_resource_group.myresourcegroup.name
}

resource "azurerm_virtual_network" "vnet" {
  name                = "${var.prefix}-vnet"
  location            = data.azurerm_resource_group.myresourcegroup.location
  address_space       = [var.address_space]
  resource_group_name = data.azurerm_resource_group.myresourcegroup.name
}

resource "azurerm_subnet" "subnet" {
  name                 = "${var.prefix}-subnet"
  virtual_network_name = azurerm_virtual_network.vnet.name
  resource_group_name  = data.azurerm_resource_group.myresourcegroup.name
  address_prefixes       = [var.subnet_prefix]
}

resource "azurerm_network_security_group" "jenkins-sg" {
  name                = "${var.prefix}-sg"
  location            = var.location
  resource_group_name = data.azurerm_resource_group.myresourcegroup.name

  security_rule {
    name                       = "HTTP"
    priority                   = 100
    direction                  = "Inbound"
    access                     = "Allow"
    protocol                   = "Tcp"
    source_port_range          = "*"
    destination_port_range     = "8080"
    source_address_prefix      = "*"
    destination_address_prefix = "*"
  }

  security_rule {
    name                       = "SSH"
    priority                   = 101
    direction                  = "Inbound"
    access                     = "Allow"
    protocol                   = "Tcp"
    source_port_range          = "*"
    destination_port_range     = "22"
    source_address_prefix      = "*"
    destination_address_prefix = "*"
  }
}

resource "azurerm_network_interface" "jenkins-nic" {
  name                      = "${var.prefix}-jenkins-nic"
  location                  = var.location
  resource_group_name       = data.azurerm_resource_group.myresourcegroup.name

  ip_configuration {
    name                          = "${var.prefix}-ipconfig"
    subnet_id                     = azurerm_subnet.subnet.id
    private_ip_address_allocation = "Dynamic"
    public_ip_address_id          = azurerm_public_ip.jenkins-pip.id
  }
}

resource "azurerm_network_interface_security_group_association" "jenkins-sga" {
  network_interface_id      = azurerm_network_interface.jenkins-nic.id
  network_security_group_id = azurerm_network_security_group.jenkins-sg.id
}

resource "azurerm_public_ip" "jenkins-pip" {
  name                = "${var.prefix}-ip"
  location            = var.location
  resource_group_name = data.azurerm_resource_group.myresourcegroup.name
  allocation_method   = "Dynamic"
  domain_name_label   = "${var.prefix}-jenkins"
}

resource "azurerm_linux_virtual_machine" "jenkins" {
  name                = "${var.prefix}-jenkins"
  location            = var.location
  resource_group_name = data.azurerm_resource_group.myresourcegroup.name
  size                = var.vm_size
  admin_username      = "adminuser"

  tags = local.common_tags

  network_interface_ids         = [azurerm_network_interface.jenkins-nic.id]
  // Add a public key to the same folder as the main.tf script (we use Ansible to send the private key to the Jenkins machine)
  admin_ssh_key {
    username   = var.adminuser
    public_key = file("id_rsa.pub")
  }

  source_image_id = data.azurerm_image.docker-image.id

  os_disk {
    name                  = "${var.prefix}-osdisk"
    storage_account_type  = "Standard_LRS"
    caching               = "ReadWrite"
  }

}
The Outputs File
This is the output FQDN that we use with the inventory file for the Ansible playbook.
outputs.tf:
output "jenkins_public_dns" {
  value = azurerm_public_ip.jenkins-pip.fqdn
}
Ansible Configuration
In this section, we’ll take a look at the Ansible configuration to run the Docker container with Jenkins. You can find the configuration in the GitHub repo under the Ansible JenkinsVM folder.
To run the playbook, make sure you’re inside the above-mentioned folder then issue the command below:
ansible-playbook -i inventory jenkinsPlaybook.yaml
Ansible Configuration File
In this file, we make sure that host_key_checking is disabled. We do this so Ansible doesn’t complain and error out when it checks for the host key. Please make sure that this directory is not world-wide writable for this to take effect.
ansible.cfg:
[defaults]
host_key_checking = False
Inventory File
This is the inventory file to run with the playbook. Notice the ansible_host is taken from the output of Terraform.
inventory:
jenkins
ansible_user=adminuser
ansible_python_interpreter=/usr/bin/python3
[jenkins]
jenkinsvm ansible_host=samg-jenkins.centralus.cloudapp.azure.com
Playbook
Below you’ll find the playbook. It’s pretty straight-forward to read and understand what it’s doing. We’d like to draw your attention to 2 things:
- We’re exposing port 8080 on the host for which Jenkins will listen on.
- We’re creating an
.sshdirectory and moving a private key into it. This key should correspond to thepublic_keythat you would push into the app VMs later. We’ll see this in the following blog post. It will allow Jenkins to use Ansible tosshinto the app VMs using this key.
jenkinsPlaybook.yaml:
- hosts: all
  become_user: root
  become: true
  tasks:
    - name: Install pip3 and unzip
      apt:
        update_cache: yes
        pkg:
        - python3-pip
        - unzip
      register: result
      until: result is not failed
      retries: 5
      delay: 5
    - name: Install Docker module for Python
      pip:
        name: docker
    - name: Pull the Jenkins Docker image
      docker_image:
        name: "samgabrail/jenkins-tf-vault-ansible:latest"
        source: pull
        state: present
        force_source: yes
    - name: Change file ownership, group and permissions
      file:
        path: /home/adminuser/jenkins_data
        state: directory
        recurse: yes
        owner: adminuser
        group: adminuser
    - name: Create Jenkins container
      docker_container:
        name: "jenkins"
        image: "samgabrail/jenkins-tf-vault-ansible:latest"
        state: started
        ports:
          - "8080:8080"
          - "50000:50000"
        volumes:
          - /home/adminuser/jenkins_data:/var/jenkins_home
    - name: Create .ssh directory
      file: state=directory path=/home/adminuser/jenkins_data/.ssh
    - name: Copy the Private SSH Key for Jenkins to Access Azure VMs
      copy:
        src: /mnt/c/Users/Sam/.ssh/id_rsa
        dest: /home/adminuser/jenkins_data/.ssh/id_rsa
        owner: adminuser
        group: adminuser
        mode: 0400
Logging into Jenkins
If all goes well, open your browser and put in the FQDN output from Terraform as the URL plus port 8080 like this:
http://samg-jenkins.centralus.cloudapp.azure.com:8080
You should be greeted by this screen:
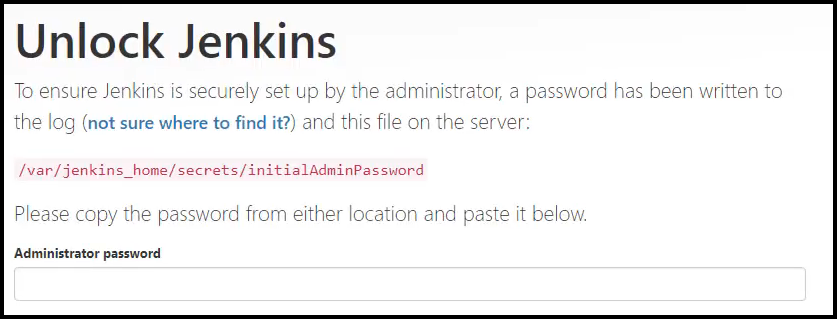
Jenkins Unlock Screen
You can now log into Jenkins but first, you’ll need to retrieve the password. You will need to exec into the Docker container and get the password from the path mentioned on the screen. Remember to run this under sudo. Congratulations, you now have Jenkins up and ready to go!
Conclusion
In this blog post, we talked about how to set up Jenkins to become our CI/CD pipeline tool. We used the following tools to do the job:
- Packer to build an Azure image that has Docker installed.
- Docker to create a container image that contains Jenkins, Vault, Terraform, and Ansible.
- HashiCorp Vault to retrieve Azure credentials to use with Terraform.
- Terraform to build a Jenkins VM in Azure based on the Packer image.
- Ansible to configure the Jenkins VM by running the Docker container.
We saw how the terraform and ansible integration works very well. Terraform is a provisioning tool and Ansible is a configuration management tool and they work very well together. Now that we have Jenkins up and ready, we can move to part 3 and see how to deliver secret zero securely to both our Jenkins pipeline and the Webblog app.
References
- Packer to Create Linux VM Images in Azure
- Ansible Docker Resource
- Vault Azure Secrets Engine Guide
- GitHub repo for the blog series
Suggested Reading
- Jenkins, Vault, Terraform, Ansible, and Consul Delivering an End-to-End CI/CD Pipeline
- HashiCorp Packer to Build a Ubuntu 22.04 Image Template in VMware vSphere
- HashiCorp Packer for VMware Ubuntu Templates and Terraform for building VMs
- Terraform vs Ansible – Learn the Differences – Part 1
Code
Hi and Welcome!
Join the Newsletter and get FREE access to all my Source Code along with a couple of gifts.