
Introduction
Have you implemented security measures around your access to Azure resources for provisioning? Learn how to use HashiCorp Vault’s Azure secrets engine to do so.
Video
Below is a video explanation and demo.
Video Chapters
You can skip to the relevant chapters below:
- 00:00 – Introduction
- 01:22 – End-to-End Infrastructure and Application Deployment
- 03:18 – Agenda
- 03:48 – Overall Goal
- 06:50 – Topics To Learn
- 09:07 – Vault Azure Secrets Engine
- 12:09 – Demo Starts
- 13:00 – Terraform Config Walkthrough
- 21:01 – Request Azure Creds from Vault
- 25:24 – Conclusion
Overview
In this blog post, we talk about the HashiCorp Vault Azure Secrets Engine. This is the first blog post in a new blog post series called End-to-End Infrastructure and Application Deployment.
The goal of this series is to learn best practices around the automation of infrastructure provisioning and application deployment.
We cover the concepts of Infrastructure as Code, CI/CD, secrets management, dynamic secrets, the secret zero problem, service mesh, and more. Our cloud of choice is Azure for this series. Our focus for this blog post is on the first step and that is to create a Vault Azure Secrets Engine. The purpose is to deliver Azure credentials dynamically for provisioning resources in Azure.
Pre-requisites
The following is required to follow along:
Overview of the End-to-End Infrastructure and Deployment Blog Series
Let’s take a look at what this blog series has to offer.
The Big Picture
Below is an overview diagram of this 4 part blog series.
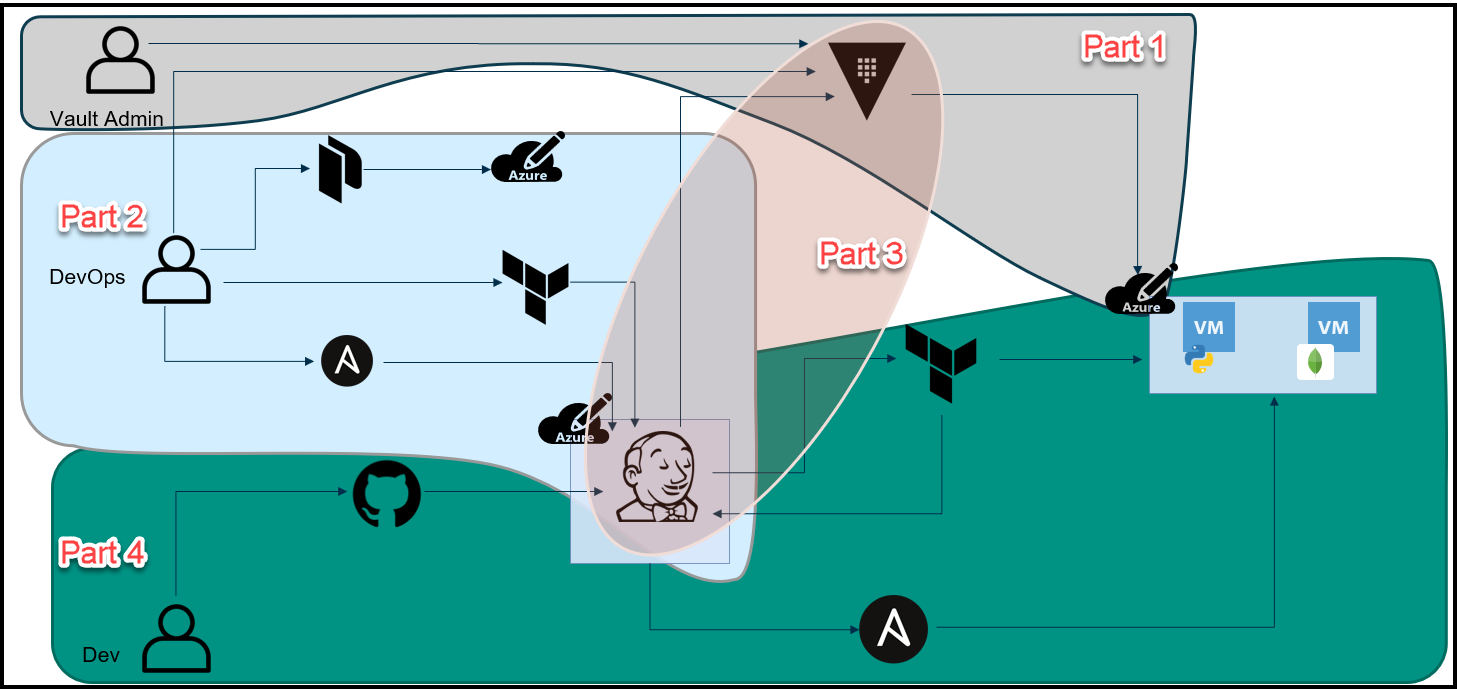
Break-Up of the Blog Series
We’ve broken up this blog series into 4 parts:
Part 1: HashiCorp Vault Azure Secrets Engine
This is the topic of this blog post and it’s really the first step to secure our pipeline. The purpose here is to create dynamic short-lived credentials for Azure. We will then use these credentials to provision the Jenkins VM and app VMs in Azure. The credentials are only valid for 1 day and they expire after that.
Part 2: HashiCorp Packer, Terraform, and Ansible to Set Up Jenkins
In this part, we use a few tools to build a Jenkins VM that will be used as our CI/CD pipeline. Below are the high-level steps:
1. Packer to create an Azure image that has Docker installed.
2. Terraform then builds a VM in Azure that will host our Jenkins pipeline.
3. The Azure credentials used by Terraform are dynamically created by Vault and have a 1 day TTL.
4. Ansible then configures the Azure VM to:
– Add necessary packages
– Pull the Jenkins Docker image
– Start the Jenkins container
Part 3: The Secret Zero Problem Solved for HashiCorp Vault
Here we discuss the secret zero problem and how to solve it. This is often referred to as Vault secure introduction. The issue is that we need to provide the Vault authentication token to our Jenkins pipeline and to our application. Once we have the token, then we can access secrets in Vault. The challenge is how to deliver this Vault token securely. We address secure introduction by using Vault AppRoles, response wrapping, and the Vault-agent.
Part 4: Jenkins, Vault, Terraform, Ansible, and Consul End-to-End CI/CD Pipeline
Finally, we put everything together in this part. Now that we have the Jenkins VM running and we’ve addressed the secret zero problem, we can finally run the pipeline to build our application. Below is the workflow:
1. A developer commits and pushes code into GitHub
2. The Jenkins pipeline automatically starts due to a webhook from GitHub to Jenkins
3. Jenkins retrieves Azure credentials from Vault
4. Jenkins runs Terraform with these credentials
5. Terraform builds 3 VMs:
– A Consul server
– The Python Webblog app server
– A MongoDB server
6. Terraform completes the provisioning and passes the 3 VMs’ fully qualified domain names (FQDNs) to Ansible
7. Ansible configures these VMs to do the following:
– Download and install the Consul and Envoy binaries for the service mesh
– Pulls the MongoDB Docker image and starts the container
– Downloads the Python dependencies for the Webblog app and starts the application
Below are some tools that we use in this series along with topics to learn. You’ll find those relevant to this post in bold italics font.
Some Tools Used in this Series
- HashiCorp Packer
- HashiCorp Terraform*
- HashiCorp Vault*
- HashiCorp Consul
- Jenkins
- Ansible
- Microsoft Azure*
*Featured in this post
Topics to Learn in this Blog Series
-
Vault Azure Secrets Engine*
-
Packer Images in Azure
-
Terraform Building VMs in Azure based on Packer Images
-
Ansible to Configure an Azure VM
-
The Secret Zero Problem and Vault Secure Introduction
-
Vault App Role
-
Vault Dynamic Database Secrets for MongoDB
-
Vault Transit Secrets Engine
-
Advanced CI/CD Pipeline Workflow using:
- GitHub(VCS)
- Jenkins(CI/CD)
- Terraform(IaC)
- Ansible(Config Mgmt)
- Vault(Secrets Mgmt)
-
Consul Service Mesh
*Featured in this post
Vault Azure Secrets Engine Explanation
Now let’s focus on part 1 of this series and discuss how to create dynamic Azure credentials using HashiCorp Vault. Take a look at the workflow diagram below:
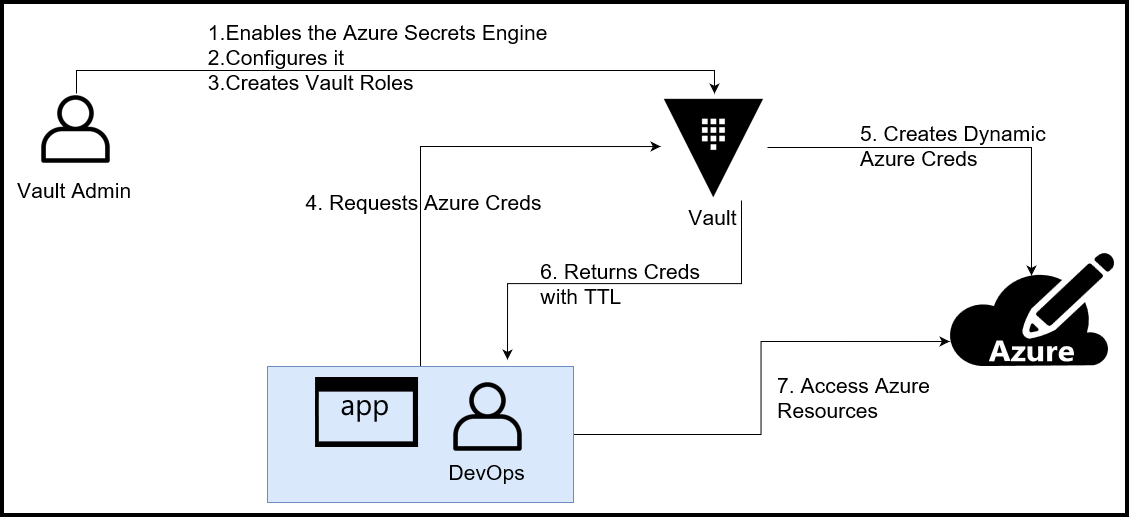
Vault Azure Secrets Engine Diagram
There are 2 personas involved in this workflow:
1. Vault admin
2. DevOps engineer or an app
The Vault admin is responsible for the following:
– Enabling the Azure secrets engine
– Configuring the engine
– Creating Vault roles
The DevOps engineer or the app is the consumer of the Azure secrets returned by Vault.
Next, we’ll take a look at the configuration that the Vault admin needs to create.
Azure Secrets Engine Terraform Configuration
A Vault admin is required to run the steps below. This can be done using the Vault CLI or API. My preferred way of doing it is via the Vault provider in Terraform. We are re-using our existing Vault cluster from our previous Webblog series. The Vault admin configuration is located in the main.tf file
We’ve included the relevant Terraform configuration for enabling the Azure secrets engine in Vault below:
resource "azurerm_resource_group" "myresourcegroup" {
  name     = "${var.prefix}-jenkins"
  location = var.location

  tags = local.common_tags
}

resource "vault_azure_secret_backend" "azure" {
  subscription_id = var.subscription_id
  tenant_id = var.tenant_id
  client_secret = var.client_secret
  client_id = var.client_id
}

resource "vault_azure_secret_backend_role" "jenkins" {
  backend                     = vault_azure_secret_backend.azure.path
  role                        = "jenkins"
  ttl                         = "24h"
  max_ttl                     = "48h"

  azure_roles {
    role_name = "Contributor"
    scope =  "/subscriptions/${var.subscription_id}/resourceGroups/${azurerm_resource_group.myresourcegroup.name}"
  }
}
One thing to note is that the scope is tied to a resource group in Azure. This means that the credentials returned from Azure will allow a user to provision resources within that resource group only.
Retrieve Azure Credentials from Vault
Now that the Vault admin created the necessary configuration in Vault, a DevOps engineer or an app can create Azure credentials. This is done by running the command below after logging into Vault.
vault read azure/creds/jenkins
Your output would look something like this:
Key                Value
---                -----
lease_id           azure/creds/jenkins/PH6H0V0COZdW6BQrWEbSflR2
lease_duration     24h
lease_renewable    true
client_id          25280ec5-d598-4997-a323-387ead4bbfac
client_secret      a9dfc2ae-582a-6020-0572-7b289cdf7c53
Once the credentials are retrieved, you can use them as Terraform variables to be used to provision the Jenkins VM and the application VMs that we will build later. We will see how this is done in the next 3 blog posts.
Note:
This Vault policy is used with a token to run the configuration commands. We use the root token in this demo for simplicity, however, in a production setting it’s not recommended to use the root token.
Conclusion
In this blog post, we introduced the new End-to-End Infrastructure and Deployment blog series. We also talked about the first part of the series and that is to create dynamic secrets for Azure. These secrets are created using the HashiCorp Vault Azure secrets engine. They are dynamic in nature and have a TTL of 1 day. This enables a DevOps engineer to carry out the following steps:
1. Log into Vault each day
2. Retrieve new Azure credentials for the day
3. Use these credentials in conjunction with Terraform to provision resources in a defined resource group in Azure
4. Credentials expire automatically at the end of the day
This will also allow our Jenkins pipeline to securely provision the app VMs in an automated fashion. You’re now ready to move on to part 2 to setup Jenkins using Packer, Terraform, and Ansible.
References
Suggested Reading
- HashiCorp Packer to Build a Ubuntu 22.04 Image Template in VMware vSphere
- HashiCorp Vault API Tutorial and Pro Tips
Code
Hi and Welcome!
Join the Newsletter and get FREE access to all my Source Code along with a couple of gifts.