

Introduction
Build an API using a serverless Lambda Function with an API Gateway all with Terraform. In this post, you will learn how to use AWS Lambda with Terraform. Additionally, we will cover how to set up the AWS provider in your Terraform configuration to manage AWS services effectively.
Video
Below is a video explanation and demo.
Video Chapters
You can skip to the relevant chapters below:
- 00:00 – Introduction
- 00:42 – How Lambda Works with the API Gateway
- 02:14 – Demo
- 08:37 – Test the Endpoint
- 09:25 – Configuration Walk-through
- 20:30 – View from the AWS Console
Overview
The need for microservices is growing rapidly as organizations strive to create and manage highly scalable, efficient applications. Microservices are an essential tool in achieving these goals, as they allow businesses to break up their applications into smaller, more manageable components that can be developed and deployed independently. With microservices, businesses can achieve faster time-to-market, better scalability, and more reliable services. Additionally, when deployed properly, microservices can provide increased security and reliability at the same time. As such, organizations are increasingly turning to microservices for their application development needs. Terraform is an excellent tool for automating the creation of these services using the serverless framework in AWS called Lambda functions. By using Terraform to configure Lambda, companies can enjoy the benefits of microservices with ease and efficiency. It is important to have the correct AWS credentials to allow Terraform to interact with AWS services effectively.
In this blog post, we will build an API using a serverless Lambda function with an API Gateway. All this will be built with Terraform.
Pre-requisites
The following is required to follow along:
- Terraform or use GitHub’s Codespaces or Gitpod as your development environment. The code repo is equipped with it.
- An AWS account or if you’re subscribed to the TeKanAid Academy Subscription you get your own AWS account on demand.
The Benefits and Challenges of Using Microservices Architectures
Using a microservices architecture has many benefits. It allows for more agility and flexibility in development since the individual components can be worked on independently without disrupting the entire system. It also reduces complexity by breaking down large applications into smaller parts that are easier to manage and scale. Additionally, it helps support multiple technologies within one application as well as improving scalability and reliability. However, using microservices also poses some challenges. It can be difficult to maintain inter-service communication and often requires a significant amount of additional coding effort. Additionally, it can take longer to debug or troubleshoot errors when dealing with multiple components. Overall, while there are potential benefits to using a microservices architecture, it is important to weigh the pros and cons carefully before making a decision.
Importance of a Microservices API Gateway
A Microservices API gateway is important for helping businesses move away from monolithic architectures to a more agile and scalable platform. By providing a central layer of abstraction, microservices API gateways enable companies to break up their applications into smaller components that can be developed and deployed independently. This allows for faster time-to-market and improved scalability. Additionally, a microservices API gateway can provide increased security by controlling access to sensitive information and by routing requests to the right services. Furthermore, since they are designed to handle large volumes of traffic more efficiently, they can help relieve the load on backend systems while still providing a great user experience. In short, effective use of a microservices API gateway can help companies make the most of their application development efforts.
Managing API Gateway configuration, including re-deployment processes, is crucial as it impacts operational uptime. Proper configuration ensures that changes are handled smoothly, minimizing downtime and maintaining service reliability.
In this post, we will make use of the AWS API Gateway to create an endpoint that invokes a Lambda function. We will create one REST API, but you could create multiple REST APIs in the API gateway.
Service Mesh and API Gateway
An API gateway handles traffic between a client and a single service, whereas a service mesh can handle communication between multiple services. Additionally, while an API gateway typically provides features such as routing, rate limiting, monitoring, and authentication, service meshes provide more granular control such as circuit breaking and service discovery. Finally, while an API gateway is typically used to mediate requests between clients and services, a service mesh provides visibility into the underlying architecture and can be used to monitor the performance of individual services. Both technologies are often used together in a microservices architecture.
Lambda Functions Explained
A Lambda function is a serverless compute service that runs code in response to events and automatically manages the underlying compute resources for you. It is an event-driven, serverless computing platform that allows developers to create applications without worrying about infrastructure or managing virtual machines. With Lambda, you write your code in a language of your preference and deploy lambda functions with just a few clicks. The code is then automatically executed when the trigger event occurs and the results are stored in an Amazon S3 bucket or DynamoDB table. When your Lambda function is triggered, it can access data from other AWS services, such as Amazon Kinesis Streams, Amazon API Gateway, and AWS IoT. This makes it ideal for building complex, event-driven applications on the cloud. Using Terraform to automate the deployment of AWS Lambda functions can significantly streamline the process, allowing for efficient management of serverless applications. Lambda functions can also be used to automate tasks such as triggering AWS CloudFormation and setting up a CI/CD pipeline in AWS CodePipeline. With its serverless architecture, you only pay for the computing time that your code uses. We will run a serverless application later on to see it in action.
Backend and Frontend Services
Backend services can be built with a number of different frameworks. In this post, I wanted to build a backend service with a Lambda function and an API gateway. We will use a Lambda function written in Python to perform currency conversions. It will get invoked by the API gateway.
To connect to backend services, you need a frontend service. The frontend service can be a web application using a Javascript framework such as React, Angular, or Vue. It can also be a mobile client. A javascript framework or a mobile client is out of the scope of this article, but if you’d like to learn more about them, leave me a comment below. For this post, we will simply use the browser to run a GET request.
What is CloudWatch?
CloudWatch is a monitoring service built into the AWS platform. It allows organizations to view and monitor resource utilization, application performance, operational health metrics, and other log data from their EC2 instances, serverless applications, containerized services, and more. With CloudWatch, users can set alarms that trigger when a certain threshold is exceeded, allowing them to act quickly and prevent issues from escalating. It also provides aggregate statistics such as the average CPU utilization or memory usage across an entire fleet of servers. CloudWatch can also be used for logging application data by sending information such as log messages and error codes to the service, which can then be analyzed for patterns and trends. Additionally, CloudWatch integrates with other services such as Amazon SNS (Simple Notification Service) and Lambda to enable automated actions based on predefined rules. This helps organizations optimize their infrastructure resources and better manage their cloud environment.
We will use CloudWatch to receive logs from Lambda for troubleshooting purposes.
What is a Log Group in CloudWatch?
A Log Group is a collection of log streams in the AWS platform. It is used to store, monitor, and manage log data from multiple sources. Log Groups are essential for organizations to keep track of what is going on in their environment with regard to performance and security. For example, it allows them to view errors that are being received from their applications, identify trends in the log data, and get alerts when certain conditions occur. Log Groups also allow users to search or filter their log data by source, severity level, date range, and other criteria. It then provides detailed insights into the logs that can help organizations troubleshoot issues with their system and make informed decisions. Log Groups are accessible through the Amazon CloudWatch and AWS CLI platforms, making them easy to manage from a central dashboard. Additionally, they can be configured with Amazon CloudTrail which allows for audit logging of activities related to the log group. This makes it easier for security teams to investigate any suspicious activity associated with the logs. With Log Groups, organizations can find out what’s happening in their environment quickly and reliably.
Why use Terraform?
Terraform is an open-source tool that allows organizations to use Infrastructure as Code (IaC) to provision and manage their cloud, on-premises, and hybrid infrastructure. It provides a consistent way of defining and managing resources across multiple providers and environments. With Terraform, developers can define the desired state for their infrastructure in declarative configuration files and use the tool to provision the necessary resources quickly and efficiently.
With its powerful command-line interface, developers can easily create, update, and delete infrastructure in a controlled manner. Terraform also makes it easy for users to version their configurations and keep track of changes over time. Additionally, it is highly extensible with a wide range of providers and plugins, allowing for the use of custom solutions.
By leveraging Terraform’s powerful automation capabilities, organizations can save time and money by automating their infrastructure setup and management processes. With its scalability, flexibility and reliability, Terraform is quickly becoming a key component in successful cloud environments.
In summary, using Terraform gives organizations greater control, scalability and reliability for their Infrastructure as Code processes. This allows them to manage their resources more efficiently and cost-effectively in a fraction of the time. With Terraform, organizations can confidently deploy infrastructure quickly and reliably, so they can focus on innovating instead of managing operations.
I write quite a bit about IaC. If you’re interested in Terraform, check out the Terraform 101 course on the TeKanAid Academy site. You could also take a look at some of the blog posts such as this one Terraform to Create a Ubuntu 22.04 VM in VMware vSphere ESXi or the Terraform Import Example – AWS EC2 Instance post.
Now let’s create an example of serverless functions in this demo. In this example, we will create an AWS Lambda function written in Python. It’s a simple function that converts a given amount from one currency to another. We can access this function using an AWS API gateway. The gateway will have one method of type GET. This whole setup will be automated and built with Terraform. Let’s get started!
Instructions to Run the Demo
1. Create a requirements.txt file from pipenv
I prefer using pipenv to create a virtual python environment for development. Once I’m done, I can generate the requirements.txt file as shown below:
pipenv requirements > requirements.txt
2. Install the requests library to a new package directory
In order to use the AWS Lambda function, we need to package our python files and dependencies in the form of a zip file. Let’s first get our dependencies ready by running the following command that installs our dependencies into a target folder called package in the infrastructure folder.
pip install --target ./infrastructure/package -r requirements.txt
3. Create a deployment package with the installed library
Now let’s zip our dependency files into a zip file called my-deployment-package.zip:
cd infrastructure/package
zip -r ../my-deployment-package.zip .
4. Add the main.py file to the zip file
Now let’s also zip the main.py file and added it to the my-deployment-package.zip file.
cd ..
zip my-deployment-package.zip ../main.py
5. Export your AWS Environment variables
If you’re subscribed to the TeKanAid Academy, then you can easily create an AWS account and will get the AWS_ACCESS_KEY_ID and AWS_SECRET_ACCESS_KEY to export them as environment variables.
Otherwise, create a user in AWS IAM and generate programmatic credentials then export your environment variables.
export AWS_ACCESS_KEY_ID=put_your_key_here
export AWS_SECRET_ACCESS_KEY=put_your_secret_here
6. Initialize Terraform
Make sure you’re inside the infrastructure folder and then initialize Terraform:
terraform init
7. Populate the AccountId Variable
In the file terraform.tfvars, put in your account ID. You will find the account ID as part of the output you get when you create a new AWS account in the TeKanAid Academy.
Otherwise, you can find it by clicking in the top right corner of your AWS console.
This is very important to give the Lambda function the correct permissions.
8. Plan Terraform
Now run a plan to see what Terraform will attempt to provision.
terraform plan
9. Apply Terraform
Once you’re happy with the proposed changes, apply Terraform:
terraform apply
10. Go to the URL output of Terraform
After Terraform has completed running, you’ll get an output with the URL for the API gateway endpoint.
It will look something like this:
endpoint_url = "https://tkckmuvy82.execute-api.us-east-1.amazonaws.com/dev/conversion?amount=100&fromCurrency=USD&toCurrency=CAD"
You can see that the default query has the following parameters:
?amount=100&fromCurrency=USD&toCurrency=CAD
Change the amount, fromCurrency, and toCurrency to get different conversions. Below is a screenshot of the result.

Currency Conversion Result
11. Clean up
When you’re done with the demo, clean up with terraform destroy.
terraform destroy
Configuration Explanation
Now let’s dive in and take a look at the configuration for this demo.
Lambda Function
Let’s examine the Python code for the Lambda function along with the Terraform configuration.
Python Code for the Lambda Function
As mentioned before, we’re writing the Lambda function in Python. We will use the Lambda function as our backend service.
Let’s take a look at what we need to import for our function code:
import logging
import json

from forex_python.converter import CurrencyRates

logger = logging.getLogger()
logger.setLevel(logging.INFO)
As you can see, we are using the logging library in python along with JSON. We are also using the forex_python library for currency conversions. Finally, we are getting the logger ready to send logs.
The Lambda function requires an event handler. Below is the function code for the event handler in main.py.
def lambda_handler(event, context):
    """
    The Lambda handler function that gets invoked when the API endpoint is hit
    """
    amount = event['queryStringParameters']['amount']
    fromCurrency = event['queryStringParameters']['fromCurrency']
    toCurrency = event['queryStringParameters']['toCurrency']
    logger.info('## Input Parameters: %s, %s, %s', amount, fromCurrency, toCurrency)
    res = convert_currency(amount, fromCurrency, toCurrency)
    logger.info('## Currency result: %s', res)
    response = {
        "statusCode": 200,
        "body": json.dumps({'result': res}),
    }
    logger.info('## Response returned: %s', response)
    return response
Notice how we can extract query parameters using event['queryStringParameters']['amount']. In this case, we are getting the value of the amount query.
The response of the Lambda function needs to be in JSON format. Therefore, we use json.dumps() to convert the res of the currency conversion to JSON.
As mentioned earlier, we are using the logger python library to show logs. These logs will be visible in Cloudwatch logs.
The final function in the Lambda function is the convert_currency function:
def convert_currency(amount: float, fromCurrency: str, toCurrency: str) -> float:
    """
    Function to convert an amount from one currency to another
    """
    c = CurrencyRates()
    res = c.convert(fromCurrency, toCurrency, float(amount))
    return float(res)
This convert_currency function takes the following input parameters:
- amount
- a from currency
- a to currency
It then instantiates an instance of the CurrencyRates class in the forex_python library. We then make a call to the convert method that returns a float of the result.
Terraform Configuration for the Lambda Function
Now that we have our lambda function built in Python, let’s take a look at the Terraform configuration.
resource "aws_lambda_function" "example_lambda" {
  function_name = var.lambda_function_name
  runtime       = "python3.9"
  role          = aws_iam_role.lambda_role.arn
  handler       = "main.lambda_handler"
  filename      = "my-deployment-package.zip"
  depends_on = [
    aws_iam_role_policy_attachment.lambda_logs,
    aws_cloudwatch_log_group.example,
  ]
}

resource "aws_cloudwatch_log_group" "example" {
  name              = "/aws/lambda/${var.lambda_function_name}"
  retention_in_days = 14
}

resource "aws_iam_policy" "lambda_logging" {
  name        = "lambda_logging"
  path        = "/"
  description = "IAM policy for logging from a lambda"
  policy = <<EOF
{
  "Version": "2012-10-17",
  "Statement": [
    {
      "Action": [
        "logs:CreateLogGroup",
        "logs:CreateLogStream",
        "logs:PutLogEvents"
      ],
      "Resource": "arn:aws:logs:*:*:*",
      "Effect": "Allow"
    }
  ]
}
EOF
}

resource "aws_iam_role_policy_attachment" "lambda_logs" {
  role       = aws_iam_role.lambda_role.name
  policy_arn = aws_iam_policy.lambda_logging.arn
}

resource "aws_iam_role" "lambda_role" {
  name               = "lambda_role"
  assume_role_policy = <<EOF
{
  "Version": "2012-10-17",
  "Statement": [
    {
      "Action": "sts:AssumeRole",
      "Principal": {
        "Service": "lambda.amazonaws.com"
      },
      "Effect": "Allow",
      "Sid": ""
    }
  ]
}
EOF
}
A couple of things to note about the aws_lambda_function resource:
- You need to specify an IAM role for the lambda function, we also created a policy that is not an AWS managed policy to allow Lambda to send logs to CloudWatch
- The handler is the
filename.handler_function _name, in my case wasmain.lambda_handler - The filename is the deployment package zip file
- Pay attention to the depends_on block
The rest of the Terraform configuration is self-explanatory.
Below is a screenshot of the Lambda console. You can run some tests directly on the code here.
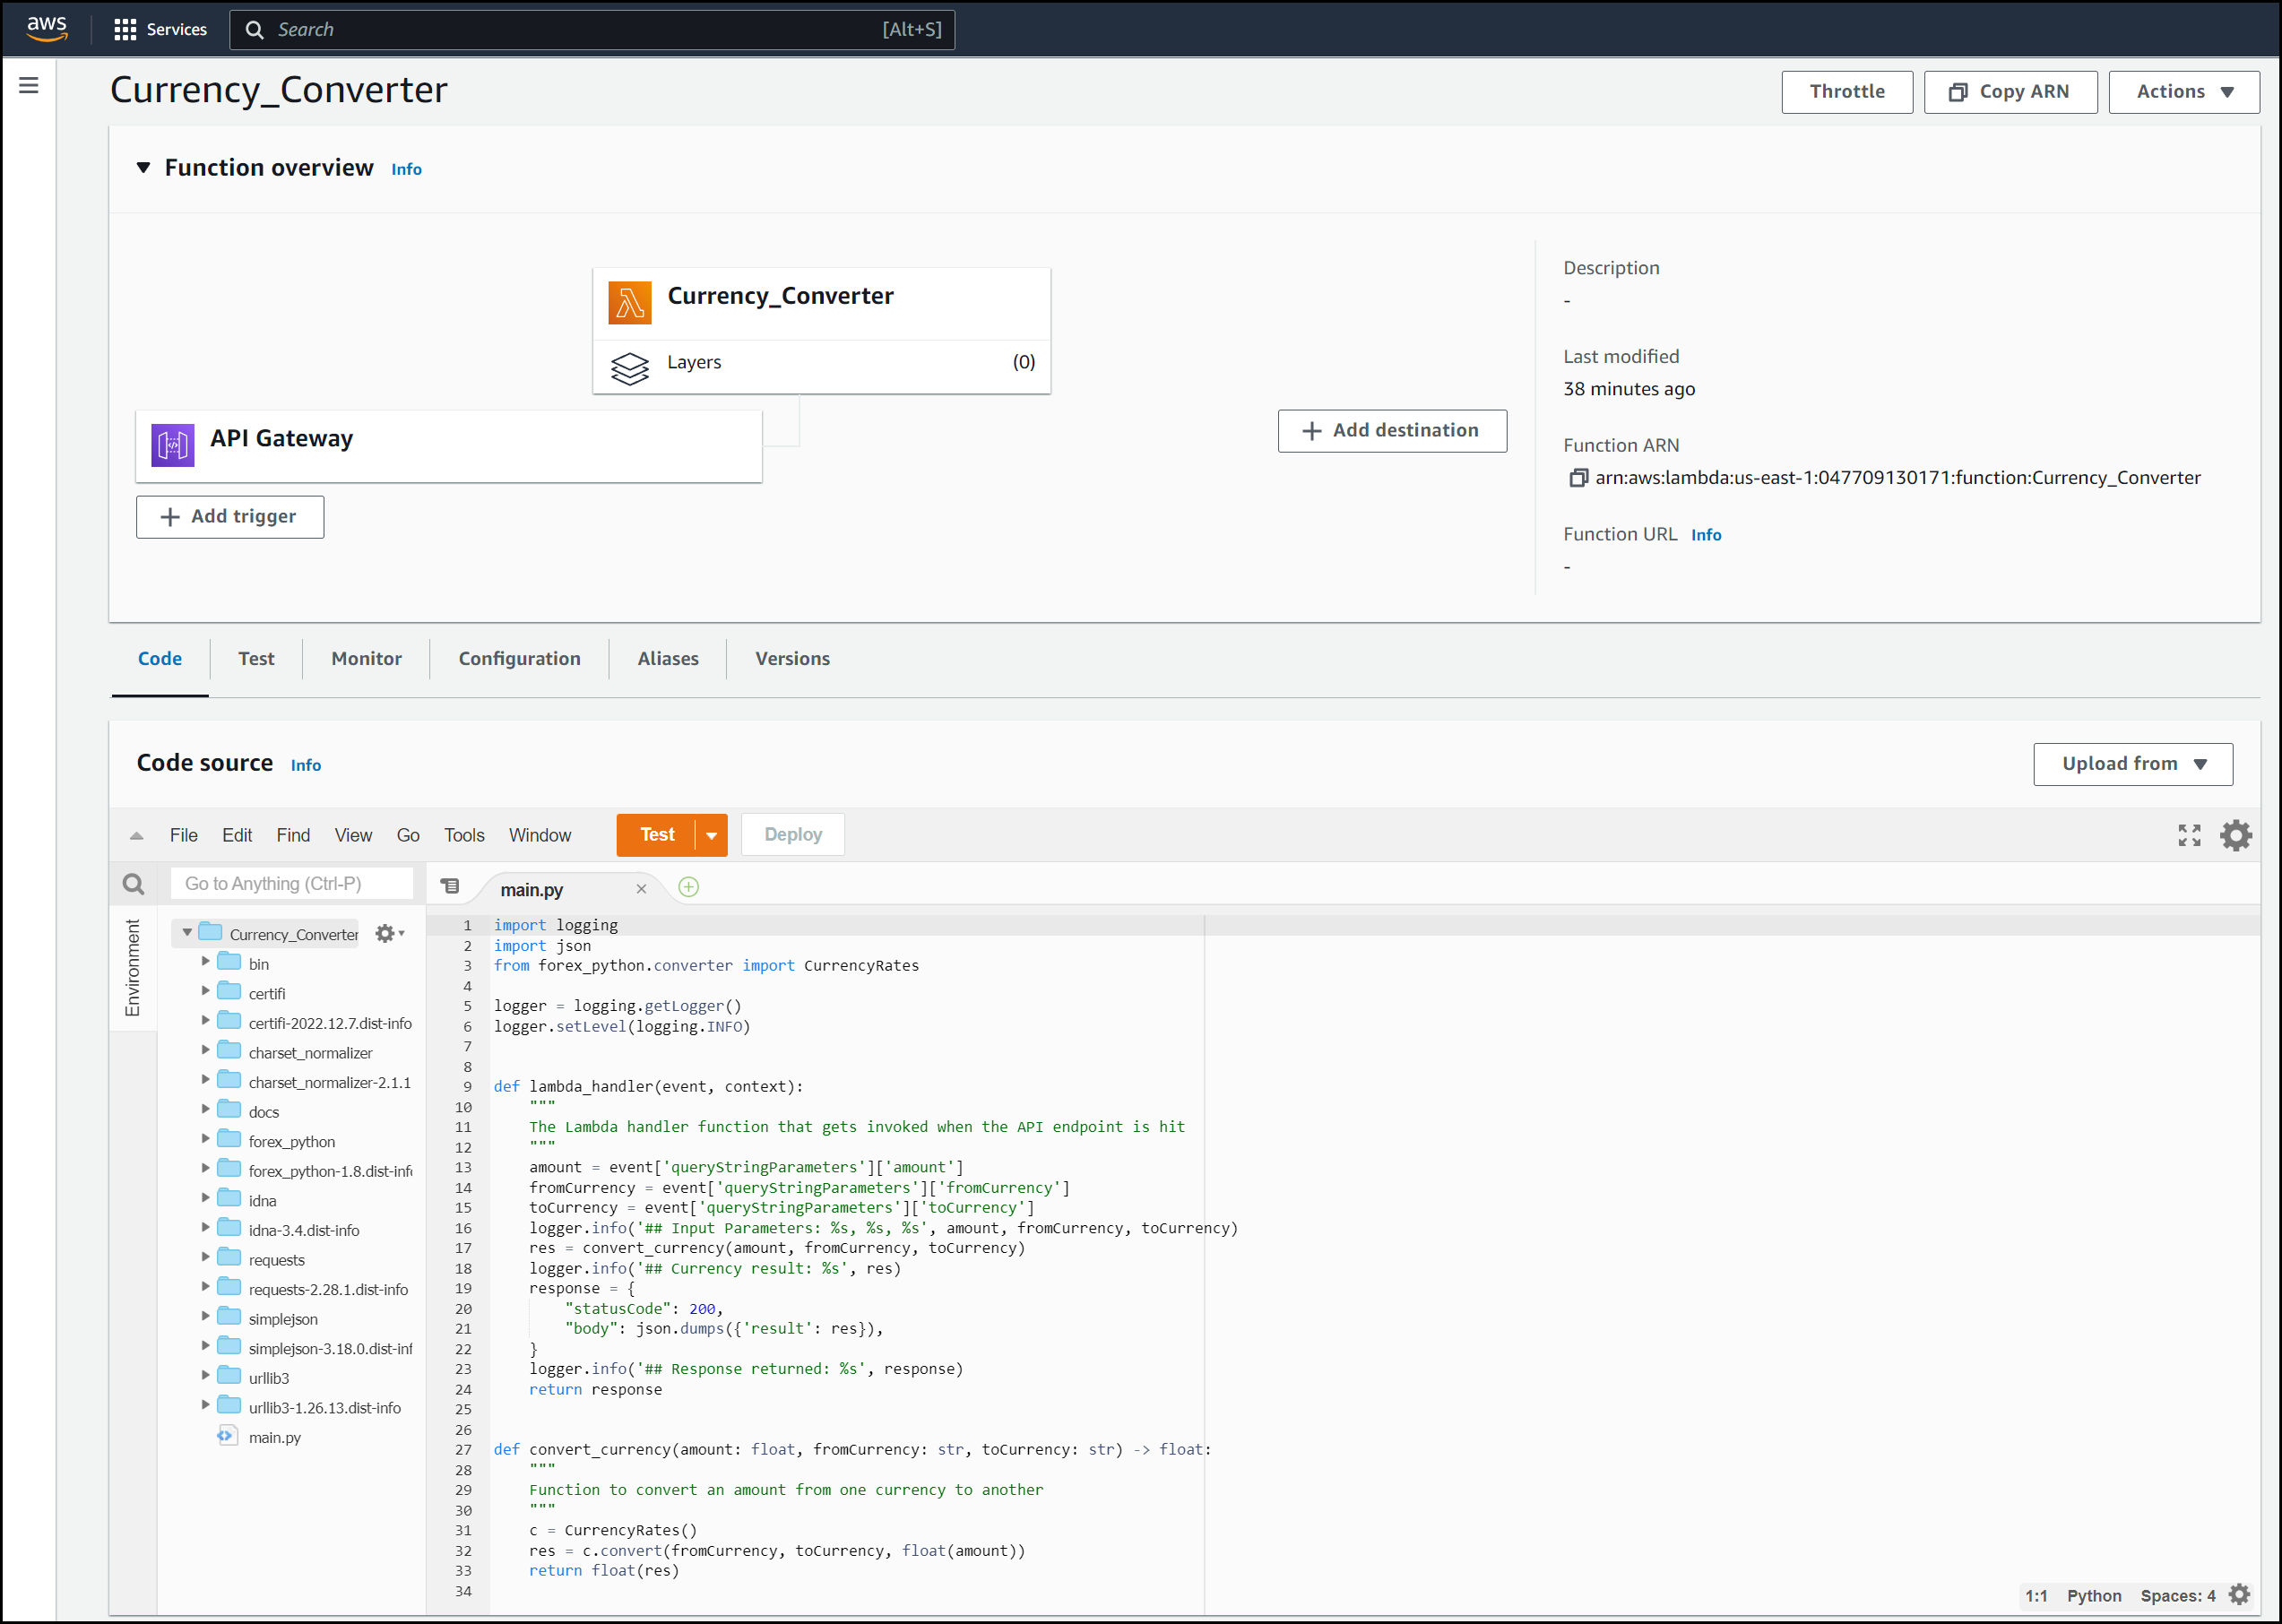
Lambda View in the Console
API Gateway
Now let’s focus our attention on the API gateway. We will use the API gateway as a REST API. The lambda integration with the API gateway is pretty straightforward. Take a look at the diagram below:
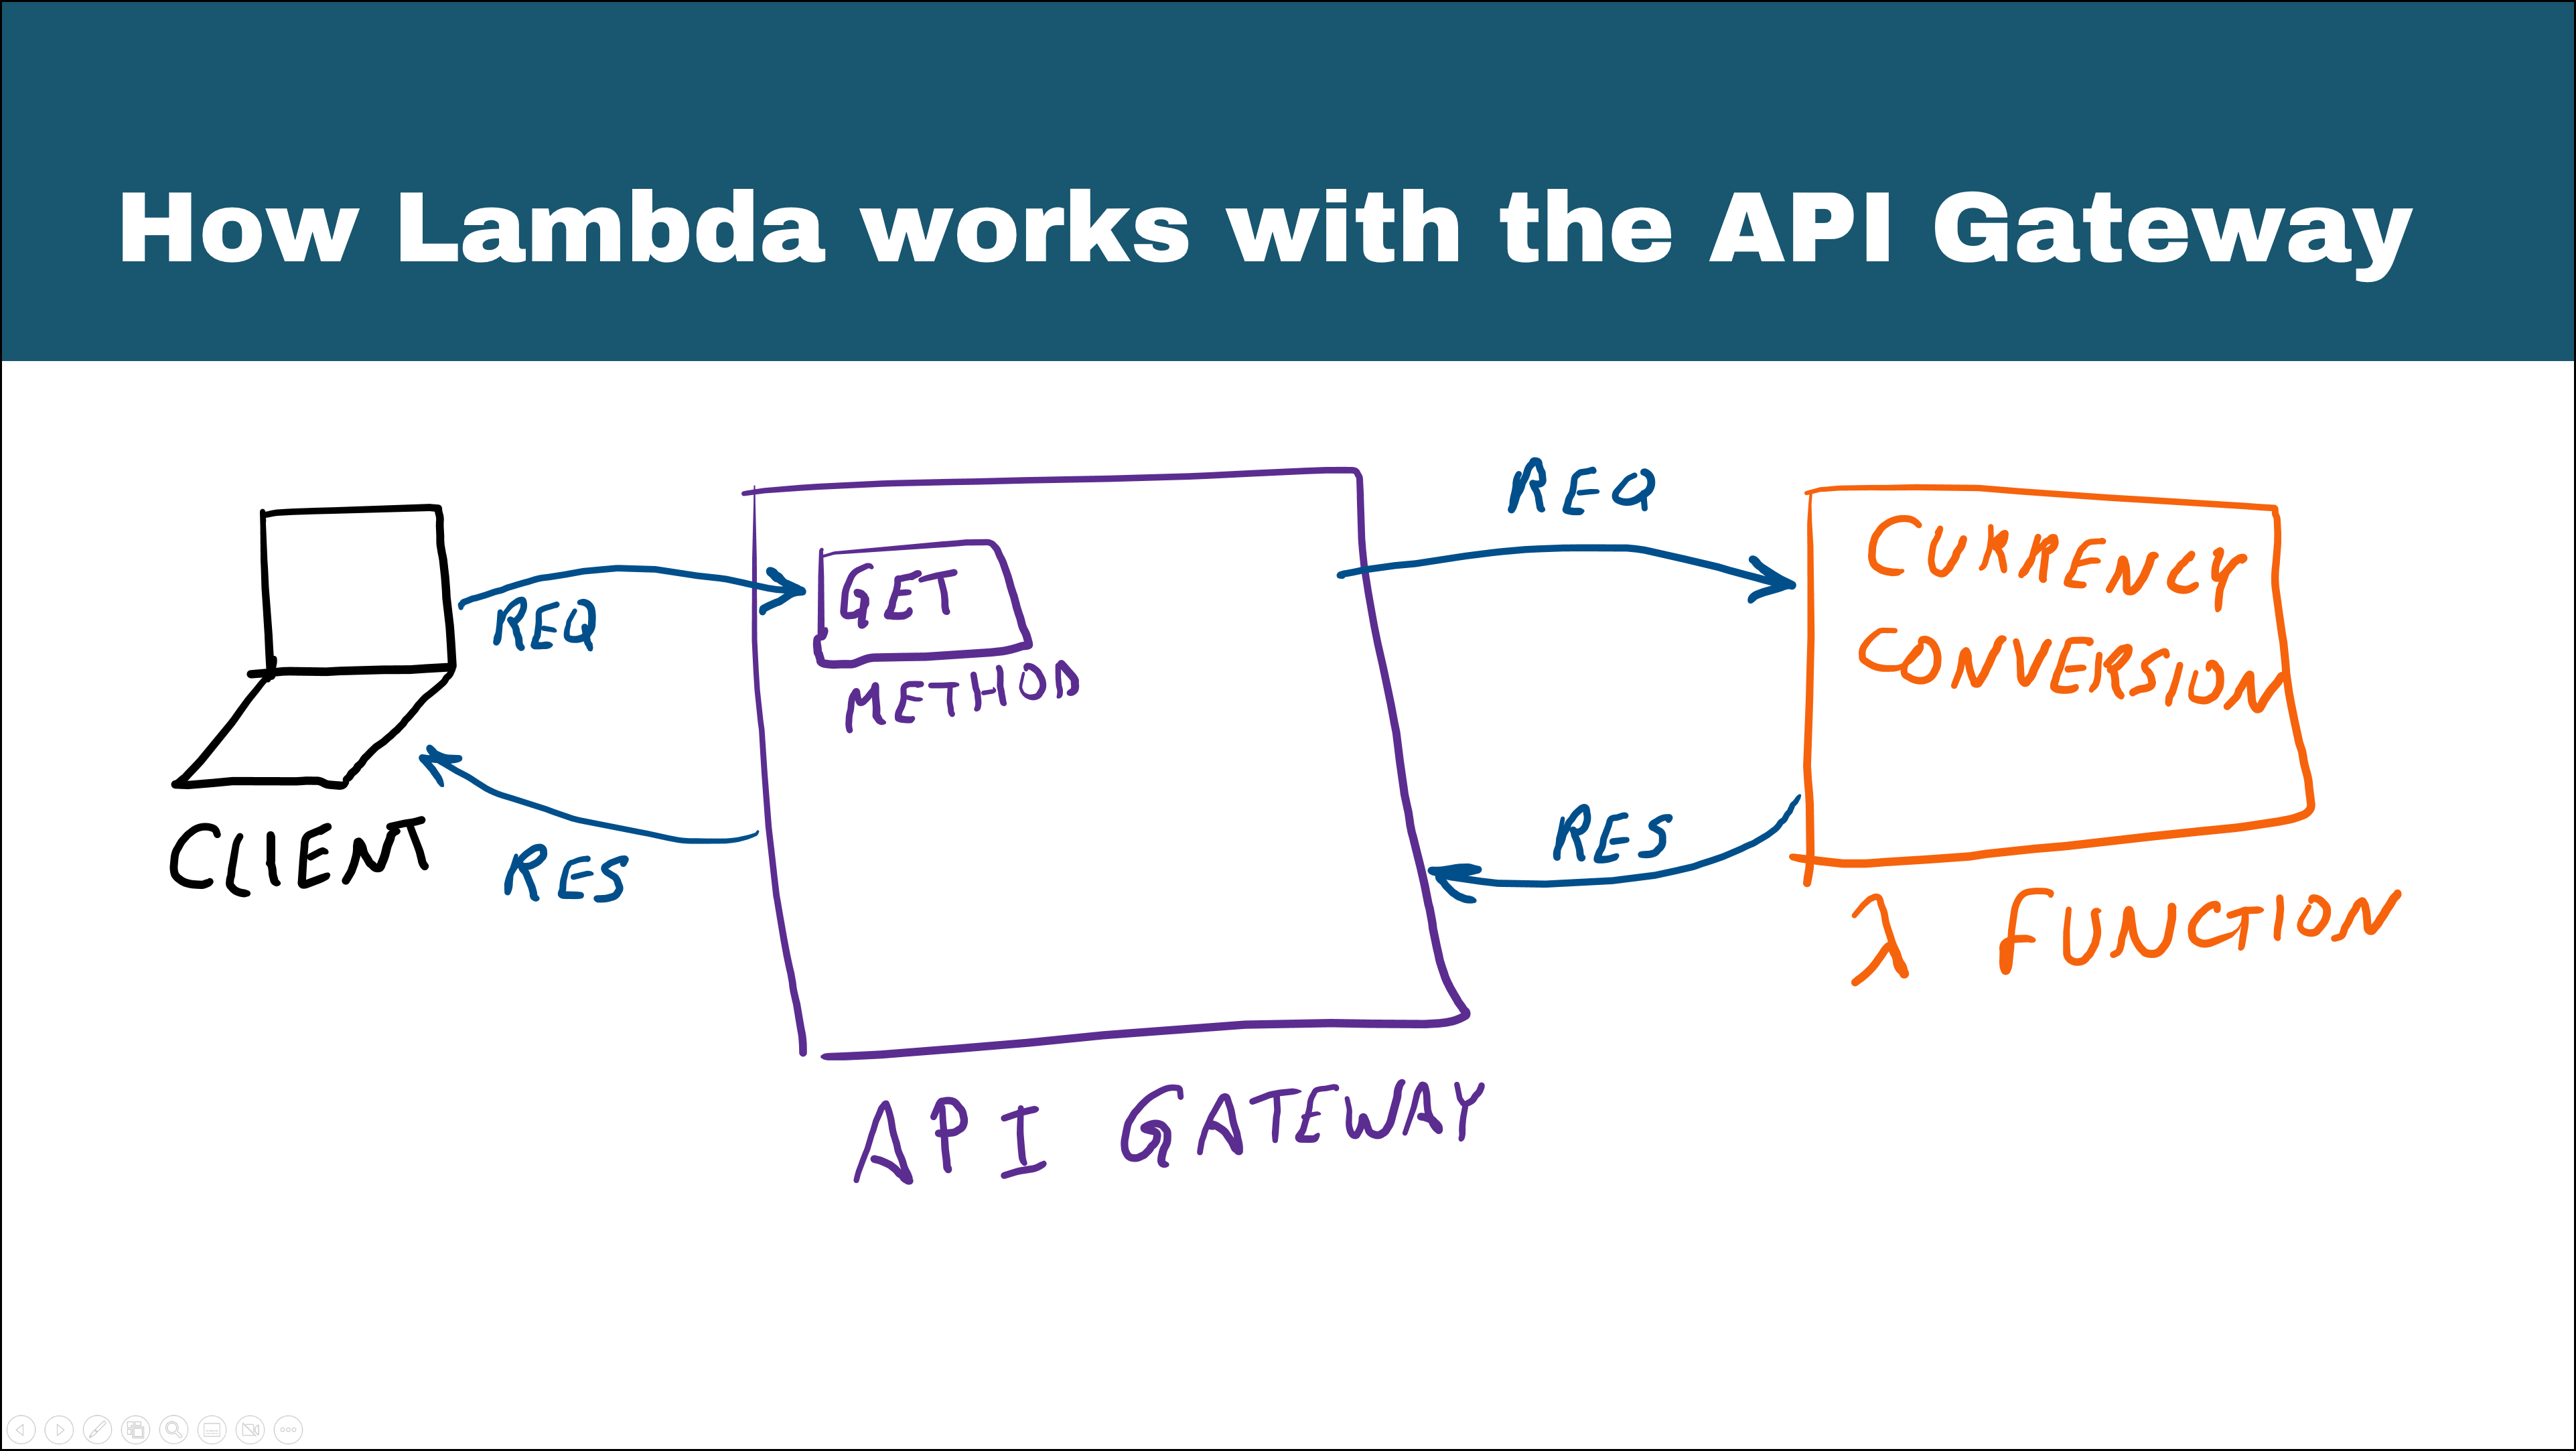
Lambda Integration with the API Gateway
We will use Terraform to get everything set up. Moreover, Terraform can be used for new API versions when we need updates.
Let’s take a look at the terraform configuration for the API gateway:
resource "aws_api_gateway_rest_api" "example_api" {
  name = "example_api"
}

resource "aws_api_gateway_resource" "example_resource" {
  rest_api_id = aws_api_gateway_rest_api.example_api.id
  parent_id   = aws_api_gateway_rest_api.example_api.root_resource_id
  path_part   = var.endpoint_path
}

resource "aws_api_gateway_method" "example_method" {
  rest_api_id   = aws_api_gateway_rest_api.example_api.id
  resource_id   = aws_api_gateway_resource.example_resource.id
  http_method   = "GET"
  authorization = "NONE"
}

resource "aws_api_gateway_integration" "integration" {
  rest_api_id             = aws_api_gateway_rest_api.example_api.id
  resource_id             = aws_api_gateway_resource.example_resource.id
  http_method             = aws_api_gateway_method.example_method.http_method
  integration_http_method = "POST"
  type                    = "AWS_PROXY"
  uri                     = aws_lambda_function.example_lambda.invoke_arn
}

resource "aws_lambda_permission" "apigw_lambda" {
  statement_id  = "AllowExecutionFromAPIGateway"
  action        = "lambda:InvokeFunction"
  function_name = aws_lambda_function.example_lambda.function_name
  principal     = "apigateway.amazonaws.com"
  source_arn    = "arn:aws:execute-api:${var.myregion}:${var.accountId}:${aws_api_gateway_rest_api.example_api.id}/*/${aws_api_gateway_method.example_method.http_method}${aws_api_gateway_resource.example_resource.path}"
}

resource "aws_api_gateway_deployment" "example" {
  rest_api_id = aws_api_gateway_rest_api.example_api.id
  triggers = {
    redeployment = sha1(jsonencode(aws_api_gateway_rest_api.example_api.body))
  }

  lifecycle {
    create_before_destroy = true
  }

  depends_on = [aws_api_gateway_method.example_method, aws_api_gateway_integration.integration]
}

resource "aws_api_gateway_stage" "example" {
  deployment_id = aws_api_gateway_deployment.example.id
  rest_api_id   = aws_api_gateway_rest_api.example_api.id
  stage_name    = "dev"
}
There are many resources here, but I’d like to draw your attention to a few:
- The
aws_api_gateway_method: Use this to create the different methods and any authorization needed. Here we only used aGETmethod with no authorization. - The
aws_api_gateway_integration: This is the way we get the lambda integration with the API gateway. For theAWS_PROXY, you have to use theintegration_http_methodofPOST. - The
aws_lambda_permissionis needed to allow the API gateway to talk to the Lambda function. - The
aws_api_gateway_deploymentand theaws_api_gateway_stageresources allow you to deploy the API gateway and give the stage a name, then you can access the endpoints.
Finally, as the application grows, it’s quite simple to add multiple services to the API gateway. These multiple services are basically lambda functions tied to certain API gateway methods.
Below is a screenshot of the API Gateway console. You can see the flow from the client through the API gateway to the Lambda function and back.
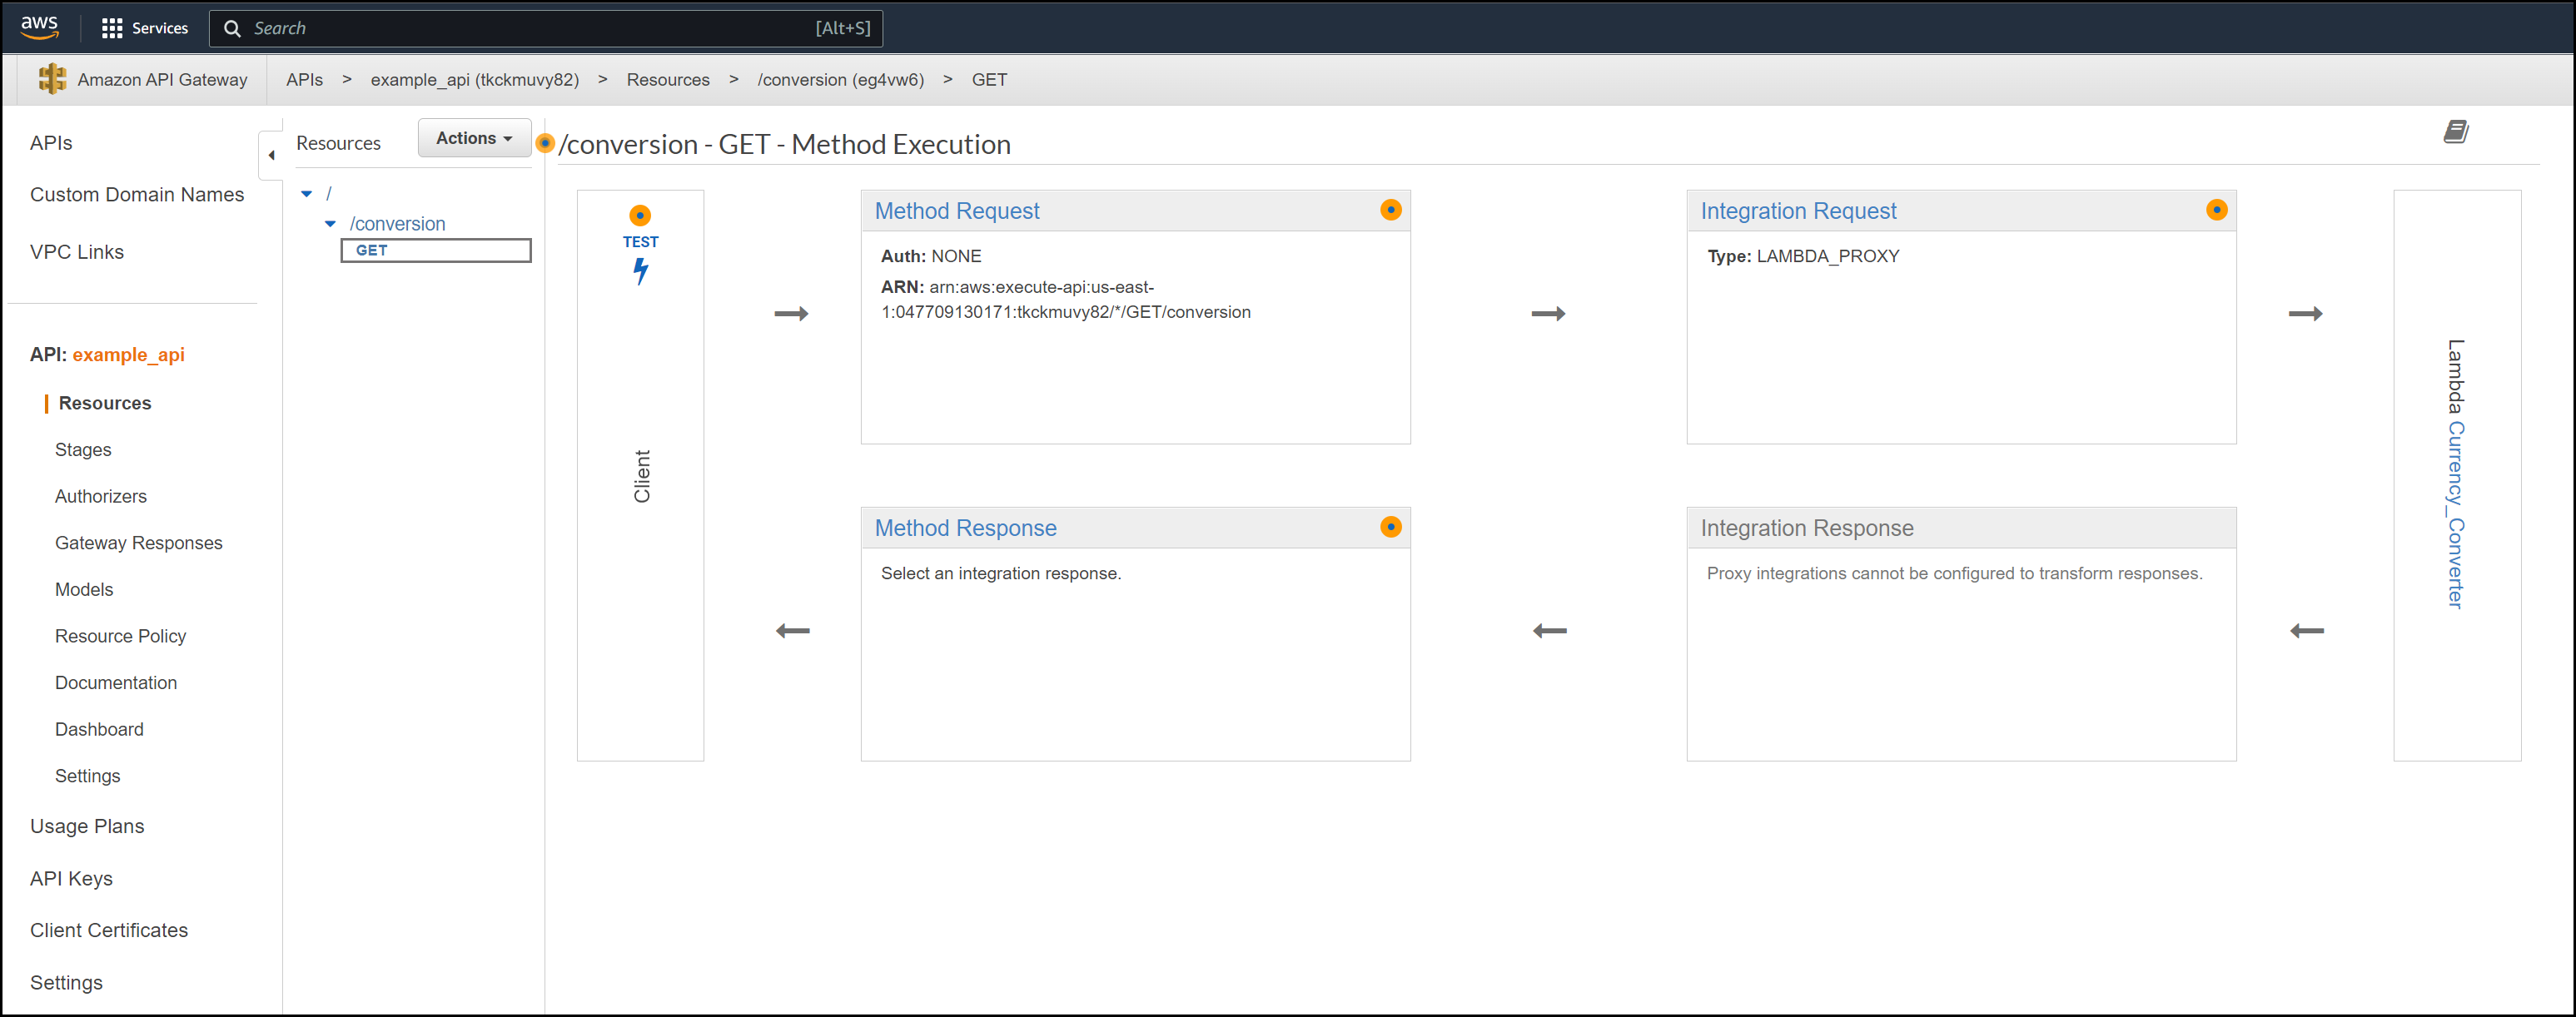
API Gateway View in the Console
CloudWatch
We can view the different cloudwatch logs as multiple requests come in. Take a look at the screenshot below.
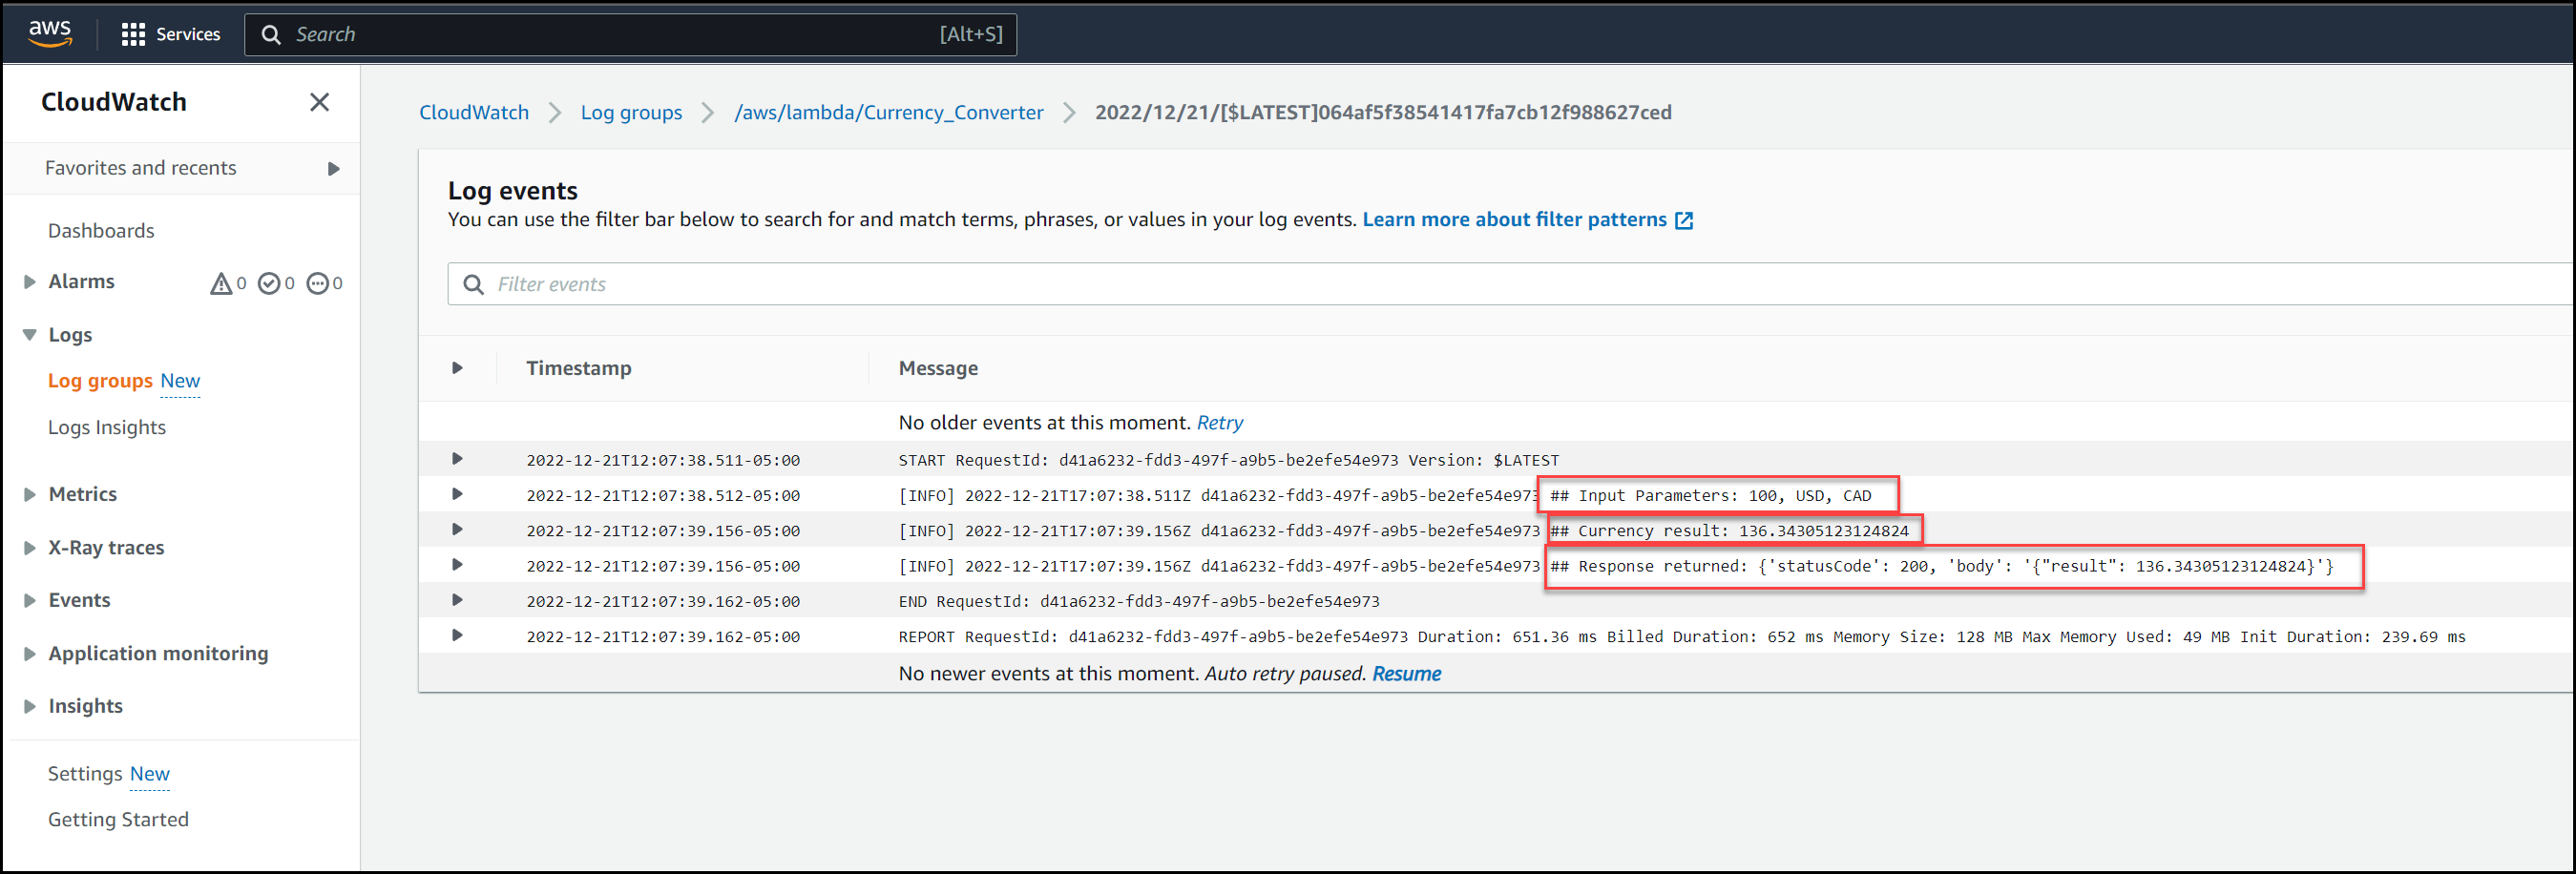
CloudWatch Logs
It’s good practice to output decent logs for troubleshooting. The above is just a quick example. It’s also good practice not to log any sensitive data.
Conclusion
In conclusion, microservices architectures offer a variety of benefits for businesses looking to improve their applications. They allow for increased scalability and faster time-to-market, while also providing increased security and reliability. To take full advantage of these benefits, companies should consider making use of an AWS API Gateway in combination with Lambda functions. This combination of technologies can provide an effective, cost-efficient way to enhance application development efforts. By utilizing these tools and strategies, businesses can ensure they are building applications that are secure, scalable, and reliable.
That’s all for now! We hope this post has helped to shed some light on how microservices architectures, AWS API Gateways, and Lambda functions work together.
Furthermore, it showed in a very practical way how to get everything set up with Terraform in a true Infrastructure as Code fashion.
Suggested Reading
- Terraform Import Example – AWS EC2 Instance
- Jenkins, Vault, Terraform, Ansible, and Consul Delivering an End-to-End CI/CD Pipeline
Code
Hi and Welcome!
Join the Newsletter and get FREE access to all my Source Code along with a couple of gifts.