

Introduction
Don’t have time and want to learn the basics of Terraform quickly? Get started with this Terraform for beginners guide.
Video
Below is a video explanation and demo.
Video Chapters
You can skip to the relevant chapters below:
- 00:00 – Course Introduction
- 01:30 – Slides
- 05:57 – Lab01 Basic Commands
- 16:22 – Lab02 Lock and State Files
- 23:47 – Lab03 Variables
- 31:50 – Lab04 Variables Continued
- 35:11 – Lab05 AWS Setup and Outputs
- 40:50 – Lab06 Data Blocks
- 45:00 – Lab07 Another Provider
- 52:31 – Lab08 Modules
- 59:44 – Lab09 A Web Server
Overview
Learn the basic concepts of Terraform in this step-by-step terraform course for beginners with hands-on labs. By no means will you master Terraform by the end of this course, but you will have a solid foundation to build upon. There are many Terraform courses out there and I even offer one myself, but I wanted to create one that is concise enough to take in one sitting and get the gist of Terraform. Learning terraform is not difficult, you just need to understand the basics and practice a lot.
Pre-requisites
The following is required to follow along:
- Terraform and Docker or use GitHub’s Codespaces or Gitpod as your development environment. The code repo is equipped with it.
- An AWS account or if you’re subscribed to the TeKanAid Academy Subscription you get your own AWS account on demand.
I. Introduction
Terraform is a popular tool used for infrastructure provisioning and management. Using a simple, human-readable language, it allows users to define and manage resources across multiple cloud providers, including Amazon Web Services (AWS), Google Cloud Platform (GCP), and Microsoft Azure. In this Terraform course, we will introduce the topic of Terraform and its use in infrastructure management, and guide beginners on how to get started.
Terraform has become a crucial tool in modern DevOps practices. It allows for infrastructure as code, which means that infrastructure can be managed in the same way as software, with version control, testing, and collaboration. This increases efficiency, reduces errors, and enables more frequent and reliable deployments. Additionally, Terraform makes it easy to automate the provisioning and management of resources across multiple providers, making it a powerful tool for multi-cloud and hybrid environments. Not only does it automate cloud computing infrastructure, but also many of the on-prem infrastructure.
This Terraform tutorial is intended for beginners who are new to Terraform. We will cover the basics of Terraform, including its configuration, and usage with a local deployment in Docker and a cloud deployment in AWS. We will also discuss variables and how to use Terraform modules. By the end of this course, you will have a solid understanding of Terraform and be able to start experimenting with it in your own infrastructure automation projects.
II. What You Will Learn in this Terraform Course
In this Terraform course, we will first learn what Infrastructure as Code is and its purpose. Then we will learn the basics of Terraform using 2 hands-on examples. A local Docker image that we will run using Terraform and a cloud example where we will deploy an EC2 instance in the AWS infrastructure.
Through these 2 examples, we will learn the following:
-
Basic Terraform Commands
- terraform init
- terraform fmt
- terraform validate
- terraform plan
- terraform apply
- terraform destroy
-
The State Lock File
-
The State File
-
Variables
-
Modules
Let’s first cover some concepts before diving into the hands-on portion.
III. Infrastructure as code – its Benefits and Purpose
Infrastructure as code (IaC) is a practice that enables the management of infrastructure in a similar way to software development. It involves using code to define, provision, and manage infrastructure resources, instead of manually configuring them through a web interface or other manual processes. The code used to automate infrastructure is typically written in a language that is both machine-readable and human-readable, such as HashiCorp Configuration Language (HCL), used by Terraform.
The benefits of using IaC are many, including increased efficiency, consistency, and reliability. It allows for version control of infrastructure, so changes can be tracked and rolled back if necessary. This makes it easier to detect and fix errors, and to collaborate with other teams. IaC also enables automated testing and deployment of infrastructure, which can speed up development and deployment cycles. When it comes to managing infrastructure, IaC makes it possible to manage resources across multiple cloud providers, making it a powerful tool for multi-cloud and hybrid environments.
The primary purpose of IaC is to make infrastructure management more efficient, reliable, and consistent. It allows for the automation of provisioning and management tasks, reducing the risk of human error and increasing the speed of development and deployment cycles. Additionally, it makes it possible to manage resources across multiple cloud providers, making it a powerful tool for multi-cloud and hybrid environments. IaC also provides an audit trail of infrastructure changes, making it easy to track and roll back changes when necessary. With IaC it is possible to manage and provision infrastructure with the same level of control and precision as software development and deployment.
IV. Terraform Core concepts
Let’s explore some of the core concepts in Terraform.
Terraform Core and Provider Plugins
In Terraform, the core is the main program that reads the configuration files, manages the state file, and creates the execution plan. It is responsible for the overall orchestration of the Terraform workflow, but it does not have any built-in knowledge of the specific resources or services that are being managed.
On the other hand, providers are plugins that add support for specific resources and services to Terraform. They are responsible for creating, updating, and deleting the resources defined in the configuration files. Providers are typically written in Golang, and they are typically developed and maintained by the companies or organizations that provide the resources or services being managed. Some examples of providers include the AWS provider, the GCP provider, the Azure provider, and the Kubernetes provider.
The core is the center of the Terraform ecosystem, it provides a common interface to interact with different providers and allows the management of resources from multiple providers in the same configuration file.
Configuration Files
One of the core concepts of Terraform is the use of configuration files to define and manage resources. These configuration files are written in a simple, human-readable language called HashiCorp Configuration Language (HCL). In these files, users can define the resources they want to create and manage and specify the desired state of those resources. Terraform will then take care of provisioning and managing those resources, making sure they always match the defined state. This allows for easy automation of infrastructure management tasks and makes it easy to track and roll back changes.
Modules
Another core concept of Terraform is the use of modules. Modules are reusable units of Terraform code that can be used to organize and manage resources. They allow users to encapsulate specific functionality and share it across different parts of an infrastructure. Modules can also be shared and reused across different organizations and teams, making it easy to standardize infrastructure management practices. Additionally, using modules allows for better organization, improves the readability and maintainability of the code and makes it easier to reuse the same infrastructure code in multiple places.
V. Install Terraform
Installing Terraform is a straightforward process. The first step is to download the appropriate Terraform binary for your operating system from the Terraform website. Once the binary is downloaded, it can be installed by unzipping the archive and placing the executable in a directory included in the system’s PATH.
On Windows, you can install terraform via chocolatey package manager by running choco install terraform. On macOS, you can do so via homebrew by running brew install terraform.
After installation, you can confirm that Terraform is installed and check the version by running the command terraform -v in the command prompt or terminal. It is also recommended to set up authentication credentials for the cloud providers you will be working with before start using Terraform. For more details refer to this article.
If you’d like to follow along in GitHub codespaces, you will find that I’ve already installed Terraform for you.
VI. Terraform Configuration
Terraform configuration is the process of defining and managing resources using HCL. The configuration files are used to specify the desired state of resources and Terraform will take care of provisioning and managing them to match that state. Understanding the basics of the configuration is key to effectively using Terraform for infrastructure management.
To create and manage resources with Terraform, you first need to define the resource in the configuration file. This is done using the “resource” block, where you specify the type of resource, its name, and any additional properties or arguments. Once the resource is defined, you can use Terraform commands to create, update, or delete the resource. For example, the command “terraform apply” can be used to create or update resources defined in the configuration file.
In Terraform, variables and modules are used to increase the flexibility and reusability of the configuration. Variables allow you to define values that can be used across different parts of the configuration, making it easier to manage and update resources. Modules, on the other hand, are reusable units of Terraform code that can be used to organize and manage resources. They allow users to encapsulate specific functionality and share it across different parts of the infrastructure, making it easy to standardize infrastructure management practices.
VII. The State File
The Terraform state file is a record of the resources that have been created and managed by Terraform. It contains information about the current state of the resources, such as their properties and metadata. The state file is used by Terraform to determine what actions need to be taken to make the actual infrastructure match the desired state defined in the configuration files.
The state file is an important part of the Terraform workflow, as it is used to keep track of the resources that have been created and to ensure that the actual infrastructure matches the desired state. Terraform uses the state file to determine the difference between the current state and the desired state, and then takes the necessary actions to make the two match. Additionally, the state file is also used to store metadata such as the resource dependencies, it allows Terraform to create, update and delete resources in the correct order and avoid errors.
The state file is stored locally by default, but it can also be stored in a remote location such as Terraform Cloud or an S3 bucket which allows for collaboration and versioning, it also enables users to have a clear track of all the changes made to the infrastructure. The state file is also used as a source of truth to ensure that the infrastructure is in the correct state and to prevent conflicts when multiple people are working on the same configuration simultaneously.
The state file is an essential part of the Terraform workflow and it plays a crucial role in ensuring that the actual infrastructure matches the desired state, it also helps to track the resources that have been created and to store metadata such as resource dependencies. It allows for collaboration and versioning and also provides a clear track of all changes made to the infrastructure. It is important to regularly review and maintain the state file, and to use remote state management to ensure that it is always up-to-date and accurate. Additionally, it’s also recommended to use state locking to prevent conflicts and ensure that only one person is making changes to the state file at a time. Overall, the state file is a vital component of the Terraform workflow and its proper management is crucial for the success of your infrastructure management projects.
VIII. The State Lock File
The Terraform state lock file is a mechanism that is used to ensure that only one person can make changes to the Terraform state at a time. It is a file that is created automatically when Terraform acquires a lock on the state. The lock file contains information about the lock, such as the time it was acquired, the name of the person who acquired it, and the operation that is being performed. When another person tries to acquire a lock on the state while it is already locked, Terraform will refuse to continue and will display an error message. This feature is particularly useful when working in a team where multiple people may be working on the same configuration simultaneously, it helps to prevent conflicts and ensure that the state file is accurate and up-to-date.
IX. Terraform Basic Commands
Below are some of the most important commands to get started with Terraform.
terraform init
This command is used to initialize a Terraform working directory. It is the first command that should be run after writing a new configuration or cloning an existing one. The command downloads the necessary plugins and verifies that the configuration is syntactically correct.
terraform fmt
This command is used to format the configuration files. It automatically updates the indentation and whitespace of the configuration files to make them more readable and consistent.
terraform validate
This command is used to validate the syntax of the configuration files. It checks for any errors or issues in the configuration files that would prevent Terraform from running properly.
terraform plan
This command is used to create an execution plan for the configuration. It shows the resources that will be created, updated, or deleted and the changes that will be made. It also allows you to review the plan before making any changes to the infrastructure.
terraform apply
This command is used to apply the changes described in the configuration files. It creates, updates, or deletes the resources defined in the configuration files to match the desired state.
terraform destroy
This destroy command is used to destroy the resources created by Terraform. It deletes the resources defined in the configuration files and also removes these resources from the state file. It’s important to be careful when using this command as it can delete important resources and cause data loss. It’s always recommended to review the plan generated by the terraform destroy command before proceeding.
X. Input Variables
Input variables in Terraform are used to pass values into a Terraform configuration. They allow for the configuration to be easily parameterized, making it more flexible and reusable. Variables are defined in the configuration file using the “variable” block, where you specify the variable name, type, and default value. Once defined, variables can be referenced in the configuration using the ${var.name} syntax. When running Terraform commands, the user can provide values for the variables either by passing them as command-line options or by using a variable file. Input variables can also be used in modules to pass values between different parts of the infrastructure. Using variables makes it easy to manage and update resources without having to modify the configuration file itself, it also allows the use of the same configuration file across different environments and projects.
XI. AWS Infrastructure and Terraform
Terraform can be used to manage AWS resources by using the AWS provider. The AWS provider is a plugin for Terraform that allows for the creation and management of AWS resources. This provider can be configured with the appropriate AWS credentials and then used to define AWS resources in configuration files. Once the resources are defined, Terraform can be used to create, update, or delete the resources, ensuring that they always match the desired state.
Examples of common AWS resources that can be managed with Terraform include Amazon Elastic Compute Cloud (EC2) instances, Amazon Simple Storage Service (S3) buckets, and Amazon Virtual Private Clouds (VPCs). Additionally, Terraform can be used to manage other AWS services such as Elastic Load Balancing, Auto Scaling, and Amazon Relational Database Service (RDS).
When using Terraform with AWS, it is best practice to use separate configuration files and state files for different environments, such as development, staging, and production. This makes it easier to manage and track changes in different environments. Another best practice is to use modules to organize and manage resources, making it easy to share and reuse the same infrastructure code across different teams and projects.
XII. Terraform Modules
Terraform modules are reusable units of Terraform code that allow for the organization and management of resources. They provide a way to encapsulate specific functionality and share it across different parts of the infrastructure, making it easy to standardize infrastructure management practices. A module can contain resources, variables, and output, and can be called multiple times with different input variables to create multiple instances of the same infrastructure. This can greatly simplify the management of large and complex infrastructure.
Using modules in the configuration has many benefits, including increased reusability, maintainability, and readability of the code. By breaking down the infrastructure into smaller and more manageable pieces, it becomes easier to understand, test and modify. Modules also allow for better organization and make it easier to reuse the same infrastructure code in multiple places. Additionally, it makes it easier to share the same infrastructure code across different teams and organizations.
There are many common modules available for use in Terraform, such as modules for managing VPCs, security groups, subnets, and load balancers. Additionally, many cloud providers have their own set of modules for managing resources specific to their platform. For example, the AWS provider has a module for managing S3 buckets, and the GCP provider has a module for managing cloud SQL instances. To use a module, you simply need to specify the source of the module and provide any necessary input variables. You can use modules from the official Terraform Registry, or from other sources such as GitHub.
Hands-on Labs
Now let’s get to the hands-on portion. You can access the code using the form above.
1. Basic Commands
Let’s first take a look at our folder structure.
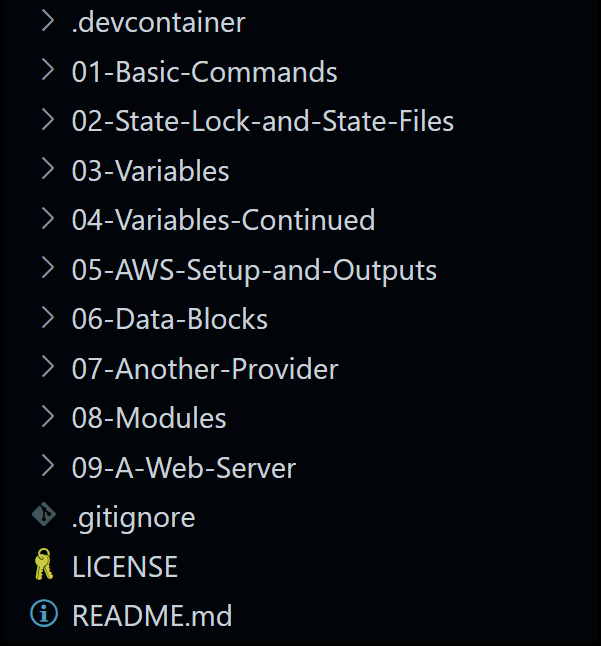
Folder Structure
Change your directory to the 01-Basic-Commands directory. Notice the main.tf file with the following configuration:
terraform {
  required_providers {
    docker = {
      source  = "kreuzwerker/docker"
      version = "3.0.1"
    }
  }
}

provider "docker" {}

resource "docker_image" "nginx_image" {
  name = "nginx:1.23.3"
}

resource "docker_container" "nginx_container" {
  name  = "web-server"
  image = docker_image.nginx_image.image_id
  ports {
    internal = 80
    external = 8080
  }
}
Now run terraform init to initialize a Terraform working directory. Notice the output of the command below:
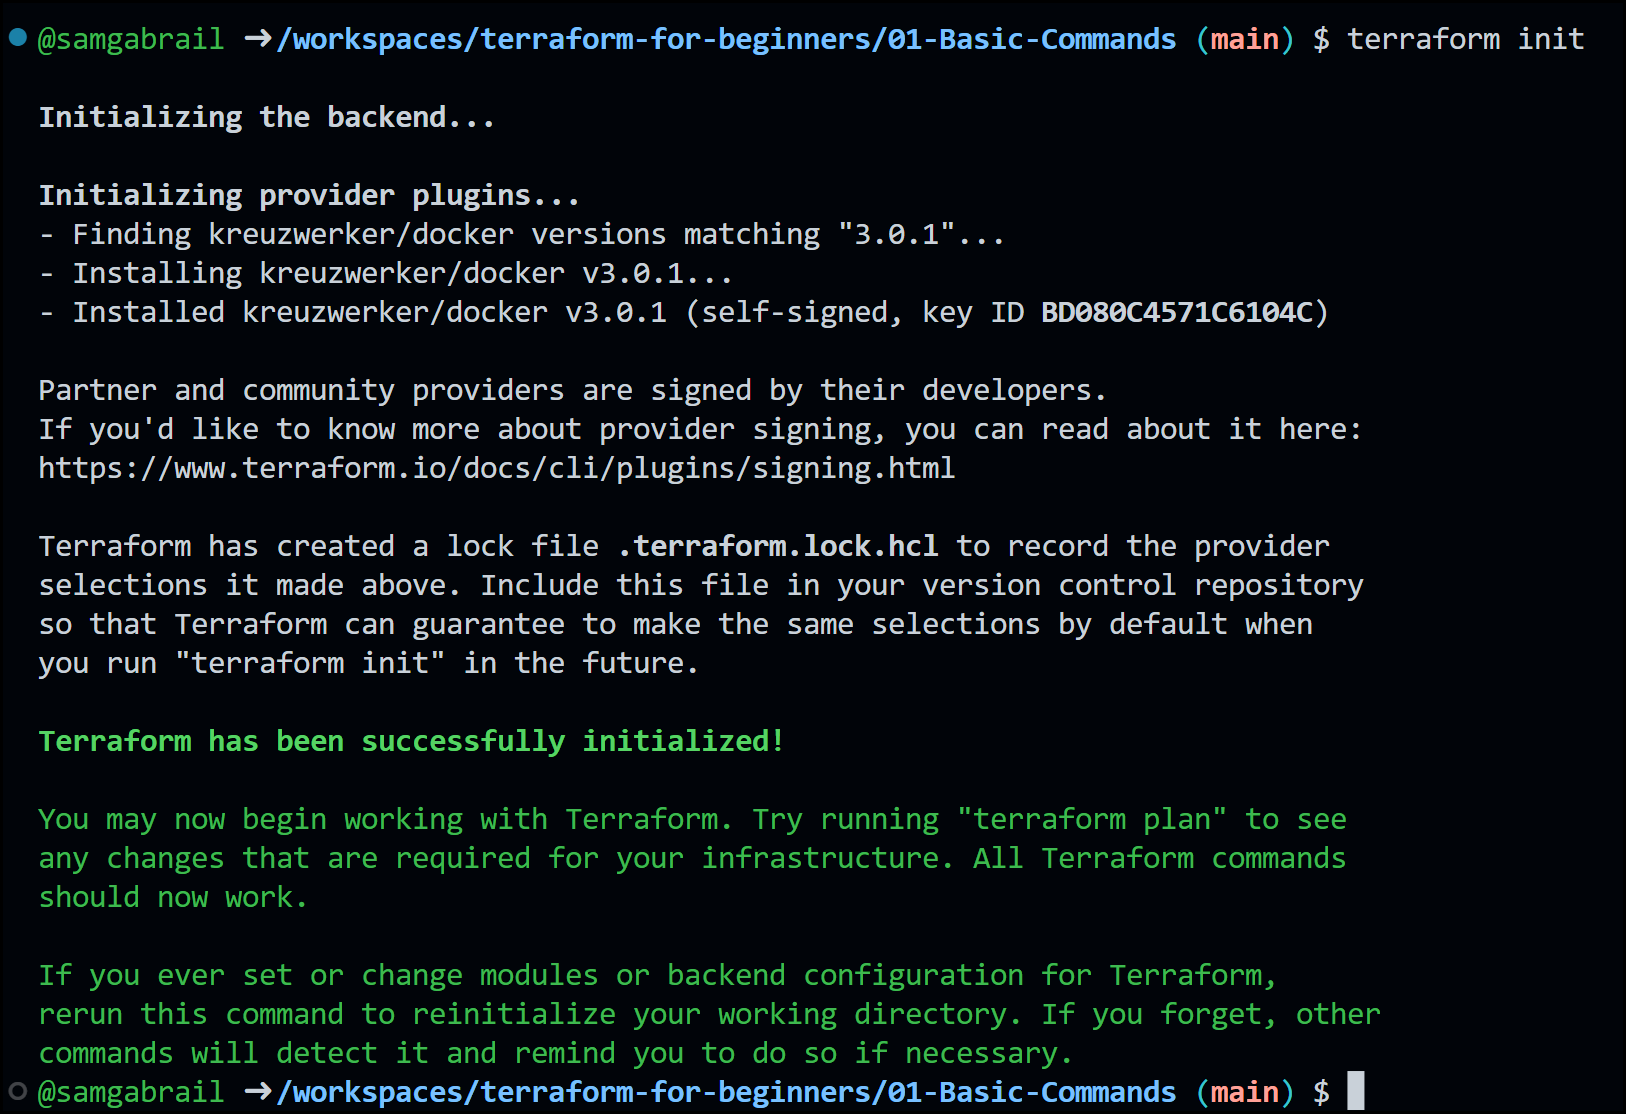
Terraform Init Output
As you can see, Terraform downloads and installs a Docker Terraform provider with version 3.0.1. Terraform also creates a lock file.
Let’s instruct Terraform to make adjustments to our main.tf file to fix indentation and make it more readable by running the terraform fmt command.
Moving on to try the terraform validate command. This checks the validity of our HCL syntax. If you haven’t made changes the main.tf file, then you will get a “Success! The configuration is valid” message.
Now try running the terraform plan command which creates a dry-run of the configuration
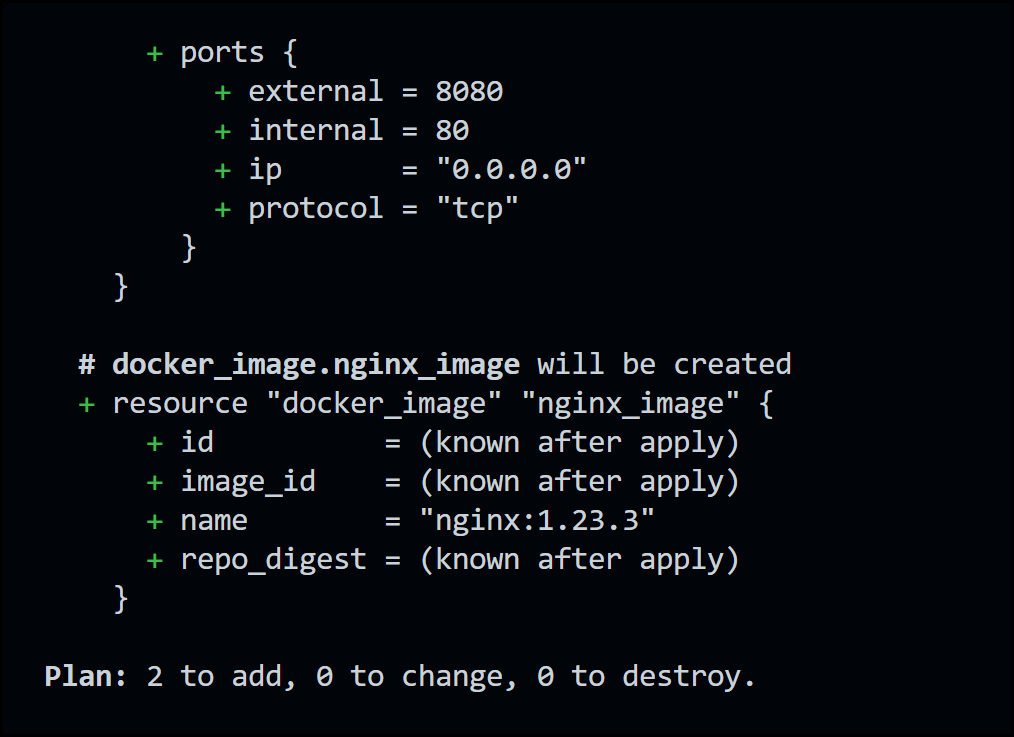
Terraform Plan Output
Notice that two resources will get created: a Docker image and a Docker container.
Next run terraform apply to create infrastructure for us.
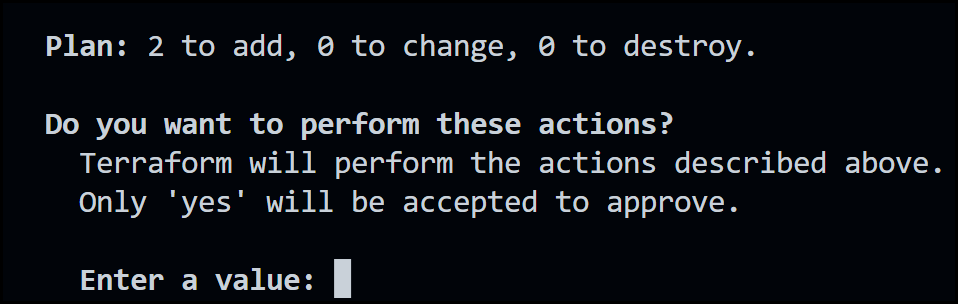
Terraform Apply Output
As you can see from the output above, terraform runs another terraform plan and then asks you if you’d like to perform the actions in the plan. Respond to the prompt with yes.
Notice the creation complete output message. We now have an NGINX image pulled into our local Docker environment with a container running with this image.
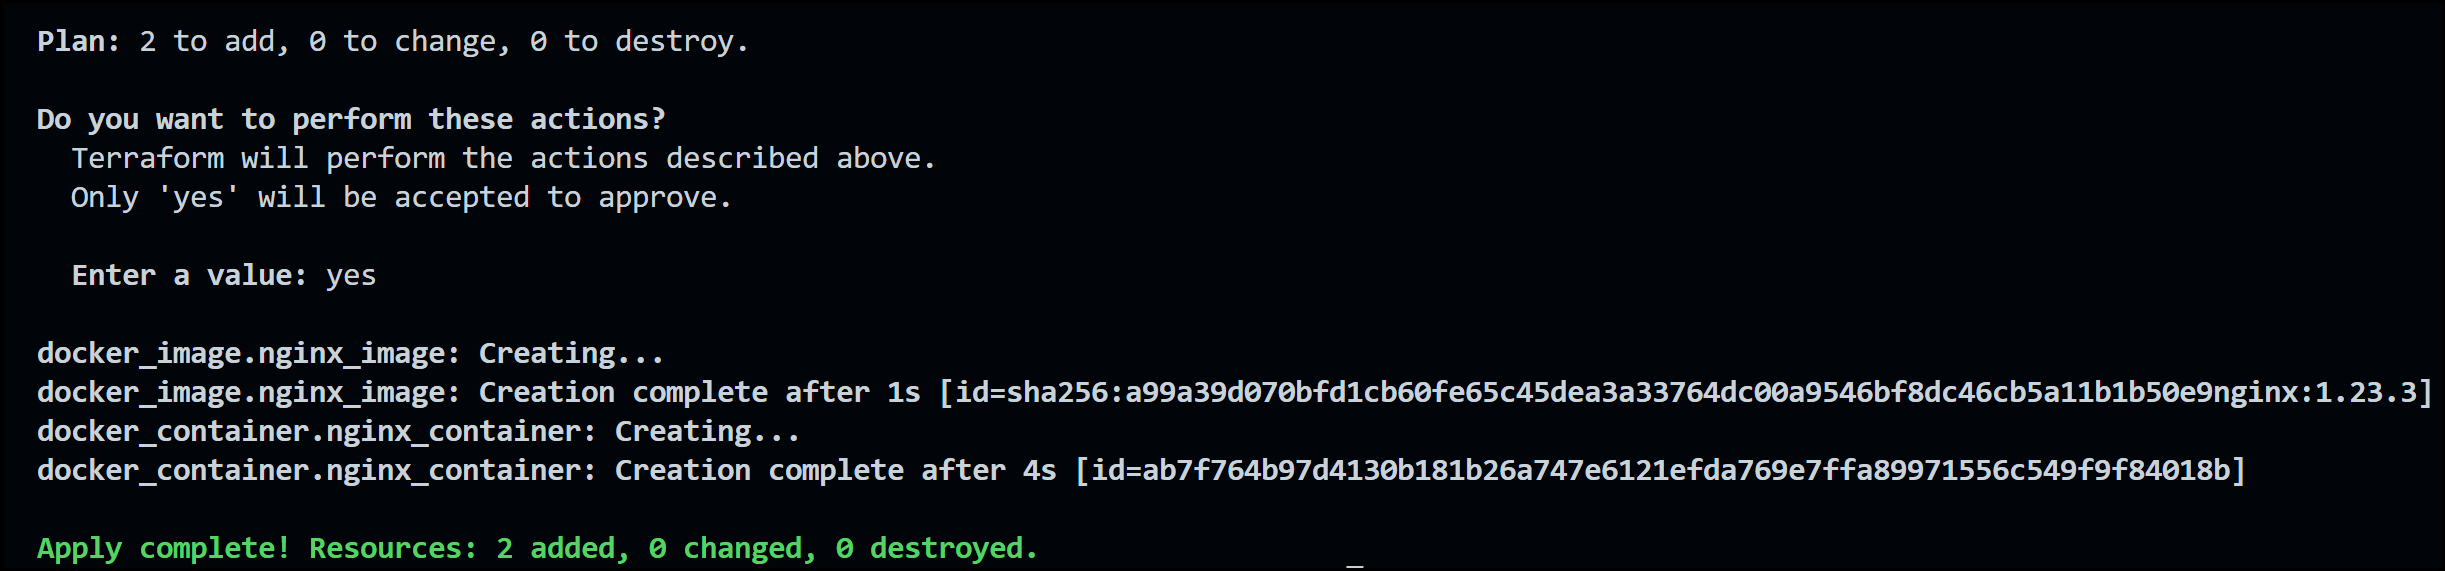
Terraform Apply Success

Docker Output
You can click on the dialogue window that opens in codespaces to open a browser tab to see the NGINX page.
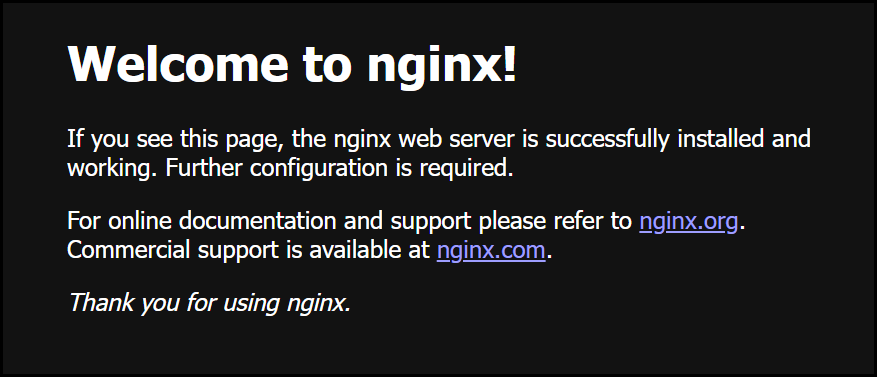
NGINX Welcome Screen
Finally, we can destroy our infrastructure easily with one command: terraform destroy. Try it out. Once again Terraform will run a plan first and prompt you if you really want to continue. Say yes
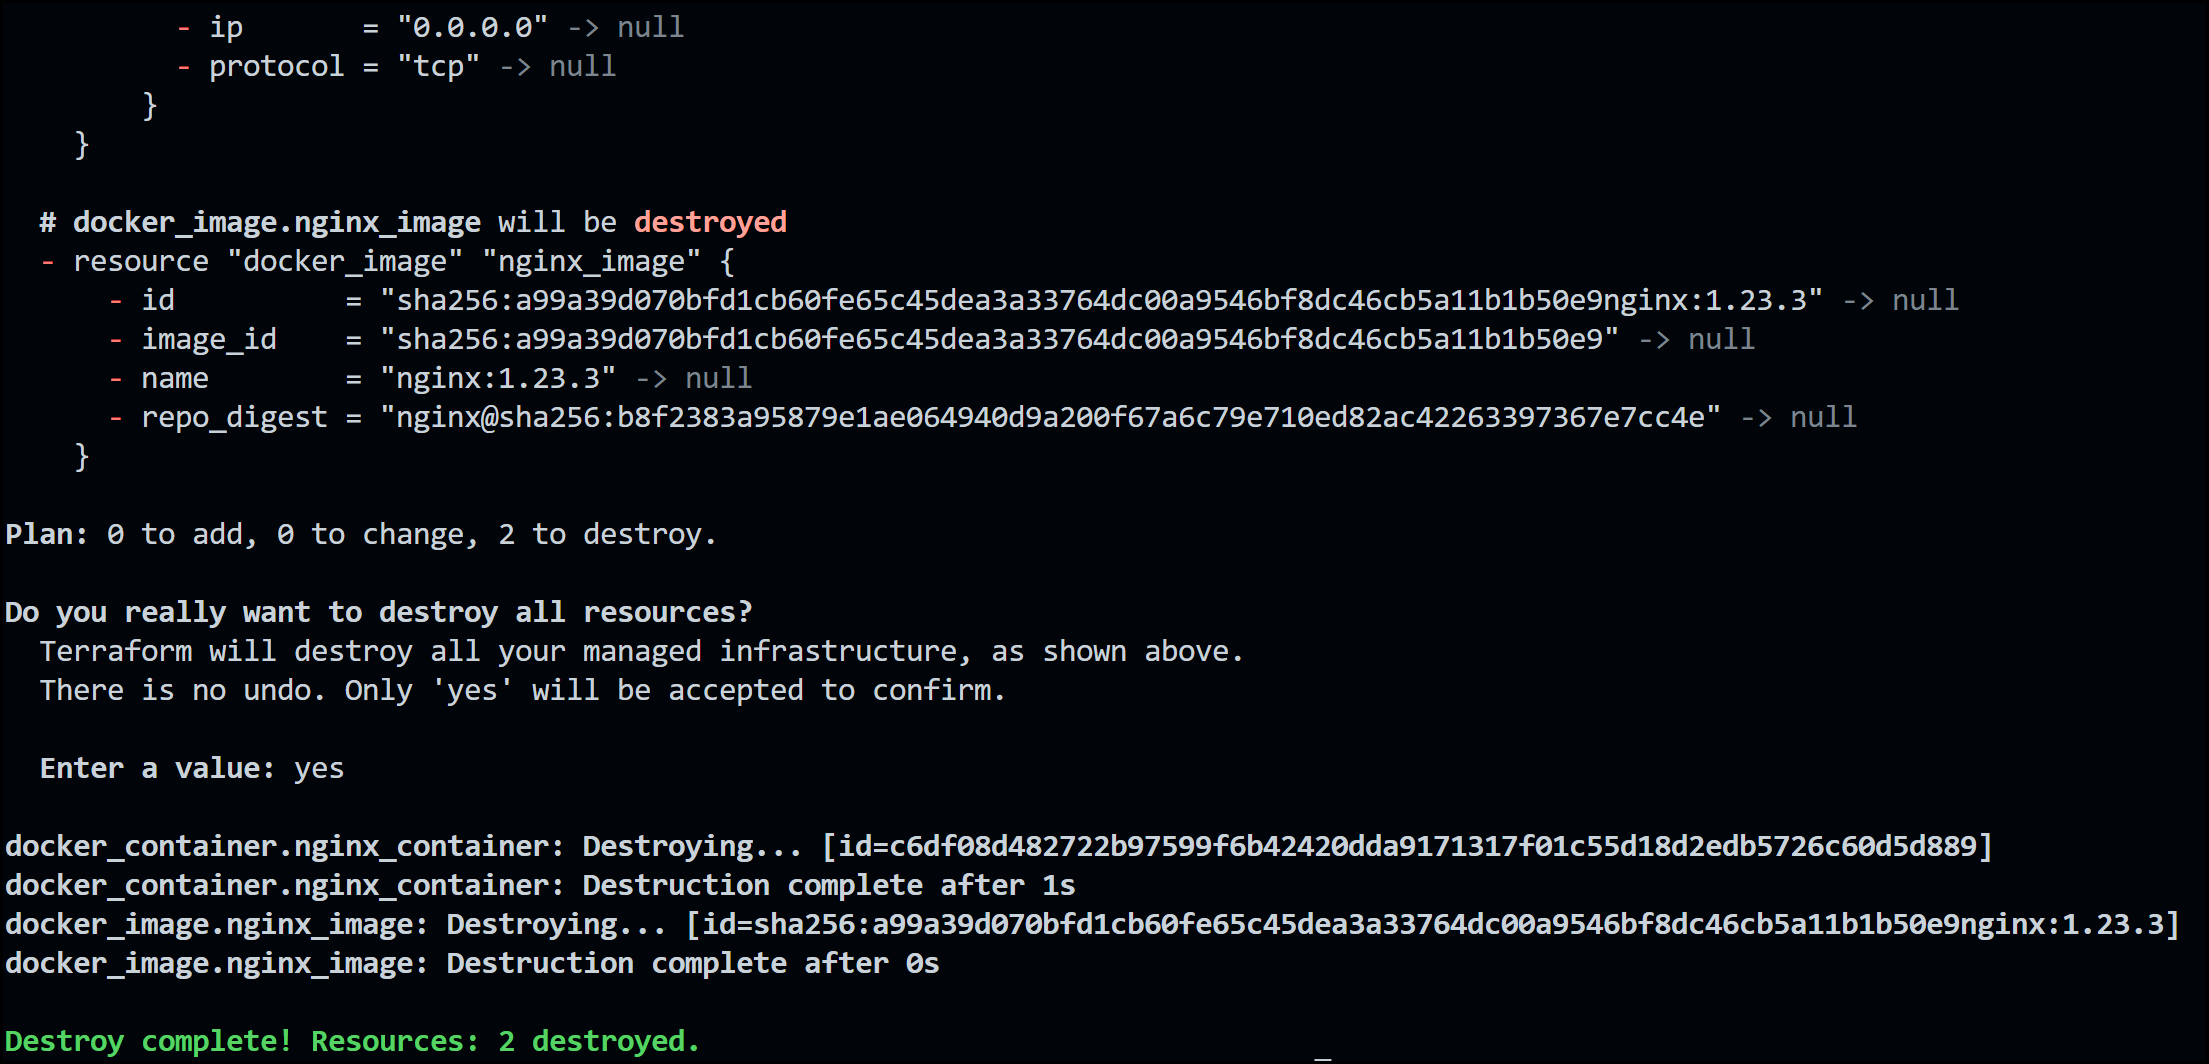
Terraform Destroy Output
Note: You can use the --auto-approve flag in conjuction with the terraform apply and the terraform destroy commands to bypass the prompt. This is useful when running Terraorm in CI/CD pipelines. It’s not adviasable to use it otherwise.
2. The Lock and State Files
Let’s now turn our attention to 2 important files that Terraform generated.
a. The Lock File .terraform.lock.hcl
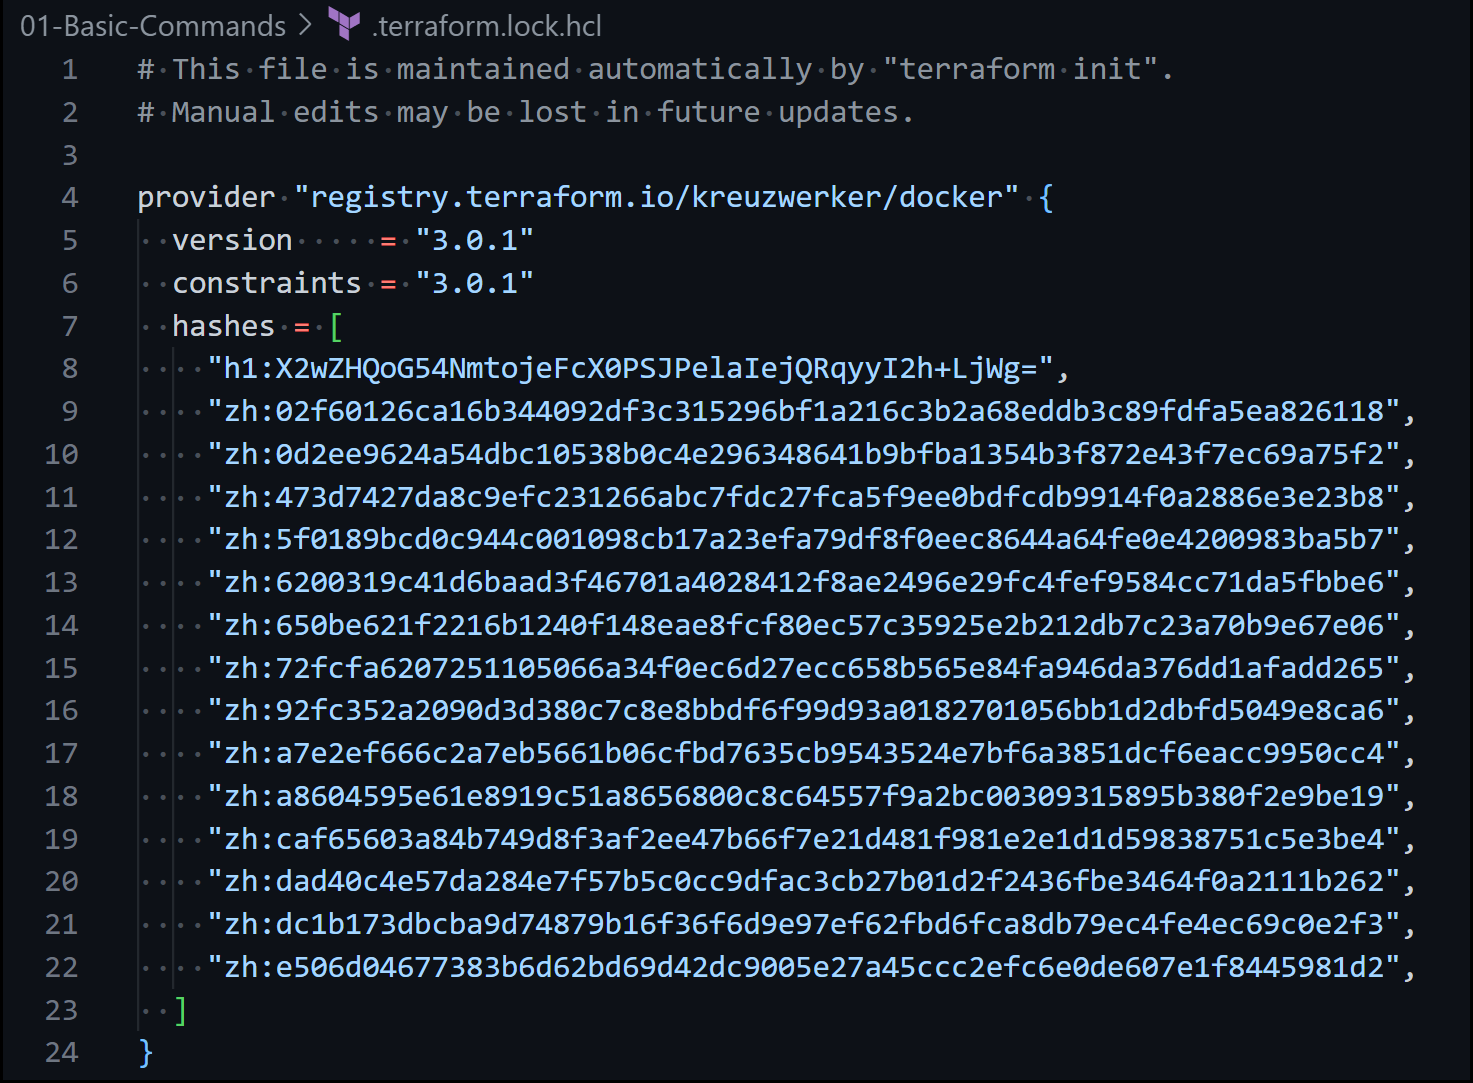
The Lock File
This file locks the version of our docker provider to 3.0.1. Locking provider versions is very important to ensure that your code doesn’t break in the future when newer versions of the provider are created.
b. The State File terraform.tfstate
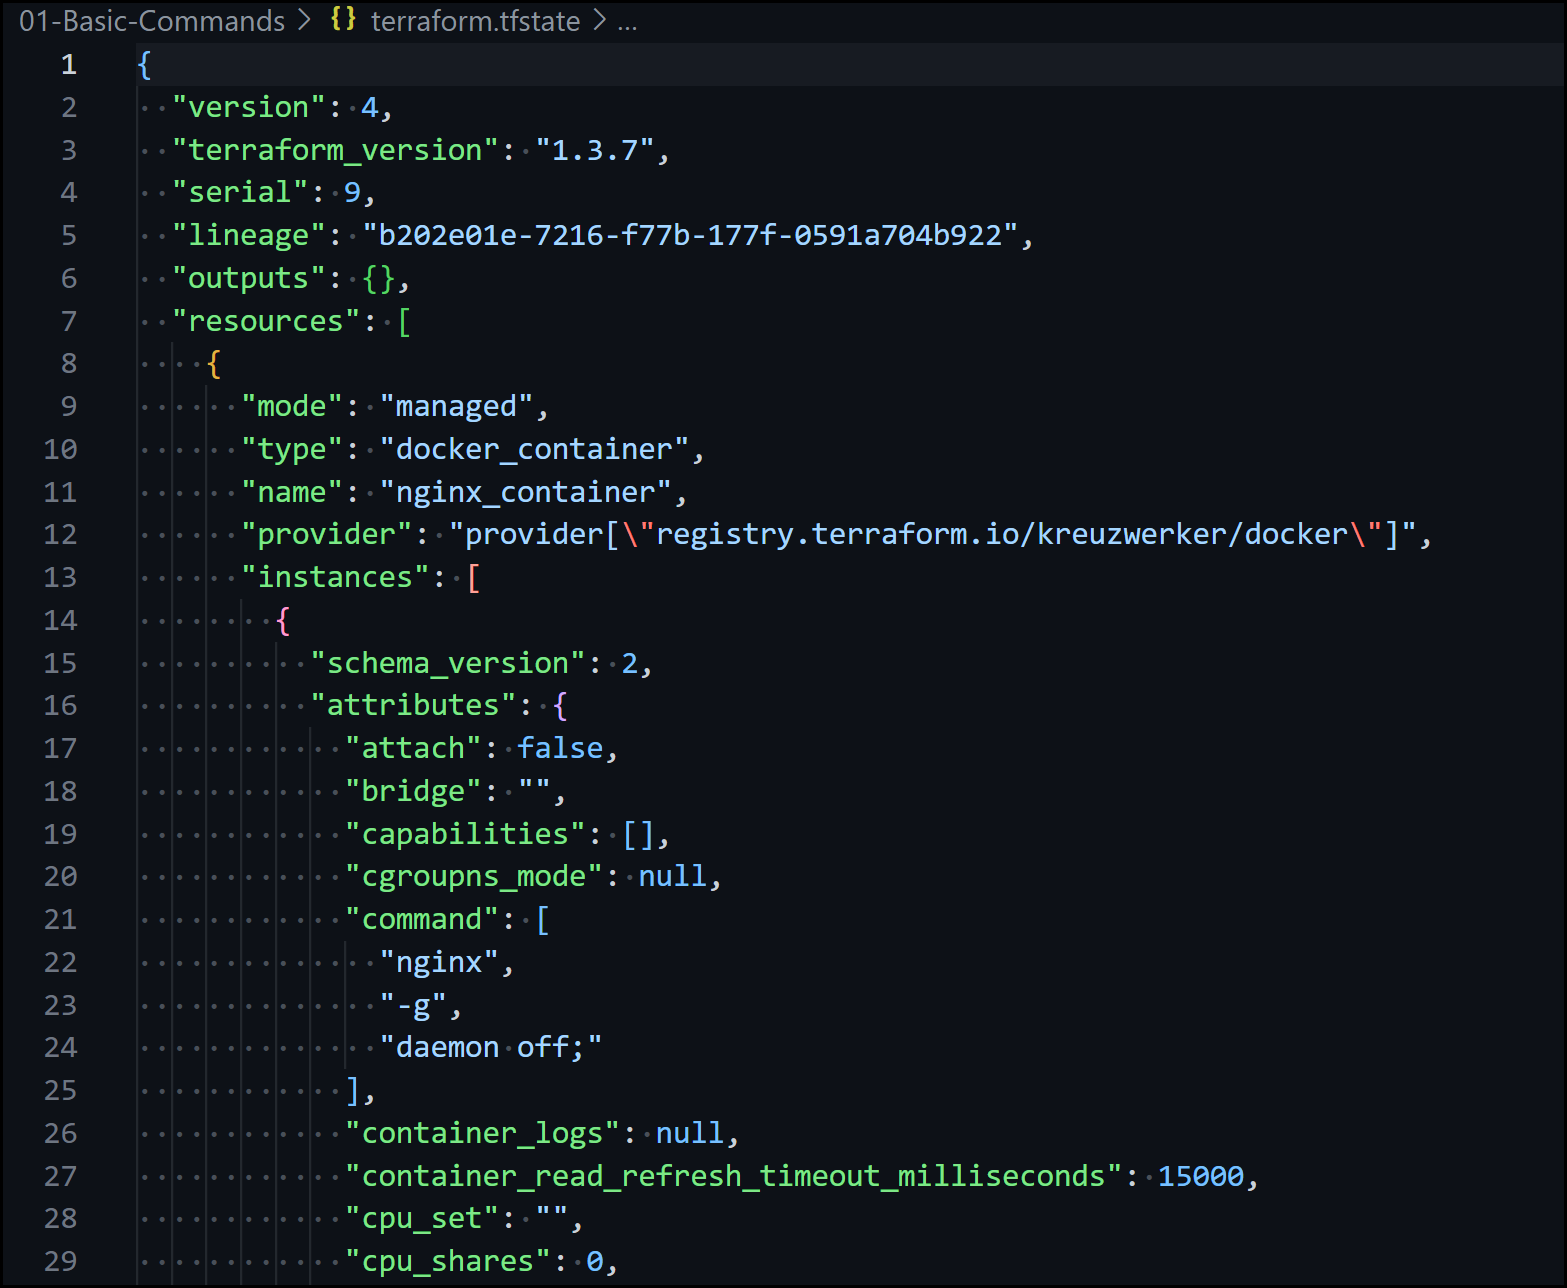
The State File
This file contains all your managed infrastructure resources. You will see both the docker container resource and the docker image resource. It keeps a copy of your existing infrastructure so that it can make future decisions such as adding to it or removing from it.
3. Variables
Make sure to change the directory to the 03-Variables folder. You will need to run terraform init again since we are now in a different folder. Wait a few seconds as it is initializing provider plugins. Once Terraform is successfully initialized we can continue.
Notice the variable blocks where we define our variables. It’s a good practice to define the type, give it a description, and a reasonable default value.
variable "image_name" {
  type        = string
  description = "The name of the Docker image"
  default = "nginx"
}

variable "image_tag" {
  type        = string
  description = "The tag of the Docker image"
  default  = "1.23.3"
}

variable "internal_port" {
  type        = number
  description = "The internal port number for the container"
}

variable "external_port" {
  type        = number
  description = "The external port number for the container"
}
The way to reference these variables is by using the keyword var.<variable_name> as shown below. Notice also in the docker_image name how we used string interpolation to join two variables with a colon and all surrounded with ". The syntax is "${var.<variable_name>}:${var.<variable_name>}"
resource "docker_image" "nginx_image" {
  name = "${var.image_name}:${var.image_tag}"
}

resource "docker_container" "nginx_container" {
  name  = "web-server"
  image = docker_image.nginx_image.image_id
  ports {
    internal = var.internal_port
    external = var.external_port
  }
}
Run terraform plan and apply again. You will get prompted to provide the values for the external and internal ports. Use 8080 for the external port and 80 for the internal port. You will get the NGINX container running again.
You can also provide the variables as part of the terraform plan or terraform apply commands like this:
terraform apply -var 'external_port=8080' -var 'internal_port=80'
If you run this command again you will get a message saying No changes. You can now go ahead and destroy the environment using the apply command with the -destroy flag. This is an alternative to terraform destroy.
terraform apply -destroy -var 'external_port=8080' -var 'internal_port=80'
4. Variables Continued
Change directory to the 04-Variables-Continued folder. Notice that we now have 3 files:
main.tfvariables.tfterraform.tfvars.
An important concept in Terraform is that it doesn’t care how many .tf configuration files you have, it will merge them all when it runs. So now we can separate our variable blocks to their own file called variables.tf. This file is used to declare our variables. The terraform.tfvars file is used to assign our variables.
main.tf, as the name indicates is the main Terraform configuration file. We already saw how we can assign our values via the command prompt and via the Terraform CLI. This is the third way of doing it.
Run terraform apply again after initializing provider plugins with terraform init. You will see that everything works the same. When you’re done, remember to destroy the infrastructure to move on to the next section which is to build an EC2 instance in AWS.
5. AWS Setup and Outputs
So far we’ve seen Terraform deploying docker images and containers locally. Now let’s continue our Terraform training and deploy resources in the AWS cloud. AWS has many cloud services and Terraform can be used to provision many of them such as EC2 instances, S3, virtual private cloud services (VPC), and more.
For this part of the course, you will need an AWS account. We will only work within the AWS free tier. If you’re subscribed to the TeKanAid Academy, you get access to AWS accounts to use without worrying about billing. Below is a snapshot of what it looks like.
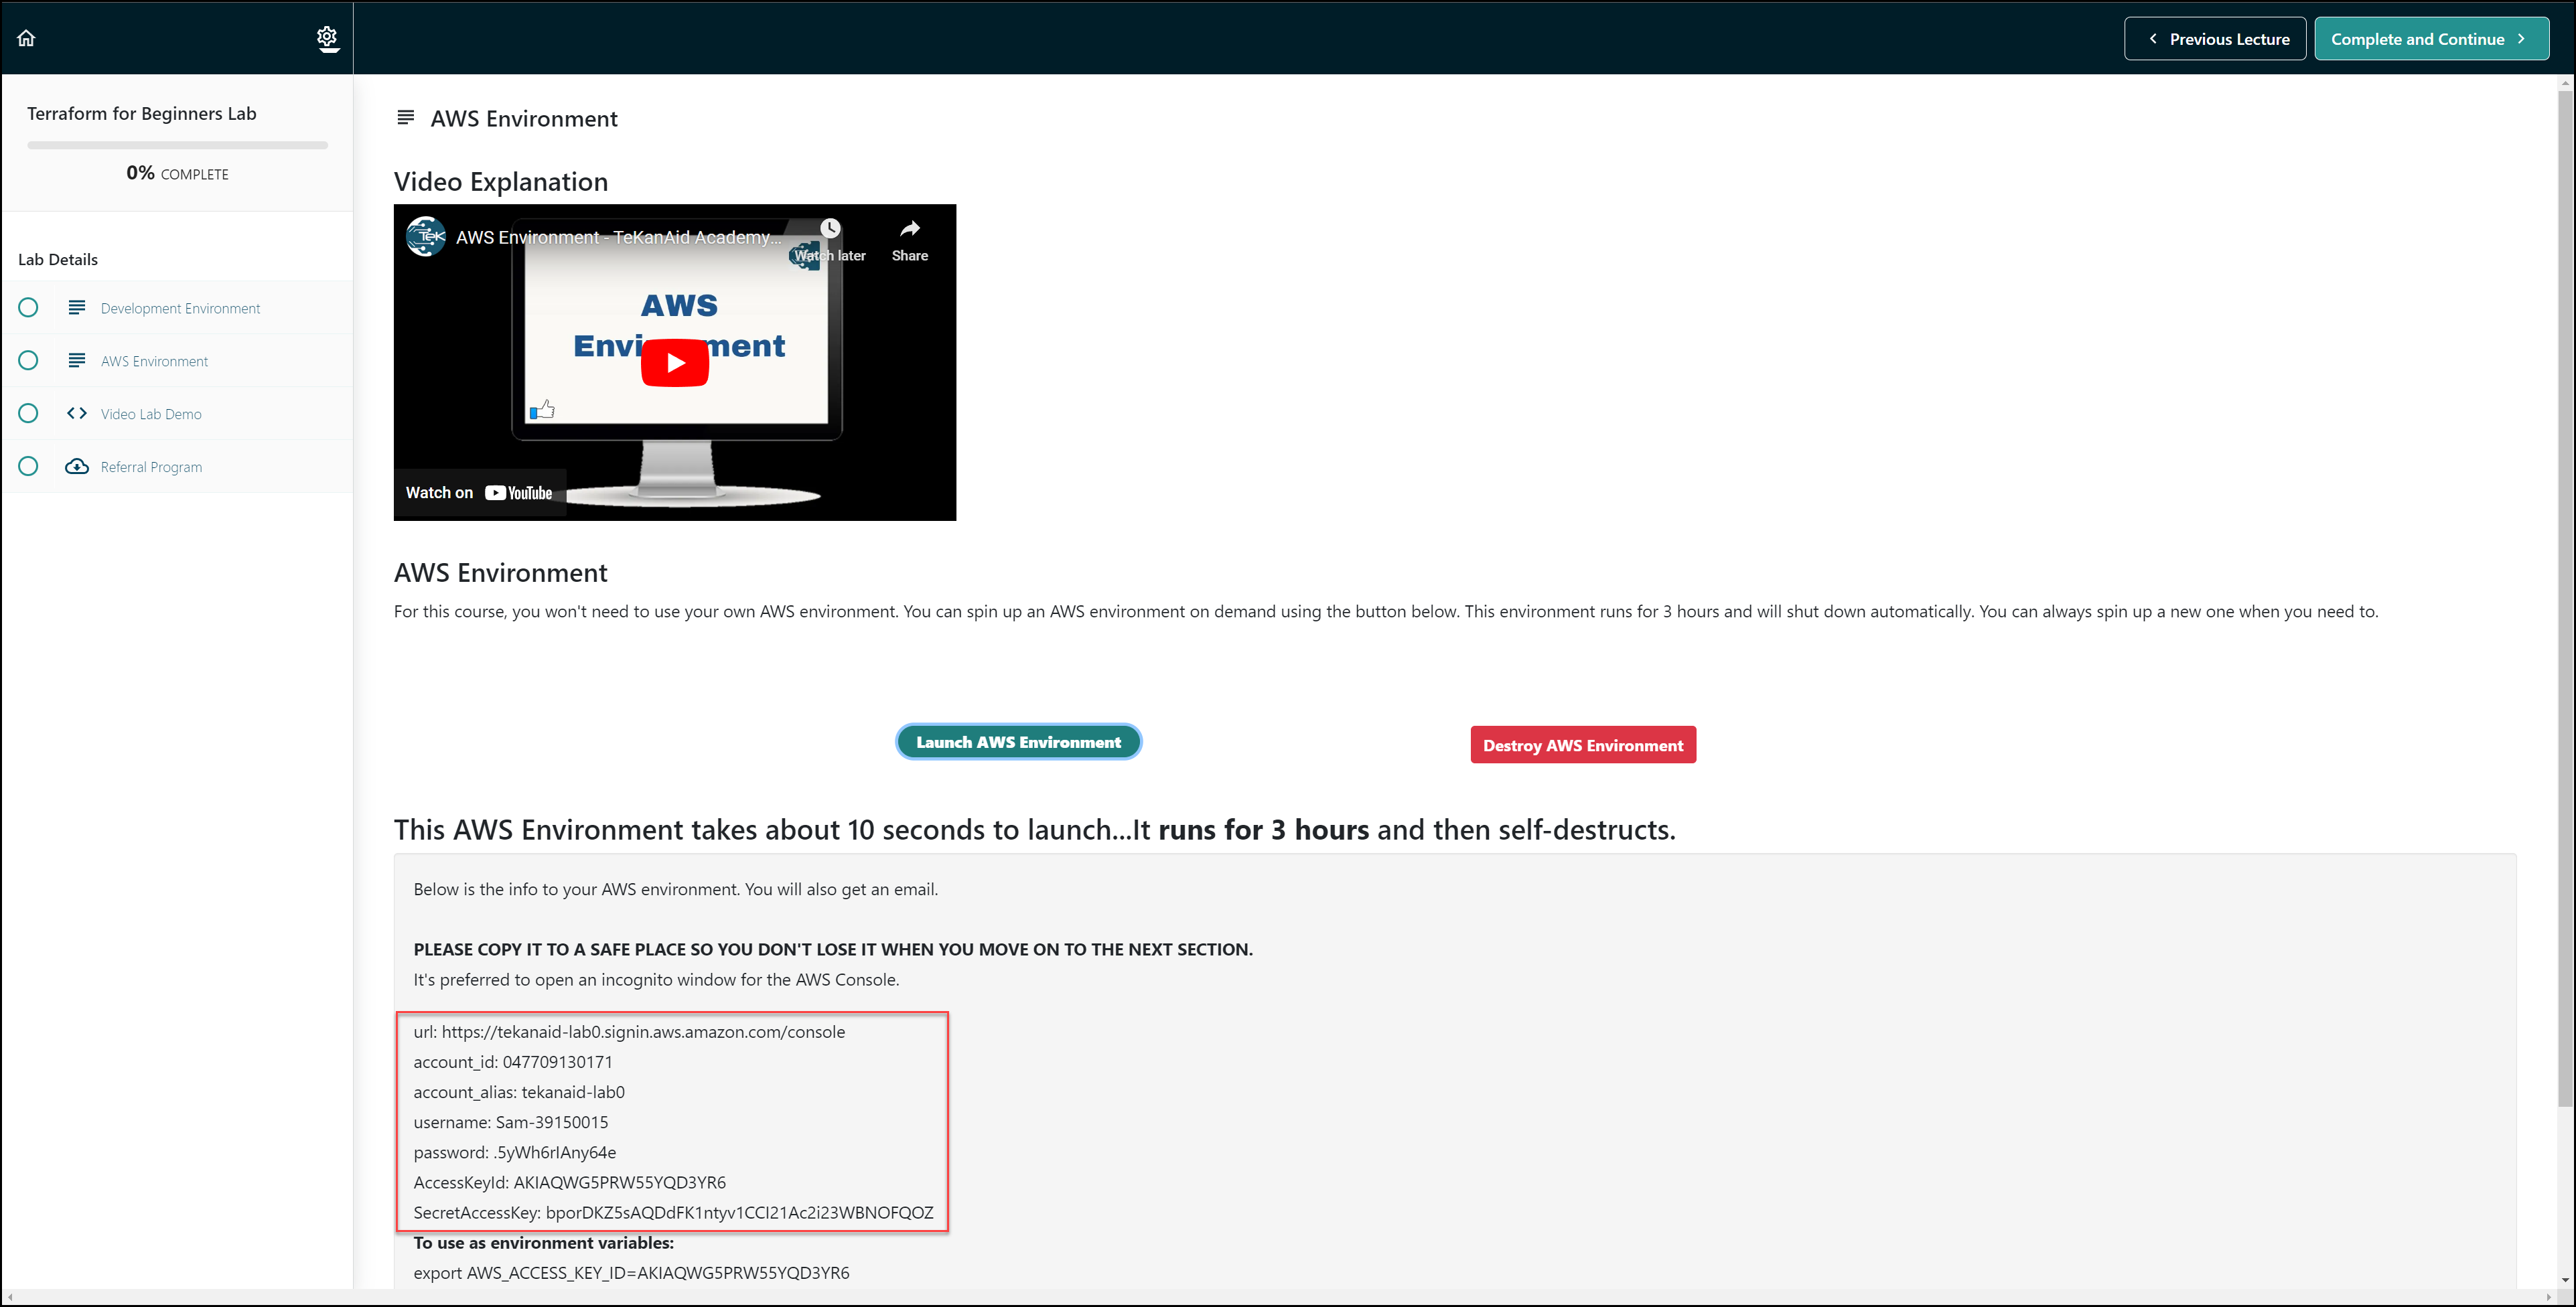
Getting an AWS Account from TeKanAid Academy Subscription
Once you have an AWS account, you will need to create an IAM user programmatically. Then export each credential as an environment variable as shown below. Make sure to replace the values below with yours.
export AWS_ACCESS_KEY_ID=AKIAQWG5PRW55YQD3YR6
export AWS_SECRET_ACCESS_KEY=bporDKZ5sAQDdFK1ntyv1CCI21Ac2i23WBNOFQOZ
Change your directory to 05-AWS-Setup-and-Outputs then run terraform init. Notice the main.tf file as shown below.
terraform {
  required_providers {
    aws = {
      source  = "hashicorp/aws"
      version = "4.19.0"
    }
  }
}

provider "aws" {
  region = var.region
}

resource "aws_instance" "webserver" {
  ami           = "ami-08d4ac5b634553e16"
  instance_type = var.my_instance_type
}

output "public_ip" {
  value       = aws_instance.webserver.public_ip
  description = "EC2 Public IP"
}
We are now using the AWS provider. The main resource is called aws_instance which creates an EC2 instance in AWS. This resource can take many options, but the main two are the ami and the instance_type. You can choose any of the many operating systems out there via the ‘ami’. Alternatively, you can create your own ‘ami’. In our case, we selected Ubuntu 20.04.
Notice that we have a new block called output. It’s used to output values after Terraform runs. In our case, we will output the public IP address of the EC2 instance. We can also move this output block to its own file which we will do in the next section. The output block takes a description and a value. The value takes the form of <resource_type.resource_name.attribute>
We also have a variables file called variables.tf. Take a quick look at it. It is self-explanatory. We don’t need a terraform.tfvars file since we have defined defaults in the variables.tf file.
Now apply Terraform and take a look at the output. It will look something like this:
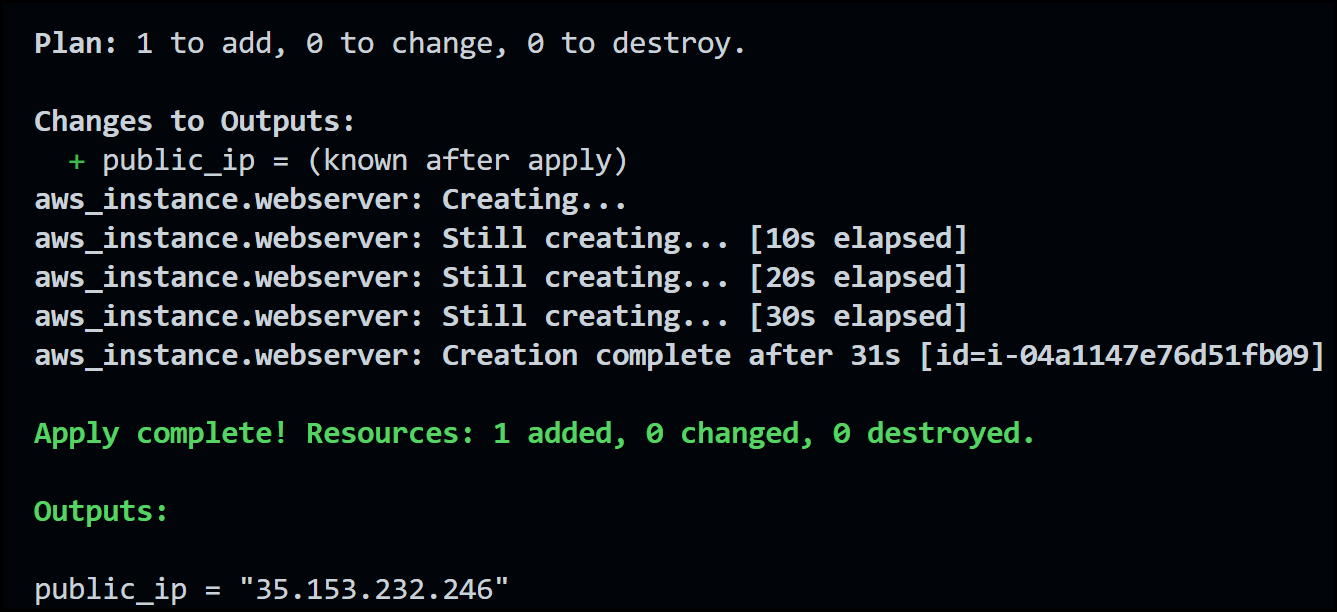
AWS Public IP Output
Also, notice the EC2 instance in the AWS console.

AWS Console EC2
Congratulations, you’ve just created an EC2 instance in AWS with Terraform! Now go ahead and destroy the existing infrastructure.
6. Data Blocks
Change your directory to 06-Data-Blocks and initialize Terraform. The one main difference from the previous section is that we now are using a new block called the data block.
data "aws_ami" "ubuntu" {
  most_recent = true
  filter {
    name   = "name"
    values = ["ubuntu/images/hvm-ssd/ubuntu-focal-20.04-amd64-server-*"]
  }

  filter {
    name   = "virtualization-type"
    values = ["hvm"]
  }

  owners = ["099720109477"] # Canonical https://ubuntu.com/server/docs/cloud-images/amazon-ec2
}
A data block is used to retrieve information about a resource that already exists in a provider rather than creating a new resource. This information can then be used in other parts of the configuration to configure resources that depend on the existing resource. In our example, we are using the data block to search for an ami with certain filters. In this case, we are searching for an ami for Ubuntu 20.04.
To access attributes from the data object, use the following syntax: <data.resource_type.resource_name> like this:
resource "aws_instance" "webserver" {
  ami           = data.aws_ami.ubuntu.id
  instance_type = var.my_instance_type
}
Finally, for this section notice how we separated the output to its own outputs.tf file. Apply Terraform and you should see the same results as the previous section. Remember to destroy the infrastructure when you’re done.
7. Another Provider
Now change your directory to 07-Another-Provider and initialize it for Terraform. Now let’s see how to add another provider into our configuration. Check it out in the main.tf file:
terraform {
  required_providers {
    aws = {
      source  = "hashicorp/aws"
      version = "4.19.0"
    }
    tls = {
      source  = "hashicorp/tls"
      version = "4.0.0"
    }
  }
}

provider "aws" {
  region = var.region
}

data "aws_ami" "ubuntu" {
  most_recent = true
  filter {
    name   = "name"
    values = ["ubuntu/images/hvm-ssd/ubuntu-focal-20.04-amd64-server-*"]
  }

  filter {
    name   = "virtualization-type"
    values = ["hvm"]
  }

  owners = ["099720109477"] # Canonical https://ubuntu.com/server/docs/cloud-images/amazon-ec2
}

resource "tls_private_key" "mykey" {
  algorithm = "RSA"
  rsa_bits  = 4096
}

resource "aws_key_pair" "mykey" {
  key_name   = "mykey.pem"
  public_key = tls_private_key.mykey.public_key_openssh
}

resource "aws_instance" "webserver" {
  ami           = data.aws_ami.ubuntu.id
  instance_type = var.my_instance_type
  key_name      = aws_key_pair.mykey.key_name
  vpc_security_group_ids = [aws_security_group.security_group1.id]
}

resource "aws_security_group" "security_group1" {
  ingress {
    cidr_blocks = ["0.0.0.0/0"]
    description = "SSH Ingress"
    from_port   = 22
    to_port     = 22
    protocol    = "tcp"
  }

  egress {
    from_port   = 0
    to_port     = 0
    protocol    = "-1"
    cidr_blocks = ["0.0.0.0/0"]
  }
}
The new provider is the tls provider. So far we’ve been creating EC2 instances with no key to ssh into them. The tls provider creates a private/public key pair to allow us to ssh into the machines.
You can have more than one provider in the same configuration as you see here.
- The
tls_private_keyresource is what creates our private/public key pair. - The
aws_key_paircreates a key in AWS referencing our public_key from thetls_private_keyresource.
Now our aws_instance resource can reference this aws_keyh_pair to create the EC2 instance with the public key in it so we can ssh into it. To get the private key, you will need to run:
terraform output -raw private_key
Notice that this private_key is considered sensitive and it gets stored in the state file. This is an important concept to understand in Terraform. Sensitive information shows up in the state file and therefore you need to make sure you store the state file in a secure location and have role base access controls around it.
Also, notice that we created a security group to allow ssh inbound to the instance. This is done with the aws_security_group resource. You then reference it in the aws_instance resource like this:
vpc_security_group_ids = [aws_security_group.security_group1.id]
The square brackets are used because vpc_security_group_ids requires a list of security group ids.
You can ssh into the EC2 instance by running the following commands:
terraform output -raw private_key > myKey.pem
sudo chmod 400 myKey.pem
ssh -i myKey.pem ubuntu@$(terraform output -raw public_ip)
8. Modules
Let’s package the tls resource into a module. Typically you would have more than one resource in a module so you could reuse this module for other purposes. For our example, we will keep it simple and just have one resource in this module.
Change your directory to 08-Modules and initialize Terraform. Now we have a new folder called modules. In this folder, we have a module called tls. A good practice is to have at minimum the following files in a module folder:
* README
* LICENSE
* main.tf
* variables.tf
* outputs.tf
All we did was move the resource tls_private_key from the root module into our newly created tls module. To call the module, use the module block and add a source path along with the necessary variables used by the module.
module "tls" {
  source    = "./modules/tls"
  algorithm = "RSA"
  bits      = 4096
}
Whenever you modify or add a module, you will need to reinitialize Terraform. Apply Terraform again and you will get the same results as you got in the previous section.
Notice how the output gets passed from the tls module to the root module and out to the CLI. Check the output of the tls module:
output "private_key" {
  value     = tls_private_key.mykey.private_key_pem
  sensitive = true
}

output "public_key_out" {
  value = tls_private_key.mykey.public_key_openssh
}
Check the output of the root module:
output "public_ip" {
  value       = aws_instance.webserver.public_ip
  description = "EC2 Public IP"
}

output "private_key" {
  value     = module.tls.private_key
  sensitive = true
}
9. A Web Server
Now let’s put everything we learned together to build a web server running NGINX in an EC2 instance. Change your directory to 09-A-Web-Server and use the init command to initialize terraform.
I’d like you to pay attention to the user_data option that we’re using with the aws_instance:
resource "aws_instance" "webserver" {
  ami           = data.aws_ami.ubuntu.id
  instance_type = var.my_instance_type
  key_name      = aws_key_pair.mykey.key_name
  vpc_security_group_ids = [aws_security_group.security_group1.id]
  user_data                   = file("install_libraries.sh")
  user_data_replace_on_change = true
}
We are using a file called install_libraries.sh. This is a shell script that runs when the EC2 instance gets generated. It installs NGINX and creates an index page for us to see. Take a look at it below:
#!/bin/bash
echo "Installing tree, jq, and nginx"
apt -y update
apt install tree jq -y
apt install nginx -y
systemctl enable nginx
sudo cat << EOF > /tmp/index.html
<html>
    <head>
        <title>Schoolapp</title>
    </head>
    <body>
        <h1 style="text-align: center;">Welcome to the School App</h1>
        <p style="text-align: center;">
        <img src="https://images.unsplash.com/photo-1508830524289-0adcbe822b40?ixlib=rb-1.2.1&ixid=MnwxMjA3fDB8MHxwaG90by1wYWdlfHx8fGVufDB8fHx8&auto=format&fit=crop&w=600&q=80" alt="School App">
        </p>
        <p style="text-align: center;">
        Photo by <a href="https://unsplash.com/@altumcode?utm_source=unsplash&utm_medium=referral&utm_content=creditCopyText">AltumCode</a> on <a href="https://unsplash.com/s/photos/courses?utm_source=unsplash&utm_medium=referral&utm_content=creditCopyText">Unsplash</a>
        </p>
        <h2 style="text-align: center;">This message confirms that your App is working with an NGINX web server. Great work!</h2>
    </body>
</html>
EOF
sudo mv /tmp/index.html /var/www/html/index.html
sudo nginx -s reload
Also, notice how we added port 80 (HTTP) to our security group so we could access the web page. Once again apply Terraform and put the public IP address into a web browser window to access the web server. You should get this page below:
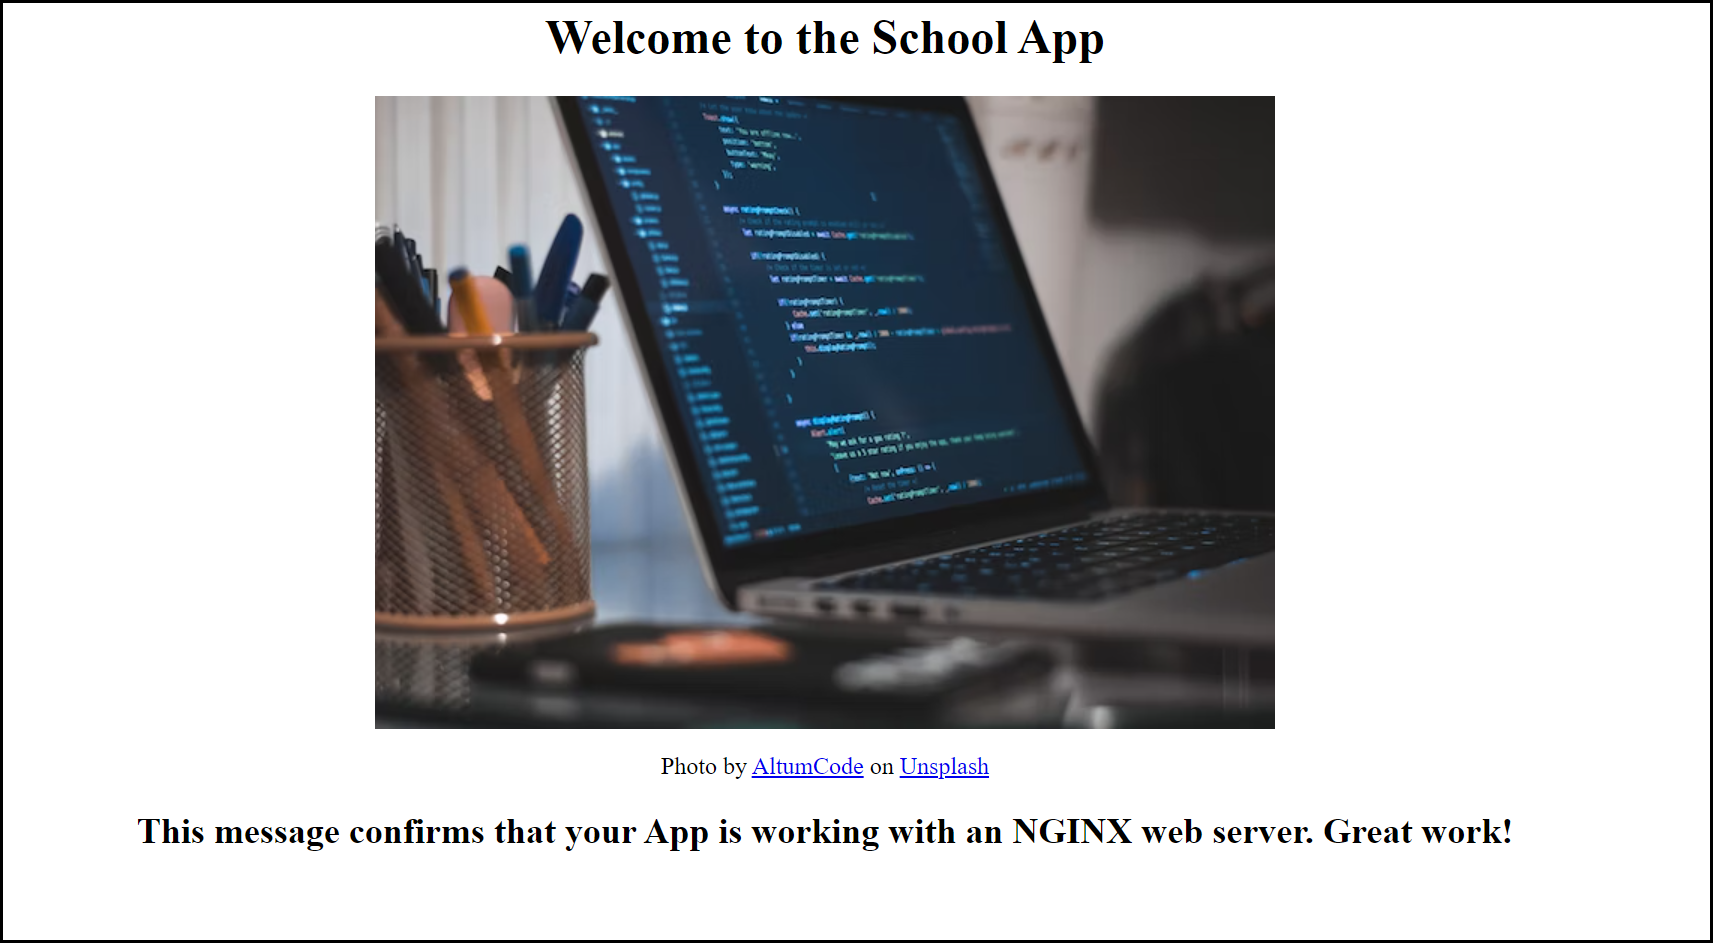
Web Server Page
Congratulations! You’ve successfully deployed a web server in an EC2 instance with Terraform! I hope you’ve had fun learning terraform so far.
Some Terraform Best Practices
Let’s finish up with some Terraform best practices.
- Use remote state management: it allows you to store the Terraform state in a remote location such as in Terraform Cloud, it enables collaboration, and versioning and enables you to have a clear track of all the changes made to your whole cloud infrastructure.
- Use a dedicated IAM user and role for Terraform: it allows you to have better control over the permissions and also allows you to audit and track the actions made by Terraform on your AWS resources.
- Use built-in testing and validation tools: like terraform validate and terraform plan to ensure that your infrastructure is working as expected and avoid potential issues.
- Use Git for version control: it allows you to track changes and maintain a history of all the changes to your infrastructure. It becomes your single source of truth.
- Use tagging: it allows you to track, organize and manage your resources easily and also enables you to apply cost allocation and reporting.
- Use AWS CloudTrail and CloudWatch: it will monitor the events and actions made by Terraform and track any issues or errors.
- Use modules to organize and manage resources: it makes it easy to share and reuse the same infrastructure code across different teams and projects.
- Use code reviews and testing for Terraform code: it will ensure that your code is accurate and well-written and that it meets best practices and guidelines.
- Use a consistent naming convention: it will make it easy to identify resources and track changes.
- Use Terraform’s workspaces: it will enable you to manage multiple environments or states.
- Use Terraform’s state locking: it will prevent conflicts and ensure that only one person is making changes at a time.
- Keep Terraform and provider versions up to date: it will ensure compatibility and security.
- Integrate Terraform with a CI/CD pipeline and configuration management tools such as Ansible. Use Terraform provisioners as a last resort. We didn’t discuss provisioners in this Terraform course on purpose because you shouldn’t use them.
- Document your Terraform code and infrastructure: it will make it easy for others to understand and maintain your infrastructure.
- Create Terraform guides: create example guides in an internal wiki to help your teams get up to speed on using Terraform.
VI. Conclusion
In conclusion, this Terraform course provided an overview of Terraform for beginners, including its use in infrastructure management, its importance in modern DevOps practices, and how to get started with it. We covered the basics of Terraform’s configuration, how to create and manage resources with Terraform, and the use of variables and modules to increase flexibility and reusability.
We used 2 examples, one using Docker for local deployment and the other using AWS as a cloud infrastructure environment.
To further deepen your understanding of Terraform, you can explore the official Terraform documentation, which provides detailed information on all aspects of Terraform. Additionally, I have a comprehensive Terraform 101 course if you’d like to learn more. It’s called Terraform 101 – Certified Terraform Associate. Not only will it give you the necessary knowledge to pass the latest Terraform Associate exam, but it will also give you the skills you need for ongoing real-world scenarios.
I also write quite a bit about IaC. If you’re interested in Terraform, take a look at some of my blog posts such:
– Terraform to Create a Ubuntu 22.04 VM in VMware vSphere ESXi
– AWS Lambda – Terraform Configuration Example with API Gateway
As we have seen, Terraform is a powerful tool for automating infrastructure management and it can be used across multiple providers. I encourage you to start experimenting with Terraform in your own infrastructure projects and explore the many possibilities it offers. By using Terraform, you can improve efficiency, consistency, and reliability in your infrastructure management, and enjoy the many benefits of infrastructure as code. Learning Terraform is not hard, just commit to it daily and you will quickly see how fast you will grasp it.
Suggested Reading
- Jenkins, Vault, Terraform, Ansible, and Consul Delivering an End-to-End CI/CD Pipeline
- env0 – A Terraform Cloud Alternative
- Crossplane: Unveiling a New Horizon in Cloud Infrastructure Management
- HashiCorp Packer for VMware Ubuntu Templates and Terraform for building VMs
- Terraform Import Example – AWS EC2 Instance
- HashiCorp Packer to Build a Ubuntu 22.04 Image Template in VMware vSphere
- DevOps Engineer NOT on Linux? Check out WSL2
Code
Hi and Welcome!
Join the Newsletter and get FREE access to all my Source Code along with a couple of gifts.