
Introduction
Learn to use Terraform to create a Ubuntu 22.04 VM in VMware vSphere ESXi.
Video
Below is a video explanation and demo.
Video Chapters
You can skip to the relevant chapters below:
- 00:00 – Introduction
- 01:24 – Run Terraform
- 01:47 – Terraform 101 Course Announcement
- 02:28 – Terraform Configuration Explained
- 11:42 – See the Results
- 14:22 – Wrap-Up
Overview
In this blog post, we will use Terraform to provision a VM in VMware vSphere by cloning a VMware template. If you recall, we created this template in a previous blog post using Packer. The post is called HashiCorp Packer to Build a Ubuntu 22.04 Image Template in VMware vSphere.
Pre-requisites
The following is required to follow along:
- Terraform (tested with Terraform v1.3.4)
- Access to a vSphere instance (tested on vSphere v6.7)
Setup
Below is our setup diagram.
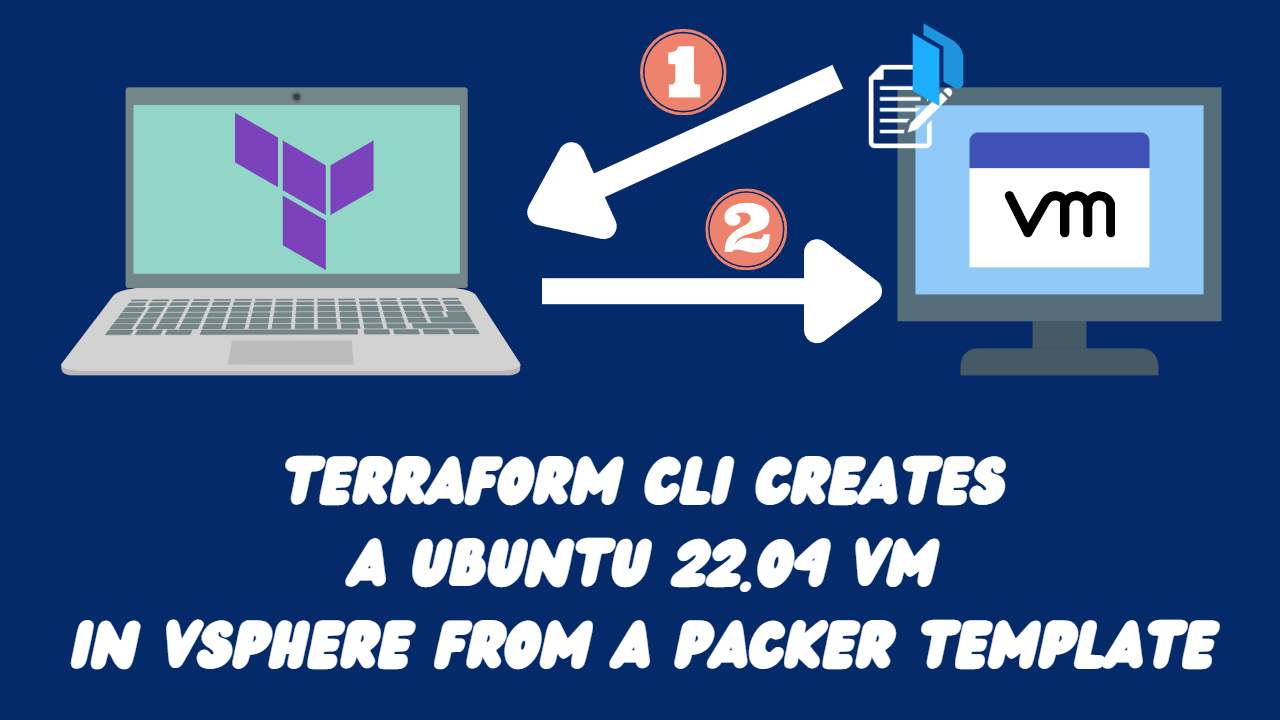
Setup Diagram
Configuration
Let’s take a look at the most important configuration pieces needed.
Folder Structure
Below is the structure of the repo folder.
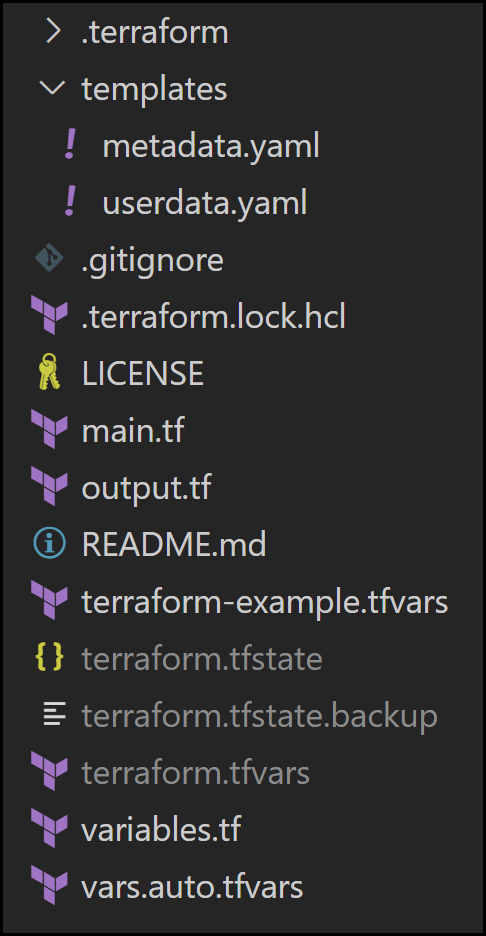
Folder Structure
main.tf File
Let’s explore the main.tf file.
- The first section of the file defines the required
vsphereprovider along with the credentials needed to accessvsphere. There is also alocalsvariable definition that gets used in themetadata.yamlanduserdata.yamltemplates.
terraform {
  required_providers {
    vsphere = {
      source = "hashicorp/vsphere"
      version = "2.2.0"
    }
  }
}

provider "vsphere" {
  user                 = var.vsphere_user
  password             = var.vsphere_password
  vsphere_server       = var.vsphere_vcenter
  allow_unverified_ssl = true
}

locals {
  templatevars = {
    name         = var.name,
    ipv4_address = var.ipv4_address,
    ipv4_gateway = var.ipv4_gateway,
    dns_server_1 = var.dns_server_list[0],
    dns_server_2 = var.dns_server_list[1],
    public_key = var.public_key,
    ssh_username = var.ssh_username
  }
}
- The second section of the
main.tffile has a bunch ofdatablocks to retrieve existing data invsphere. You’ll see that we capture the following to use in generating the VM:
- datacenter
- datastore
- cluster
- network
- template
data "vsphere_datacenter" "dc" {
  name = var.vsphere-datacenter
}

data "vsphere_datastore" "datastore" {
  name          = var.vm-datastore
  datacenter_id = data.vsphere_datacenter.dc.id
}

data "vsphere_compute_cluster" "cluster" {
  name          = var.vsphere-cluster
  datacenter_id = data.vsphere_datacenter.dc.id
}

data "vsphere_network" "network" {
  name          = var.vm-network
  datacenter_id = data.vsphere_datacenter.dc.id
}

data "vsphere_virtual_machine" "template" {
  name          = "/${var.vsphere-datacenter}/vm/${var.vsphere-template-folder}/${var.vm-template-name}"
  datacenter_id = data.vsphere_datacenter.dc.id
}
- In this third and last section, we use a
vsphere_virtual_machineresource to build our VM. Notice how we use the info from thedatablocks retrieved earlier. We also feed thelocal.templatevarsvariables into themetadata.yamland theuserdata.yamltemplates. We will take a look at these templates next.
resource "vsphere_virtual_machine" "vm" {
  name             = var.name
  resource_pool_id = data.vsphere_compute_cluster.cluster.resource_pool_id
  datastore_id     = data.vsphere_datastore.datastore.id

  num_cpus             = var.cpu
  num_cores_per_socket = var.cores-per-socket
  memory               = var.ram
  guest_id             = var.vm-guest-id

  network_interface {
    network_id   = data.vsphere_network.network.id
    adapter_type = data.vsphere_virtual_machine.template.network_interface_types[0]
  }

  disk {
    label            = "${var.name}-disk"
    thin_provisioned = data.vsphere_virtual_machine.template.disks.0.thin_provisioned
    eagerly_scrub    = data.vsphere_virtual_machine.template.disks.0.eagerly_scrub
    size             = var.disksize == "" ? data.vsphere_virtual_machine.template.disks.0.size : var.disksize
  }

  clone {
    template_uuid = data.vsphere_virtual_machine.template.id
  }
  extra_config = {
    "guestinfo.metadata"          = base64encode(templatefile("${path.module}/templates/metadata.yaml", local.templatevars))
    "guestinfo.metadata.encoding" = "base64"
    "guestinfo.userdata"          = base64encode(templatefile("${path.module}/templates/userdata.yaml", local.templatevars))
    "guestinfo.userdata.encoding" = "base64"
  }
  lifecycle {
    ignore_changes = [
      annotation,
      clone[0].template_uuid,
      clone[0].customize[0].dns_server_list,
      clone[0].customize[0].network_interface[0]
    ]
  }
}
metadata.yaml Template File
Cloud-init uses this file to define the instance we’re creating. We can configure the network interface, the hostname, the instance-id, the disks, and so on. Notice the ${variable_name} syntax. This is used to receive variables from the local.templatevars variable we fed into the template.
#cloud-config
local-hostname: ${name}
instance-id: ubuntu-${name}
network:
  version: 2
  ethernets:
    ens192:
      dhcp4: false
      addresses:
        - ${ipv4_address}/24
      gateway4: ${ipv4_gateway}
      nameservers:
        search: [home]
        addresses: [${dns_server_1}, ${dns_server_2}]
growpart:
  mode: auto
  devices: ['/dev/sda2']
  ignore_growroot_disabled: true
wait-on-network:
  ipv4: true
userdata.yaml Template File
This file is used by cloud-init to configure users’ ssh names, keys, and so on. Furthermore, you can install packages here. We install the tree package to show this functionality.
#cloud-config
users:
  - name: ${ssh_username}
    ssh-authorized-keys:
      - ssh-rsa ${public_key}
    sudo: ['ALL=(ALL) NOPASSWD:ALL']
    groups: sudo
    shell: /bin/bash

packages:
  - tree
output.tf File
In this file we display the output IP for our VM.
output "ip" {
  value = vsphere_virtual_machine.vm.guest_ip_addresses[0]
}
Variables Files
We split the variable assignment files into two files:
- terraform.tfvars (holds sensitive variables – not checked into git)
- vars.auto.tfvars (holds non-sensitive variables – checked into git)
terraform.tfvars File
You won’t find this file in the git repo because it contains sensitive information about my vSphere instance. I added it to .gitignore. I created an example file called terraform-example.tfvars. Please rename this file to terraform.tfvars and populate it with your values. Here it is below:
# vSphere Specific
vsphere_user     = "<your_vsphere_user>"
vsphere_password = "<your_vsphere_password>"
vsphere_vcenter  = "<your_vcenter_ip>"
vars.auto.tfvars File
This file assigns values to the different variables to build our VM. The variables are self-explanatory.
cpu                    = 4
cores-per-socket       = 1
ram                    = 4096
disksize               = 100 # in GB
vm-guest-id            = "ubuntu64Guest"
vsphere-unverified-ssl = "true"
vsphere-datacenter     = "Datacenter"
vsphere-cluster        = "Cluster01"
vm-datastore           = "Datastore1_SSD"
vm-network             = "VM Network"
vm-domain              = "home"
dns_server_list        = ["192.168.1.80", "8.8.8.8"]
name                   = "ubuntu22-04-test"
ipv4_address           = "192.168.1.97"
ipv4_gateway           = "192.168.1.254"
ipv4_netmask           = "24"
vm-template-name       = "Ubuntu-2204-Template-100GB-Thin"
variables.tf File
This is where you declare/define all the variables. You can find it in the GitLab repo.
Conclusion
In this blog post, we demonstrated how to use an existing vSphere template built by Packer to create a VM with Terraform. The key takeaway is that Infrastructure as Code works just as well in an on-premises environment as it does in the cloud. Keep building!
References
- HashiCorp Packer to Build a Ubuntu 22.04 Image Template in VMware vSphere.
- GitLab repo for this post
Suggested Reading
- AWS Lambda – Terraform Example with API Gateway
- HashiCorp Packer for VMware Ubuntu Templates and Terraform for building VMs
- Terraform Import Example – AWS EC2 Instance
- Terraform for Beginners – Infrastructure as Code Intro
- HashiCorp Packer to Build a Ubuntu 20.04 Image Template in VMware
- Build a Kubernetes k3s Cluster in vSphere with Terraform and Packer
- DevOps Engineer NOT on Linux? Check out WSL2
Code
Hi and Welcome!
Join the Newsletter and get FREE access to all my Source Code along with a couple of gifts.