
Introduction
Vault is a great tool to centralize and manage secrets. However, how do you get access to Vault in the first place to retrieve your secrets? Learn best practices for solving the secret zero problem here.
Video
Below is a video explanation and demo.
Video Chapters
You can skip to the relevant chapters below:
- 00:00 – Introduction
- 00:36 – Review
- 02:20 – Agenda
- 02:51 – Overall Goal
- 04:01 – Topics to Learn
- 04:29 – Secure Intro & Secret Zero Explanation
- 11:37 – Secure Intro for Pipelines
- 18:00 – Secure Intro for App
- 24:16 – Demo Steps
- 25:36 – Demo Starts with Jenkins Build
- 27:51 – Vault Admin Tasks
- 33:33 – Jenkins Vault Plugin
- 36:38 – Jenkins Build
- 38:28 – Jenkinsfile Walkthrough
- 46:28 – Ansible Playbook Walkthrough
- 48:18 – How Vault Agent Works
- 53:02 – Conclusion
Overview
We’ve reached our third post in the blog post series called End-to-End Infrastructure and Application Deployment. Here is what we’ve done so far:
– In part 1, we discussed the HashiCorp Vault Azure Secrets Engine. That was the first step in securely automating our CI/CD pipeline. The purpose was to deliver Azure credentials dynamically for provisioning resources in Azure.
– In part 2, we looked at how to build our Jenkins VM to be used as our CI/CD pipeline using HashiCorp Packer, Terraform, Docker, and Ansible
Now let’s turn our focus to the topic of this blog post. Today we discuss the Secret Zero Problem and how to solve it. It is often also called Vault Secure Introduction. In short, secret zero is the first secret you introduce into your environment or to your application. Since Vault is used to store secrets, we need to first authenticate into Vault using a token to retrieve these secrets. The question becomes, how do we securely deliver this Vault token. We’ll see how to do this using the AppRole authentication method in Vault in addition to the Vault agent.
As a reminder, the goal of this series is to learn best practices around the automation of infrastructure provisioning and application deployment. We cover the concepts of Infrastructure as Code, CI/CD, secrets management, dynamic secrets, the secret zero problem, service mesh, and more.
Pre-requisites
The following is required to follow along:
- Microsoft Azure
- Terraform Cloud or Open Source
- An Installation of HashiCorp Vault
- Ansible
- Docker
- Packer
Overview of the End-to-End Infrastructure and Deployment Blog Series
As a reminder, let’s take a look at the big picture of this blog series.
The Big Picture
Below is an overview diagram of this 4 part blog series.
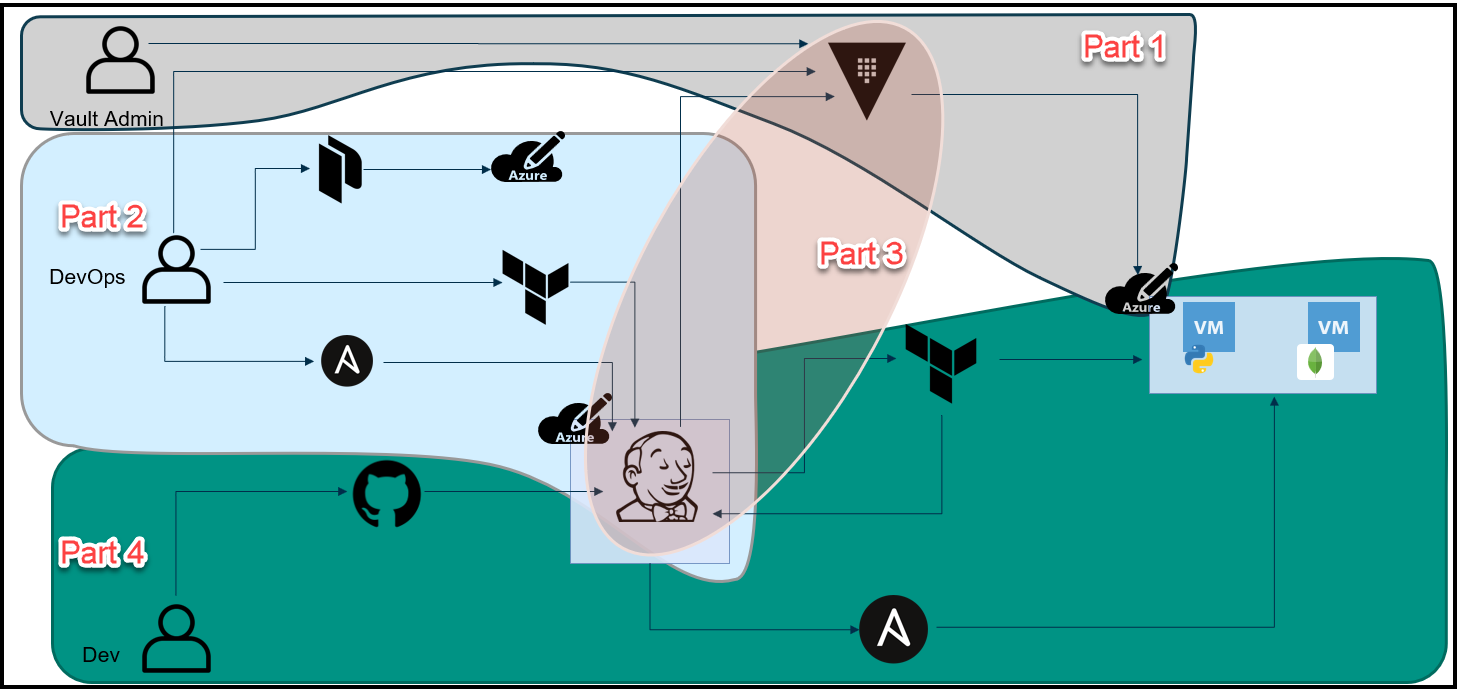
Break-Up of the Blog Series
We’ve broken up this blog series into 4 parts:
Part 1: HashiCorp Vault Azure Secrets Engine
This is the first step to secure our pipeline. The purpose here is to create dynamic short-lived credentials for Azure. We will then use these credentials to provision the Jenkins VM and app VMs in Azure. The credentials are only valid for 1 day and they expire after that.
Part 2: HashiCorp Packer, Terraform, and Ansible to Set Up Jenkins
Here we used a few tools to build a Jenkins VM that will be used as our CI/CD pipeline. Below are the high-level steps:
1. Packer to create an Azure image that has Docker installed.
2. Create a Docker container image that contains Jenkins, Vault, Terraform, and Ansible.
3. Use HashiCorp Vault to retrieve Azure credentials that have a 1 day TTL to use with Terraform
4. Run Terraform to build a VM in Azure based on the Packer image that will host our Jenkins pipeline.
5. Ansible then configures the Azure VM to:
– Add necessary packages
– Pull the Jenkins Docker image
– Start the Jenkins container
Part 3: The Secret Zero Problem Solved for HashiCorp Vault
In this blog post, we discuss the secret zero problem and how to solve it. This is often referred to as Vault secure introduction. The issue is that we need to provide the Vault authentication token to our Jenkins pipeline and to our application. Once we have the token, then we can access secrets in Vault. The challenge is how to deliver this Vault token securely. We address secure introduction by using Vault AppRoles, response wrapping, and the Vault agent.
Part 4: Jenkins, Vault, Terraform, Ansible, and Consul End-to-End CI/CD Pipeline
Finally, we put everything together in this part. Now that we have the Jenkins VM running and we’ve addressed the secret zero problem, we can finally run the pipeline to build our application. Below is the workflow:
1. A developer commits and pushes code into GitHub
2. The Jenkins pipeline automatically starts due to a webhook from GitHub to Jenkins
3. Jenkins retrieves Azure credentials from Vault
4. Jenkins runs Terraform with these credentials
5. Terraform builds 3 VMs:
– A Consul server
– The Python Webblog app server
– A MongoDB server
6. Terraform completes the provisioning and passes the 3 VMs’ fully qualified domain names (FQDNs) to Ansible
7. Ansible configures these VMs to do the following:
– Download and install the Consul and Envoy binaries for the service mesh
– Pulls the MongoDB Docker image and starts the container
– Downloads the Python dependencies for the Webblog app and starts the application
Below are some tools that we use in this series along with topics to learn. You’ll find those relevant to this post in bold italics font.
Some Tools Used in this Series
- HashiCorp Packer
- HashiCorp Terraform*
- HashiCorp Vault*
- HashiCorp Consul
- Jenkins*
- Ansible*
- Microsoft Azure*
Topics to Learn in this Blog Series
-
Vault Azure Secrets Engine
-
Packer Images in Azure
-
Terraform Building VMs in Azure based on Packer Images
-
Ansible to Configure an Azure VM
-
The Secret Zero Problem and Vault Secure Introduction*
-
Vault AppRole*
-
Vault Dynamic Database Secrets for MongoDB
-
Vault Transit Secrets Engine
-
Advanced CI/CD Pipeline Workflow using:
- GitHub(VCS)
- Jenkins(CI/CD)
- Terraform(IaC)
- Ansible(Config Mgmt)
- Vault(Secrets Mgmt)
-
Consul Service Mesh
Secret Zero and Secure Introduction Explanation
Let’s now focus our attention on the Secret Zero Problem and the Vault Secure Introduction goals.
Secure Introduction Goals
Secure introduction means that we use a trusted entity (orchestrator) to provide (introduce) secrets to another entity in a secure manner. Below are the goals:
- Unique credentials per instance
- Not hard-coded into an application
- Credentials don’t live forever (Very short TTLs)
- Distributed securely
- Detect unauthorized access
- Limit exposure if disclosed (“break-glass” procedure)
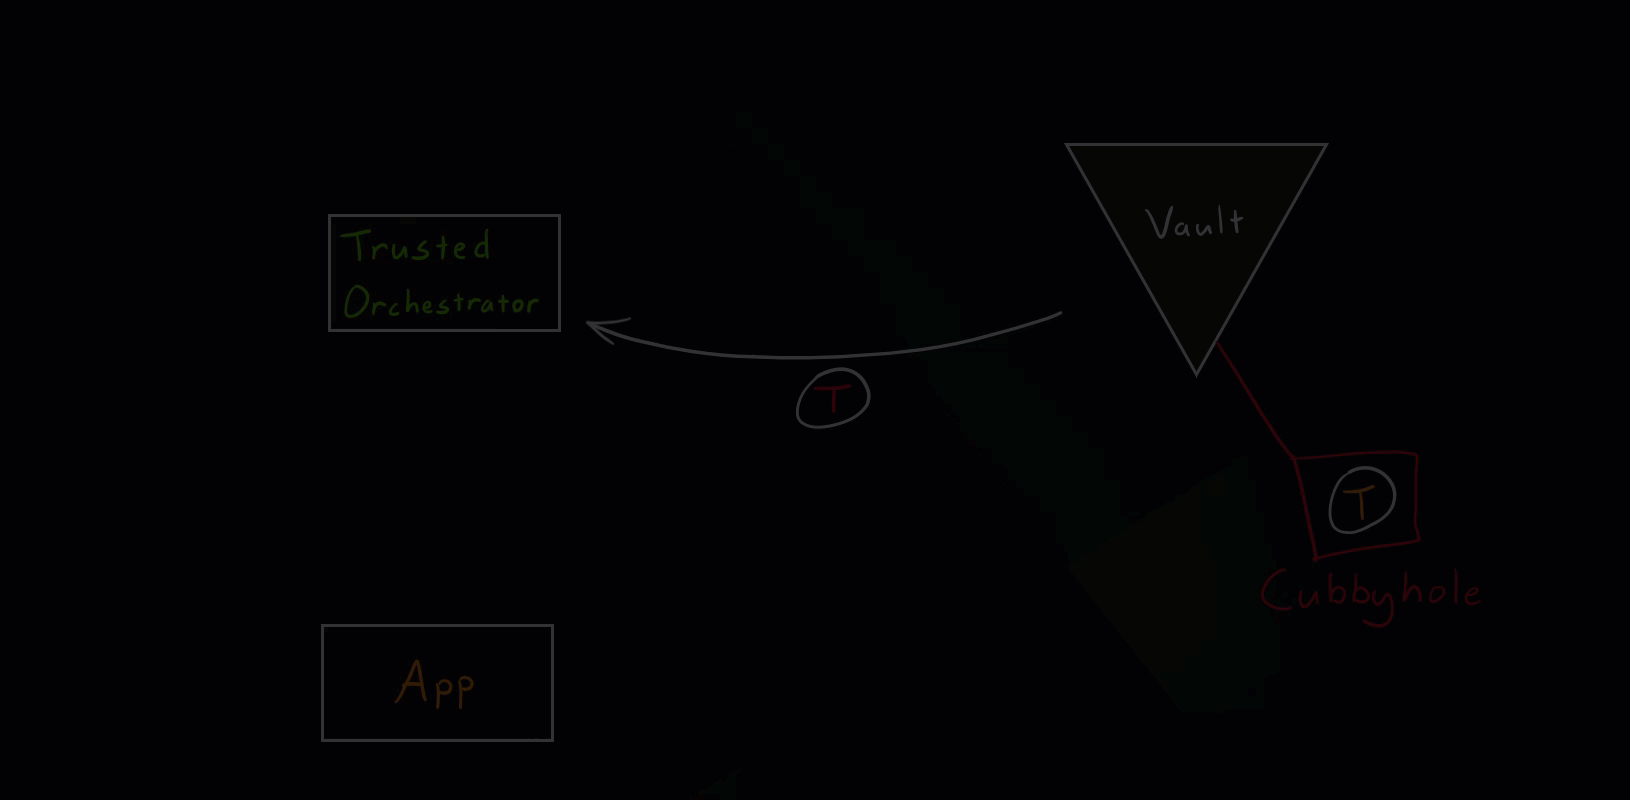
Secure Introduction Steps
These are generic steps for secure introduction. The tools used can vary. For example, our trusted orchestrator here is Jenkins.
- Create a Vault identity (role) for our application.
- Trusted orchestrator requests a wrapped Vault token.
- Trusted orchestrator delivers the wrapped token to the application.
- Application unwraps the token.
- Application uses the new token to access various secrets paths.
Normal Scenario
This is the intended use of response wrapping as mentioned in the Secure Introductions Steps above.

Vault Secure Introduction Normal Scenario
Hacker Scenario
Let’s see what happens if a hacker tries to get hold of secret zero.
Vault Secure Introduction Hacker Scenario
As you saw in the illustration, if the hacker somehow manages to unwrap the wrapped token, the intended application will get an error message (status code 400) when trying to run the unwrap operation. This event will appear in the Vault audits and needs to be closely investigated. It simply means that some other entity unwrapped the token beforehand and we’ve detected unauthorized access.
Vault Secure Introduction for Pipelines
We use secure introduction twice in this project. Once with the Jenkins pipeline and a second time with the Webblog application. Check out the diagram below for the steps involved in secure introduction for pipelines.
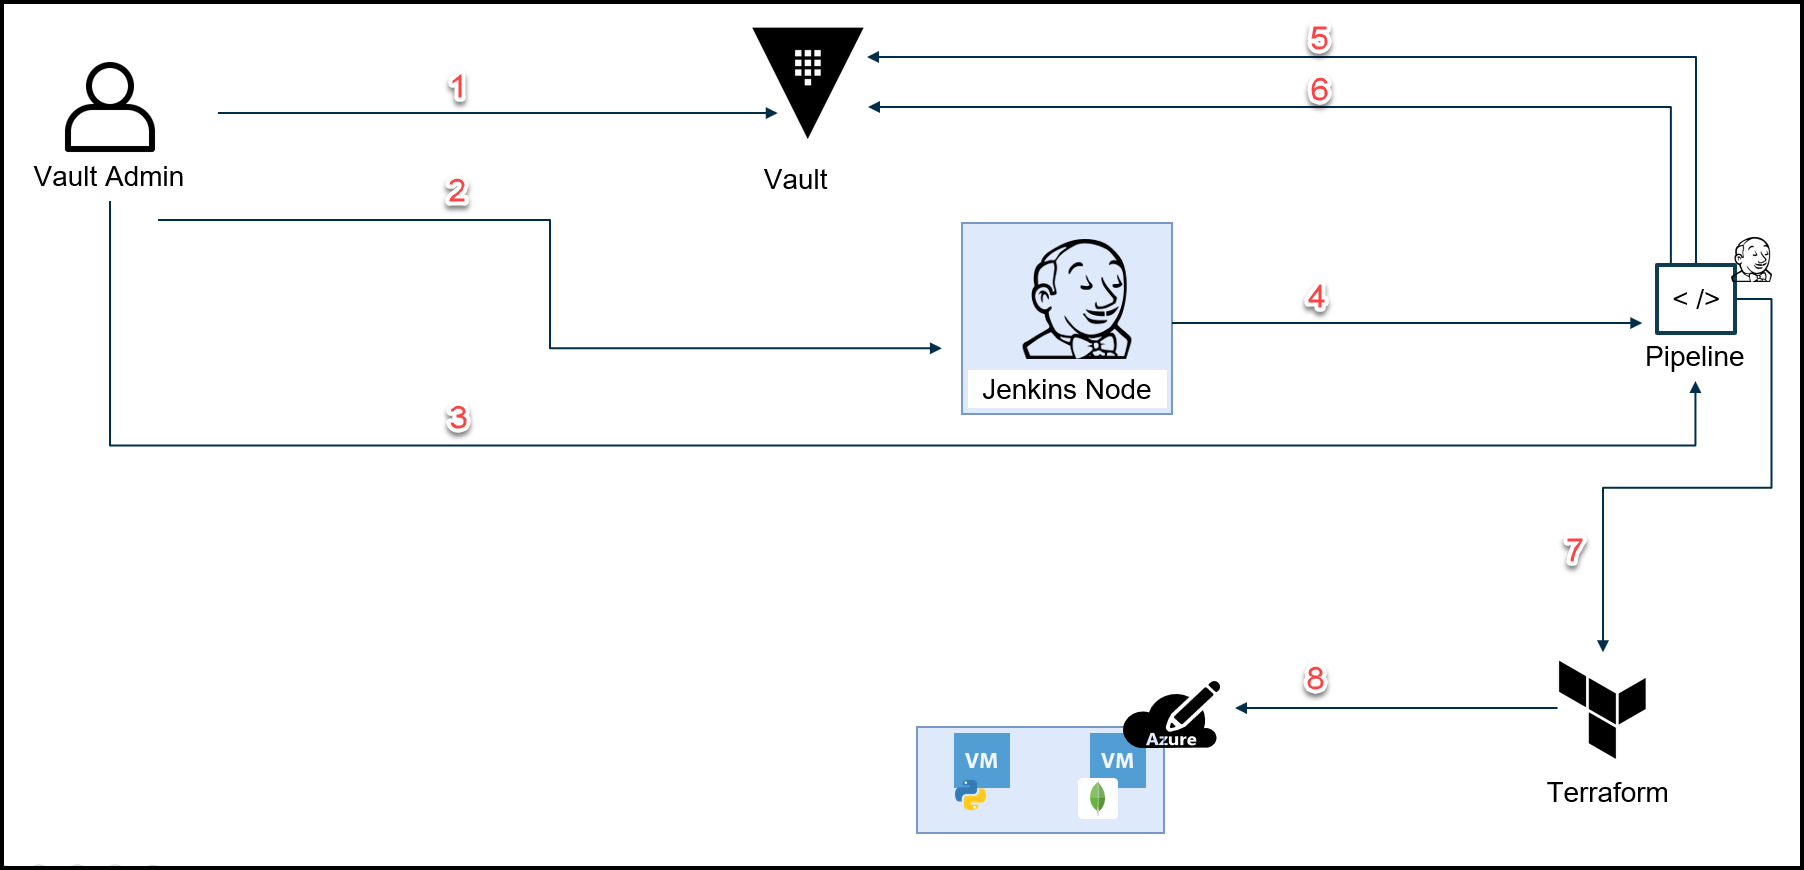
Vault Secure Introduction Diagram for Pipelines
Below are the steps that map to the diagram above.
- Create AppRoles for Jenkins node and the pipeline with policies
- Insert AppRole auth creds into Jenkins node’s Vault plugin*
- Deliver the Role ID for the pipeline
- Jenkins node creates a wrapped secret ID for the pipeline
- Pipeline unwraps secret ID and logs into Vault via AppRole for pipeline**
- Retrieve TFC token and generate dynamic Azure creds
- Call TFC to build app VMs
- Build app VMs in Azure
- Jenkins Node is a trusted entity, however, the policy associated with its AppRole only allows writing a wrapped Secret ID and nothing else. Inspired by this talk.
** The Pipeline has permissions to access the following:
– TFC token
– Generate Dynamic Azure Credentials via Vault Azure Secret Engine
– Create a wrapped Secret ID for the Vault agent to be used with the Webblog App
– MongoDB Root Credentials to bootstrap MongoDB
Vault Secure Introduction for the Webblog Application
Below you can find a diagram for the steps involved in secure introduction for the Webblog application.
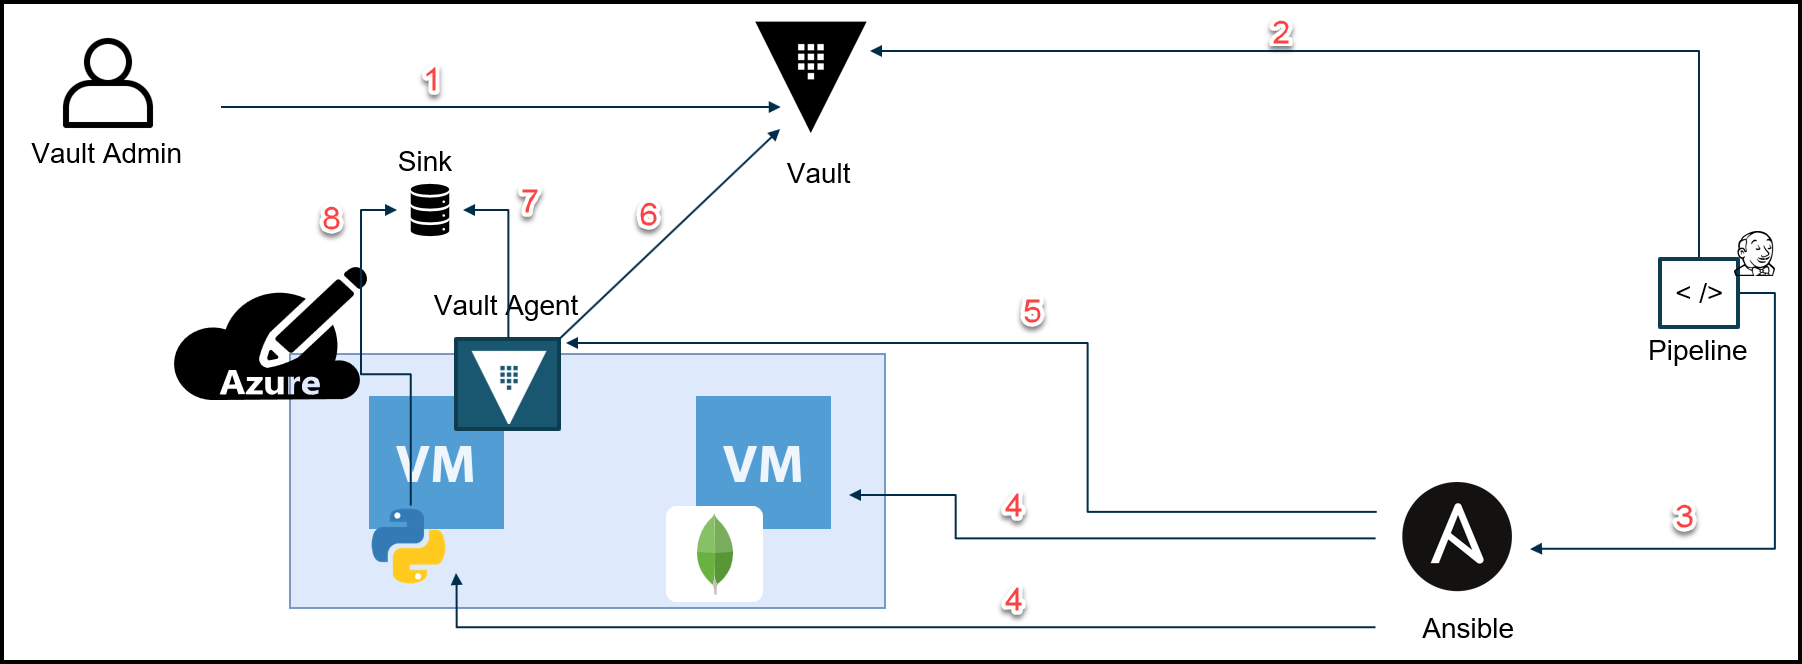
Vault Secure Introduction Diagram for the Webblog App
Below are the steps that map to the diagram above.
- Create AppRoles for the Webblog App with policies
- Create Role ID and wrapped secret-ID for the Vault agent on app VM
- Call Ansible to configure the Webblog App VMs and pass the Vault agent AppRole creds
- Configure the Webblog App VMs*
- Securely introduce the wrapped secret ID and start the Vault agent then the Vault agent deletes the wrapped secret ID file
- Login and auto-auth
- Drop the Vault token
- Pick up the Vault token
- This includes:
– Installing dependency libraries for the app
– Downloading and installing Vault agent, Consul, Envoy binaries
– Running services via Systemd and Docker
– Joining the Webblog App and MongoDB to the Service Mesh
Configuration
In this section, we go over the configuration that makes all this work. This includes the configuration for the following:
- Vault
- Jenkins
- Ansible
- Vault agent
Vault Configuration
Let’s take a look at Vault’s configuration. A Vault admin is required to run the steps below. Some organizations utilize namespaces to segregate duties and create mini-Vaults within Vault. This allows different application teams to have their own mini-Vault with their own configuration and permissions. Do note that using Namespaces is an enterprise feature in Vault.
You can use the Vault CLI or API for the configuration. My preferred way of doing it is via the Vault provider in Terraform. We are re-using our existing Vault cluster from our previous Webblog series. The Vault admin configuration is located in the main.tf file
You’ll see that we create 3 AppRoles along with their policies for the following:
– The Jenkins node
– The Jenkins pipeline
– The Vault agent
Create an AppRole for the Jenkins Node
This is done via Terraform using the following configuration:
resource "vault_policy" "jenkins_policy" {
  name = "jenkins-policy"
  policy = file("policies/jenkins_policy.hcl")
}

resource "vault_auth_backend" "jenkins_access" {
  type = "approle"
  path = "jenkins"
}

resource "vault_approle_auth_backend_role" "jenkins_approle" {
  backend            = vault_auth_backend.jenkins_access.path
  role_name          = "jenkins-approle"
  //secret_id_num_uses = "0"  means unlimited
  secret_id_num_uses = "0"
  token_policies     = ["default", "jenkins-policy"]
}
The jenkins_policy.hcl file mentioned here contains the following policy. As you can see, the Jenkins node is very limited in permissions. It can only wrap the secret-id for the pipeline and with a min and max TTL.
path "auth/pipeline/role/pipeline-approle/secret-id" {
  policy = "write"
  min_wrapping_ttl   = "100s"
  max_wrapping_ttl   = "300s"
}
Once you configure Vault via Terraform, you can then run the two commands below to get the role-id and the secret-id. You can see more instructions in the documentation.
vault read auth/jenkins/role/jenkins-approle/role-id
vault write -field=secret_id -f auth/jenkins/role/jenkins-approle/secret-id
You can now take the role-id and the secret-id and insert them into the Jenkins Vault plugin. This allows the Jenkins node to authenticate into Vault. However, remember that the policy only allows the Jenkins node to wrap the secret-id for the pipeline and that’s it. Please make sure you have the correct path for the AppRole when entering it into the plugin. This is shown in the Jenkins Vault Plugin and AppRole Creds section.
You can use the command below to run a test to login. Remember to substitute the role_id and secret_id with your values:
vault write auth/jenkins/login \
    role_id=a79bdd3a-81e3-e356-4c9e-46d22ff3fdc5 \
    secret_id=8b635683-82d1-2fc5-7028-682566137e74
Create an AppRole for the Jenkins Pipeline
Once again we use Terraform for configuration as shown below:
resource "vault_policy" "pipeline_policy" {
  name = "pipeline-policy"
  policy = file("policies/jenkins_pipeline_policy.hcl")
}

resource "vault_auth_backend" "pipeline_access" {
  type = "approle"
  path = "pipeline"
}

resource "vault_approle_auth_backend_role" "pipeline_approle" {
  backend            = vault_auth_backend.pipeline_access.path
  role_name          = "pipeline-approle"
  secret_id_num_uses = "1"
  secret_id_ttl      = "300"
  token_ttl          = "1800"
  token_policies     = ["default", "pipeline-policy"]
}
The jenkins_pipeline_policy.hcl file mentioned here contains a policy to allow the pipeline to do the following:
- Retrieve Azure credentials so that Terraform can provision Azure VMs
- Read the AppRole for the Vault agent
- Write a wrapped
secret-idfor the Vault agent - Read a static K/V secret for the TFC token to use Terraform to provision the app VMs
- Read the MongoDB root credentials stored in a K/V secret to bootstrap the MongoDB container
Here is the policy configuration:
path "azure/*" {
  capabilities = [ "read" ]
}
path "auth/approle/role/webblog-approle/role-id" {
  policy = "read"
}
path "auth/approle/role/webblog-approle/secret-id" {
  policy = "write"
  min_wrapping_ttl   = "100s"
  max_wrapping_ttl   = "1000s"
}
path "internal/data/tfc" {
  capabilities = ["read"]
}
path "internal/data/webblog/mongodb" {
  capabilities = ["read"]
}
You then need to read the role-id for the Jenkins policy and insert that into the jenkinsfile for the pipeline. Below is the command used to generate the role-id for the pipeline.
vault read auth/pipeline/role/pipeline-approle/role-id
Then the following occurs:
– The Jenkins node will create a wrapped secret-id for the pipeline
– The pipeline then unwraps the secret-id and retrieves a VAULT_TOKEN
– That VAULT_TOKEN will get used for the remainder of the pipeline
Create an AppRole for the Vault Agent
Below is the Terraform configuration for Vault:
resource "vault_policy" "webblog" {
  name   = "webblog"
  policy = file("policies/webblog_policy.hcl")
}

resource "vault_auth_backend" "apps_access" {
  type = "approle"
  path = "approle"
}

resource "vault_approle_auth_backend_role" "webblog_approle" {
  backend            = vault_auth_backend.apps_access.path
  role_name          = "webblog-approle"
  secret_id_num_uses = "1"
  secret_id_ttl      = "600"
  token_ttl          = "1800"
  token_policies     = ["default", "webblog"]
}
The webblog_policy.hcl file mentioned here contains a policy to allow the Vault agent to create a token for the webblog app to use. The policy allows the Webblog app to do 2 things:
- Read dynamic MongoDB secrets
- Utilize the Vault Transit secrets engine to encrypt the content of the blog posts
Here is the policy configuration:
path "mongodb_azure/creds/mongodb-azure-role" {
  capabilities = [ "read" ]
}
path "transit/*" {
  capabilities = ["list","read","update"]
}
The pipeline will need to run the following commands to create a role-id and a wrapped-secret-id for the Vault agent. We will see this inside the jenkinsfile.
vault read -field=role_id auth/approle/role/webblog-approle/role-id > /tmp/webblog_role_id
vault write -field=wrapping_token -wrap-ttl=200s -f auth/approle/role/webblog-approle/secret-id > /tmp/webblog_wrapped_secret_id
Jenkins Configuration
The entire Jenkins configuration can be found in this section.
Jenkins Vault Plugin and AppRole Creds
We need to install the Vault plugin for Jenkins so that the Jenkins node could receive its Vault AppRole credentials. Take a look at the screenshot below.
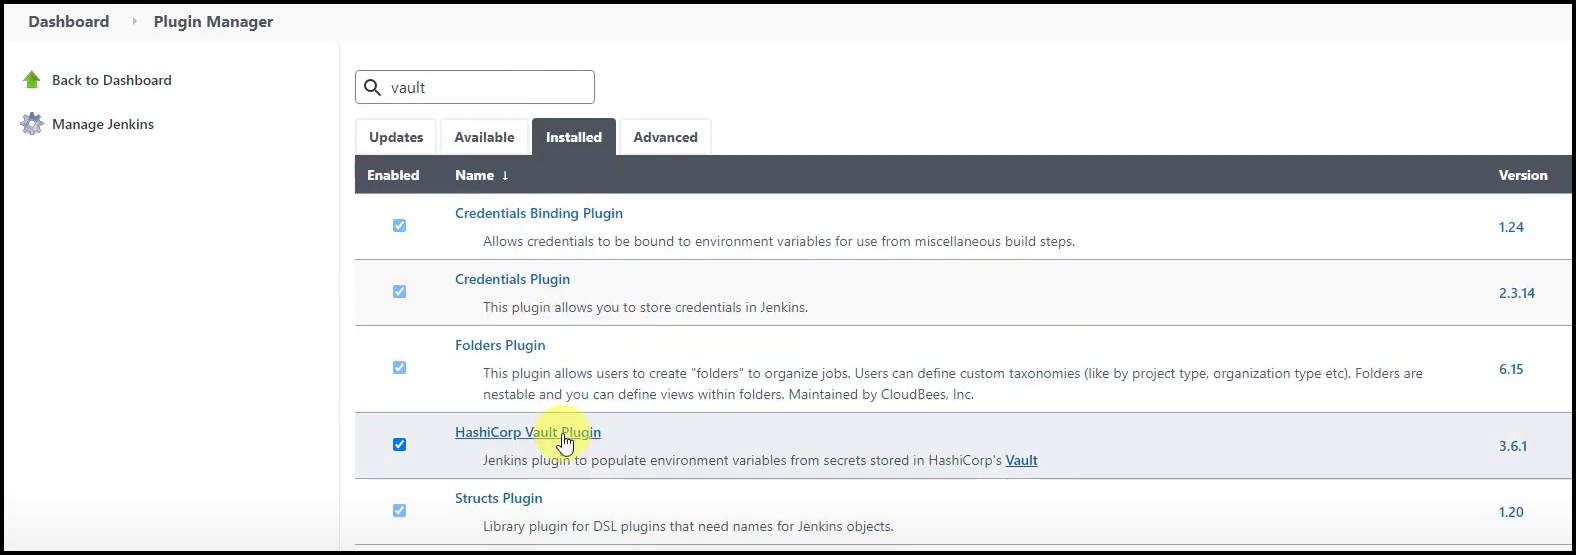
Vault Plugin for Jenkins
Then we enter the AppRole Vault credentials as you see in the picture below. Make note of the bread crumbs for the credentials section in Jenkins to get to the desired screen below.
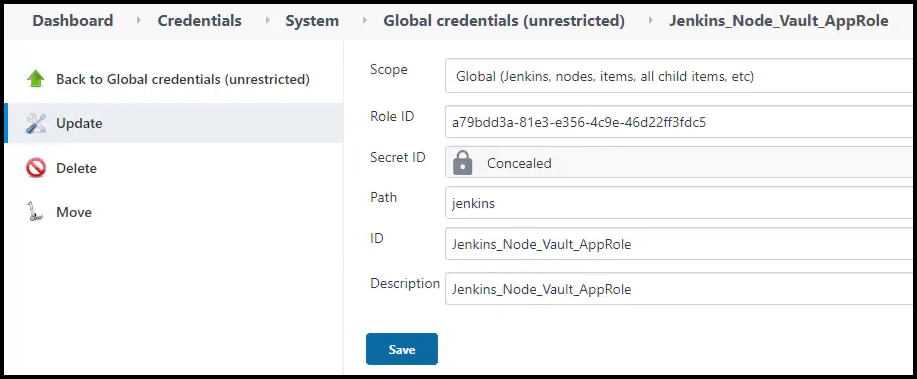
Vault Plugin for Jenkins AppRole Credentials
Jenkins Pipeline Configuration
Let’s take a look at how we configured the Jenkins pipeline and how we connected it to our GitHub repo.
GitHub Webhook for Jenkins
To get Jenkins to trigger a build automatically upon a push to GitHub, you need to configure a webhook in GitHub. You can do that by going to the webbhook section in the settings section of your GitHub repo. The Payload URL should be in the format of the <Jenkins_node_URL>/github-webhook. Here’s my example below:
http://samg-jenkins.centralus.cloudapp.azure.com:8080/github-webhook/
You can also see a screenshot of my settings below.
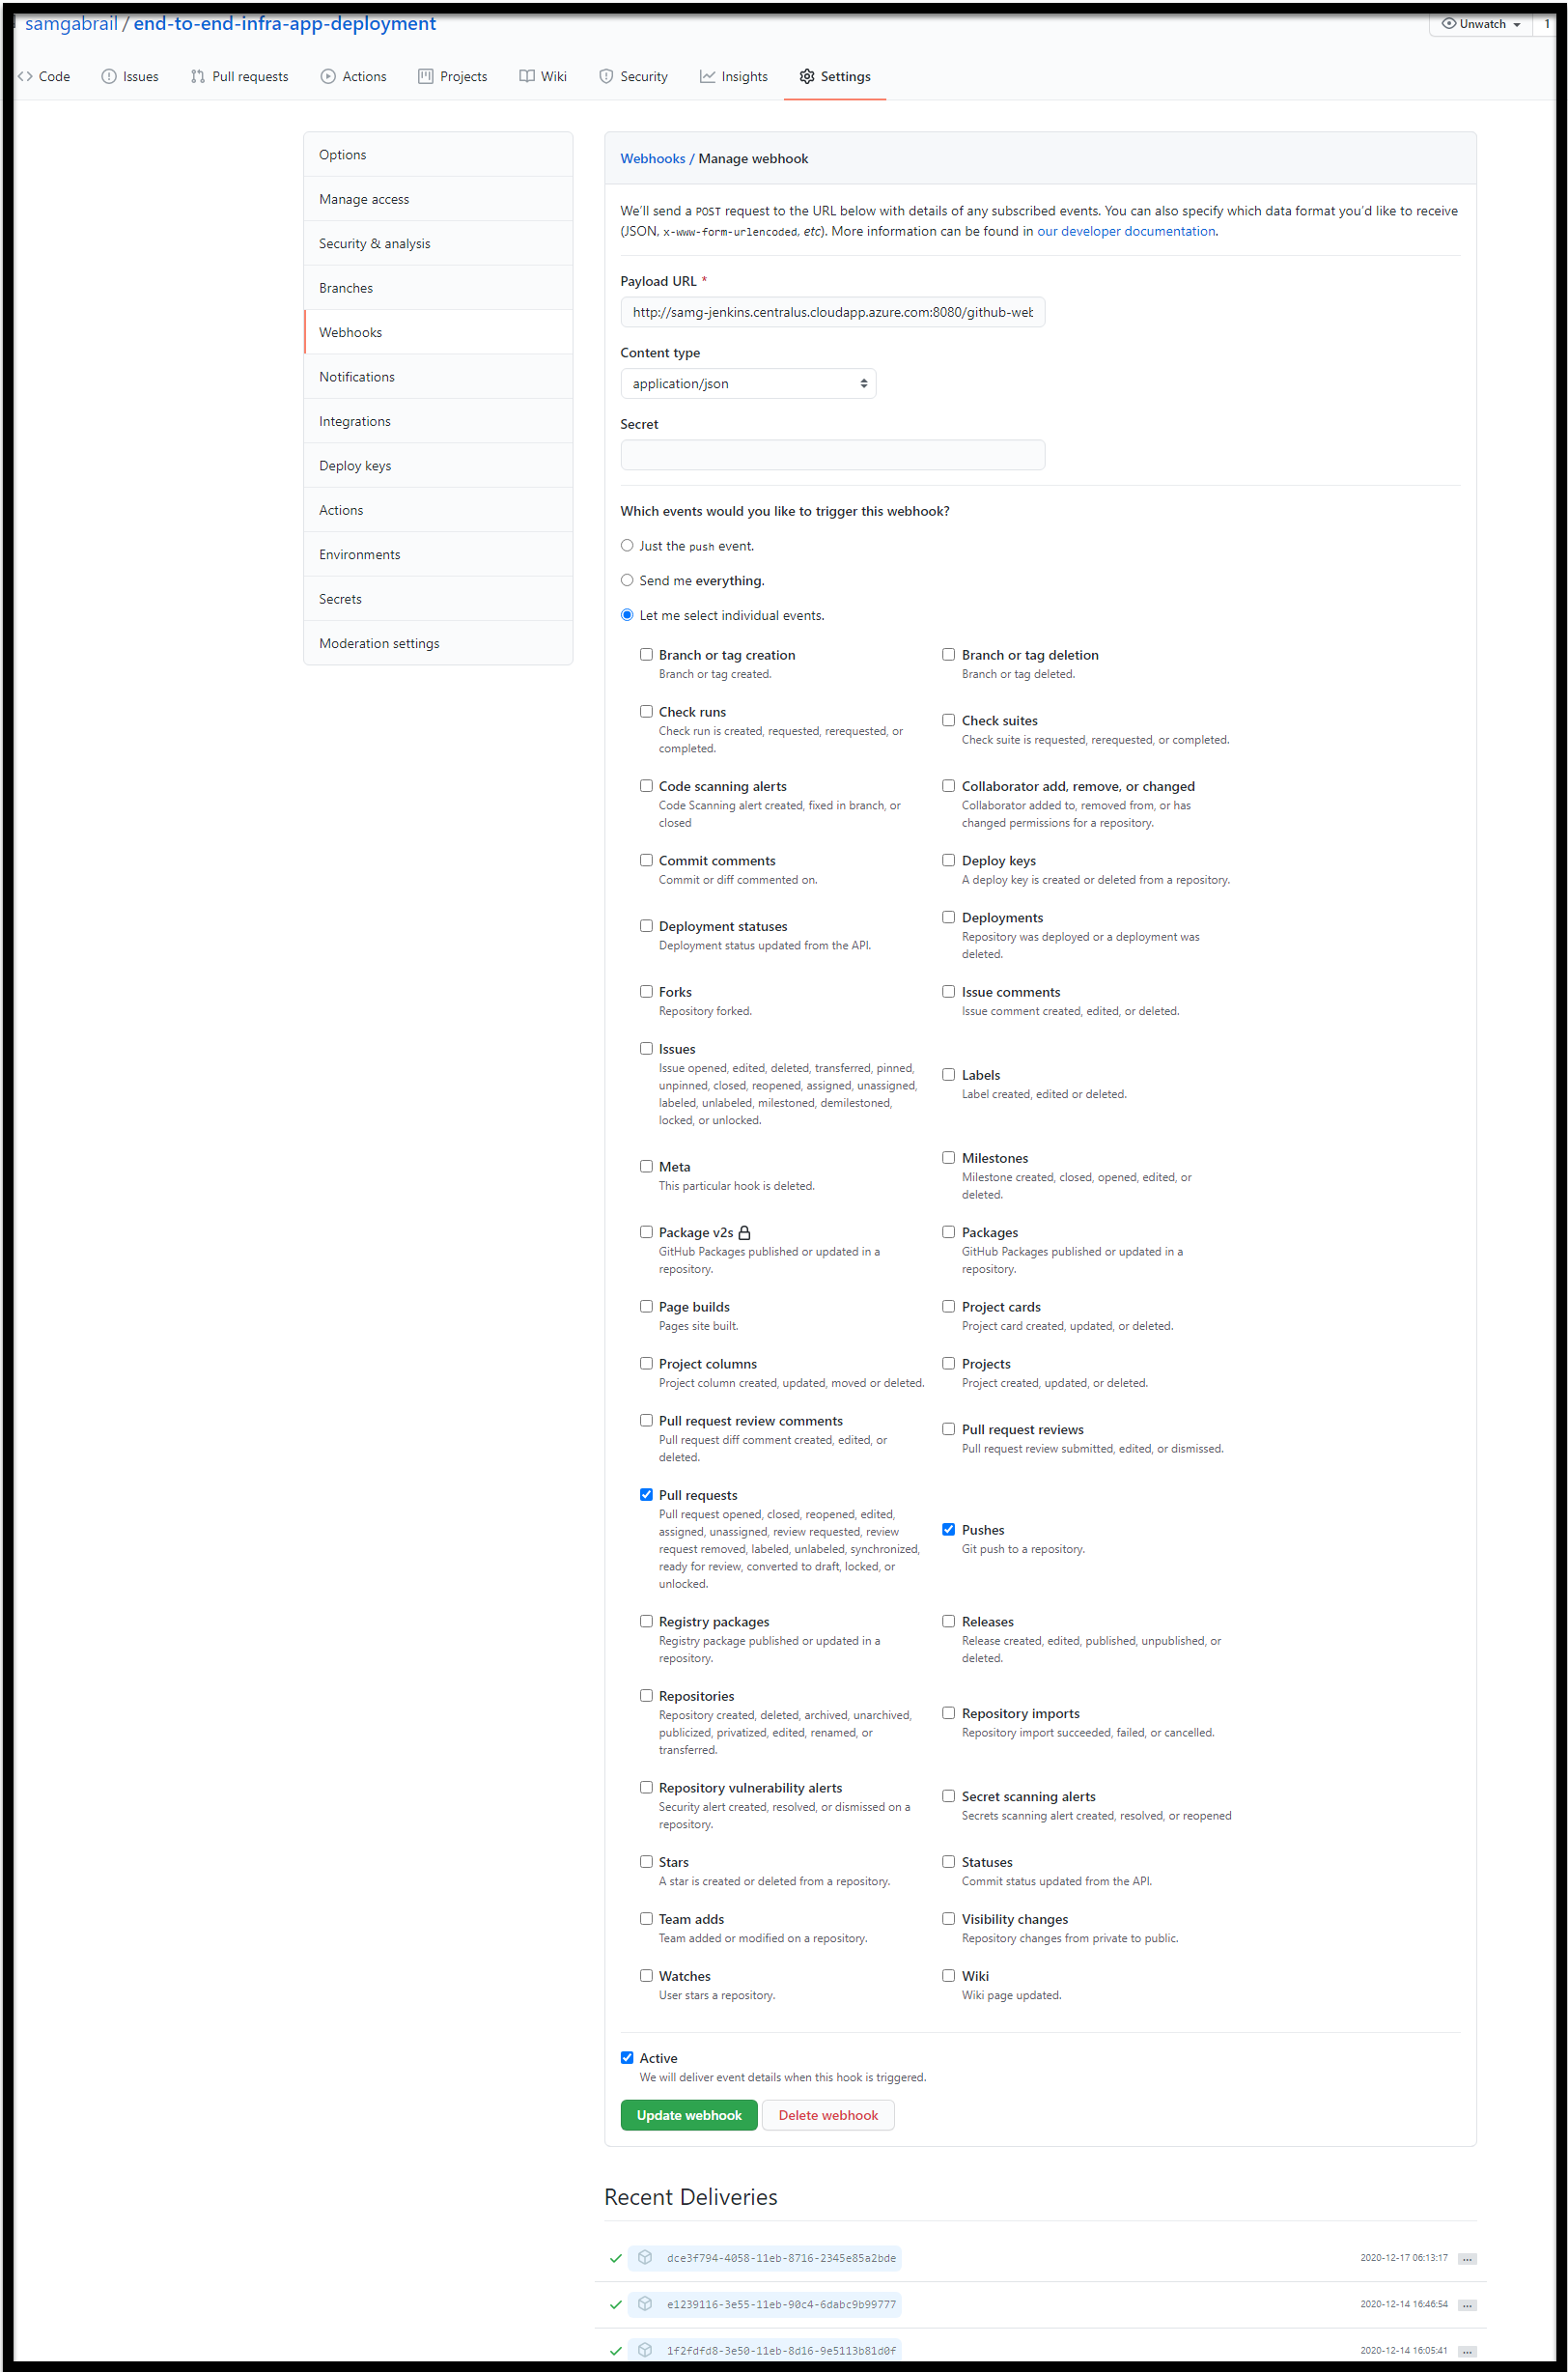
GitHub Webhook for Jenkins
Jenkins Pipeline Setup
Below are a few screenshots showing the options used in the Jenkins pipeline.
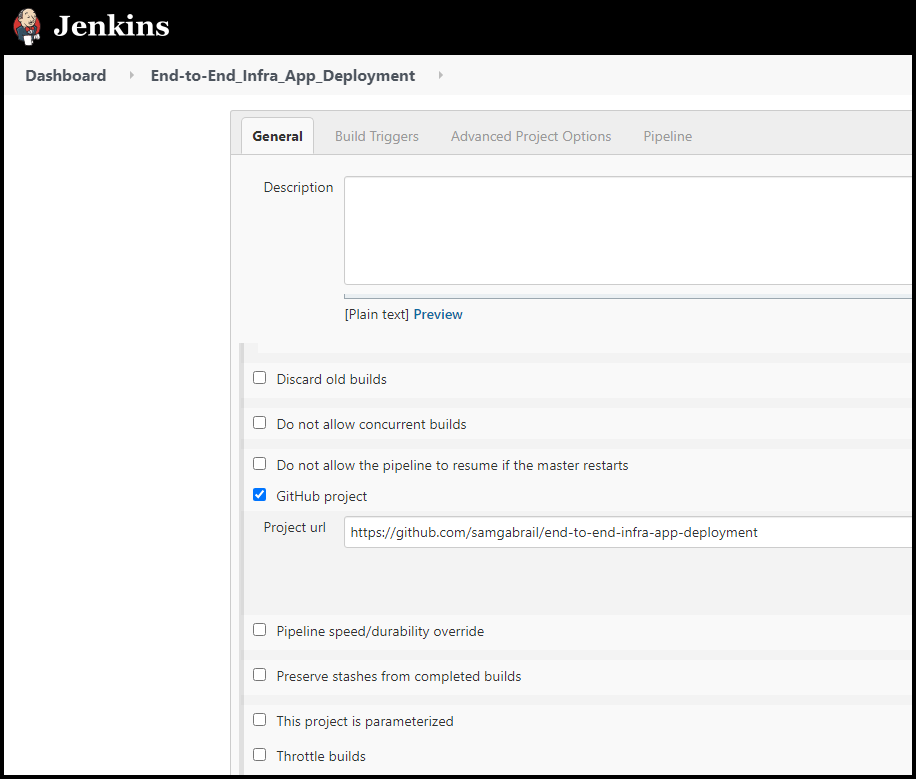
Jenkins Pipeline General Settings
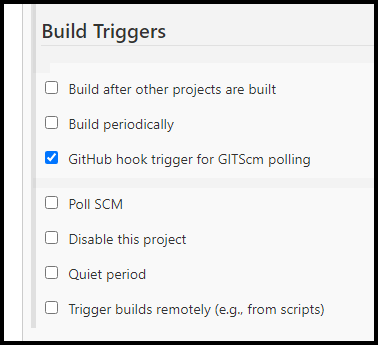
Jenkins Build Triggers
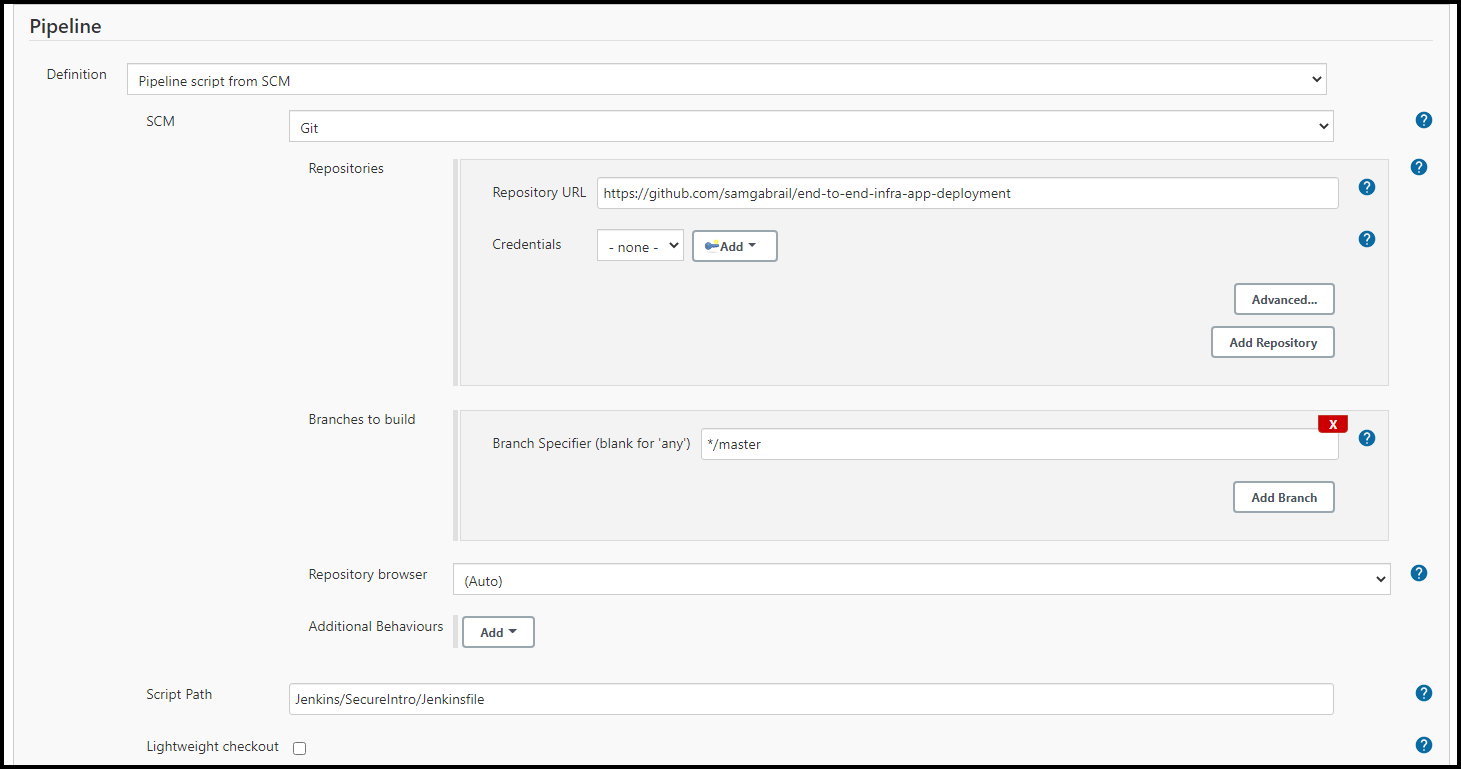
Jenkins Pipeline SCM
Jenkinsfile
Now let’s dig deeper into the actual Jenkinsfile. You can also find it in the GitHub repo here.
Here you see how things are starting to come together. The file is well commented to explain the different stages in the pipeline.
#!/usr/bin/env groovy
def ROLE_ID = "11f503c6-9c4f-d223-7845-64b177864ddf" //this is the Role-id for the Pipeline and needs to be inserted manually by a Vault Admin
def VAULT_ADDR = "http://vault.hashidemos.tekanaid.com:8200"
env.VAULT_ADDR = VAULT_ADDR

node() {
  timestamps{
  // Below are the Jenkins AppRole credentials provided by the Vault Admin. These are Jenkins wide credentials and are not to be confused with the Jenkins Pipeline AppRole credentials that are specific to this pipeline for this application
  withCredentials([
        [
            $class: 'VaultTokenCredentialBinding',
            credentialsId: 'Jenkins_Node_Vault_AppRole',
            vaultAddr: 'http://vault.hashidemos.tekanaid.com:8200'
        ]
    ]){
        // The Jenkins Node is only allowed to create the wrapped secret ID and with a wrap-ttl between 100s and 300s
        stage ('Jenkins Node Creates a Wrapped Secret ID for the Pipeline') {

            def WRAPPED_SID = ""
            env.WRAPPED_SID = sh(
              returnStdout: true,
              script: "vault write -field=wrapping_token -wrap-ttl=200s -f auth/pipeline/role/pipeline-approle/secret-id"
            )
        }
        stage("Unwrap Secret ID"){
          def UNWRAPPED_SID = ""
          env.UNWRAPPED_SID = sh(
            returnStdout: true,
            script: "vault unwrap -field=secret_id ${WRAPPED_SID}"
          )
        }
      }
        stage("Pipeline gets login token with Role ID and unwrapped Secret ID"){
          def VAULT_LOGIN_TOKEN = ""
          env.VAULT_LOGIN_TOKEN = sh(
            returnStdout: true,
            script: "vault write -field=token auth/pipeline/login role_id=${ROLE_ID} secret_id=${UNWRAPPED_SID}"
          )
        }
        stage("Log into Vault with Pipeline AppRole") {
          def VAULT_TOKEN = ""
          env.VAULT_TOKEN = sh(
            returnStdout: true,
            script: "vault login -field=token ${VAULT_LOGIN_TOKEN}"
          )
        }
        stage("Create Azure Creds for Terraform to Provision App VMs") {
          sh(returnStdout:false, script: "vault read -format=json azure/creds/jenkins > /tmp/azure_creds.json")
          sh '''
          cat /tmp/azure_creds.json | jq .data.client_id && cat /tmp/azure_creds.json | jq .data.client_secret
          echo client_id=$(cat /tmp/azure_creds.json | jq .data.client_id) > /var/jenkins_home/workspace/Webblog_App@script/Terraform/ProvisionAppVMs/client_id.auto.tfvars
          echo client_secret=$(cat /tmp/azure_creds.json | jq .data.client_secret) > /var/jenkins_home/workspace/Webblog_App@script/Terraform/ProvisionAppVMs/client_secret.auto.tfvars
          '''
        }
        stage("Retrieve TFC Token from Vault and Create the .terraformrc file to Authn into TFC") {
          sh '''
          cat <<EOF > /var/jenkins_home/.terraformrc
          credentials "app.terraform.io" {
              token = "$(vault kv get -field=tfc_token internal/tfc)"
          }
          EOF
          '''.stripIndent()
        }
        stage("Terraform to Provision the 2 App VMs + Consul Server VM in Azure") {
          // Search for the output FQDN from Terraform using jq and feed it into the inventory file of Ansible
          sh '''
              cd /var/jenkins_home/workspace/Webblog_App@script/Terraform/ProvisionAppVMs
              #terraform destroy --auto-approve
              terraform init
              terraform fmt
              terraform validate
              terraform apply --auto-approve
              sed -i "s/<placeholder_app>/$(terraform output -json webblog_public_dns | jq -r '.["samg-webblog-01-ip"]')/g" ../../Ansible/WebblogApp/inventory
              sed -i "s/<placeholder_db>/$(terraform output -json webblog_public_dns | jq -r '.["samg-webblog-02-ip"]')/g" ../../Ansible/WebblogApp/inventory
              sed -i "s/<placeholder_consul_server>/$(terraform output -json webblog_public_dns | jq -r '.["samg-webblog-03-ip"]')/g" ../../Ansible/WebblogApp/inventory
          '''
        }
        stage("Create Role-id and Wrapped Secret-id for the Vault Agent on App VM") {
          // Ansible to send the Role-id and the Wrapped Secret-id give 15 minutes for the wrap ttl to give enough time for ansible to prep the machines.
          sh '''
              vault read -field=role_id auth/approle/role/webblog-approle/role-id > /tmp/app_role_id
              vault write -field=wrapping_token -wrap-ttl=900s -f auth/approle/role/webblog-approle/secret-id > /tmp/app_wrap_secret_id
          '''
        }
        stage("Ansible to Configure Webblog App VMs") {
          // We will need to install Vault to use the Vault agent and Consul for service mesh
          // Grab MongoDB Root Credentials from Vault and pass it to Ansible to create the MongoDB Container
          // set +x below is to hide the response from vault with the mongo creds from displaying in Jenkins' logs
          sh '''
              set +x
              cd /var/jenkins_home/workspace/Webblog_App@script/Ansible/WebblogApp
              ansible-playbook -i inventory --extra-vars "mongo_root_user=$(vault kv get -field=username internal/webblog/mongodb) mongo_root_password=$(vault kv get -field=password internal/webblog/mongodb)" appPlaybook.yaml
          '''
        }
  }
}
Ansible Configuration
You can find the entire Ansible playbook in the GitHub repo, however, we included only the relevant section below.
- hosts: webblog-app-vm
  become_user: root
  become: true
  tasks:
    - name: Copy vault config to server
      copy: src=VaultConfig/vault_agent_config.hcl dest=/etc/opt/vault/
    - name: Copy role_id for Vault Agent
      copy: src=/tmp/app_role_id dest=/tmp/webblog_role_id
    - name: Copy wrapped_secret_id for Vault Agent
      copy: src=/tmp/app_wrap_secret_id dest=/tmp/webblog_wrapped_secret_id
    - name: Copy vault service to server
      copy: src=SystemdServices/vault.service dest=/etc/systemd/system/vault.service
    - name: Start vault service
      systemd:
        state: started
        name: vault
        daemon_reload: yes
As you can see, Ansible copies the following files to the Webblog app server so that the Vault agent can start correctly.
– Vault agent configuration
– The role-id file
– The wrapped secret-id file
Ansible also starts the vault agent as a Systemd service.
Vault Agent Configuration
Below is the Vault agent configuration file. You can also find it in the GitHub repo here.
vault_agent_config.hcl:
pid_file = "./pidfile"

vault {
  address = "http://vault.hashidemos.tekanaid.com:8200"
}

auto_auth {
  method "approle" {
    mount_path = "auth/approle"
      config = {
        role_id_file_path = "/tmp/webblog_role_id"
        secret_id_file_path = "/tmp/webblog_wrapped_secret_id"
        remove_secret_id_file_after_reading = true
        secret_id_response_wrapping_path = "auth/approle/role/webblog-approle/secret-id"
    }
  }

  sink "file" {
    config = {
      path = "/tmp/vault_token"
      mode = 0644
      }
    }
}
You can see how it uses AppRole as the authentication method into Vault. It looks for a role-id file along with a wrapped secret-id file. You already saw how Ansible delivered these two files in addition to this configuration file to the Webblog server VM in the Ansible Configuration section.
Upon first starting, the Vault agent does the following:
– Reads the role-id and wrapped secret-id from the respective files
– Unwraps the secret-id
– Deletes the wrapped secret-id file
– Authenticates into Vault
– Drops the VAULT_TOKEN into a sink file at the path /tmp/vault_token for the app to read it
– Starts the auto-authentication process and handles the renewal of the Vault token
You can read more about the Vault agent auto authentication feature here.
Conclusion
In this blog post, we talked about the secret zero problem. In our case, it was the secure delivery of the Vault token. We discussed how to do so for both our Jenkins pipeline and for our application via the Vault agent.
Securely introducing secret zero can be handled in many ways depending on the environment and the setup. On platforms such as Kubernetes and cloud platforms (GCP, Azure, AWS), it is easier to securely introduce secret zero. This is because these platforms provide an identity to the entities they generate. For example, AWS provides an identity to an EC2 instance via metadata. Vault can then verify the identity of this EC2 instance by checking with the AWS API. This is true of the other platforms mentioned above. We wrote another blog series where we used the Kubernetes platform for secure introduction. The relevant post is called Webblog App Part 2 – Secrets Development Phases with Vault.
However, when it comes to environments that don’t provide that sort of identity, it becomes a bit more complex to introduce secret zero. In this blog post, we took the difficult route to show how to solve the secret zero problem without utilizing a platform that provides an identity.
Now that we have shown how to securely introduce the Vault token to our pipeline and to the application, we are ready for part 4, which is the last part of this blog series. Let’s see how in part 4 Jenkins, Vault, Terraform, Ansible, and Consul work together to deliver an End-to-End CI/CD Pipeline for our application.
References
- Secure Introduction of Vault Clients
- Vault Response Wrapping
- AppRole Response Wrapping
- Vault Response Wrapping Makes The “Secret Zero” Challenge A Piece Of Cake
- Vault Agent Auto Authentication
- GitHub repo for Vault admin tasks
- GitHub repo for the blog series
Suggested Reading
- HashiCorp Vault API Tutorial and Pro Tips
- Migrate Secrets from AWS Secrets Manager to HashiCorp Vault with Python, Docker, and GitLabHashiCorp Packer to Build a Ubuntu 22.04 Image Template in VMware vSphere
- HashiCorp Vault PKI Secrets Engine Demo for Certificate Management
- Terraform Import Example – AWS EC2 Instance
- HashiCorp Packer to Build a Ubuntu 20.04 Image Template in VMware
- Migrate Secrets from AWS Secrets Manager to HashiCorp Vault with Python, Docker, and GitLab
Code
Hi and Welcome!
Join the Newsletter and get FREE access to all my Source Code along with a couple of gifts.