
Introduction
As a DevOps engineer, you know that managing secrets is critical to your job. And HashiCorp Vault is one of the best tools for the job. But what happens when you need to back up and restore your Vault data? In this post, we’ll show you how to use Raft snapshots for HashiCorp Vault backup. We’ll also show you how to store those snapshots in AWS S3 for added durability. So if you’re ready to learn how to keep your data safe, read on!
Video
Below is a video explanation and demo.
Video Chapters
This video lecture has been taken from my course:
HashiCorp Vault 201 – Vault for Apps in Kubernetes
You can skip to the relevant chapters below:
- 00:00 – Introduction
- 00:15 – Setup the Environment
- 02:54 – Starting a Vault Cluster
- 08:15 – Mentions of Vault 101 and 201 Courses
- 12:24 – Explanation of the Backup Cronjob
- 16:17 – Create the S3 Bucket
- 18:32 – Snapshot Pushed to S3 Successfully
- 18:55 – Restoring a Snapshot
- 26:15 – Final Important Closing Thoughts
Overview
Securing your data is a key part of being a DevOps engineer, and HashiCorp Vault makes that easier than ever. But what if you need to back up and restore the data stored in your Vault? In this post, we’ll show you how Raft snapshots make that possible while also providing an extra layer of protection by storing those backups in AWS S3! So let’s get started on keeping all your important information safe – keep reading for more info!
Pre-requisites
The following is required to follow along:
- GitHub’s Codespaces as your development environment. The code repo is equipped with it.
- An AWS account or if you’re subscribed to the TeKanAid Academy Subscription you get your own AWS account on demand.
1. What is HashiCorp Vault?
Vault is an open-source tool used to securely store and access secrets such as passwords, tokens, certificates, and more. It provides a secure mechanism for managing these secrets while also simplifying the process of using them in applications. Vault can be deployed in either on-premise or cloud environments, allowing users to leverage the advantages of both.
2. HashiCorp Vault Integrated Storage Backend
Vault supports several backend storage solutions, including the Integrated Storage (IS) option. IS is also sometimes referred to as raft storage backend. The IS backend relies on the Raft consensus protocol. The Raft consensus protocol ensures that all nodes in the cluster agree on the data that needs to be backed up and any updates made during the backup process. This enables users to perform backup and restore operations in a secure and reliable manner.
Vault takes Raft snapshots to back up and restore its data. These are point-in-time copies of Vault’s state that can be used to quickly restore Vault back to a known-good state. Below is an image of a Vault HA Cluster with Raft Storage.
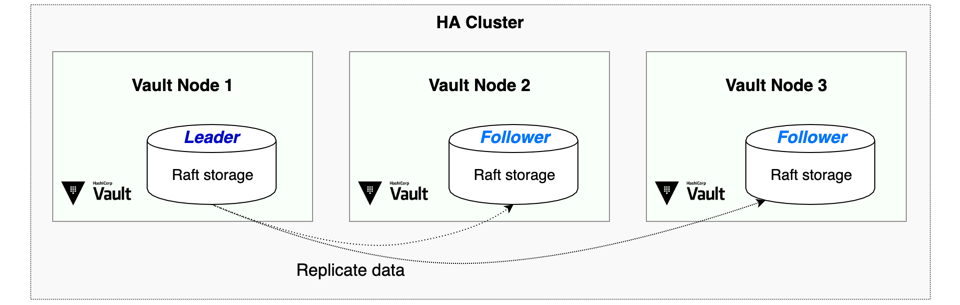
Vault Raft HA
3. Why do you need to back up your Vault data
Backing up your data stored in Vault is critical for protecting against potential data loss. Vault stores sensitive information and if the data is lost or corrupted, it can have serious implications on operations. By backing up the data with Raft snapshots, users can quickly restore their HashiCorp Vault back to a known-good state if something goes wrong.
It’s important to note that taking snapshots should be implemented as a last-resort backup solution. This is a simple backup solution. In production, you need to use Vault Enterprise and enable Disaster Recovery and/or Performance Replication on top of Raft snapshots. Both DR and PR stream Vault configuration and secrets to other Vault instances. Using either DR or PR or both depend on your use cases and your Recovery Point Objective (RPO) and Recovery Time Objective (RTO). I go over some of the basics of DR and PR in the HashiCorp Vault 101 – Certified Vault Associate Course on TeKanAid Academy. I also discuss this in the HashiCorp Vault Tutorial for Beginners blog post and video.
4. Backup in Vault Enterprise
Vault Enterprise starting with version 1.6.0 has a built-in automated snapshots feature. You can read more about it here. It is fairly straightforward and has multiple options such as backing up to AWS S3, Azure Blob, and Google GCS. You can find these options in the API documentation.
However, for Vault OSS there is no automated backup feature. You can use the Vault CLI to save a snapshot of Vault running integrated storage as the backend storage mechanism. Then you can upload the snapshot file to an online storage system such as AWS S3 or Azure Blob. In this blog post, we will create an automated backup feature to backup to AWS S3 for our online storage solution.
5. How to use Kubernetes and AWS S3 to automate the backup process
If you’re running a Vault cluster in Kubernetes, then you can simply create a cronjob that takes a snapshot from Vault and upload it to S3. Below are some high-level steps:
- Create an AWS S3 bucket to store the snapshot files.
- Store the AWS access credentials in a KV store in Vault.
- Write a Vault policy to allow the cronjob to access the KV store and take snapshots.
- Configure the K8s auth method to allow the cronjob to authenticate to Vault.
- Create a cronjob based on a Docker image that runs a script to take Vault snapshots and upload them to an S3 bucket.
Note: The Vault agent sidecar access Vault and drops the AWS access credentials into a shared volume in the cronjob’s pod that gets picked up by the cronjob’s script. If you would like to learn more about running Vault in Kubernetes, then check out my course called HashiCorp Vault 201 – Vault for Apps in Kubernetes
6. The Backup Solution
Let’s first set up a Vault cluster running in a Kubernetes environment. We will use minikube as our Kubernetes cluster. If you don’t have minikube set up, you can simply run a codespace in the repo of this project and will get minikube set up for you. You can check the Video demo above for instructions. You can get the repo with the code here.
Below is an overview of the process.

The Backup Process
Below is the folder structure for our repo.
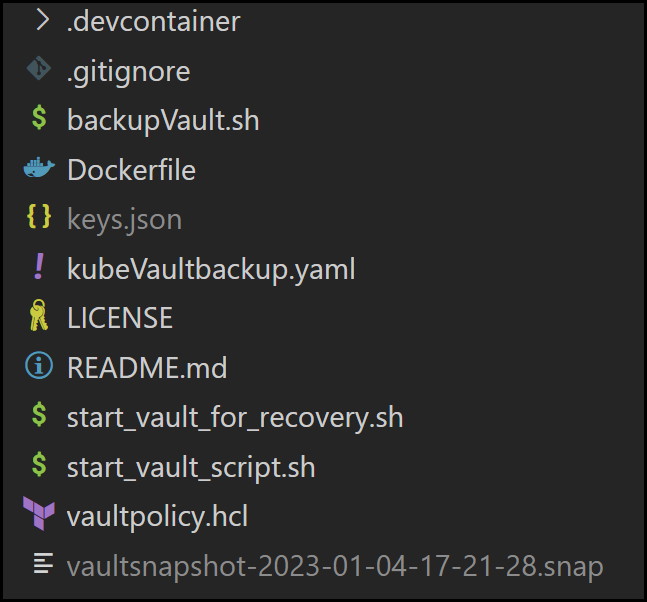
The Repo’s Folder Structure
6.1 Set up Vault
Run the script below to get Vault deployed via Helm as a Raft cluster.
./start_vault_script.sh
The script does the following:
- Installs Vault with Integrated Storage in K8s with Helm and uses the official vault docker image (You can set the vault version with the
server.image.tagoption) - Initializes and Unseals Vault
- Creates a Vault Policy to allow access to the KV storage location to retrieve the AWS creds and take snapshots
- Sets up the K8s auth method
- Enables the KV v2 secrets engine to store the AWS creds
The content of the script is found below:
#!/usr/bin/bash

## Install Vault with Raft in K8s
kubectl create ns vault
helm repo add hashicorp https://helm.releases.hashicorp.com
helm install vault --namespace vault --set server.image.tag=1.12.2,server.ha.enabled=true,server.ha.raft.enabled=true,server.ha.replicas=1 hashicorp/vault
sleep 60

## Expose the Vault service
kubectl -n vault port-forward service/vault 8200:8200 &
## Export the vault address
export VAULT_ADDR=http://127.0.0.1:8200

## Initialize and Unseal Vault
kubectl -n vault exec vault-0 -- vault operator init -format=json -key-shares=1 -key-threshold=1 > /tmp/vault-keys.json
export VAULT_TOKEN=$(cat /tmp/vault-keys.json | jq -r .root_token)
vault operator unseal $(cat /tmp/vault-keys.json | jq -r .unseal_keys_b64[0]) || true

## Create the Vault Policy
vault policy write vaultpolicy ./vaultpolicy.hcl

## Vault with K8s Auth
vault auth enable kubernetes
TOKEN_REVIEWER_JWT=$(kubectl -n vault exec vault-0 -- cat /var/run/secrets/kubernetes.io/serviceaccount/token)
KUBERNETES_PORT_443_TCP_ADDR=$(kubectl -n vault exec vault-0 -- sh -c 'echo $KUBERNETES_PORT_443_TCP_ADDR')
kubectl -n vault exec vault-0 -- cp /var/run/secrets/kubernetes.io/serviceaccount/ca.crt /tmp/ca.crt
kubectl -n vault cp vault-0:/tmp/ca.crt /tmp/ca.crt
vault write auth/kubernetes/config issuer="https://kubernetes.default.svc.cluster.local" token_reviewer_jwt="${TOKEN_REVIEWER_JWT}" kubernetes_host="https://${KUBERNETES_PORT_443_TCP_ADDR}:443" kubernetes_ca_cert=@/tmp/ca.crt
rm /tmp/ca.crt
kubectl -n vault exec vault-0 -- rm /tmp/ca.crt
vault write auth/kubernetes/role/vault \
    bound_service_account_names=vault \
    bound_service_account_namespaces=vault \
    policies=vaultpolicy

## Enable KV v2 and put the AWS creds
vault secrets enable -path=secret -version=2 kv
After running the above script, you will have a working vault cluster running one vault server replica. Now let’s take a look at the vaultpolicy.hcl file content.
path "secret/data/aws/awscreds_s3" {
  capabilities = ["list","read"]
}

path "sys/storage/raft/snapshot" {
  capabilities = ["read"]
}
6.2 Store the Unseal Keys somewhere safe
We need to store the unseal keys safely because we will need them when recovering vault.
cp /tmp/vault-keys.json keys.json
6.3 Insert the AWS Creds into the Vault Cluster
Now we will put the AWS credentials into the KV store so that our cronjob can retrieve them to upload the vault snapshot file.
export AWS_ACCESS_KEY_ID=<enter_it_here>
export AWS_SECRET_ACCESS_KEY=<enter_it_here>
export VAULT_ADDR=http://127.0.0.1:8200
export VAULT_TOKEN=$(cat /tmp/vault-keys.json | jq -r .root_token)
vault kv put -mount=secret aws/awscreds_s3 AWS_ACCESS_KEY_ID=${AWS_ACCESS_KEY_ID} AWS_SECRET_ACCESS_KEY=${AWS_SECRET_ACCESS_KEY}
6.4 The Dockerfile
The cronjob that we will create will call on a container to run. This container is built with the following Dockerfile:
FROM ubuntu:20.04
LABEL maintainer="Sam Gabrail"
ARG VAULT_VERSION="1.12.2"
RUN groupadd -g 999 appuser \
    && useradd -m -r -u 999 -g appuser appuser \
    && apt update -y && apt install -y gnupg wget curl zip unzip \
    && wget https://releases.hashicorp.com/vault/${VAULT_VERSION}/vault_${VAULT_VERSION}_linux_amd64.zip && unzip vault_${VAULT_VERSION}_linux_amd64.zip && mv vault /usr/local/bin \
    && curl "https://awscli.amazonaws.com/awscli-exe-linux-x86_64.zip" -o "awscliv2.zip" && unzip awscliv2.zip && ./aws/install
USER appuser
WORKDIR /app
COPY backupVault.sh /app/backupVault.sh
CMD  ["./backupVault.sh" ]
6.5 The Actual Backup Script to Upload the Snapshot File
The docker container runs a bash script that uses the Vault CLI to create a vault snapshot. Then it uses the AWS CLI to upload this vault snapshot to the S3 bucket. Notice that we are using the Vault binary here. We could have also used the Vault API with a curl command to achieve the same result. You can find the content of this script below:
#!/bin/bash
export VAULT_TOKEN=$(</home/appuser/.aws/token)
DATE=`date +%Y-%m-%d-%H-%M-%S`
vault operator raft snapshot save /tmp/vaultsnapshot-$DATE.snap
/usr/local/bin/aws s3 cp /tmp/vaultsnapshot-$DATE.snap s3://$S3BUCKET/
rm /tmp/vaultsnapshot-$DATE.snap
echo "Completed the backup - " $DATE
6.6 Apply the Backup Cronjob
Now we are ready to backup vault by applying the cronjob. This cronjob is what will automate vault backup for us. Take a look below
kubectl apply -n vault -f kubeVaultbackup.yaml
Here is the content of the cronjob:
apiVersion: batch/v1
kind: CronJob
metadata:
  name: vaultbackup
spec:
  concurrencyPolicy: Forbid
  schedule: "0 7 * * *"
  jobTemplate:
    spec:
      template:
        metadata:
          annotations:
            vault.hashicorp.com/agent-inject: "true"
            vault.hashicorp.com/agent-configmap: "vault-backup-configmap"
            vault.hashicorp.com/agent-pre-populate-only: "true"
            vault.hashicorp.com/secret-volume-path: "/home/appuser/.aws"
        spec:
          serviceAccountName: vault
          containers:
          - name: vaultbackup
            image: samgabrail/tekanaid_vault_backup
            imagePullPolicy: Always
            env:
              - name: VAULT_ADDR
                value: http://vault-active.vault.svc.cluster.local:8200
              - name: S3BUCKET
                value: tekanaid-vault-backup-demo
          restartPolicy: OnFailure
This cronjob uses a configmap for automated backups. The configmap is shown below:
apiVersion: v1
kind: ConfigMap
metadata:
  name: vault-backup-configmap
data:
  config-init.hcl: |
    "auto_auth" = {
      "method" = {
        "config" = {
          "role" = "vault"
        }
        "type" = "kubernetes"
      }
      "sink" = {
        "config" = {
          "path" = "/home/appuser/.aws/token"
          "mode" = 0644
        }
        "type" = "file"
      }
    }
    "exit_after_auth" = true
    "template" = {
      "contents" =
        "{{- with secret \"secret/data/aws/awscreds_s3\" -}}\n[default]\naws_access_key_id = {{ .Data.data.AWS_ACCESS_KEY_ID }}\naws_secret_access_key = {{ .Data.data.AWS_SECRET_ACCESS_KEY }}\n{{- end -}}"

      "destination" = "/home/appuser/.aws/credentials"
    }
    "vault" = {
      "address" = "http://vault-active.vault.svc.cluster.local:8200"
    }
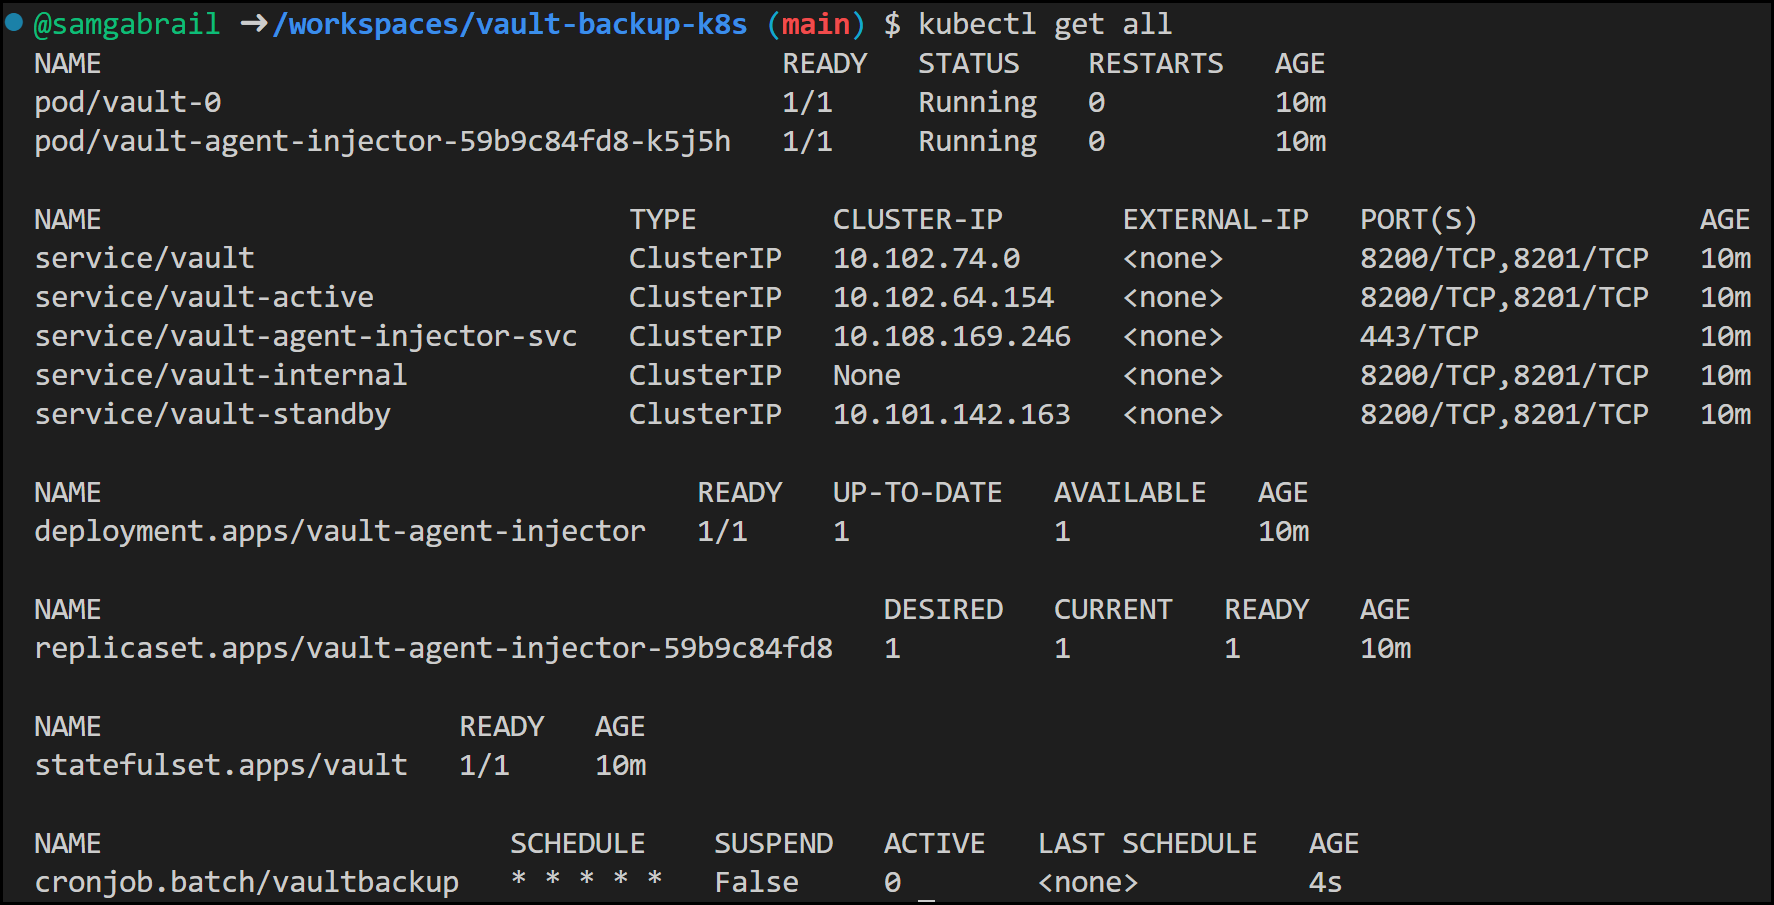
If you run kubectl get all inside of your vault namespace, you would get something like this just before the cronjob starts running:
Kubectl Output
6.7 Check the AWS S3 Console For Backups
Now go to the AWS S3 Console to make sure you’re getting backups. You can see that we have 2 HashiCorp Vault snapshots in the image below.
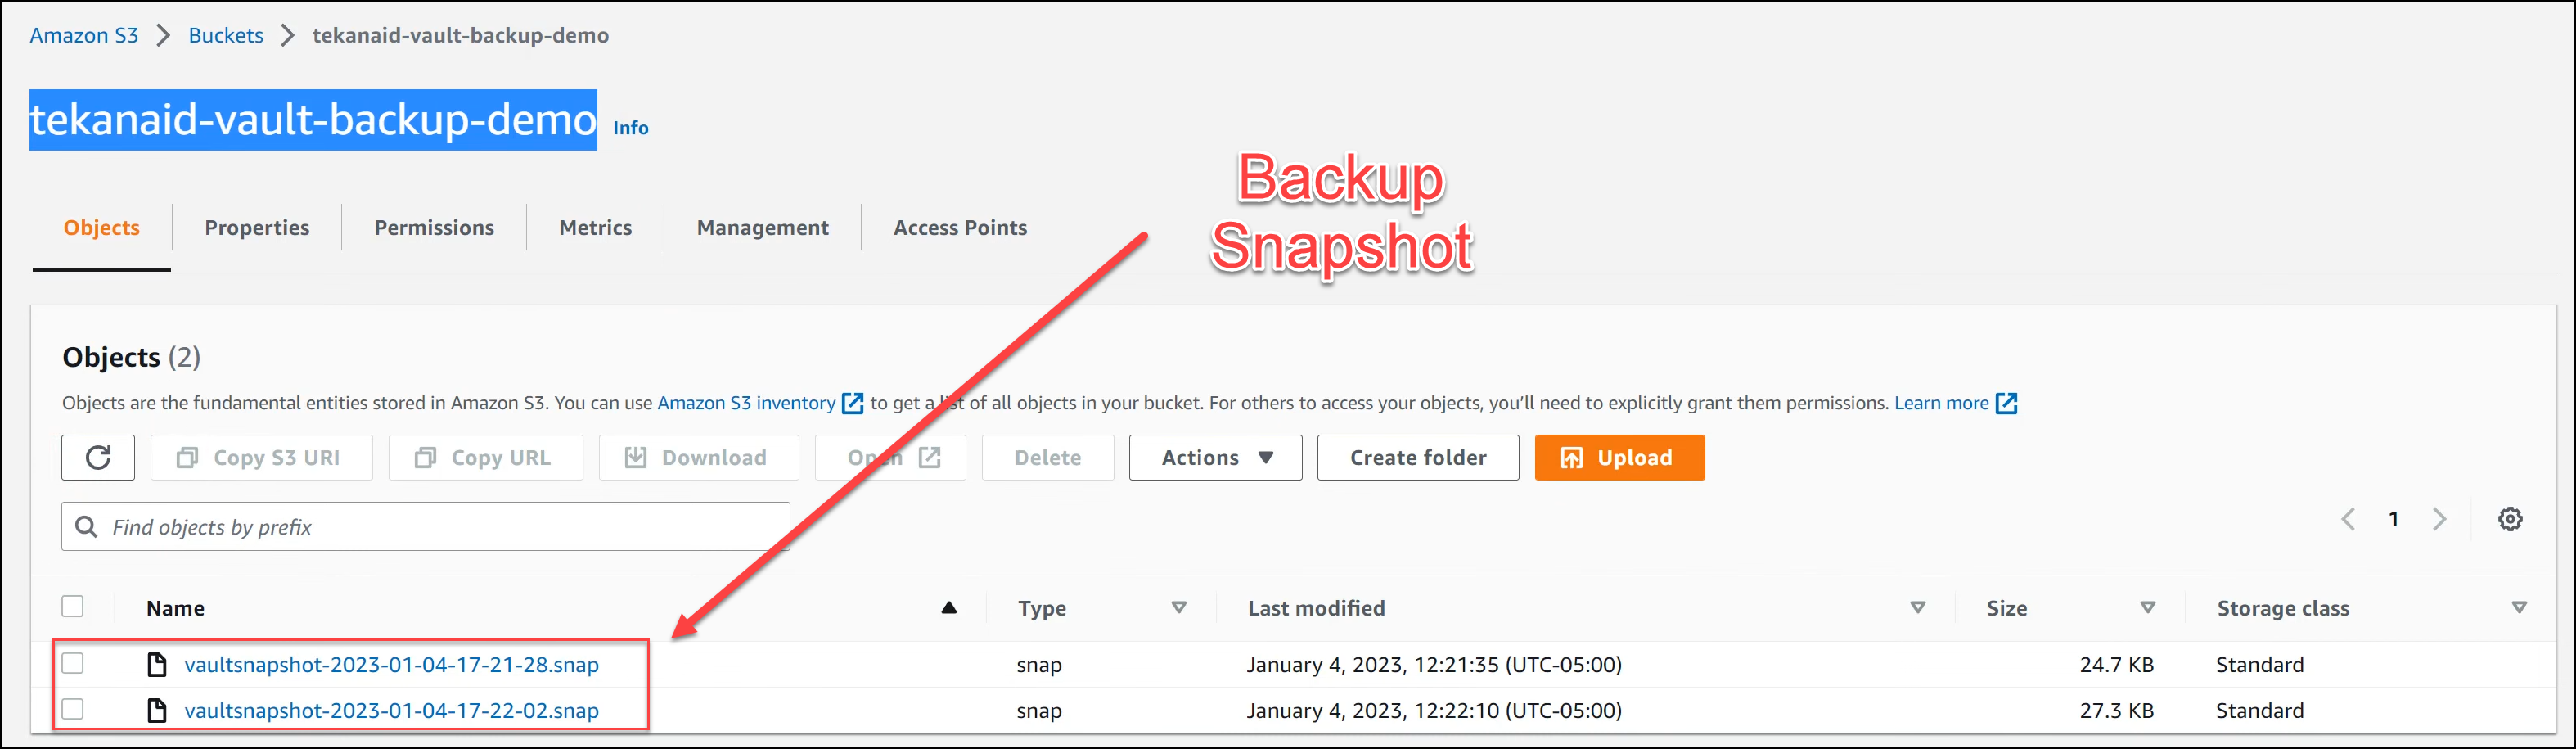
Snapshots in S3
7. Restore the Raft snapshot from AWS S3 back to your Vault Kubernetes cluster
It’s time to simulate a disaster. So we’re going to kill the vault server in order to restore it from the vault snapshot.
7.1 Destroy the Vault Instance
Now let’s destroy the Vault cluster to simulate a disaster. We will simply delete the namespace vault. This will destroy our vault Kubernetes deployment.
kubectl delete ns vault
Deleting the namespace should kill the process forwarding the 8200 port. If for some reason it doesn’t then follow the process below:
Searching for the process ID and then kill it.
ps -ef | grep 8200
Output:
codespa+ 79440 1 0 15:39 pts/3 00:00:00 kubectl -n vault port-forward service/vault 8200:8200
kill 79440
7.2 Restore the Data from Backup
Bring your Vault cluster with the raft backend back online. You will need to reinitialize your Vault cluster and log in with the new root token that was generated during its reinitialization. Note that these will be temporary- the original unseal keys will be needed following restoration. Remember we saved these in the keys.json file earlier. Run the following script to rebuild a new Vault cluster. This new cluster will have no configurations or secrets data.
./start_vault_for_recovery.sh
Now copy the backup raft snapshot file from the S3 bucket to your local directory as shown below.
aws s3 cp s3://<your_bucket_name>/<your_backup_file.snap> .
It’s now time to restore from backup. Note, the -force option is required here since the auto-unseal or Shamir keys will not be consistent with the snapshot data as you will be restoring a snapshot image from a different cluster.
export VAULT_TOKEN=$(cat /tmp/vault-keys.json | jq -r .root_token)
vault operator raft snapshot restore -force <your_backup_file.snap>
Once you have restored the Raft snapshot you will need to unseal your Vault cluster again using the following command:
vault operator unseal $(cat keys.json | jq -r .unseal_keys_b64[0]) || true
7.3 Check that Vault is Restored
Now log into the UI of the restored Vault server to make sure that the configuration and the secrets data are there. You can check the K8s auth method and the AWS S3 credentials are present.
8. Conclusion
In this blog post, we discussed HashiCorp Vault OSS backup and restore using Raft snapshots. We showed you how to automatically store those snapshots in AWS S3 for extra durability, and how to restore the data back into your Vault Kubernetes cluster. This was all done with a K8s cronjob running alongside the Vault server.
We hope this post has given you a good understanding of the backup and restore processes using Raft Snapshots. If you follow these steps, you’ll be able to ensure your HashiCorp Vault data is safe and secure, giving you the peace of mind that your HashiCorp Vault data is backed up and recoverable. So go ahead and get started with HashiCorp Vault backup and restore today! Happy automating!
9. References
- HashiCorp Vault
- HashiCorp Official Documentation
- HashiCorp Raft Consensus Protocol
- Standard Procedure for Restoring a Vault Cluster
- AWS S3
Suggested Reading
- HashiCorp Vault Tutorial for Beginners
- Migrate Secrets from AWS Secrets Manager to HashiCorp Vault with Python, Docker, and GitLab
- HashiCorp Vault API Tutorial and Pro Tips
- Build a Kubernetes k3s Cluster in vSphere with Terraform and Packer
- HashiCorp Vault PKI Secrets Engine Demo for Certificate Management
- Terraform Import Example – AWS EC2 Instance
- Webblog App Part 4 – HashiStack – Nomad Consul Vault Terraform
Code
Hi and Welcome!
Join the Newsletter and get FREE access to all my Source Code along with a couple of gifts.