

Introduction
Are you a beginner looking to master Azure DevOps? Look no further! This is your Azure DevOps for Dummies guide with a hands-on video tutorial. In this tutorial, you’ll learn how to deploy a python flask app into Azure App Service with Azure DevOps. With the help of Azure DevOps Repos and Azure DevOps Pipelines, you’ll gain hands-on experience and develop the skills you need to excel in your development workflow. So sit back, relax, and enjoy our Microsoft Azure DevOps Tutorial for Beginners.
Video
Watch our Microsoft Azure DevOps fundamentals training for beginners videos below.
Video Chapters
You can skip to the relevant chapters below:
- 00:00 – Introduction
- 00:40 – Azure DevOps UI Demo
- 04:31 – Service Connection Set Up
- 05:46 – WebApp Resource Creation
- 11:28 – Pipeline Creation
- 13:40 – Pipeline Walk-through
- 22:12 – 2nd Pipeline Run and Status Badge
- 23:52 – Wrap Up
Introduction to DevOps in Azure
Definition of Azure DevOps
Azure DevOps is a cloud-based platform offered by Microsoft that provides development and operations teams with a range of tools and services to streamline and automate software development processes. Azure DevOps provides features such as project management, source code management, continuous integration and deployment, testing and quality assurance, and monitoring and feedback. By bringing these tools together in a unified platform, Azure DevOps helps teams to collaborate more effectively and increase the speed and efficiency of software development.
Azure DevOps Server: This is an on-premises version of Azure DevOps. While Azure DevOps is a cloud-based service, Azure DevOps Server allows you to get many of the same features but hosted on your own infrastructure. This is an excellent option for organizations that require additional control over their environment.
Benefits of using the Azure DevOps Service
Azure DevOps offers several benefits to development and operations teams, including increased collaboration and communication, streamlined workflows, improved quality and efficiency, and enhanced visibility and control over software development processes. Teams can use Azure DevOps to manage their entire software development lifecycle, from planning and design to testing and deployment. Azure DevOps also integrates with a wide range of tools and services, making it easy for teams to integrate their existing tools and workflows with the platform.
Overview of Azure DevOps tools and services
Azure DevOps provides a comprehensive set of tools and services that development and operations teams can use to manage their software development process. Some of the key tools and services offered by Azure DevOps include Azure Boards for project management and tracking, Azure Repos for source code management, Azure Pipelines for CI/CD, and Azure Test Plans for testing and quality assurance. By leveraging these tools and services, teams can streamline and automate their software development process, increasing collaboration and efficiency and delivering high-quality software faster.
Understanding Azure DevOps Projects
Creating an Azure DevOps project
Azure DevOps projects are used to organize and manage software development processes within the platform. To create an Azure DevOps project, you first need to log in to your Azure DevOps account. Once logged in, you can click on the “Projects” button in the navigation menu and then click on the “New project” button to create a new project.
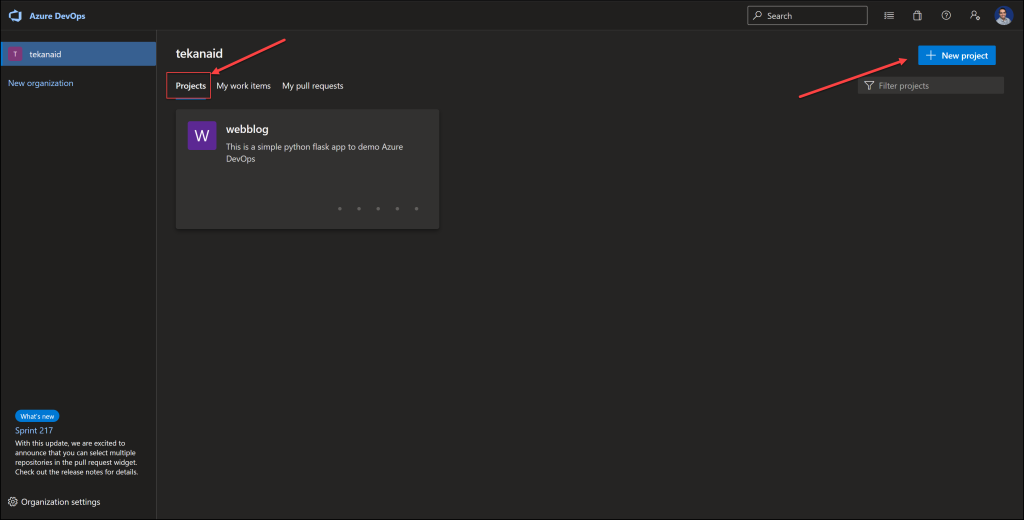
New Project
When creating a new project, you will be prompted to provide the following information:
- Project name: A name for the project that will help you identify it.
- Description: A brief description of the project, its purpose, and its goals.
- Visibility: A setting that determines who can access the project, either publicly or privately.
- Repository: A setting that determines whether a Git repository should be created for the project.
Once the project has been created, you can start adding work items, source code, and pipelines to the project. Work items can be added to the project’s backlog, which is a list of work items that need to be completed as part of the project. Source code can be added to the project’s repository, which is a central location for storing and managing the project’s code. Pipelines can be created to automate the build and deployment of the project’s code.
Creating an Azure DevOps project is the first step in using the platform to manage software development processes. With an Azure DevOps project, you have a centralized location for managing your projects, work items, and code, making it easy to collaborate and streamline software development processes.
Configuring project settings and options
In Azure DevOps, project settings and options provide a way for you to customize and configure your projects to suit your specific needs. You can access project settings and options by clicking on “Project settings”.
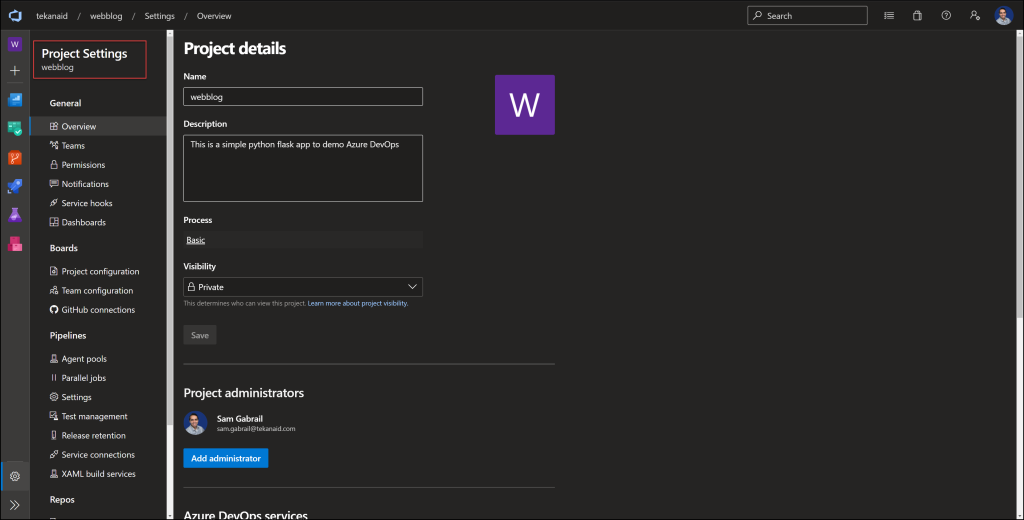
Project Settings
There are several options that can be configured in project settings, including:
- Version control: You can configure the version control system used by the project, either Git or TFVC.
- Work item process: You can select a work item process that defines the work item types, fields, and workflows used by the project.
- Boards: You can configure the settings for the Azure Boards tool, including settings for backlogs, boards, and sprints.
- Pipelines: You can configure the settings for the Azure Pipelines tool, including settings for build and deployment pipelines.
- Repos: You can configure the settings for the Azure Repos tool, including settings for Git policies and pull requests.
By configuring project settings and options, you can tailor your projects to meet your specific needs and requirements. This can help to increase the efficiency and effectiveness of software development processes, as well as improve collaboration and communication between team members.
In addition to project settings and options, you can also configure settings and options at the organization and account levels. These settings and options provide a way to manage and configure Azure DevOps across multiple projects and teams. By configuring settings and options at different levels, you can ensure that your Azure DevOps environment is set up in the way that best meets your needs and requirements.
Working with Azure Boards
Azure Boards is a tool within Azure DevOps that provides a centralized location for managing work items and tracking progress. Azure Boards includes features such as backlogs, boards, and sprints, which help you to organize, prioritize, and manage work items.
Creating work items and backlogs
Work items in Azure DevOps are used to represent work that needs to be done, such as tasks, bugs, and feature requests. You can create work items within Azure Boards by clicking on the “New work item” button in the navigation menu, and then selecting the type of work item you would like to create.
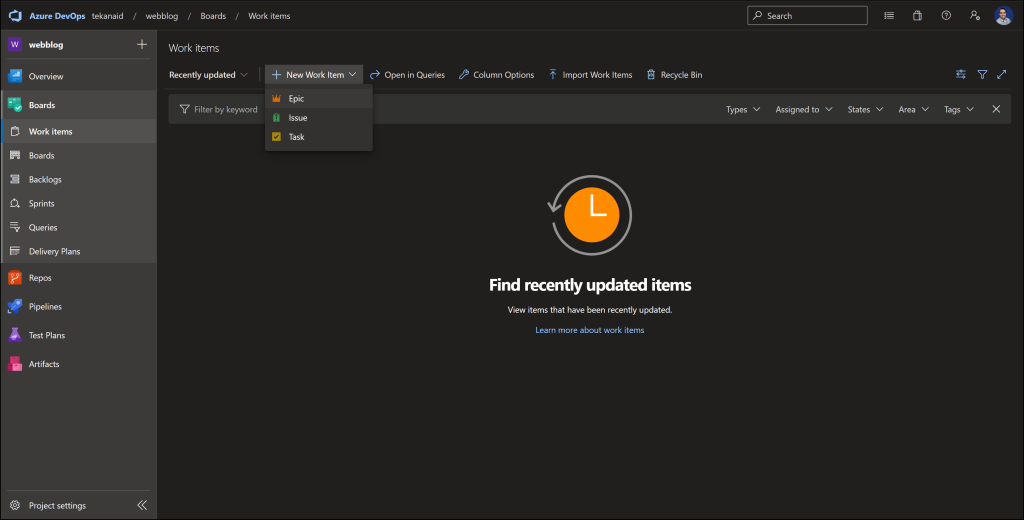
New Work Item in Boards
Once a work item has been created, you can add it to a backlog, which is a list of work items that need to be completed as part of the project. Backlogs help to prioritize work items and provide an overview of what needs to be done.
Managing and prioritizing work items
In Azure Boards, you can manage and prioritize work items using features such as drag and drop, and colour coding. For example, you can drag work items to change your order in the backlog, and use colour coding to categorize work items based on your type or priority.
You can also add additional information to work items, such as descriptions, attachments, and comments, to help provide more context and detail about the work that needs to be done.
Tracking progress with Azure Boards
Azure Boards provides you with several ways to track progress and stay informed about the status of work items. For example, you can use boards to view work items in a visual, card-based format, which makes it easy to see what work is currently in progress, what work has been completed, and what work still needs to be done.
You can also use sprints to track progress over time, by defining a period of time during which work will be completed. Sprints help to break down work into smaller, manageable chunks, and provide a way to track progress and see how much work has been completed during each sprint.
Overall, Azure Boards provides a powerful tool for managing and tracking work items, helping you to stay organized, prioritize your work, and keep track of progress.
Source Code Management with Azure Repos
Azure Repos is a tool within Azure DevOps that provides source code management capabilities, such as Git and TFVC, to help you manage your source code and collaborate with your teams. Repos provides features such as version control, pull requests, and code reviews, which help you to maintain quality and control over your code.
Setting up a Git repository
To set up a Git repository in Azure Repos, you can click on the “Repos” button in the navigation menu and then select “Git repositories”. You can then create a new repository by clicking the “New repository” button, and following the on-screen prompts to set up the repository.
Once a repository has been set up, you can start adding, committing, and pushing code changes to the repository. You can also invite others to collaborate on the repository by adding them as collaborators.
Collaborating with code changes and pull requests
With Azure Repos, you can collaborate on code changes and review changes made by others using pull requests. Pull requests are a way for you to propose changes to a repository, and for others to review and approve or reject those changes.
When you create a pull request, they can specify the changes they want to propose, as well as provide a description of the changes and any additional information that may be helpful. Other you can then review the changes and provide feedback, before deciding whether to approve or reject the pull request.
Managing source code with Azure Repos
Azure Repos provides a powerful tool for managing source code, helping you to keep track of changes, maintain quality, and collaborate with your team. In addition, to version control and pull requests, Repos also provides features such as code reviews, which help you to ensure that code is of high quality and meets your standards before it is merged into the repository.
You can also set up policies for your repositories, such as requiring pull requests for all changes, or requiring code reviews before changes can be merged. These policies help to maintain quality and control over code changes and ensure that code is properly reviewed and approved before it is merged into the repository.
Overall, Repos provides a comprehensive solution for source code management, helping you to manage your code and collaborate with your team in an efficient and effective way. Below is an image of our repo for this tutorial.
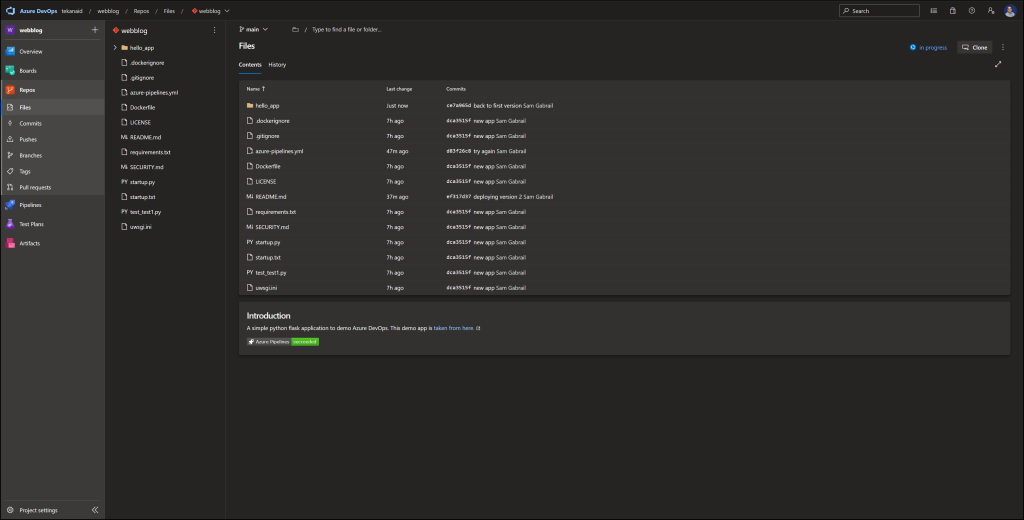
Azure DevOps Repos
Azure Artifacts
This feature enables you to manage, publish, and share packages across your team or organization. It is fully integrated into Azure DevOps, providing a comprehensive solution for artifact management and version control.
Continuous Integration and Deployment with Azure Pipelines
Azure Pipelines is a tool within Azure DevOps that provides CI/CD capabilities. With Azure Pipelines, you can automate the build, test, and deployment of your applications, helping to ensure that code changes are properly tested and deployed to production quickly and efficiently.
Creating a pipeline for continuous integration and deployment
To create a pipeline for continuous integration and deployment, delve into our Azure DevOps Pipeline Training section below.
You can click on the “Pipelines” button in the navigation menu, and then select “New pipeline”. You can then select the source code repository that they want to build and deploy and follow the on-screen prompts to set up the pipeline.
Once the pipeline has been set up, you can configure the pipeline to build and deploy your applications. For example, they can specify the build steps that they want to run, such as compiling code and running tests, and they can configure the deployment steps, such as deploying the application to a specific environment.
Below is a screenshot of the pipeline runs for our example.
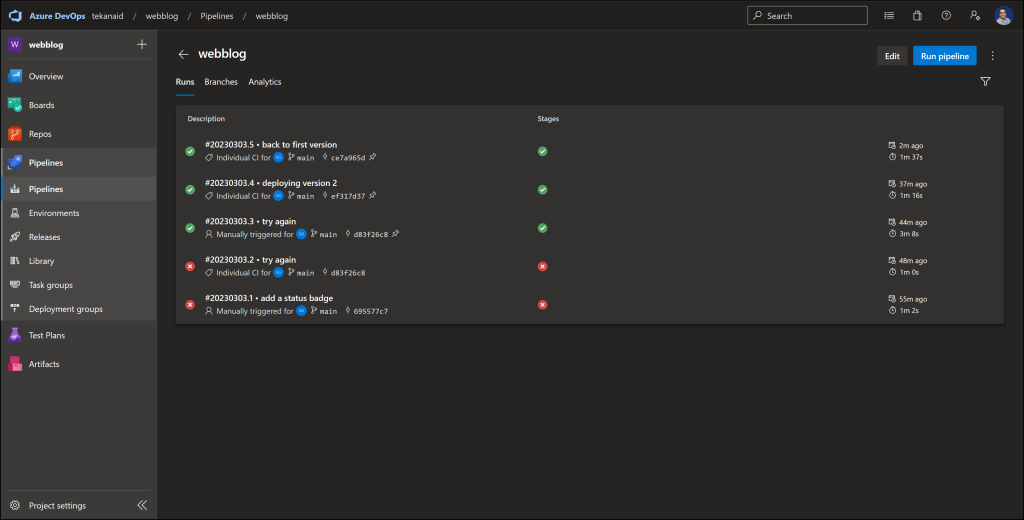
Azure Pipeline Runs
Automating builds and deployments
With Azure Pipelines, you can automate the build and deployment process, ensuring that code changes are properly tested and deployed to production quickly and efficiently. The pipeline will automatically build and deploy the application every time changes are made to the code, helping to reduce the risk of errors and improve the speed of deployment.
Monitoring pipeline execution and results
Azure Pipelines provides a dashboard for monitoring the execution and results of pipelines, helping you to see the status of builds and deployments, and to identify and resolve any issues that may arise. The dashboard provides detailed information about pipeline execution, including the status of builds, deployments, and tests, and any errors or warnings that may occur.
You can also view detailed logs for each pipeline run, helping them to understand what happened during the pipeline execution and identify any issues that may need to be addressed. With Azure Pipelines, you can monitor the build and deployment process and ensure that your applications are being built and deployed correctly, helping to improve the quality and reliability of your applications. Below is a sample log from our demo:
Azure Pipeline Job Logs
In conclusion, Azure Pipelines provides a comprehensive solution for continuous integration and deployment, helping you to automate the build, test, and deployment of your applications, and monitor the process to ensure that your applications are being built and deployed correctly.
Integrating Azure DevOps with Other Tools
Azure DevOps provides integration with a wide range of tools and services, helping you to streamline your development workflow and improve collaboration across teams. By integrating Azure DevOps with other tools, you can take advantage of the powerful features and functionalities of Azure DevOps, while also leveraging the benefits of other tools that they are already using.
Integrating with Visual Studio Code
Visual Studio Code is a popular code editor that can be integrated with Azure DevOps to provide a seamless and efficient development experience. By integrating with Azure DevOps, you can access features such as source control, work item tracking, and continuous integration and deployment, directly from within Visual Studio Code.
For example, you can check in code changes, create and manage work items, and view build and deployment results, all from within Visual Studio Code. This integration helps to simplify the development process, reducing the time and effort required to switch between different tools.
Integrating with GitHub
GitHub is a widely used platform for collaborative software development and is often used in conjunction with Azure DevOps. By integrating Azure DevOps with GitHub, you can take advantage of the powerful features and functionalities of both platforms, and streamline your development workflow.
For example, you can use Azure DevOps for continuous integration and deployment, and GitHub for source code management. The integration between the two platforms enables you to work on code changes in GitHub and then seamlessly integrate the changes into the build and deployment process managed by Azure DevOps.
Integrating with other tools and services
In addition to Visual Studio Code and GitHub, Azure DevOps can be integrated with a wide range of other tools and services, such as Slack, Trello, and JIRA. These integrations help to improve collaboration and communication across teams and provide you with a comprehensive solution for software development.
For example, you can integrate Azure DevOps with Slack to receive notifications about build and deployment results, or integrate with Trello to track work items and manage project backlogs. With Azure DevOps integration capabilities, you can take advantage of the powerful features and functionalities of Azure DevOps, while also leveraging the benefits of other tools and services that they are already using.
In conclusion, Azure DevOps provides integration with a wide range of tools and services, helping you to streamline your development workflow and improve collaboration across teams. Whether integrating with Visual Studio Code, GitHub, or other tools and services, you can take advantage of the powerful features and functionalities of Azure DevOps to deliver high-quality software applications.
Best Practices for Using Azure DevOps
Azure DevOps is a powerful platform for software development, but it’s important to follow best practices to ensure efficient and secure use of its services. This helps to ensure that projects are organized, you have the necessary permissions, and resources are used optimally.
Managing user roles and permissions
One of the best practices for using Azure DevOps is to manage user roles and permissions effectively. By doing so, you can ensure that each team member has the necessary permissions to perform your assigned tasks, while also protecting sensitive information and resources.
In Azure DevOps, there are different user roles, such as project administrators, contributors, and readers, and each role has a specific set of permissions. For example, project administrators have full control over the project and can manage user roles and permissions, while contributors can make changes to the source code, and readers can view project information.
Managing and organizing projects
Another best practice for using Azure DevOps is to manage and organize projects effectively. This helps to ensure that each project is well-structured and easy to navigate, reducing the time and effort required to find information.
You can organize projects in Azure DevOps by using features such as project boards, backlogs, and milestones. For example, you can create a project board to track work items and prioritize tasks and use backlogs to manage the work that needs to be done for a project. Additionally, you can use milestones to define key dates and deadlines for a project, helping to ensure that the project is completed on time.
Ensuring secure and efficient use of Azure DevOps services
Finally, it’s important to ensure that the services are used securely and efficiently. This helps to ensure that sensitive information and resources are protected and that resources are used optimally.
One way to ensure the secure and efficient use of these services is to implement security best practices, such as using secure authentication and authorization and implementing security policies for data access.
In conclusion, following best practices for using Azure DevOps helps to ensure the efficient and secure use of its services, and helps to ensure that projects are organized, you have the necessary permissions, and resources are used optimally. Whether managing user roles and permissions, organizing projects, or ensuring secure and efficient use of Azure DevOps services, you can take advantage of the best practices to deliver high-quality software applications.
Troubleshooting Common Issues in Azure DevOps
As with any software development platform, there may be times when issues arise in Azure DevOps services. However, you can troubleshoot common issues and resolve them quickly with the right techniques and tools.
Debugging pipeline failures
One common issue in Azure DevOps is pipeline failures, which can occur when a pipeline execution doesn’t complete as expected. Debugging pipeline failures is important to ensure that builds and deployments are completed successfully, and to resolve any problems that may be impacting software development.
To debug pipeline failures in Azure DevOps, you can use features such as pipeline logs, error messages, and build artifacts. For example, you can view the pipeline logs to see what went wrong during the pipeline execution and use error messages to identify the root cause of the failure. Additionally, you can view the build artifacts to see what files were produced during the pipeline execution and use this information to resolve the failure.
Resolving merge conflicts in source code
Another common issue in Azure DevOps is merge conflicts in source code, which can occur when two or more you make changes to the same file simultaneously. Resolving merge conflicts is important to ensure that the latest version of the code is available, and to prevent delays in software development.
To resolve merge conflicts in Azure DevOps, you can use features such as pull requests, code reviews, and conflict resolution tools. For example, you can create a pull request to merge changes into the main codebase and use code reviews to identify and resolve any conflicts before they are merged. Additionally, you can use conflict resolution tools to automatically resolve conflicts or to manually resolve conflicts by making changes to the code.
Demo
Now that we got a good understanding of what Azure DevOps can do, let’s demo its functionality. We will deploy a python flask app into Azure App Service with Azure DevOps.
Folder Structure
Below is the folder structure of our app. This folder contains our app’s source code along with the azure-pipelines.yml file used for our Azure DevOps pipeline. You can find the code here.
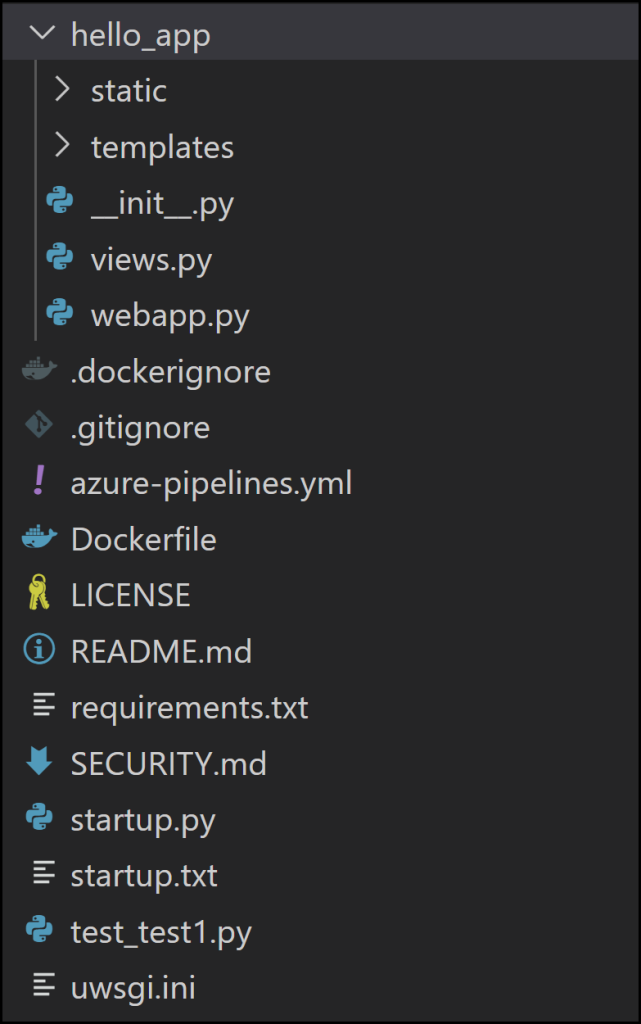
Folder Structure
Create an Azure App Service Web App
You will first need to create a resource group and an Azure App Service Linux app. This will be the shell of our app. Then we will deploy the actual app with Azure DevOps. So go to your Azure portal and create the resource. It should look something like the screenshot below:
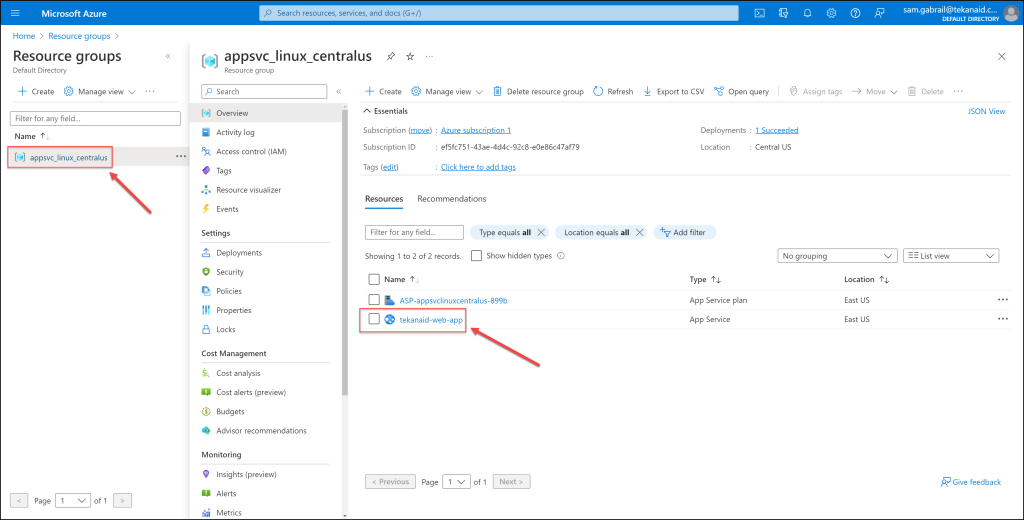
Azure Portal with Resource Group and Web App Service
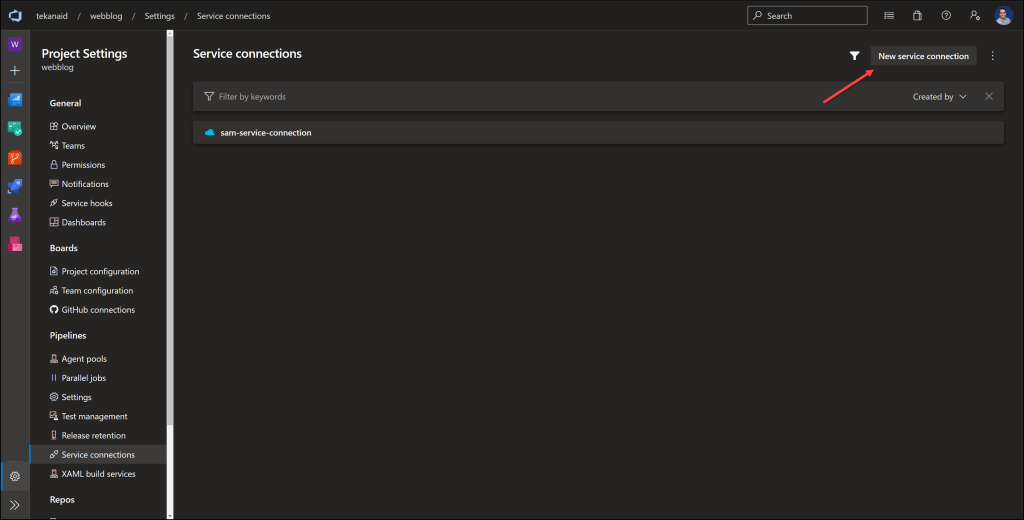
New Service Connection
Before you run the pipeline, make sure to create a service connection in your project’s settings in Azure DevOps. This allows Azure DevOps to talk to Azure to access the Azure App service.
Service Connection
Select your Azure subscription and leave the Resource group empty to apply the service connection to all resource groups if you wish. Make a note of the service connection name because you will use that in the pipeline yaml file.
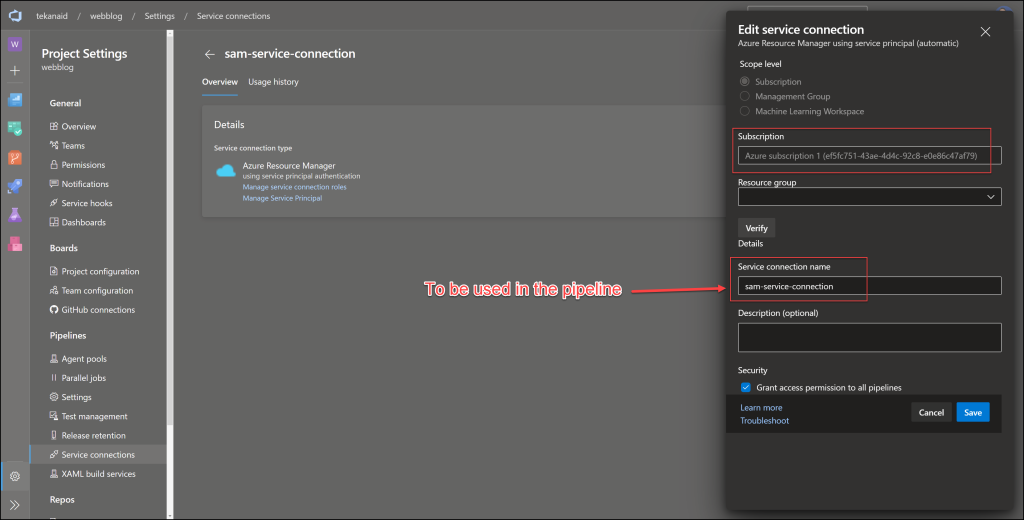
Service Connection Details
The Azure Pipeline
Inside your Azure DevOps console, create a new pipeline and select the **Azure Repos Git (YAML) **option. This will use the azure-pipelines.yml file in the root of our repo.
Below is the content of this pipeline with comments.
# Set the trigger to run the pipeline when changes are pushed to the "main" branch
trigger:
- main

# Specify the pool of agents to use for this pipeline, in this case "ubuntu-latest"
pool:
  vmImage: ubuntu-latest

# Define the jobs to run in this pipeline
jobs:
- job: Build
  # Set the display name of the job to "Build and Test"
  displayName: 'Build and Test'
  steps:
  # Use Python 3.9
  - task: UsePythonVersion@0
    displayName: 'Use Python 3.9'
    inputs:
      versionSpec: '3.9'
  # Install dependencies from requirements.txt
  - script: |
      python -m pip install --upgrade pip
      pip install -r requirements.txt
    displayName: 'Install dependencies'
  # Run tests using pytest
  - script: |
      pip install pytest pytest-azurepipelines
      pytest
    displayName: 'Run tests'
  # Create a zip archive of the workspace and publish it as an artifact
  - task: ArchiveFiles@2
    displayName: 'Create artifact'
    inputs:
      rootFolderOrFile: '$(System.DefaultWorkingDirectory)'
      includeRootFolder: false
      archiveType: 'zip'
      archiveFile: '$(Build.ArtifactStagingDirectory)/$(Build.BuildId).zip'
      replaceExistingArchive: true
  # Publish the zip archive as an artifact named "drop"
  - publish: '$(Build.ArtifactStagingDirectory)/$(Build.BuildId).zip'
    displayName: 'Upload package'
    artifact: drop

# Define the "Deploy" job, which depends on the "Build" job
- job: Deploy
  # Set the display name of the job to "Deploy to Azure Web App Service"
  displayName: 'Deploy to Azure Web App Service'
  # Make this job dependent on the "Build" job, so it only runs if the "Build" job succeeds
  dependsOn: Build
  condition: succeeded()
  # Define some variables to be used in this job
  variables:
    - name: webAppName
      value: 'tekanaid-web-app'
    - name: artifactPath
      value: '$(System.ArtifactsDirectory)'
  steps:
  # Download the "drop" artifact produced by the "Build" job
  - download: current
    artifact: drop
  # Deploy the downloaded artifact to an Azure Web App Service
  - task: AzureWebApp@1
    displayName: 'Deploy to Azure Web App Service'
    inputs:
      azureSubscription: 'sam-service-connection'
      appType: 'webAppLinux'
      appName: $(webAppName)
      package: $(Pipeline.Workspace)/drop/$(Build.BuildId).zip
      deploymentMethod: zipDeploy
      startUpCommand: 'gunicorn --bind=0.0.0.0 --workers=4 startup:app'
Overall, this pipeline automates the build, test, and deployment process of a Python web application to an Azure Web App Service. It starts by installing the necessary dependencies and running tests, then creates a zip archive of the files in the workspace and publishes it as an artifact. Finally, it downloads the artifact created by the “Build” job and deploys it to Azure using the Azure Web App Service task.
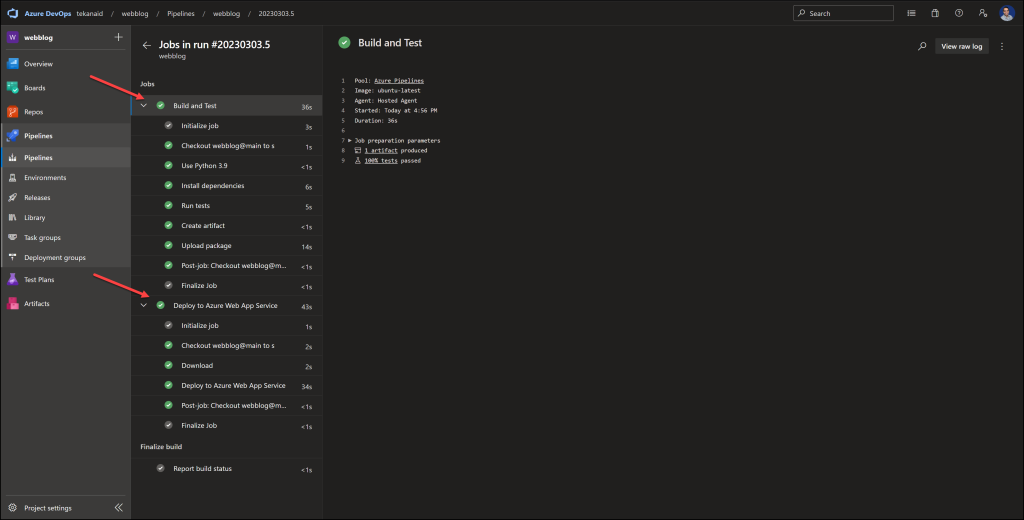
Successful Jobs
You can choose to run the pipeline manually or trigger it by making a change in your code and pushing it. Once the pipeline succeeds, you can view the jobs’ success and logs as shown in the images below.
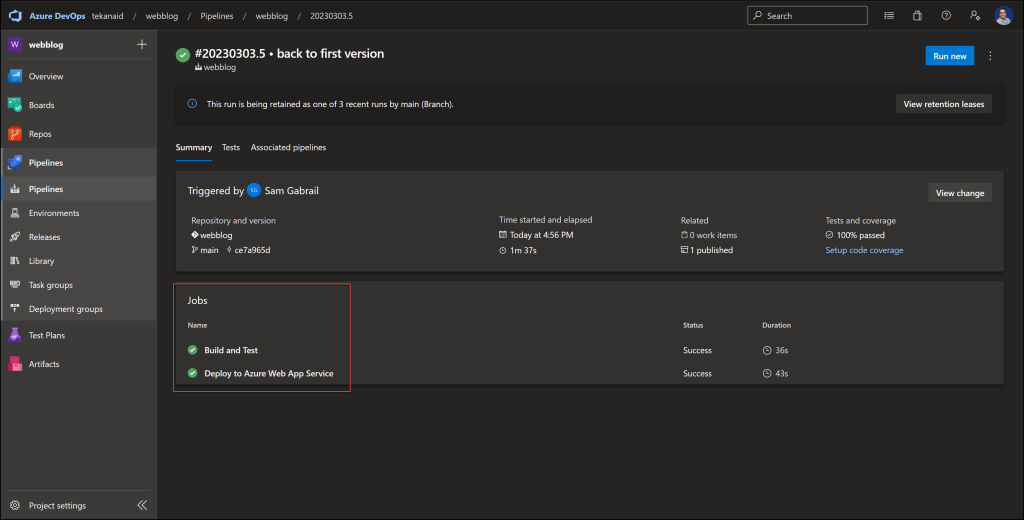
Successful Jobs
Azure Pipeline Job Logs
You can now get the URL of the app by checking on the Deploy job log for the “Deploy to Azure Web App Service” step.

App URL from Pipeline Output
When you click on the URL of the app, it will take you to the deployed app which will look like the image below.
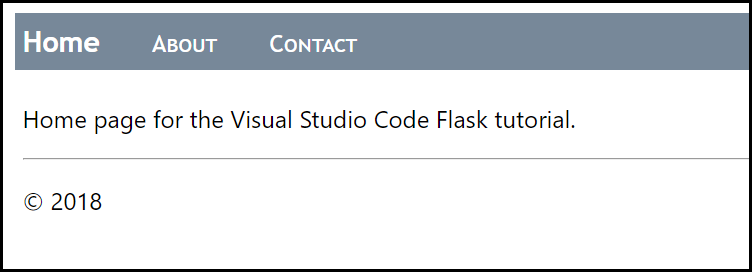
App UI v1
Since the pipeline has a trigger, when you make an update to the application code and push it to the remote repo in Azure DevOps, the pipeline will automatically run. Congratulations, you’ve successfully used Azure DevOps to deploy an application in Azure App Service!
Signing Up and Azure DevOps Pricing
To get started with Azure DevOps, you’ll need to sign up for an Azure DevOps account. Signing up is a straightforward process that requires just a few steps. Once signed up, you’ll gain access to Azure Boards for work management, Azure Repos for source code management, and Azure Pipelines for continuous integration and deployment.
When it comes to Azure DevOps Pricing, there are various plans available, including free tiers and enterprise-level packages, making it accessible for teams of all sizes.
Conclusion
In this beginner’s tutorial course, we have explored the basics of Azure DevOps and how to get started with it. We have covered topics such as signing up for an Azure DevOps account, navigating the interface, creating projects, working with Azure Boards, source code management with Azure Repos, continuous integration and deployment with Azure Pipelines and integrating with other tools.
Azure DevOps is a suite of development tools, services, and features for software development teams to plan, develop, test, and deliver software applications. The platform provides a centralized and integrated platform for all aspects of software development, from planning and design to deployment and maintenance. Azure DevOps provides tools and services for work management, source code management, continuous integration and deployment, and more.
We successfully demonstrated creating a python application and stored it in an Azure DevOps repo. We then used Azure DevOps Pipelines to build, test, and deploy this application to Azure App Service.
Getting started with Azure DevOps can seem overwhelming, especially for you who are new to software development. However, by following the steps outlined in this tutorial course and using the available resources, you can quickly and effectively get started with the platform and begin using it to support your software development projects.
Finally, Azure DevOps is a powerful and comprehensive platform for software development teams, providing tools and services to support all aspects of software development. By following this beginner’s tutorial course and exploring the additional resources available, you can get started with Azure DevOps and begin realizing the many benefits of this platform.
Suggested Reading
- 36 Top DevOps Questions to Get You Started in 2023
- Terraform for Beginners – Infrastructure as Code Intro
- Hashicorp Vault Azure Secrets Engine – Secure Your Azure Resources
- Migrate Secrets from AWS Secrets Manager to HashiCorp Vault with Python, Docker, and GitLab
- DevOps Engineer NOT on Linux? Check out WSL2
- Securing the Future – DevSecOps Trends for 2023
Code
Hi and Welcome!
Join the Newsletter and get FREE access to all my Source Code along with a couple of gifts.