

Introduction
Are you looking for a beginner-level course for HashiCorp Vault? You’ve come to the right place! This is a full 1-hour HashiCorp Vault Tutorial course.
Video
Below is a video explanation and demo.
Video Chapters
You can skip to the relevant chapters below:
- 00:00 – Introduction
- 01:40 – What is HashiCorp Vault?
- 05:38 – Vault Use Cases
- 11:03 – Basic Vault CLI Commands
- 15:24 – Vault Server Modes
- 26:18 – Vault Architecture Internals
- 28:38 – Vault Seal and Unseal
- 36:28 – The Configuration File
- 37:56 – Run a Production Vault Server Lab
- 48:30 – Authentication Overview
- 50:38 – Types of Auth Methods
- 53:06 – Policies Overview
- 56:39 – Tokens Overview
- 58:22 – Secrets Engines Overview
- 1:01:46 – Replication Design with DR and PR
- 1:08:18 – Vault Agent Overview
- 1:10:36 – Closing Remarks
Overview
HashiCorp Vault is the prominent secrets management solution today. It is currently used by the top financial institutions and enterprises in the world. I’ve created this vault fundamentals course for you. This is a one-hour video course which is a subset of a much larger course that is eight hours long that course is called HashiCorp Vault 101 – Certified Vault Associate it will help you dig deeper and be ready for the vault associate exam.
What is HashiCorp Vault?
What is HashiCorp Vault?
HashiCorp Vault is a tool for securely storing and managing sensitive data such as passwords, tokens, and encryption keys. It provides a central location for storing and managing secrets and can be integrated with other systems and tools to automatically retrieve and use these secrets in a secure manner. This allows organizations to manage and rotate secrets without having to update them in every application or service that uses them, helping to reduce the risk of secrets being compromised.
Some of Vault’s Features
Additionally, it provides a robust set of security features such as encryption, access control, and audit logging to help protect sensitive data. Vault uses a secure, industry-standard encryption algorithm to encrypt data at rest and in transit, and allows administrators to set up fine-grained access controls to ensure that only authorized users can access specific secrets. It also provides detailed audit logs that can be used to track who accessed what secrets and when. This helps organizations to comply with regulatory requirements and to investigate potential security incidents.
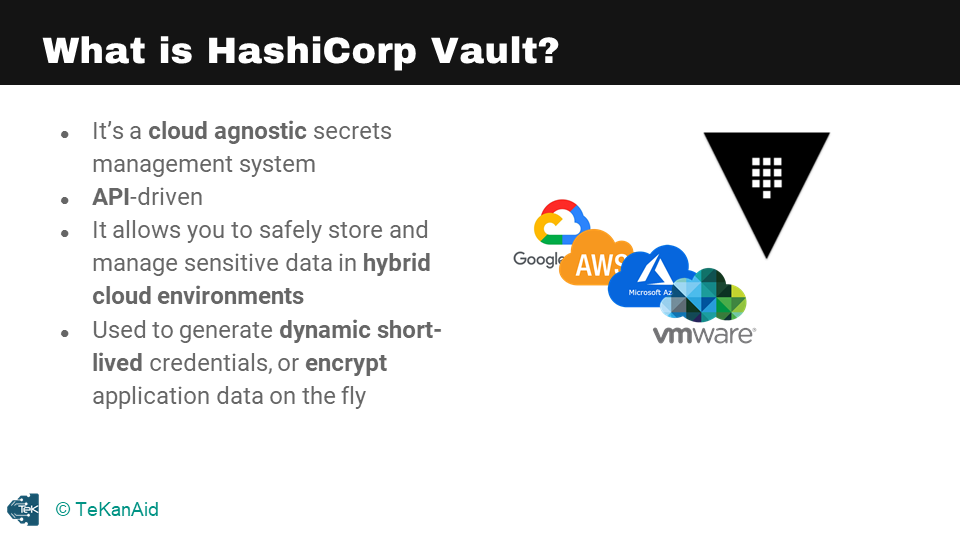
Vault is a cloud-agnostic secrets management system that sets out to create a control plane that is above different platforms, making it possible to work on multiple locations and platforms such as data centers, clouds, and more. When you have a hybrid cloud solution, you may have secrets on-premises or across different clouds. Vault provides a centralized solution that can manage sensitive data in hybrid cloud environments. The system is API driven, allowing you to interact with Vault safely through CLI or UI.
Vault is also used to generate dynamic short-lived credentials and encrypts application data on the fly, moving away from static long-lived credentials to dynamic short-lived ones. Secrets can come in various forms such as usernames and passwords, certificates, SSH keys, API keys, and encryption keys. Managing secrets is not an easy task for IT engineers in large enterprises because secrets can live in many different locations, making it difficult to figure out who owns what in those locations. Vault provides proper auditing mechanisms and is crucial in knowing the state of all the secrets in an environment.
The Main Problem that Vault Solves
Main Problem that Vault Solves
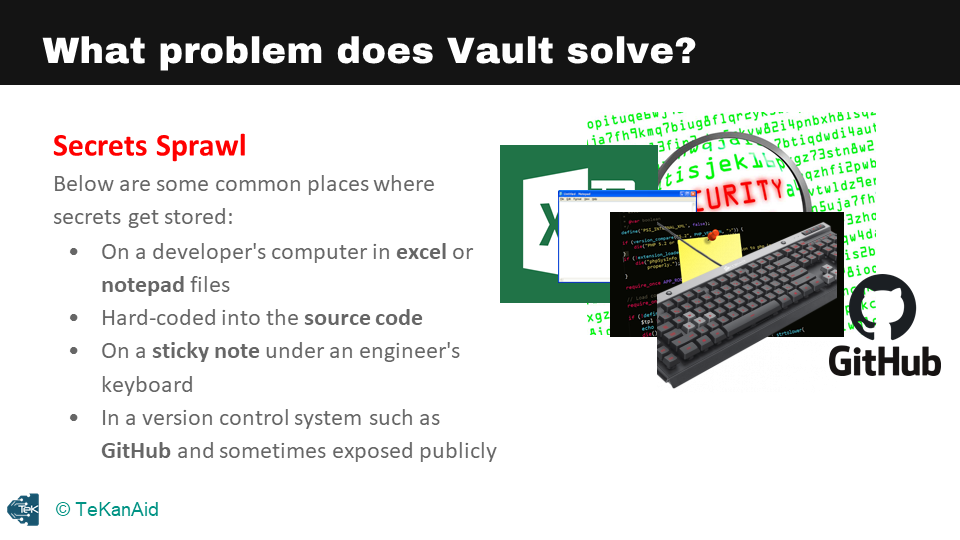
One of the problems that Vault solves is secret sprawl. Secrets can be stored in various locations such as a developer’s computer, an Excel sheet, a notepad file, or a version control system. These locations can be vulnerable to exposure or breaches, making it necessary to have proper management mechanisms in place. Cybersecurity is a top concern for CEOs, and a lack of management of secrets can lead to massive data breaches, costing companies over a million dollars. Vault provides a solution to manage secrets safely and securely, preventing breaches and protecting sensitive data.
Vault Use Cases
HashiCorp Vault is a powerful tool for securing and centralizing access to secrets, encryption keys, and identity-based authentication. The first use case is secrets management, which involves storing secrets in a central vault and distributing them to both humans and machines. The second use case is encrypting application data, where the encryption keys are centralized inside Vault to keep application data secure. The third use case is identity-based access, where Vault acts as a broker of identity and provides access to different clouds and system endpoints.

Vault Use Cases
Secrets Management Use Case
Let’s take a closer look at each of these use cases. The first example is secrets management, where a client retrieves a secret from the kv secrets engine by making a call to Vault at a specific path. The client presents a token associated with a policy that authorizes it to read, write or create secrets at that path. Vault responds with the actual value of the secret, which is stored statically in the kv secrets engine.
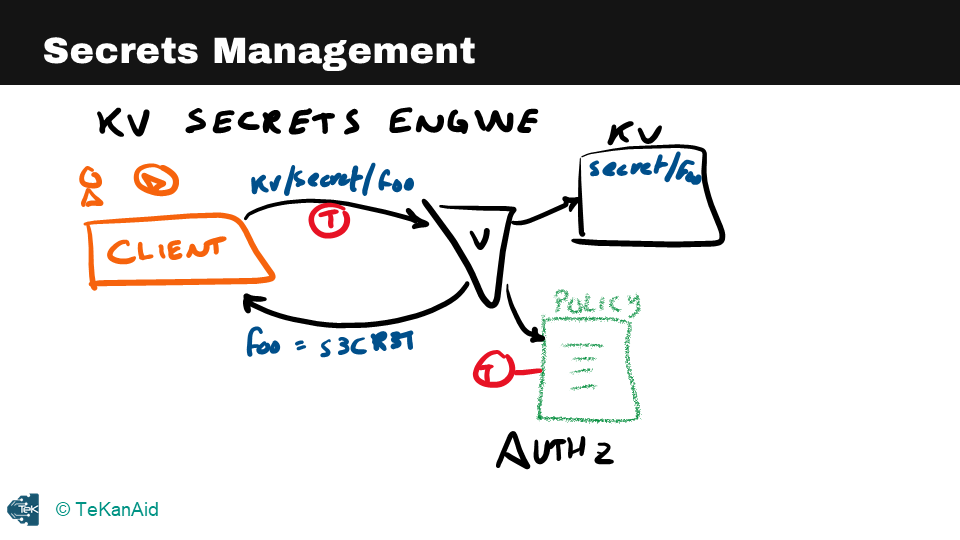
Secrets Management
Encrypting Application Data Use Case
The second example is encrypting application data, where a web server passes plaintext to Vault at a particular path, and Vault responds with encrypted data that can be stored securely in a database. The transit secrets engine in Vault ensures that the encrypted data cannot be accessed by anyone who does not have access to the encryption keys.
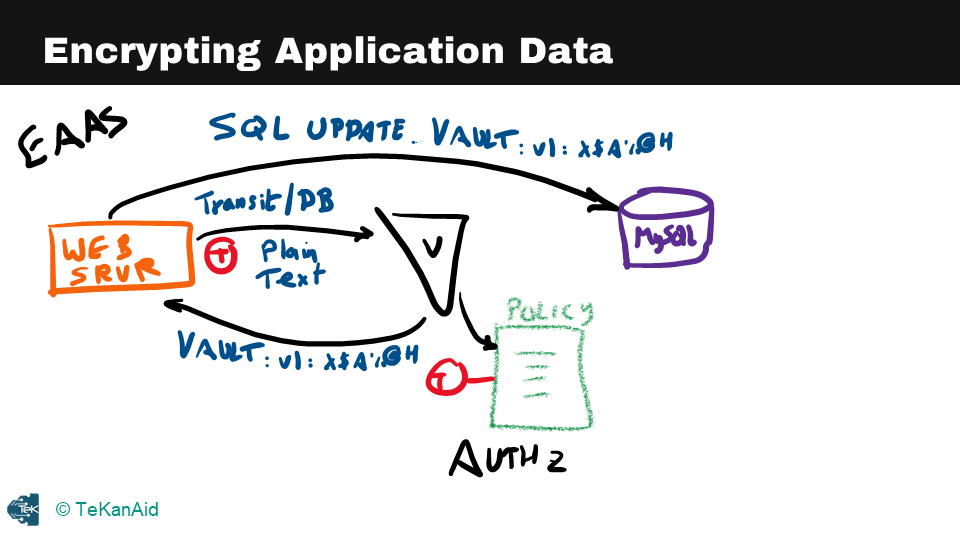
Encrypting Application Data
Identity Based Access Use Case
The third example is identity-based access, where a client requests access to AWS by passing its token with a particular path to Vault. If the client is authorized, Vault creates credentials inside AWS and passes back the access and secret keys to the client. At this point, the client has access to AWS, and Vault is brokering the access into AWS.
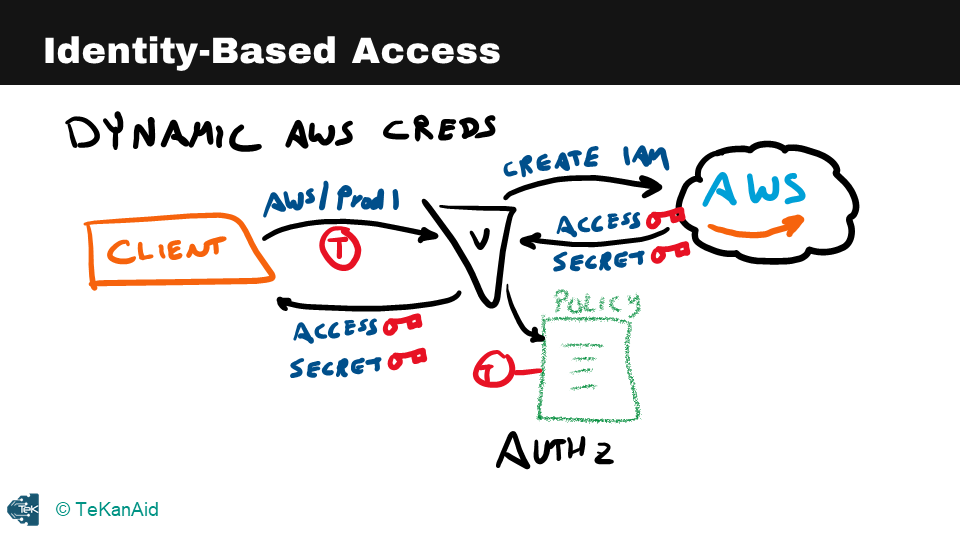
Identity-Based Access
Vault provides powerful tools for securing secrets, encrypting application data, and managing identity-based access. By centralizing these functions, Vault enables organizations to implement robust security and access controls.
Basic Vault CLI Commands
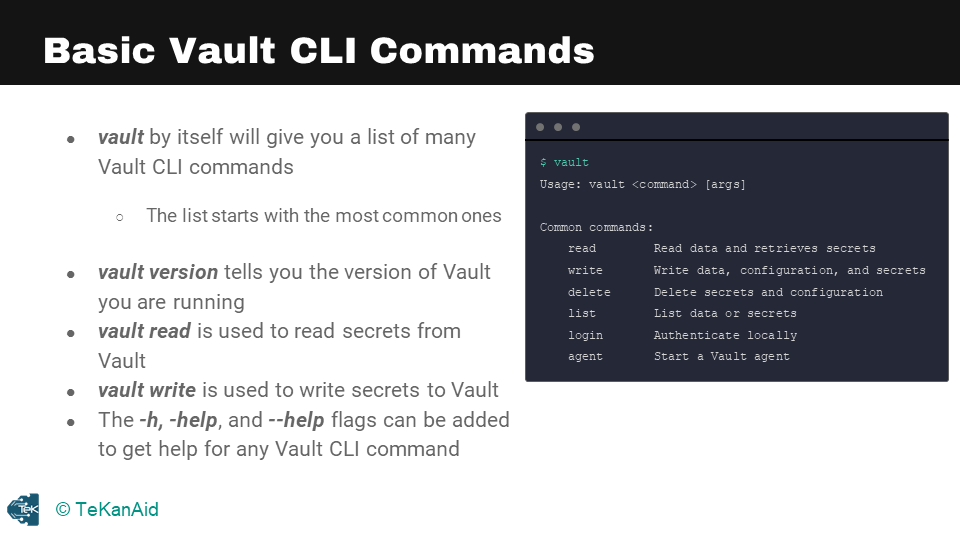
Vault Basic CLI Commands
Vault Login
One of the basic commands in HashiCorp Vault is the vault login command, which is used to authenticate to a Vault server. This command takes a token or a set of credentials as an argument and will return a token that can be used to authenticate to the server for subsequent commands. The token will have a certain set of policies associated with it, that define the actions that can be performed by the token holder.
Vault Read
Another basic command is the vault read command, which is used to read data from a path in the Vault. This command takes the path of the data as an argument and will return the data stored at that path. The data returned can be in various formats such as JSON, string, and so on. This command can also be used to read secrets, which are encrypted and stored in the vault, it will decrypt and return the secret.
Vault Write
The vault write command is used to write data to a path in Vault. This command takes the path and the data as arguments and will store the data at that path. The data can be in various formats such as JSON, string, and so on. This command is also used to write secrets, which are encrypted before being stored in the vault. This command is typically used by applications and services to store and retrieve secrets, without having to hardcode or expose them in configuration files or source code.
Vault List
Another important command in HashiCorp Vault is the vault list command, which is used to list all the paths or secrets stored in a specific path in the Vault. This command takes the path as an argument and will return a list of all the paths or secrets stored in that path. This command can be useful for getting an overview of the secrets stored in a certain path or namespace.
Vault Delete
The vault delete command is used to delete a specific path or secret in the Vault. This command takes the path as an argument and will delete the data stored at that path. This command is typically used to delete stale or unnecessary data in Vault or to rotate secrets by deleting old versions and creating new ones.
Vault Auth List
Another useful command is vault auth list which is used to list all the available auth methods in the vault. This command gives information on what type of authentication methods are enabled and configured on the vault server.
Vault Token Create
The vault token create command is used to create a new token. This command takes the policies associated with the token as an argument and will return a new token that can be used to authenticate to the server for subsequent commands. This command can be used to create tokens for different purposes and with different sets of policies, such as tokens for applications, services, or users.
Vault Token Revoke
The vault token revoke command is used to revoke a token, this command takes the token as an argument and will revoke the token, which will make it unusable for further authentication. This command is useful for revoking tokens that are lost, stolen or when a user leaves the organization and you want to revoke their access.
Notes
vault read typically is used to read secrets from Vault whereas vault write is used to write secrets to Vault. The vault --h or vault --help or vault -h are very important flags. You would use them to get help from the Vault CLI. You can also use them at different subcommands as well so as you get deeper into the commands it can be very helpful.
Vault Architecture Internals
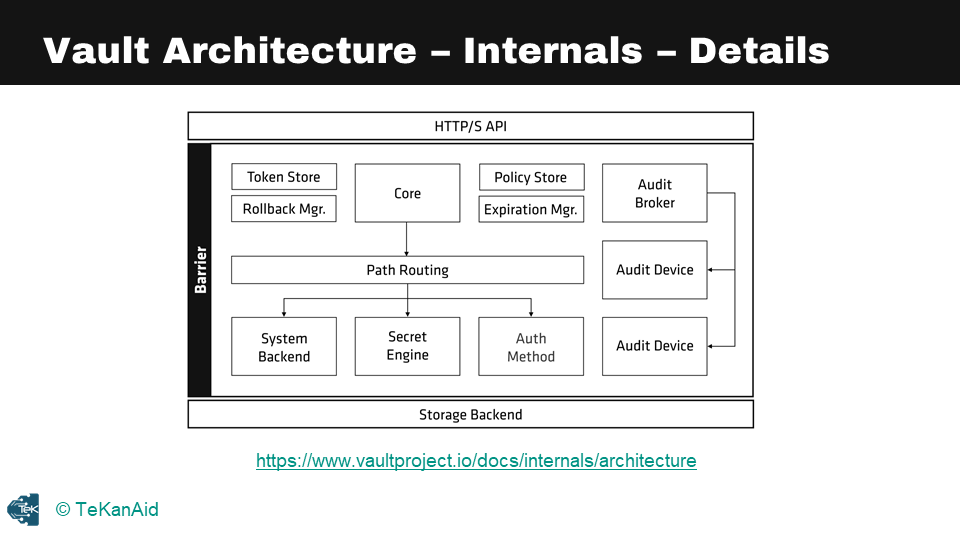
Vault Architecture Internals
Now let’s discuss the internal components of Vault,. One key feature of Vault is the clear separation of components that are inside or outside of its security barrier. Only the storage back end and the API are outside of this barrier, while all other components are contained within it. The storage back end is considered untrusted by Vault, as it could be vulnerable to attacks, but Vault encrypts all data stored in the back end.
Similarly, the HTTP API must be started with Vault, and clients interact with it via a UI or other means. A simple picture of the internal architecture of Vault shows the HTTP API at the top and the storage back end at the bottom, with multiple components within the cryptographic barrier. Throughout this course, we will explore these components in more detail.
Vault has two modes to run in: dev mode and prod mode. Dev mode is intended only for development purposes and should never be used in production environments. Everything is stored in memory in dev mode, and the configuration and secrets are lost when the process is stopped. The root token can be specified before launching, and we will be using it in our hands-on tutorial. However, it is essential to note that actual secrets should never be stored in Vault while running in dev mode.
In prod mode, Vault is secure and intended for use in QA or production environments. Sealing and unsealing the Vault is a critical concept that we will explore later in this course. For now, it is important to know that Vault can only be interacted with when unsealed.
In the hands-on portion of this course, we will be running some commands to see how these concepts work in practice.
Vault Seal and Unseal
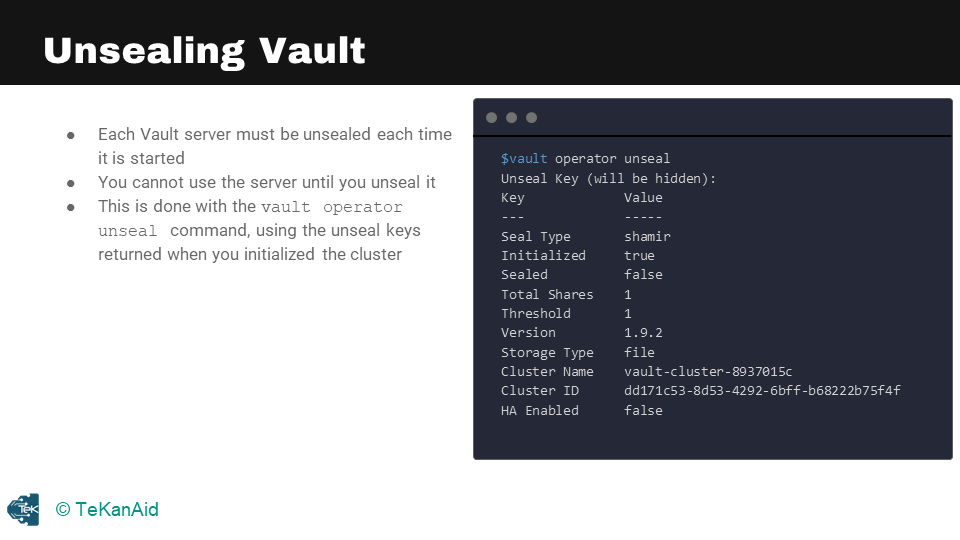
Vault Unseal
The Vault startup process has multiple levels of protection to ensure data security. The first time Vault starts up, it enters what’s known as the “sealed” state, which is similar to a bank vault being locked. In this state, Vault cannot perform any operations except for accessing the underlying storage backend, although it can’t decrypt or retrieve any data. All data stored in Vault is encrypted using an encryption key in the key ring, and the keyring itself is encrypted using a master key. This master key is encrypted with an unseal key, which is generated using Shamir’s Secret Sharing algorithm. The unseal key is obtained by combining a certain number of shared keys, and once obtained, it is used to decrypt the master key.
Vault Unseal
Unsealing Vault is the process of reconstructing the unseal key and restoring the master key to memory. Shamir’s Secret Sharing is the default mechanism for unsealing Vault. In this algorithm, the keys are split into shards, and a certain threshold of shards is required to reconstruct the unseal key. The operation to do this is performed using the command “vault operator unseal.” By default, Shamir unsealing will require five shared keys and a threshold of three. The recommended best practice is to make sure that the five shared keys are held by different stakeholders within the organization to avoid a single point of failure.
Vault Seal
Sealing Vault, on the other hand, is the process of locking down Vault by removing the master key from memory. This process is performed using the command “vault operator seal.” Sealing Vault requires a single operator with root privileges. This process is typically used in emergency situations to minimize damages, such as detecting an intrusion. Once Vault is sealed, it remains that way until it is resealed via the API, the server is restarted, or the storage layer encounters an unrecoverable error.
Auto Unseal
Vault also has an “auto-unseal” mechanism that delegates the responsibility of securing the unseal key to a cloud service or a hardware security module (HSM). This mechanism reduces the operational complexity of keeping the unseal key secure, as it does not require the custodians of the keys to manually perform the unsealing process. When Vault starts up, it connects to the device or service implementing the auto-unseal and asks it to decrypt the master key stored in storage.
In conclusion, Vault has robust security measures that make it one of the most secure ways to store and manage secrets. The multiple levels of protection make it challenging for an attacker to access the encrypted data. Nevertheless, it’s essential to follow best practices, such as keeping the unseal keys secure and having a disaster recovery plan in place, to ensure that Vault is always available when needed.
The Configuration File
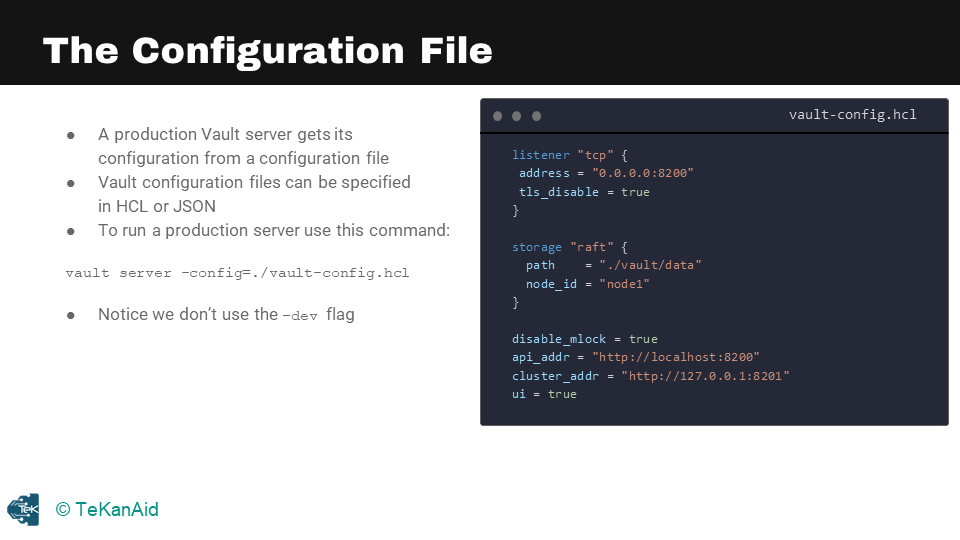
The Configuration File
When running a Vault server in production mode, there are multiple steps that need to be taken. It’s important to note that we are no longer in dev mode and need to take the necessary precautions. The first step is to specify the configuration file and write the necessary configuration in it.
The configuration file is where the production Vault server will get its configuration. An example of this file can be seen in the above image. It can be specified in HCL or Hashicorp Configuration Language or in JSON. To run a production server, use the command vault server -config followed by the path to the configuration file. It’s important to note that the flag -dev should not be used when running the server in production mode.
After starting the server, the next step is to initialize it. When initializing the server, you will receive the unsealed keys and the root token. These keys and token are crucial as they allow you to interact with Vault.
Finally, unseal the Vault using the unsealed keys you received during initialization. This will allow you to begin interacting with Vault in production mode.
In summary, setting up a Vault server in production mode requires several important steps. Starting with the configuration file, initializing the server, and unsealing the Vault with the unsealed keys are all crucial steps in getting the Vault server up and running in production mode.
Run a Production Vault Server Lab
In this lab, we’re going to run a Vault production server. So, let’s get started. I am going to use my favourite IDE, Visual Studio Code. If you don’t have it, I highly recommend that you download and use it. It’s cross-platform, and you can use it with your Linux system, Mac or Windows. We are going to look at the lab guide and execute it step by step, following all the commands. You can get the code here.
To start the Vault server, we need a configuration file. This is what the configuration file looks like:
listener "tcp" {
 address = "0.0.0.0:8200"
 tls_disable = true
}

storage "raft" {
  path    = "./vault/data"
  node_id = "node1"
}

disable_mlock = true

api_addr = "http://localhost:8200"
cluster_addr = "http://127.0.0.1:8201"
ui = true
- The very first piece is the listener, where we are listening on all addresses at port 8200. For demo purposes, TLS is disabled.
- We are going to use the raft storage backend, my favourite back-end. The path we will use is the Vault data in the current directory. We give it a node name, and we will call it node 1. You can have multiple nodes in a cluster, so giving it a node number is essential.
- Finally, we have the API address, cluster address, and the UI is true because we want to look at the UI as well.
Start the Vault Server with a config file
Firstly, we want to change the directory to our lab and then create a new directory to store our backend storage. Next, we run the command to start the Vault server, which is vault server -config=./vault-config.hcl. This starts the Vault server, and we can see the logs, including the API address and cluster address.
Open a terminal tab and run a Vault server that uses the configuration file:
Run these commands:
cd Section06-Starting_a_Production_Vault_Server
mkdir -p vault/data
vault server -config=./vault-config.hcl
Since that tab is now running the Vault server, you’ll run the rest of the CLI commands on a new terminal tab.
Initialize the Vault Server
In a new terminal tab, run the following commands to store the Vault address. We need to initialize Vault by running the command vault operator init and vault operator unseal. To do this, we first export the Vault address to the environment variable, run the vault status command to check whether the server is initialized, and run the vault operator init command to initialize Vault. We also export the Vault token to communicate with Vault. After this, we run the vault operator unseal command to unseal Vault.
Run this command:
export VAULT_ADDR=http://localhost:8200
Initialize the new server, indicating that you want to use one unseal key:
Run this command:
vault operator init -key-shares=1 -key-threshold=1
This gives you back an unseal key and an initial root token. Please save these for further use.
In order to use most Vault commands, you need to set the VAULT_TOKEN environment variable, using the initial root token that the init command returned:
export VAULT_TOKEN=<root_token>
being sure to use your own root token instead of <root_token>.
Unseal Vault
You next need to unseal your Vault server, providing the unseal key that the init command returned:
vault operator unseal
This will return the status of the server which should show that “Initialized” is “true” and that “Sealed` is “false”.
To check the status of your Vault server at any time, you can run the vault status command. If it shows that “Sealed” is “true”, re-run the vault operator unseal command.
You can also log into the Vault UI with your root token.
Check the Vault status
vault status
Enable audit logging
The next step is enabling audit logging. To do this, we create a directory called logs and run the command vault audit enable file file_path=./logs/vault_audit.log. This enables the file audit device. Now you can examine the logs as you make changes in Vault.
mkdir logs
vault audit enable file file_path=./logs/vault_audit.log
Open a third terminal and check the logs:
tail -f ./logs/vault_audit.log | jq
View the Vault UI
You can now go to a web browser and use this URL: http://127.0.0.1:8200
This will give you access to the Vault UI. You will need to insert the root token to log in. Congratulations, you now have a running production Vault server in the lab.
Authentication Methods Overview
Let’s take a look at an overview of authentication. In our architecture diagram, you can see where authentication methods lie. There are many available authentication methods, and we’re just going to tackle the most popular ones. Below are the available authentication method to work with.
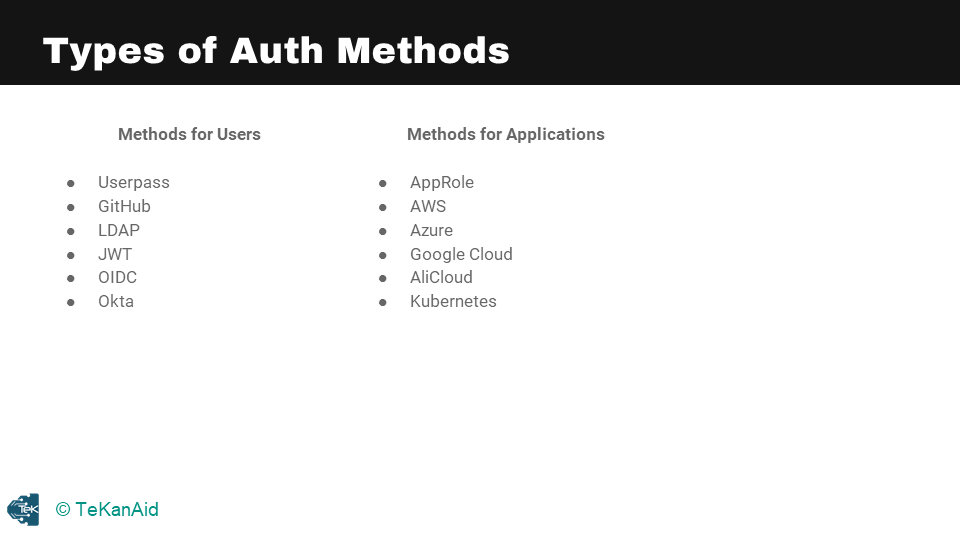
Vault Authentication Types
So, you’ll have a client – that client could be a human user or it could be a machine or application. This client needs to authenticate into the Vault server. Everything in Vault is path-based, so you’re going to authenticate at a particular path depending on which authentication method you’ve enabled and want to use. As I mentioned before, there are multiple ones, but generally speaking, the response is the same. You’re going to get a token back once you’ve logged into Vault with any one of those authentication methods.

Authentication in Action
Associated with this token is a policy. This token, once the client has it, can use it to talk to Vault and retrieve secrets from Vault. This token has a time to live, and it expires at the end of this time to live and will no longer respond to requests based on this token. The user or the client will need to re-authenticate to Vault to get a new token.
The policy is the authorization mechanism for Vault. Once you’ve authenticated, the policy will know what you’re allowed to do inside of Vault, what secrets you’re allowed to retrieve, and so on.
Policies Overview
Let’s take a closer look at the policy store in our internal architectural diagram. The policy store is where we store policies. As we saw in the authentication section, policies are attached to tokens. Vault uses policies to govern the behaviour of clients and to instrument role-based access control (RBAC) by specifying access privileges with the least privileged principle. We should always use the least privileged principle when defining policies. Policies act as the authorization mechanism to access secrets inside of Vault.
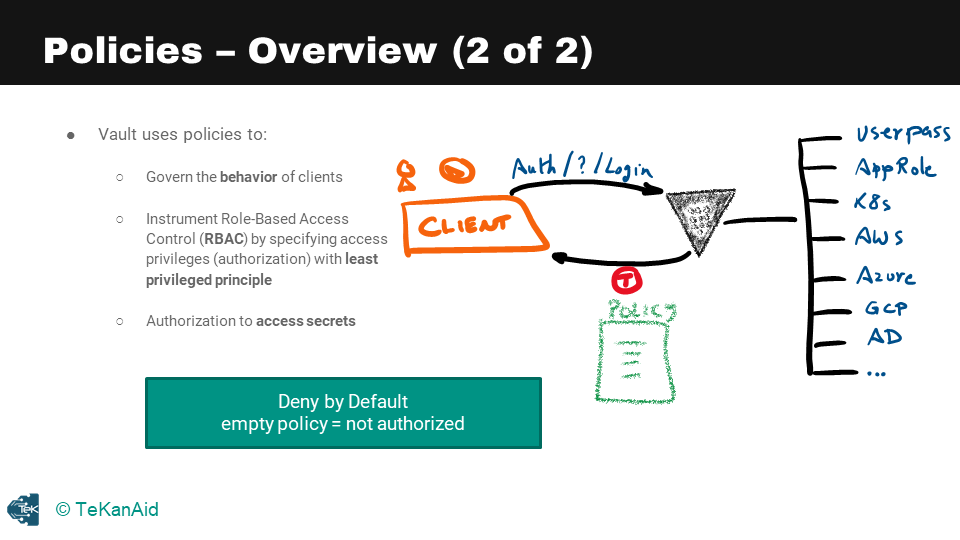
Policies Overview
When a client, whether a human or an application, authenticates into Vault using one of the available authentication methods, they receive a token and a policy attached to that token. The policy authorizes the holder of the token to access secrets in Vault. It is important to understand that policies are a deny by default, which means that any empty policy equals not authorized. So, if you don’t have a policy, you’re not authorized.
There are two built-in policies in Vault: the** default policy** and the root policy. The default policy cannot be removed, but it can be modified. The root policy cannot be removed or modified. The default policy is attached to all tokens, while the root policy is granted to any user that holds it, making them a superuser with full access to Vault.
The Default Policy
The default policy can be explicitly excluded at token creation time using the command vault token create with the flag -no-default-policy. This removes the default policy from the token. On the root policy side of things, a best practice is to revoke the root token in production using vault token revoke followed by the token.
The default policy allows basic functionalities such as letting the token look up data about itself and use its cubbyhole data, whereas the root policy is used when the Vault server is first initialized. One root user is created to do the initial configuration and set up the Vault. After configuration, the initial root token should be revoked, and more strictly controlled users and authentication methods should be used. This means creating an admin policy for administrators and other policies for regular users and applications in the system.
Tokens Overview
Returning to our internal diagram of Vault, we can see the token store component in the architecture. Tokens are the core method for authentication within Vault, as we’ve learned in previous sections. Tokens can be used directly or dynamically generated by the auth methods, and clients require valid tokens to interact with Vault.
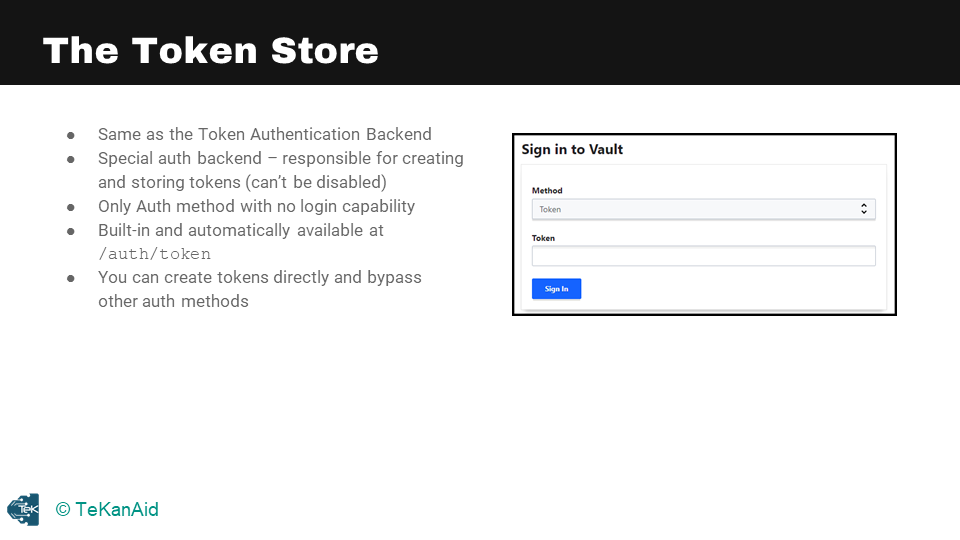
The Token Store
Let’s take a closer look at the token store in the above diagram, which is also referred to as the token authentication backend. It is a special auth backend that is responsible for creating and storing tokens. You cannot disable it, and it is the only auth method with no login capability. It is built-in and automatically available at the path /token.
You can create tokens directly and bypass other authentication methods, but this is not recommended except for specific use cases. It is generally better to use authentication methods as we saw in the previous section, as tokens are generated from authentication methods. In the Vault UI, you can choose the token authentication method, enter your token, and log in.
In summary, tokens are essential for authentication in Vault and can be used directly or dynamically generated by the auth methods. The token store is responsible for creating and storing tokens, and it is a special auth backend that cannot be disabled. Although you can create tokens directly, it is recommended to use authentication methods. In the Vault UI, you can choose the token authentication method to log in with your token.
Secrets Engines Overview
We’re back to our diagram, and you can see where secrets engines lie in the architecture internals of Vault. Secrets engines are the component of the Vault architecture that manages secrets, as you can see in this picture below. This is a snapshot of all the secrets engines available to Vault at the time of writing, so this is Vault 1.9.3.
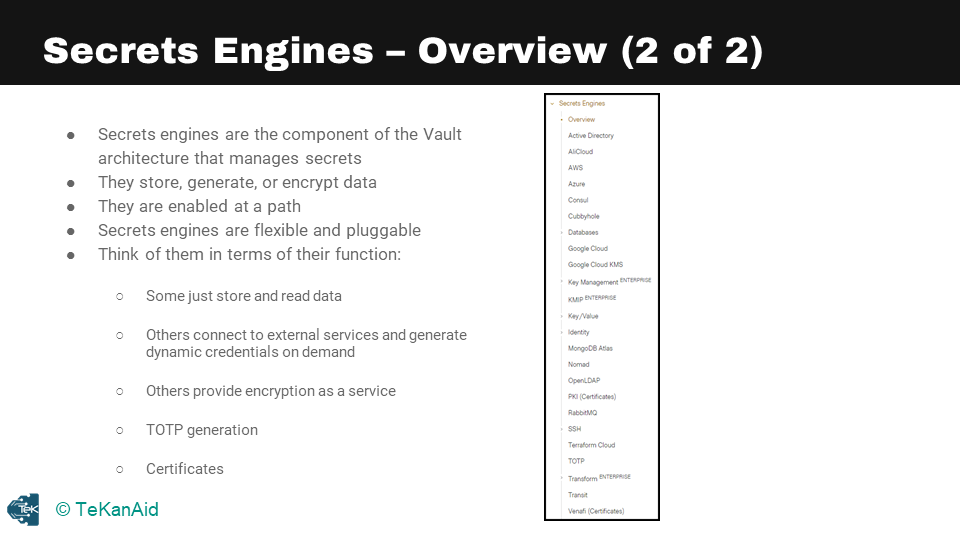
Secrets Engine Overview
Secrets engines store, generate, or encrypt data. They are enabled at a path, they’re flexible and pluggable. You can even write your own secrets engine. Think of them in terms of their function: some just store and read data, others connect to external services and generate dynamic credentials on demand, others provide encryption as a service, including the timed one-time password generation, and finally, certificates.
Secrets Engine Life Cycle
Now let’s take a look at the life cycle of secrets engines. The first option here is to enable a secrets engine, and this enables it at a given path. Each secrets engine is isolated to its path by default. They are enabled at their type; for example, AWS will be enabled at the path aws. You can also customize the path, of course, for any of the secrets engines.
The second option is to disable it. You can disable an existing secrets engine. When a secrets engine is disabled, all of its secrets are revoked (if they support it), and all of the data stored for that engine in the physical storage layer is deleted. You can move the path for an existing secrets engine, and this process revokes all secrets, since secret leases are tied to the path where they were created. The configuration data stored for the engine persists throughout the move. Finally, tune, and this tunes the global configuration for the secrets engine, for example, the time to live.
Let’s take a look at some commands. If you run the vault secrets -h command, or --help, you’ll get the help under this particular subcommand vault secrets. The most common one here is vault secrets list, that you’ll use quite often to find all the enabled secrets engines. Also, enabling a new secrets engine is vault secrets enable.
Replication Design with DR and PR
When an organization or customer expands their use of Vault across different geographic locations and data centers, it becomes necessary to consider scaling with Vault Enterprise. The Vault Enterprise license enables the deployment of performance replication and disaster recovery clusters.
Design Considerations
In terms of design considerations, there are two primary areas to focus on – disaster recovery and performance replication. A performance replica cluster is deployed in each region to optimize application performance, while a disaster recovery cluster serves as a warm standby to receive replicated data from the primary cluster.
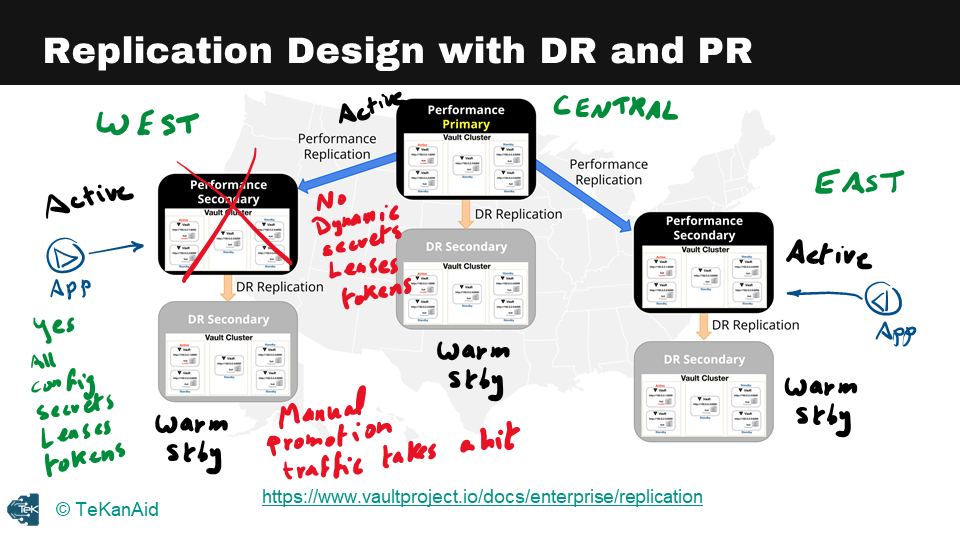
Replication Design with DR and PR
For example, if there are west, central, and east regions, there should be a performance replica cluster in each of these regions. In a primary performance cluster, there are typically five nodes to ensure high availability. The disaster recovery cluster can be deployed locally to each region or cross-region, depending on the architectural requirements.
Applications that need to retrieve secrets from Vault should talk to their local cluster to avoid adding latency to the application. Performance replication clusters are active and can be accessed by the applications. In contrast, disaster recovery clusters are warm standbys that only receive replicated data from their primary clusters.
One thing to note about performance replication and disaster recovery is that dynamic secrets, leases, or tokens are not replicated across clusters. This means that if an application logs in to Vault to retrieve secrets and the primary cluster goes down, the dynamic secrets or leases will need to be regenerated.
In contrast, for disaster recovery, everything is replicated, including configurations, secrets, leases, and tokens. When the primary cluster goes down, the disaster recovery cluster must be manually promoted, and all the leases and tokens will still be available. Determining the appropriate SLAs, RTOs, and RPOs is critical to determine whether to deploy both performance replication and disaster recovery or to start with disaster recovery and add performance replication later.
Comparing PR and DR
In terms of the comparison between disaster recovery and performance replication, both replicate configurations of primary clusters, back ends, auth methods, secrets engines, and audit devices. The primary difference is that tokens and leases are replicated for disaster recovery but not for performance replication. When a secondary is promoted, applications must re-authenticate and obtain new leases from the newly promoted primary. Additionally, disaster recovery only allows the secondary cluster to handle client requests as a warm standby, while performance replication is an active cluster that applications and human users can interact with.
In conclusion, while this is a brief overview of the architecture and design considerations for scaling Vault Enterprise, there is much more to consider when designing an appropriate solution. For a deeper dive into this topic, it’s recommended to review the whiteboard and demo sessions in my HashiCorp Vault 101 – Certified Vault Associate course.
Vault Agent Overview
Let’s dive into understanding the Vault Agent and the reasons for its existence. The Vault Agent is a client daemon that uses the same Vault binary that was previously downloaded, and it allows easy adoption of Vault without making code changes in your applications. This means that your application does not need to be Vault aware. With the Vault Agent, you don’t need to modify the code of your application. Instead, you can simply utilize the Vault Agent.
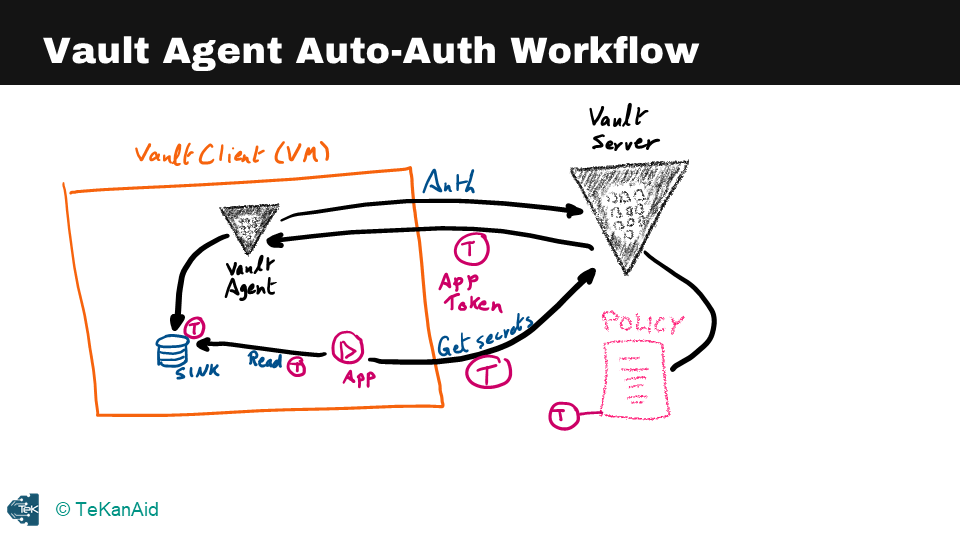
Vault Agent Auto Auth Workflow
So, what can the Vault Agent do on behalf of your applications? The agent provides a feature called Auto Auth, which helps with the authentication into Vault. It can also help manage the token renewal process, also known as the Auto Auth functionality. From a caching perspective, the Vault Agent can do client-side caching where it caches the Vault tokens and leases for dynamic secrets. However, it will not do caching for the key-value secrets. Additionally, it can renew the cached tokens and leases that it generated.
Vault Agent Templates
Another crucial feature of the Vault Agent is templates. You can write a template, and the Vault Agent will grab some secrets, put them in the pre-configured template, and render a configuration file that your application can read from. In this file, the secrets are already populated, so the application doesn’t need to know anything about Vault, as long as it knows how to read from a particular file. Many applications know how to read from a config file, for example, and this is how you can run the Vault Agent: by running the command vault agent -config specifying the configuration file for the Vault Agent.
In summary, the Vault Agent is a powerful tool that makes it easy to adopt Vault without making changes to your application’s code. It can handle authentication, manage token renewal, and provide templates for your applications, making it easier to integrate secrets management with your applications.
Conclusion
I hope this has been a good HashiCorp Vault tutorial to introduce you to this incredible secrets management product. If you would like to dig deeper and even prepare to become a Certified Vault Associate, then check out my course: HashiCorp Vault 101 – Certified Vault Associate.
You can also find additional blog posts on Vault:
- HashiCorp Vault API Tutorial and Pro Tips
- HashiCorp Vault Backup and Restore Raft Snapshots from Kubernetes to AWS S3
- HashiCorp Vault PKI Secrets Engine Demo for Certificate Management
- Securing the Future – DevSecOps Trends for 2023
Suggested Reading
- Migrate Secrets from AWS Secrets Manager to HashiCorp Vault with Python, Docker, and GitLab
- Crossplane: Unveiling a New Horizon in Cloud Infrastructure Management
Code
Hi and Welcome!
Join the Newsletter and get FREE access to all my Source Code along with a couple of gifts.