
Introduction
Video
Below is a video explanation and demo.
Video Chapters
You can skip to the relevant chapters below:
- 00:00 – Introduction
- 02:00 – Workflow Whiteboard
- 05:05 – Run Demo
- 06:44 – Pihole Docker Configuration Walk-through
- 09:18 – Repo Folder Structure
- 10:27 – GitLab CI/CD Pipeline Config
- 18:29 – View Demo Results
- 19:30 – Update the Pihole Docker Image Demo
- 21:57 – Terraform Config
- 26:00 – Ansible Config
- 30:10 – Docker-compose config
- 33:37 – Pihole Raspberry Pi and Synology NAS
- 35:29 – Demo Results After Version Upgrade
- 36:34 – Conclusion
What is Pihole Docker?
is an open-source software that is used as an ad blocker. It’s a DNS sinkhole for ads and can be run on multiple flavours of Linux. The reason it has Pi in the name is that it was originally intended to run on a Raspberry Pi. You can also install pihole inside of a docker container. We will refer to this setup as a Pihole Docker setup for this blog post.
I’ve been using Pihole Docker for over two years now and absolutely love it. It not only blocks ads on websites, but it can also block ads in some mobile apps. You also have the option to add domains to whitelists or blacklists. Finally, you could also run your DCHP and DNS servers directly on the Pihole Docker.
My Pihole has been running on an old Ubuntu 16.04 VM and it was time to upgrade the OS. However, I didn’t use Infrastructure as Code principles when I built it the first time. So the motivation for this blog post is to recreate Pihole Docker on a Ubuntu 20.04 VM in vSphere. This time around, we will use Infrastructure as Code principles. This will make it much easier to run upgrades and updates next time.
Here are some of the tools used to build our Pihole Docker:
- vSphere
- Terraform Cloud
- GitLab
- Ansible
- Docker and docker-compose
- Pihole Docker
Pre-requisites
The following is required to follow along:
- Access to a vSphere instance (tested on vSphere v6.7)
- A VMware image template for Ubuntu 20.04 (Check out my blog post on how to build one with HashiCorp Packer)
- Terraform Cloud for Business (you could also modify the code to use Terraform OSS or Terraform Cloud Free Tier)
- Ansible OSS
- GitLab Free Account
Why Run Pihole in Docker?
There are several reasons to run Pihole in Docker. Here are a few:
- Very simple to start, modify the configuration, and stop Pihole.
- Upgrade is as simple as pulling the new docker image.
- Portability is a great advantage. You could simply lift and shift the application to a new server.
How to Install Docker Pihole?
You could simply run a docker-compose file on a VM that has docker and docker-compose installed. However, if you’ve read any of my previous blog posts, you’ll know that I’m a big fan of Infrastructure as Code. This is the idea of defining our infrastructure as code and storing it in a version control system.
In this section, you will learn the following:
- GitLab as a Version Control System (VCS) and as a CI/CD tool
- Terraform to provision a VM on vSphere
- Ansible to do configuration management and start the Pihole Docker container
Workflow Diagram
Below is a diagram of the workflow we will use to set up Pihole Docker:
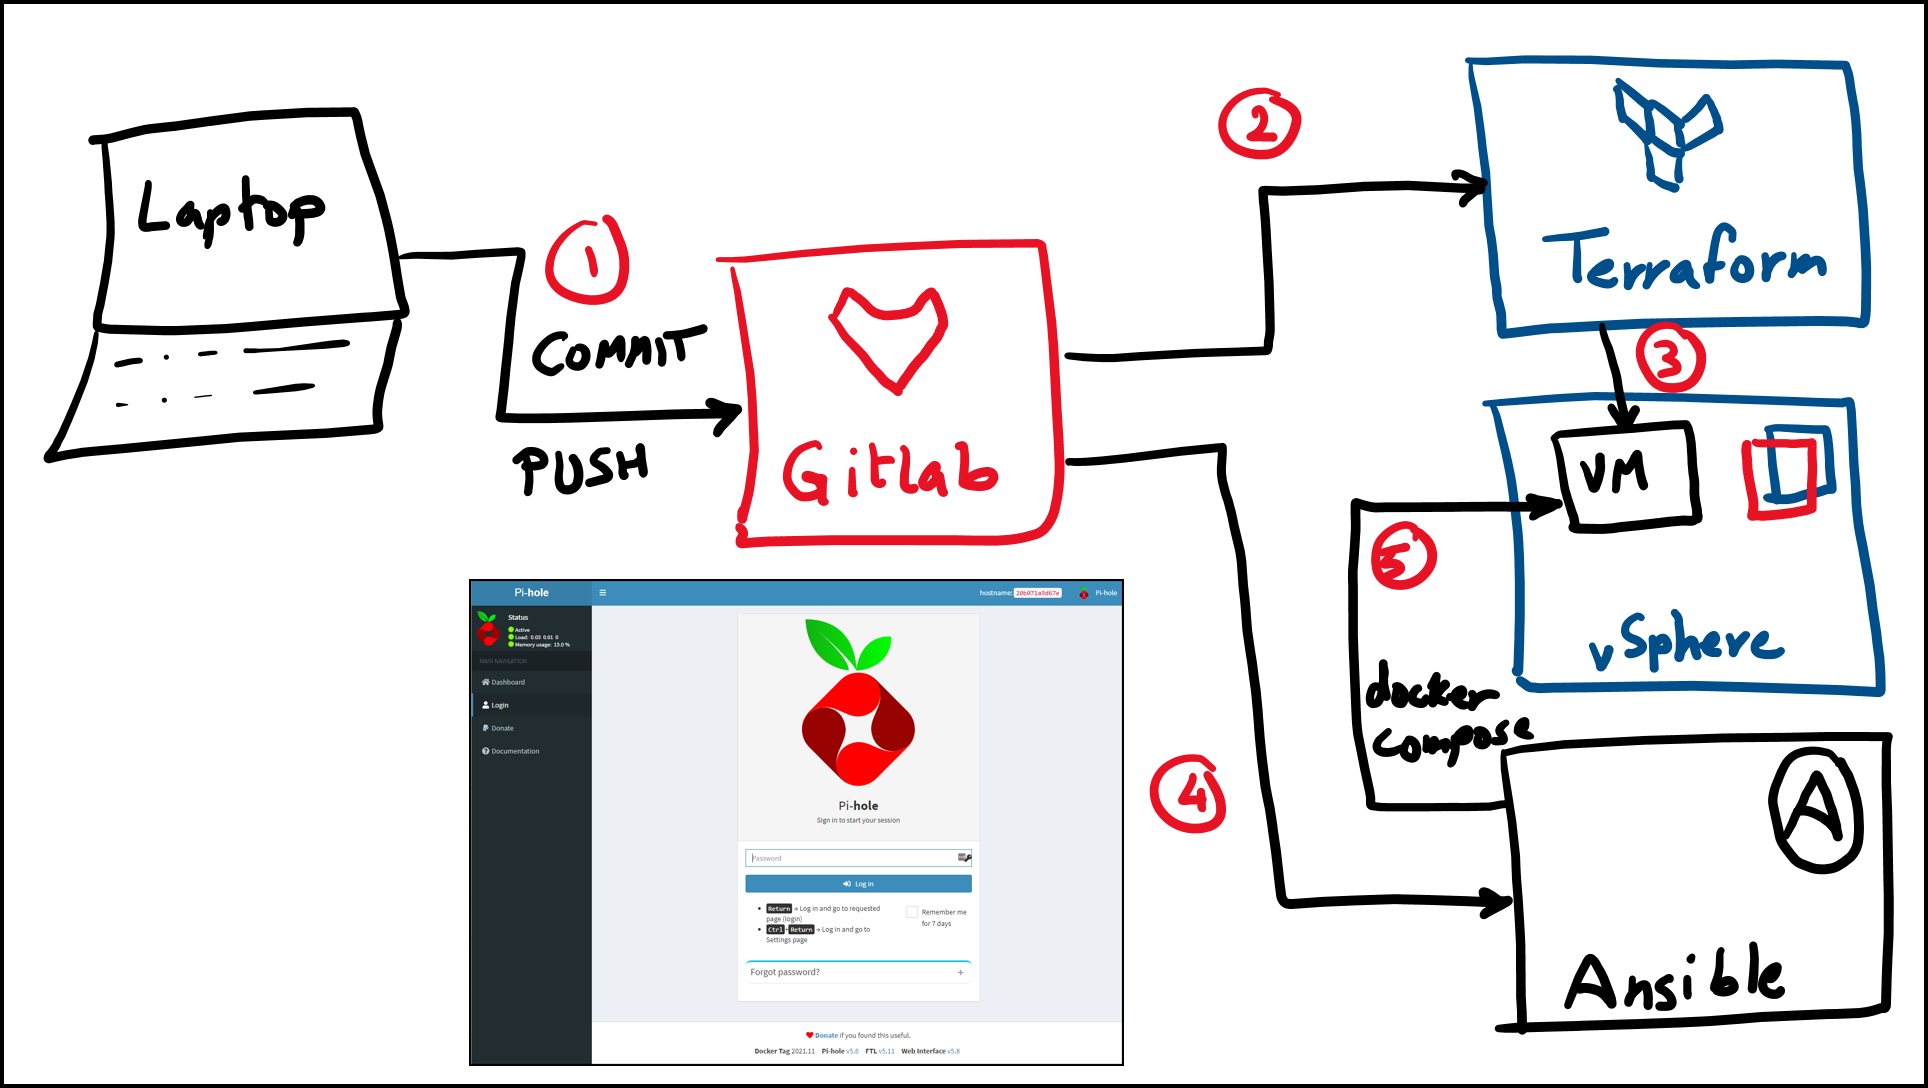
Workflow to Set up Pihole Docker
GitLab Repo Folder Structure
And here is the folder structure for the repo:
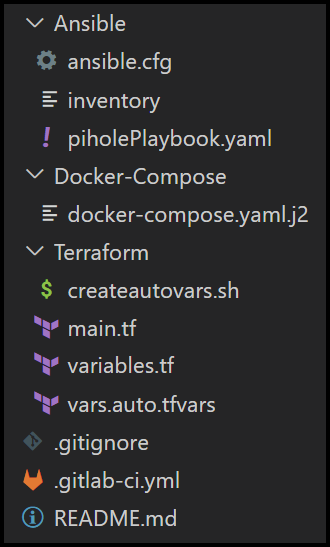
Folder Structure for the GitLab Repo
GitLab CI/CD Configuration
GitLab is the brains of this whole operation. You will use it for the following two stages:
- Call on Terraform to provision a VM in vSphere
- Call on Ansible to deploy the Docker Pihole application
Terraform Build Stage
Below is the Terraform build stage in the GitLab pipeline:
variables:
  WORKER_NAMES: "docker-1"
  WORKER_IPS: "192.168.1.81"
  PIHOLE_USER: "sam"
  PIHOLE_IMAGE_TAG: "2021.11"

terraform-docker-vm:
  stage: build
  script:
    - export USER=$(whoami)
    - mkdir -p /home/${USER}/.terraform.d
    - |-
      cat > /home/${USER}/.terraform.d/credentials.tfrc.json <<-EOF
      {
        "credentials": {
          "app.terraform.io": {
            "token": "${TFC_TOKEN}"
          }
        }
      }
      EOF
    - cd Terraform
    - ./createautovars.sh "${WORKER_NAMES}" "${WORKER_IPS}"
    - terraform init -backend-config="token=${TFC_TOKEN}"
    - terraform fmt
    - terraform validate
    - terraform apply --auto-approve
  tags: [inK8s]
Some comments on this configuration:
- We are using Terraform Cloud (TFC) because it securely stores the Terraform state file and configuration variables encrypted at rest.
- The Terraform CLI-driven workflow is used, which is common when using CI/CD pipelines with TFC.
- We picked the agent execution mode in the TFC workspace since we’re running local cloud agents in the vSphere environment. Check out
- GitLab is using a few bash commands to get the Terraform setup ready to use TFC.
- You could create multiple VMs here if you would like an HA setup of Pihole Docker
- I’m running a GitLab runner inside of a K8s cluster. If you’re interested in learning more, check out this blog post on building a Kubernetes cluster in vSphere with Terraform and Packer.
Ansible Deploy Stage
Below is the Ansible deploy stage in the GitLab pipeline:
deploy-pihole:
  stage: deploy
  script:
    - export USER=$(whoami)
    - sudo chmod 755 Ansible
    - cd Ansible
    - sudo sed -i "s/<placeholder_ip>/${WORKER_IPS}/g" inventory
    - mkdir -p /home/${USER}/.ssh
    - cp ${id_rsa} /home/${USER}/.ssh
    - sudo chmod 400 /home/${USER}/.ssh/id_rsa
    - eval `ssh-agent`
    - ssh-add /home/${USER}/.ssh/id_rsa
    - ansible-playbook -i inventory --extra-vars "user=${PIHOLE_USER} PIHOLE_IMAGE_TAG=${PIHOLE_IMAGE_TAG}" piholePlaybook.yaml
  needs:
    - job: terraform-docker-vm
  tags: [inK8s]
Some comments on this configuration:
- The
id_rsaprivate key is stored inside of my CI/CD variables in GitLab. We copy it to the.sshfolder to be used by Ansible to ssh into our VM. - Ansible runs the
piholePlaybook.yamlplaybook which takes care of the entire deployment process of Pihole Docker. We will see more on this later.
Terraform Configuration
You can view the entire configuration in the GitLab repo here.. However, we will cover the highlights in this section.
Notice in the main.tf file that we are using a module called vsphere_vm-public. Modules in Terraform is a way to capture bits of code configuration for re-usability. If you’re interested in seeing how we created this module, please refer to this blog post where we showed how to use Terraform with modules to build a k3s cluster in vSphere.
module "vsphere_vm-public" {
  for_each               = var.worker_nodes
  source                 = "app.terraform.io/HashiCorp-Sam/vsphere_vm-public/vsphere"
  version                = "1.0.1"
  vsphere_user           = var.vsphere_user
  vsphere_password       = var.vsphere_password
  vsphere_vcenter        = var.vsphere_server
  ssh_username           = var.ssh_username
  name                   = each.key
  cpu                    = var.worker_cpu
  cores-per-socket       = var.worker_cores-per-socket
  ram                    = var.worker_ram
  disksize               = var.worker_disksize
  vm-template-name       = var.vm-template-name
  vm-guest-id            = var.vm-guest-id
  vsphere-unverified-ssl = var.vsphere-unverified-ssl
  vsphere-datacenter     = var.vsphere-datacenter
  vsphere-cluster        = var.vsphere-cluster
  vm-datastore           = var.vm-datastore
  vm-network             = var.vm-network
  vm-domain              = var.vm-domain
  dns_server_list        = var.dns_server_list
  ipv4_address           = each.value
  ipv4_gateway           = var.ipv4_gateway
  ipv4_netmask           = var.ipv4_netmask
  public_key             = var.public_key
}
As you see from this module, it has a number of input variables. Many have to do with setting up access to vSphere vCenter. You also define the CPU, RAM, and disk size along with other parameters such as network-related parameters.
You may have noticed three other files in the Terraform folder in the GitLab repo:
- The first one is
variables.tf. This file is used to declare terraform variables. - The second is
vars.auto.tfvars. This file is used to assign necessary values to the terraform variables used in themain.tffile. - The third is
createautovars.sh. We use this bash script to take the VM names and IP values from the GitLab CI/CD pipeline variables and then create an additional variables assignment file calledips.auto.tfvars. This file will include theworker_nodesmap variable that is used in thefor_eachloop in themain.tffile. This basically allows us to have multiple VMs. In our example, we only deal with one VM for the Docker Pihole application.
Now that we have a VM running in vSphere. Let’s see how to run Pihole docker on it. Hint: we’ll use Ansible.
How to Set up Pi Hole Docker?
In this section, we will get to how we use Ansible as the configuration management tool of choice to set up Pi Hole Docker.
Ansible Configuration
Below we will take a look at the Ansible playbook that is used to bring up the Docker Pihole container with docker-compose. Let’s break up the configuration into multiple sections. You could also check the GitLab repo for the entire source code.
-
The first section below does the following:
- Installs docker-compose on our VM with some retries and delays necessary for apt not to give us some lock errors.
- Installs the docker module for Python needed for Ansible.
- Takes the
PIHOLE_USERvariable from the GitLab CI/CD and adds this user to thedockergroup. This allows thePIHOLE_USERto run docker commands without needing to elevate privileges withsudo. - Create a Pihole directory that will be used to store the configuration data for pihole.
- hosts: all
  become_user: root
  become: true
  tasks:
    # adding retries and delays for apt to catch up otherwise you get this error: Could not get lock /var/lib/dpkg/lock-frontend
    - name: Install Docker Compose
      apt:
        update_cache: yes
        pkg:
        - docker-compose
      register: result
      until: result is not failed
      retries: 20
      delay: 30
    - name: Install Docker module for Python
      pip:
        name: docker
    - name: Adding user '{{ user }}' to Docker group
      user:
        name: '{{ user }}'
        group: docker
        append: yes
    - name: Create Pihole Directory
      file: state=directory path=/home/'{{ user }}'/pihole
-
The section below does a few things:
- Gets our pihole docker Ubuntu VM ready to use Pihole by disabling the stub resolver, changing a symlink, and restarting the
systemd-resolvedprocess. - Deploys the Pihole Docker container with docker-compose
- Gets our pihole docker Ubuntu VM ready to use Pihole by disabling the stub resolver, changing a symlink, and restarting the
  # Three tasks below are needed in Ubuntu as per https://github.com/pi-hole/docker-pi-hole/#installing-on-ubuntu
    - name: Disable Stub Resolver
      replace:
        path: /etc/systemd/resolved.conf
        regexp: '#DNSStubListener=yes'
        replace: 'DNSStubListener=no'
    - name: Change Symlink
      shell: sh -c 'rm /etc/resolv.conf && ln -s /run/systemd/resolve/resolv.conf /etc/resolv.conf'
    - name: Restart systemd-resolved
      systemd:
        state: restarted
        name: systemd-resolved
        daemon_reload: yes
    - name: Use a Docker-Compose Template for Image Variable
      template:
          src: ../Docker-Compose/docker-compose.yaml.j2
          dest: /home/'{{ user }}'/pihole/docker-compose.yaml
    - name: Deploy PiHole via Docker Compose
      docker_compose:
        project_src: /home/'{{ user }}'/pihole
        files:
        - docker-compose.yaml
Pihole Docker-Compose Configuration
Below you will find the pihole docker-compose jinja2 template file content. You technically could use this file directly on a Raspberry Pi or on any machine with a Linux operating system using docker and docker-compose. However, we took the scenic route of deploying everything from scratch:
– The VM with Terraform
– The configuration of this Pihole Docker container with Ansible
The configuration is straightforward. A few notes to keep in mind:
- The docker image is pulled from docker hub and references the
PIHOLE_IMAGE_TAGthat is defined in the variables section of the GitLab CI/CD configuration:PIHOLE_IMAGE_TAG: "2021.11". - We expose the pihole ports to the host VM. We need ports 80 and 443 for the UI access, 53 and 67 for DNS and DHCP, respectively.
- You can define your time zone under the
TZblock. - The web interface password here is
changeMe. Make sure to change it. - The volumes block has 2 paths and that is where the pihole stores its data.
- DNS settings are defined under the
dnsblock. These are for the pihole container itself. You can configure the pihole to run as a DNS server or as a DHCP server from the UI. (Note if you are going to use the Pihole as your DHCP server, then make sure to turn off the DHCP server in your router)
version: '3.7'
# More info at https://github.com/pi-hole/docker-pi-hole/ and https://docs.pi-hole.net/
services:
  pihole:
    container_name: pihole
    image: pihole/pihole:{{ PIHOLE_IMAGE_TAG }}
    ports:
      - '53:53/tcp'
      - '53:53/udp'
      - '67:67/udp'
      - '80:80/tcp'
      - '443:443/tcp'
    environment:
      TZ: 'America/Toronto'
      WEBPASSWORD: 'changeMe'
    # Volumes store your data between container upgrades
    volumes:
      - './etc-pihole/:/etc/pihole/'
      - './etc-dnsmasq.d/:/etc/dnsmasq.d/'
    dns:
      - 127.0.0.1
      - 185.228.168.168 # Using Cleanbrowsing family filter DNS
    # Recommended but not required (DHCP needs NET_ADMIN)
    #   https://github.com/pi-hole/docker-pi-hole#note-on-capabilities
    cap_add:
      - NET_ADMIN
    restart: always
Pihole Docker Up and Running
By now you should have a working Pihole Docker. You could navigate to the http://192.168.1.81/admin/index.php?login URL and you will get to the admin page. Make sure to use the changeMe password and actually change it later. The IP address above was defined in the GitLab CI/CD configuration like this WORKER_IPS: "192.168.1.81". Change it to your own IP.
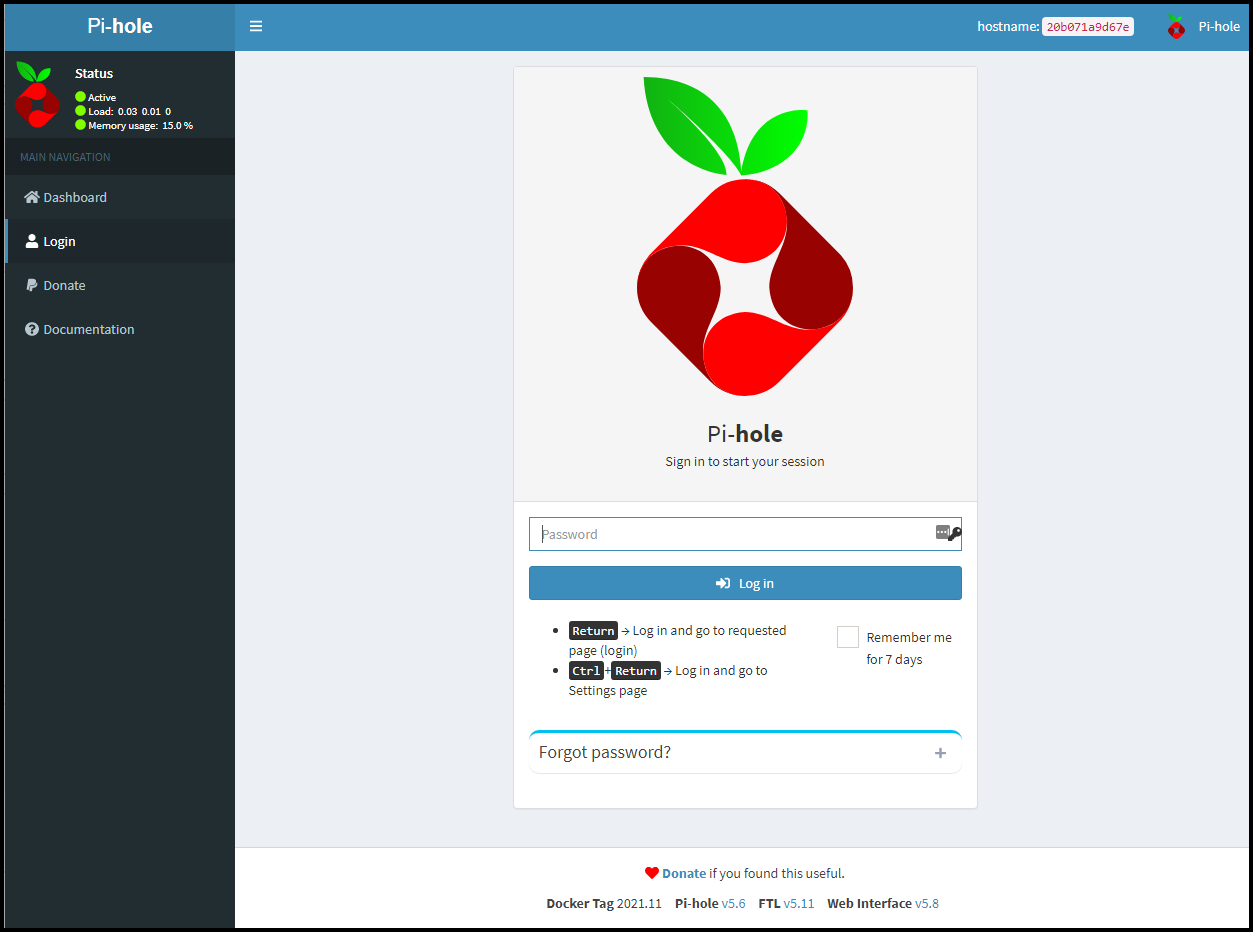
Pihole Docker Login Page
How to Update Docker Pi Hole?
Updating the docker pi hole is relatively simple. If you are using docker-compose directly on the VM then you can just pull the new docker image and make sure you use either the latest image tag or the specific image tag that you need. Then run docker-compose up -d. I prefer not to use the lastest image tag as it may lead to confusion as to which version is used.
If you are continuing with Infrastructure as Code principles, which I hope you do, then it’s a matter of re-running the GitLab pipeline. You will need to update the PIHOLE_IMAGE_TAG: "2021.11" with the tag that corresponds to the latest tag. You can check the I do not recommend using the latest tag in the docker-compose configuration as it could lead to confusion. You may not know what version of the container image is actually used.
Pihole Docker Raspberry Pi
You can definitely follow the instructions in this post to install and manage Pihole Docker on a Raspberry Pi. The difference is that you won’t use Terraform for provisioning. You could basically remove that step from the GitLab CI/CD configuration. You would still use Ansible to run the configuration and install Pihole Docker on the Pi. You only need to ensure that the Pi can receive ssh connections to it.
Pihole Docker Synology NAS Thoughts
I have a Synology NAS at home and was tempted to use it to run Pihole inside of a docker container on the NAS. However, after doing a bit of research, I found that it is probably a better idea to separate the pihole from the NAS. If you still would like to install the Pihole on the Synology NAS, then take a look
Conclusion
In this blog post, we showed how to use Infrastructure as Code concepts to build a VM hosting a Pihole Docker container. We used the following:
- Terraform to provision a VM in vSphere
- Ansible to deploy the configuration and start the container
- GitLab to store the source code and run the CI/CD pipeline
- Docker-compose to stand up the Pihole application
The beauty about all of this is that:
- The configuration is stored safely in a version control system
- The process is self-documented
- The deployment is repeatable and portable
If you followed along thus far, then congratulations on your new Pihole Docker ad blocker and say goodbye to annoying ads.
References
- GitLab repo for this post
- GitLab repo for the VM Terraform module
- HashiCorp Packer to Build a Ubuntu 20.04 Image Template in VMware
Suggested Reading
- Jenkins, Vault, Terraform, Ansible, and Consul Delivering an End-to-End CI/CD Pipeline
- Terraform Import Example – AWS EC2 Instance
- Terraform vs Ansible – Learn the Differences – Part 1
Code
Hi and Welcome!
Join the Newsletter and get FREE access to all my Source Code along with a couple of gifts.