

Introduction
Vault Raft Cluster High Availability refers to implementing a highly available configuration for a Vault cluster using the Raft consensus protocol. HashiCorp Vault is a popular open-source tool developed by HashiCorp that provides secrets management and encryption capabilities.
The Raft consensus protocol is used in Vault to ensure data consistency and fault tolerance in a distributed environment. By deploying a Vault cluster with Raft, you can achieve high availability, meaning that the service remains accessible even if individual nodes or servers within the cluster fail.
Video
Below is a video explanation and demo.
Video Chapters
p class=”has-text-align-start”>You can skip to the relevant chapters below:
-
00:00 – Introduction
-
00:40 – Test Setup
-
04:28 – Terminating a Follower Node
-
06:04 – Autoscaling Group Recreates a Vault Node
-
08:47 – Vault Node added to Cluster
-
09:30 – Terminating the Leader Node
-
10:01 – Losing Data for 5 seconds
-
11:05 – Autoscaling Group Adds a Node
-
11:43 – 5 Seconds Timeout Explained
-
12:49 – Vault Node added to the Cluster
-
13:53 – Wrap-Up
Vault Servers High Availability Overview
In this blog post, I demonstrate how to test the high availability of a HashiCorp Vault Raft cluster deployed in AWS with a load balancer.
We will perform two scenarios of node failure: one where a follower node is terminated and one where a leader node is terminated. I will explain how the cluster handles the failure and elects a new leader, and how the load balancer detects the unhealthy node and routes the traffic to the leader node.
The leader and follower nodes are sometimes also referred to as the active vault instance and the standby vault instance or node.
This blog post is useful for anyone who wants to learn how to use Vault Raft (Integrated Storage) as a storage backend and ensure high availability and fault tolerance for their secrets management.
This post is part of the Vault 202 for Operators course, a comprehensive resource for mastering the management of Vault in production environments. If you’re interested in deepening your understanding of this topic, consider enrolling in this course.
Without further ado, let’s embark on this exploration session and uncover the repercussions of terminating Vault nodes within a Raft Vault cluster in AWS.
Vault High Availability Architecture in AWS
Before we jump into breaking things, let’s first take a look at the architecture for our Vault cluster with the Raft storage backend.
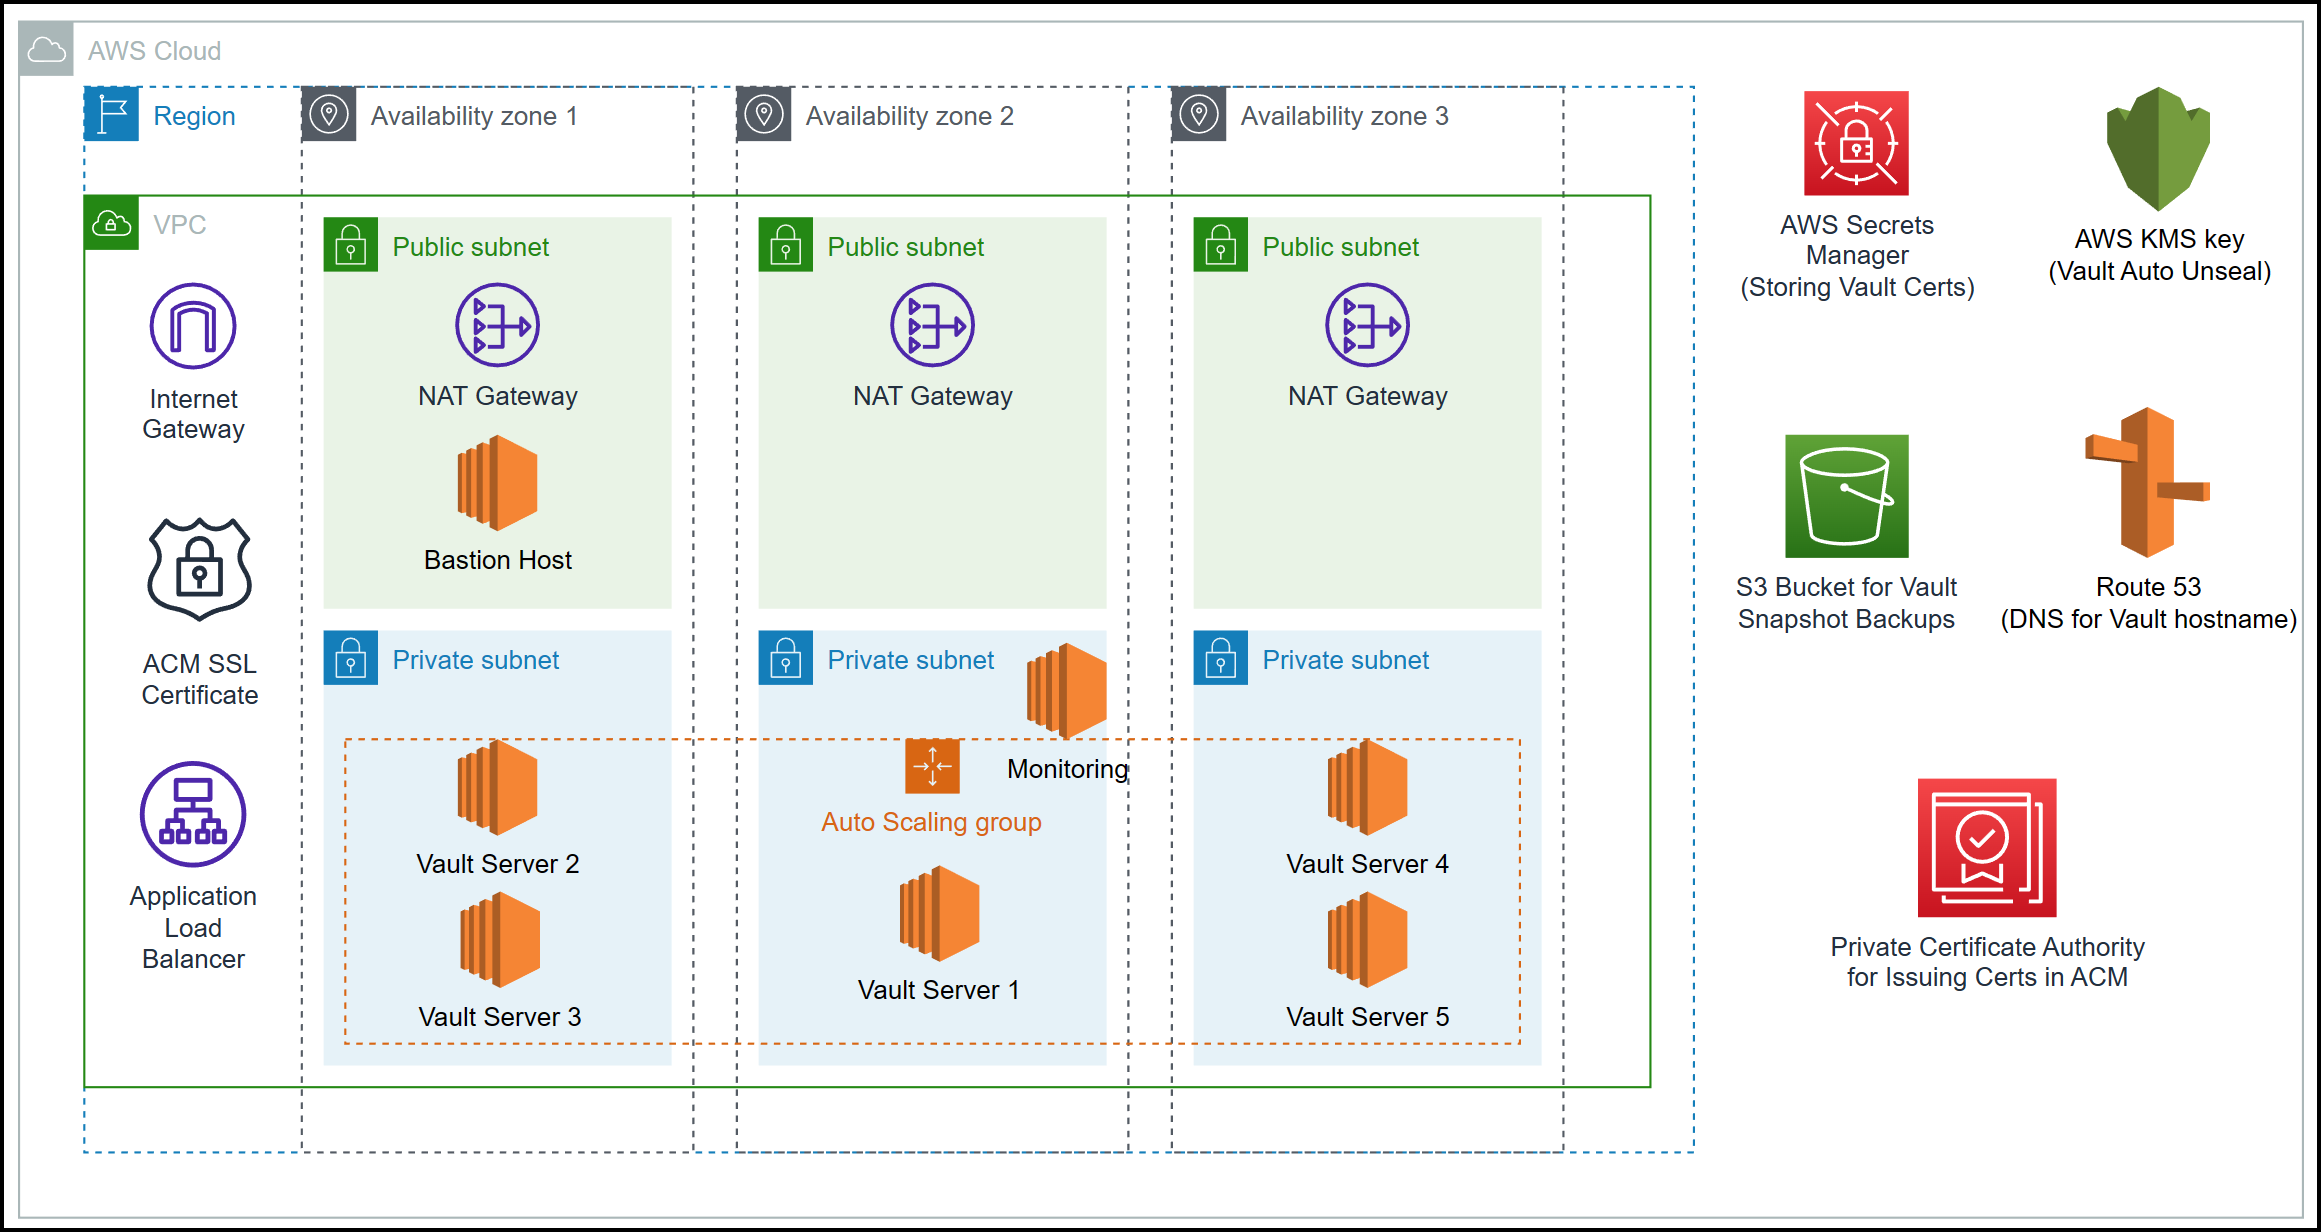
Raft Storage Backend
Also known as the Integrated Storage backend, the Raft storage backend is only one of two supported storage backends by HashiCorp. The other one is the Consul storage backend.
With the integrated storage backend, Vault automatically handles data replication, synchronization, and leader election across multiple nodes, enabling seamless failover and data consistency in the event of node failures or network disruptions. This backend not only simplifies the setup and configuration of Vault clusters but also enhances the overall resilience and scalability of the system,
Multiple Vault Servers in HA mode
As shown in the diagram above, we are running multiple Vault servers in an HA Raft cluster. These can be three, five, or seven Vault servers. In our testing, we will just use 3. Below is a very good table highlighting the Quorum Size and Failure Tolerance for different numbers of Vault servers. As you can see, using an even number doesn’t give any additional failure tolerance. This is why the recommendation is always odd numbers: three, five, and seven.
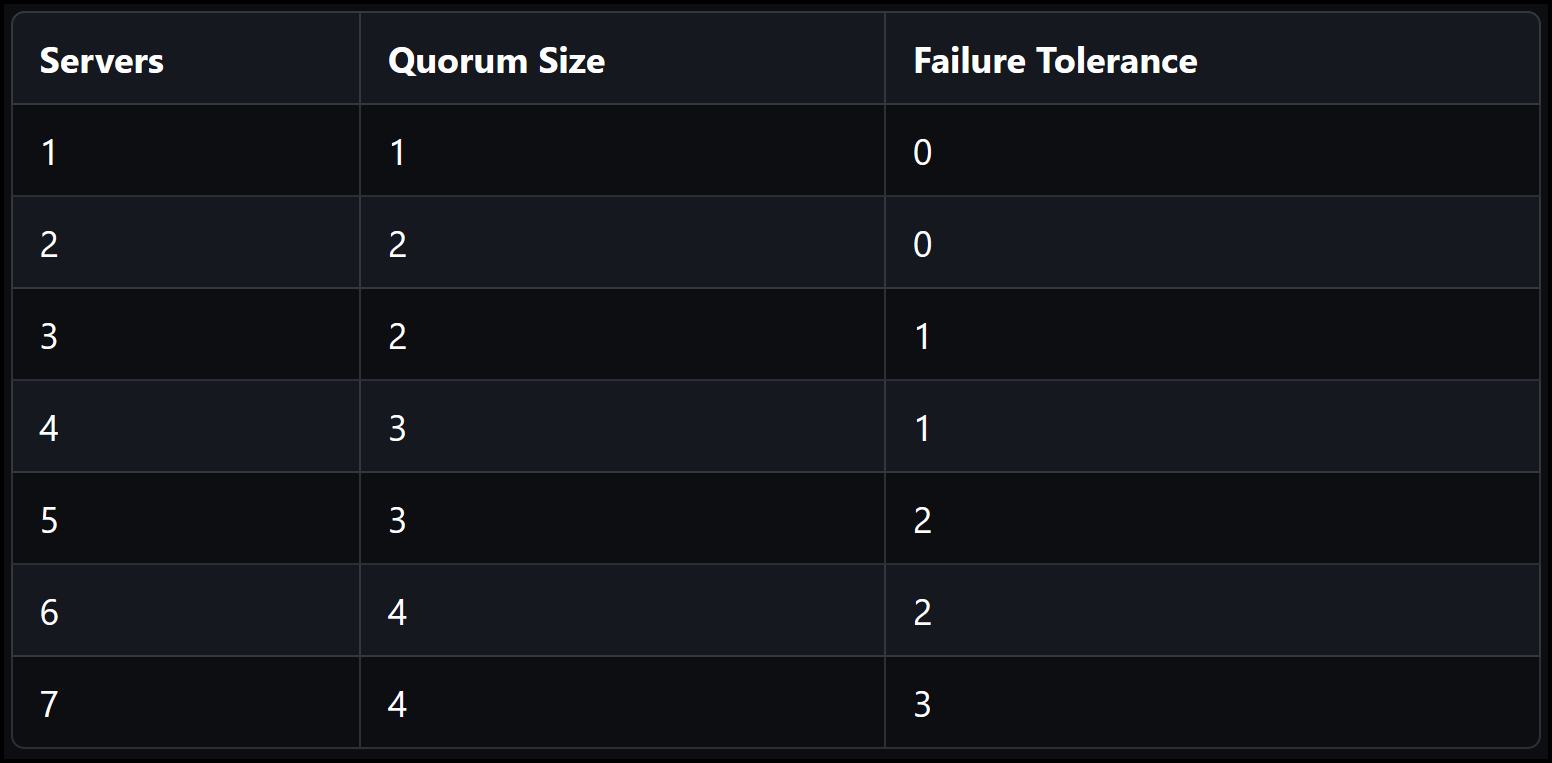
Failure tolerance table for Raft
Test Setup: Examining High Availability in a Vault Cluster
In this section, we will conduct a test to explore the high availability capabilities of our Vault cluster by terminating certain nodes. Let’s dive into the experiment.
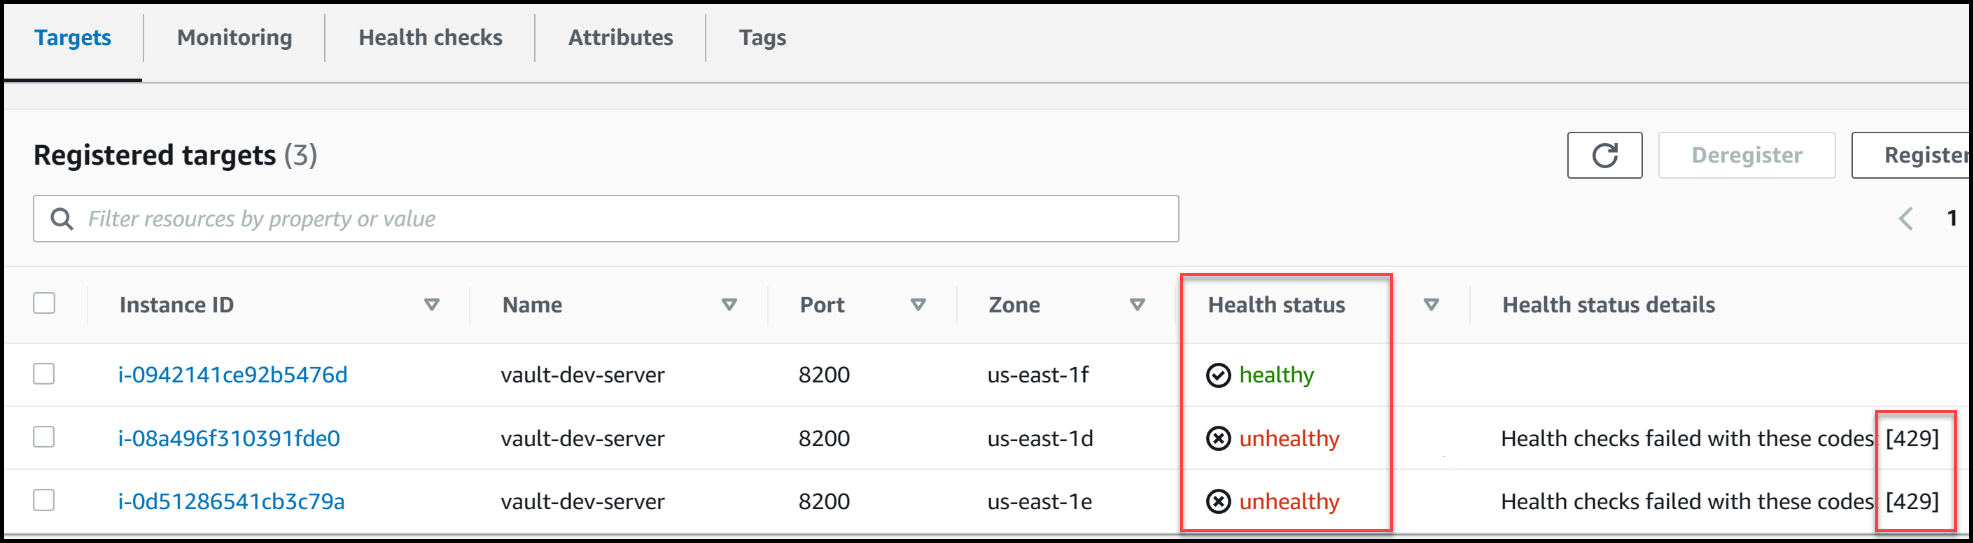
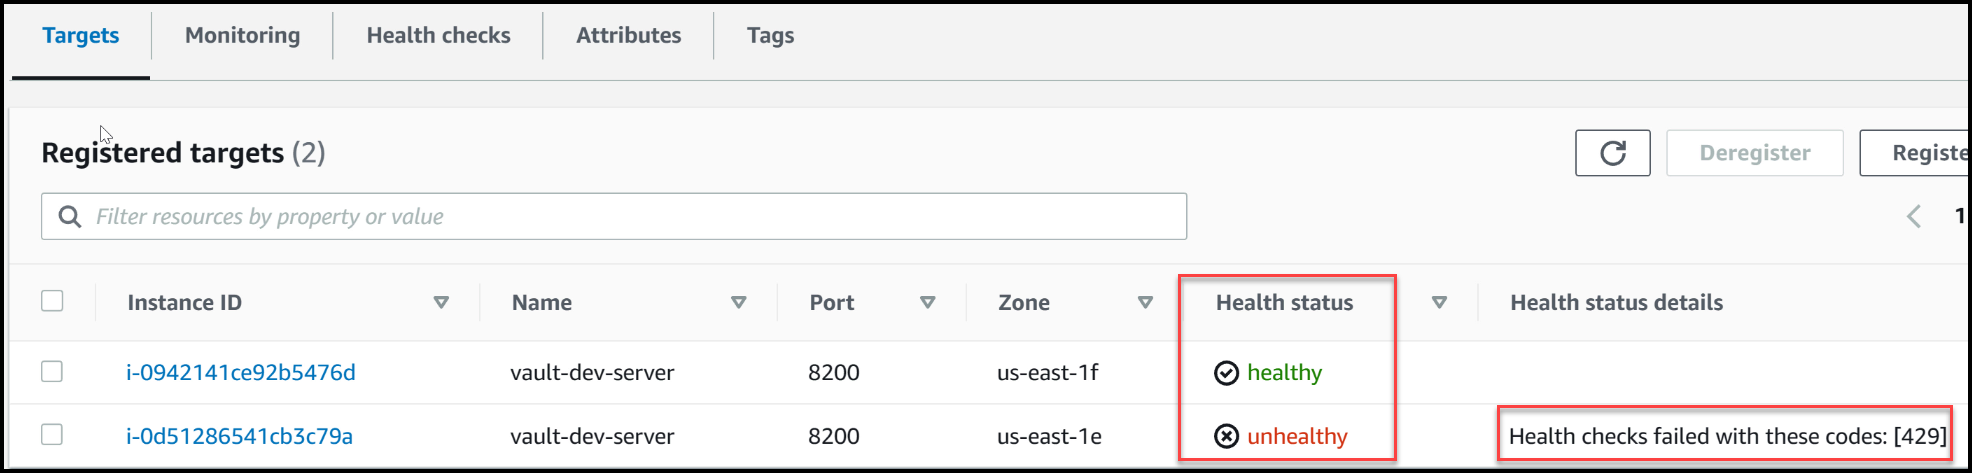
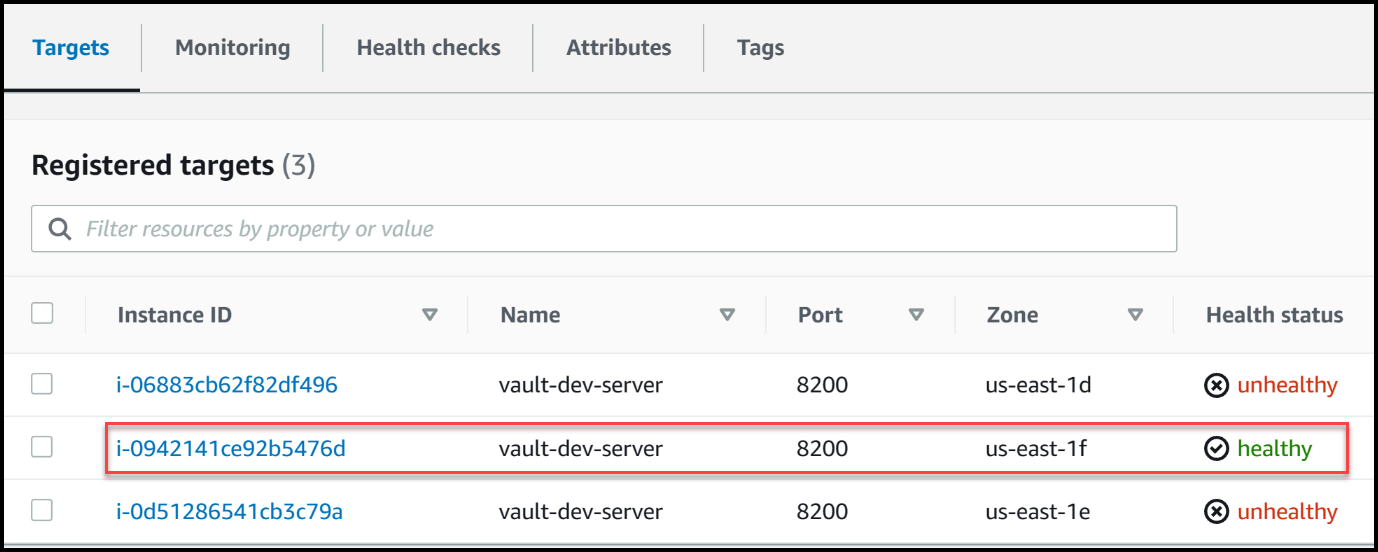
Vault server targets
To begin, we’ll navigate to our terminal and observe the load balancer targets. Currently, we can see that one node is healthy, while two nodes are marked as unhealthy. The reason for this is intentional – the healthy node responds with a status code of 200, indicating it is the active node. On the other hand, the unhealthy nodes respond with a status code of 429, highlighting their standby status. The load balancer directs traffic solely to the active node, ensuring optimal performance. This approach is desired in open-source Vault setups, as the standby or follower nodes would simply proxy traffic to the active node without providing any performance improvements.
Now, if we were to load balance across all three nodes, this would introduce a potential issue. In the event that one of the follower nodes fails, if a request happens to be directed to that specific node, failures may occur. This scenario emphasizes the importance of directing traffic exclusively to the healthy node. In our upcoming test, we will terminate one of the follower nodes and observe the behavior.
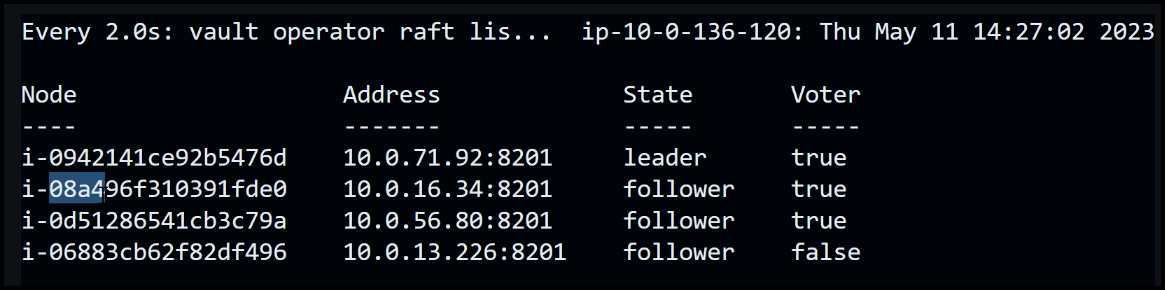
To facilitate the test, I have set up a watch command in one terminal window, which displays the Vault operator raft list output, indicating the leader and follower nodes. In another terminal window, I will run a loop that executes every second. This loop simulates continuous data read and write operations to the KV store. Specifically, it performs a put request to store a secret and then retrieves the data that was just written. The loop increments the ID for each write operation, ensuring a continuous flow of data.
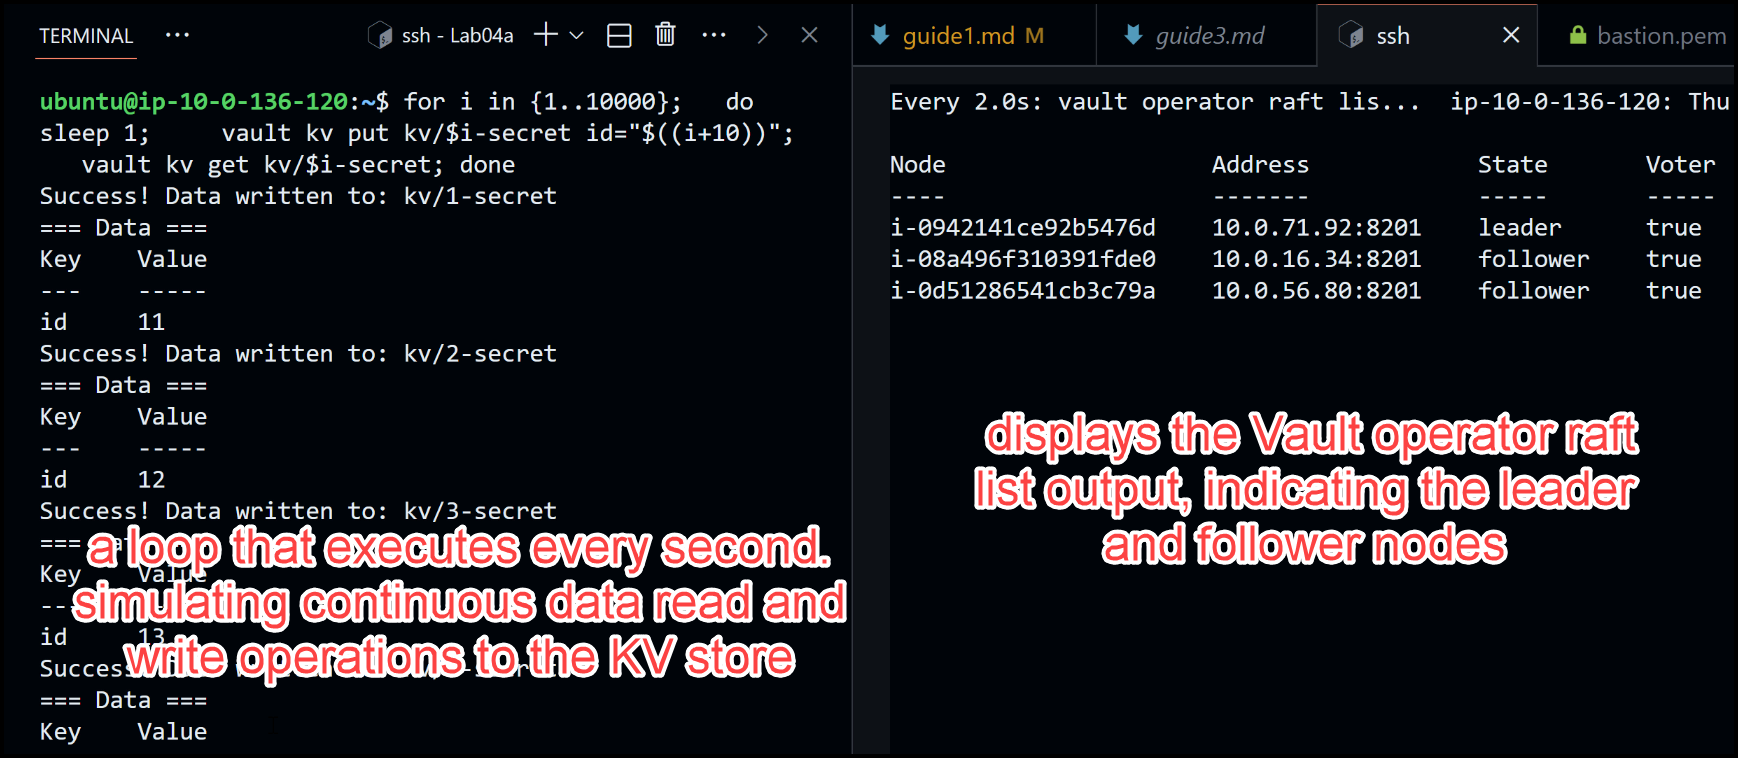
Terminal Windows Setup for testing
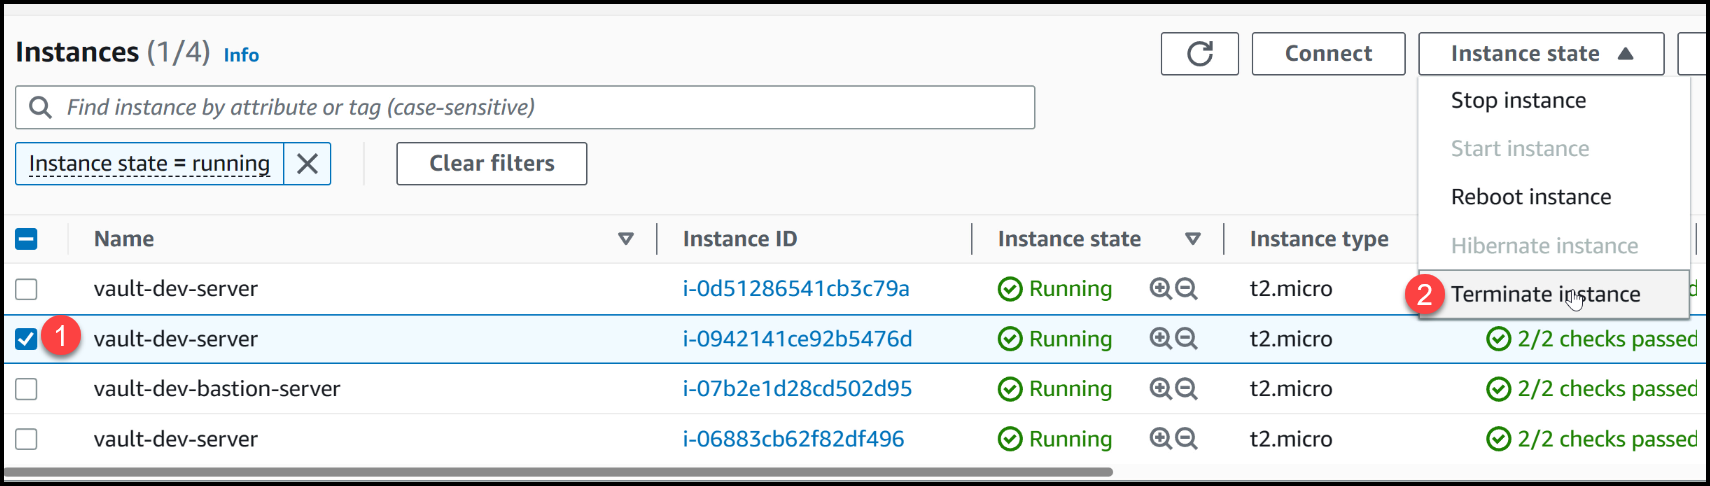
Now that the setup is ready, we can proceed with terminating one of the follower nodes. This action will provide insights into the response and resilience of our Vault cluster. Let’s terminate the follower node labeled i-08a.
By conducting this experiment, we aim to gain a better understanding of how our Vault cluster responds in real-world scenarios. The observations will provide valuable insights for ensuring high availability and effective management of Vault. Stay tuned for the results and analysis in the following sections.
Terminating a Follower Node: Observing the Effects
Now, let’s proceed with terminating one of the follower nodes and observe the consequences of this action.
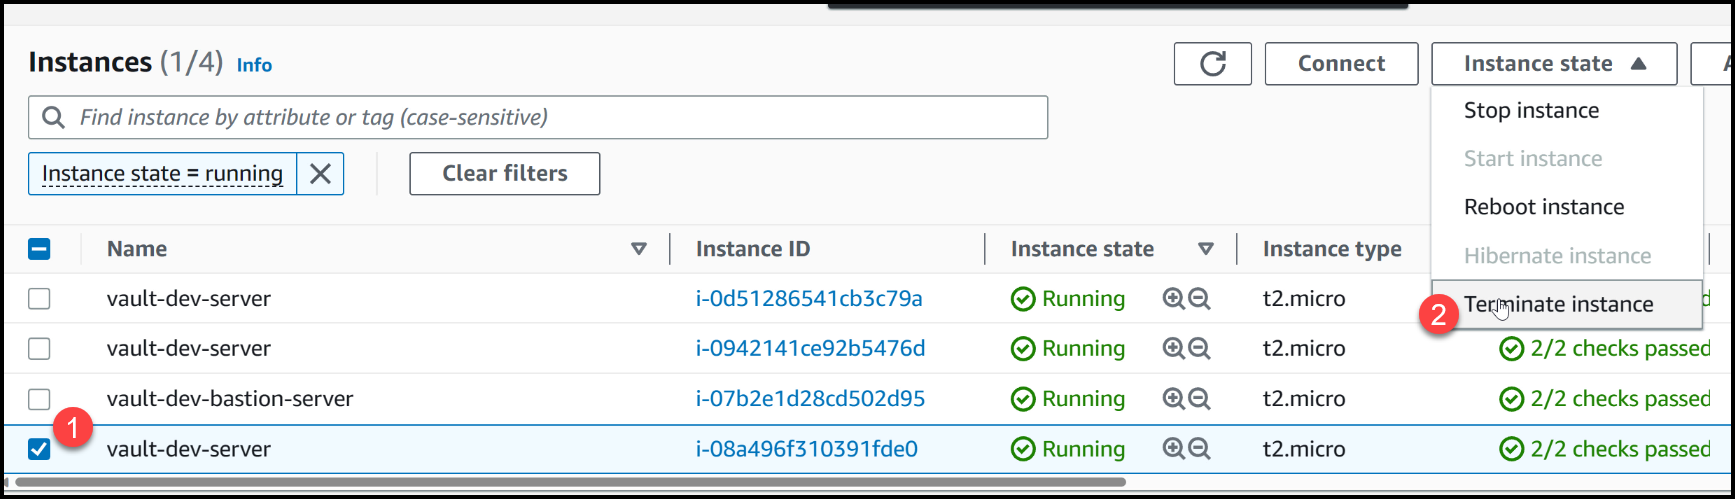
Terminate a follower
Upon termination, we will refresh the system to confirm that the node is no longer present. Let’s take a moment to review the load balancer targets.
While the termination process is underway, the health checks and timeouts come into play. The timeouts are set to five seconds, meaning it will take approximately five seconds for the load balancer to detect that the node has failed. Let’s give it some time.
The load balancer removes it from the target group, and at this point, we should not observe any changes in the client’s interaction with Vault. Everything appears to be functioning smoothly, with no disruptions in read and write operations.
One less Vault server in targets
Despite the termination of the follower node, our active node, which is still operational, continues to handle all incoming traffic, thanks to the load balancer’s routing mechanism.
The i-08a node is still visible within Vault, recognized as a follower. Once the auto-scaling group generates a new Vault node and adds it to the cluster, Vault will automatically remove this terminated follower node through the Autopilot cleanup process. This process ensures the ongoing stability and optimal performance of our Vault cluster.
In just a few seconds, we will witness the removal of the terminated follower node from the cluster, demonstrating the resilience and self-management capabilities of Vault in response to node failures. Stay tuned for the upcoming results and observations in the subsequent sections.
Autoscaling Group Recreates a Vault Node: Witnessing the Process
Now, let’s return our attention to the system and observe if the auto-scaling group has initiated its process. As we check, a new node is indeed being created. We can see that a new EC2 instance, labeled i068, is currently in the initialization phase. Let’s patiently wait for the completion of this process.
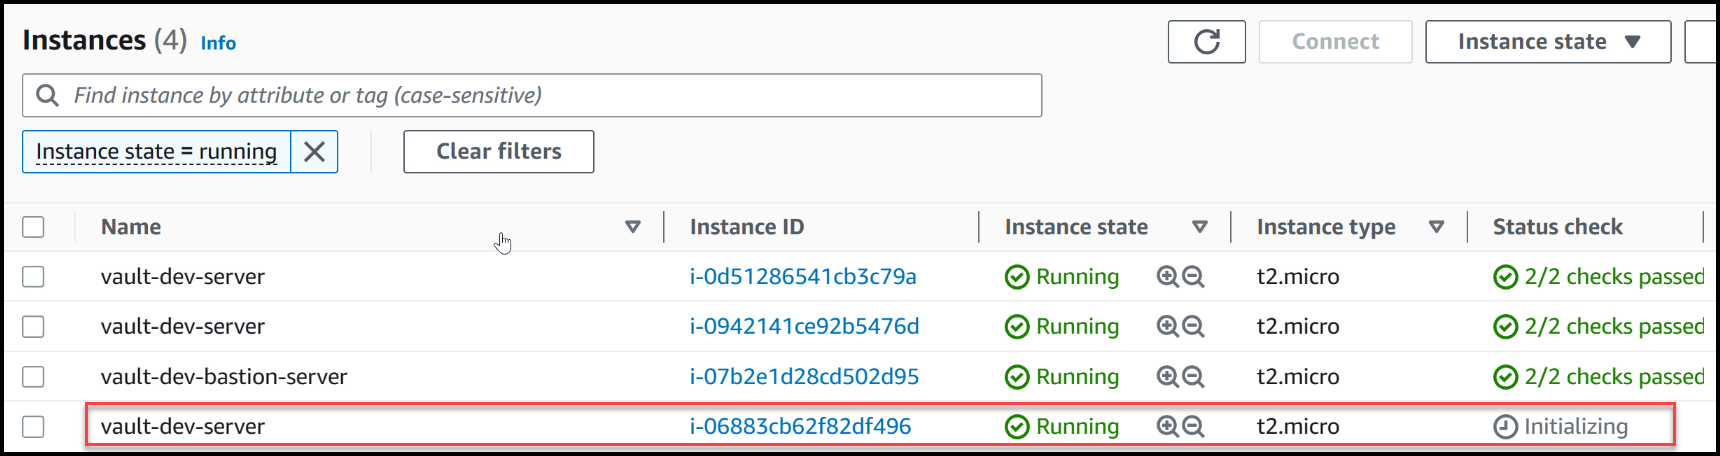
The autoscaling group spins up a new node
During this time, our traffic continues to flow smoothly, and Vault remains responsive without any issues. The existing operations are unaffected, and everything appears to be functioning optimally.
If you keep your focus on the screen, in just a few seconds, we will witness the addition of a new follower node in Vault, followed by the removal of the old node. This sequence showcases the self-healing capabilities of Vault as it seamlessly manages the cluster’s composition.
As the new node is introduced, Vault’s internal mechanisms ensure that it assumes the role of a follower within the cluster. Simultaneously, the old node, which has served its purpose, will be gracefully removed from the cluster. The speed at which these actions take place demonstrates the efficiency and agility of the auto-scaling group’s functionality.
While we continue to observe this process, it’s important to note that our next step will involve testing the impact of terminating the leader node. It is expected that an interruption in traffic will occur during this test. As the leader node is the only active node recognized by the load balancer, until a new leader is elected and starts responding with a status code of 200, the load balancer perceives all servers in the target group as unavailable. However, this interruption is brief, usually lasting under five seconds. Keep in mind that you can customize the load balancer’s configuration to adjust this duration if necessary.
As we wait for the new node to complete its initialization, it’s worth mentioning that in our current setup with Vault Open Source, the default status codes and health checks are appropriate. However, when working with Vault Enterprise, it may be beneficial to fine-tune the status codes for standby nodes, especially if you require a performance standby node capable of directly responding to read requests without proxying them to the active node.
Vault Node Added to Cluster: Welcoming the New Node
New follower node shows up in Vault
Fantastic! As anticipated, a new node has successfully joined the Vault cluster. This addition brings a fresh perspective to our cluster dynamics. Initially, the newly added node is labeled as a non-voter. However, with a little patience, we can observe its transition to a voter as it assumes its role within the cluster. Meanwhile, the previous follower node remains in place, ensuring the continuity of our operations.
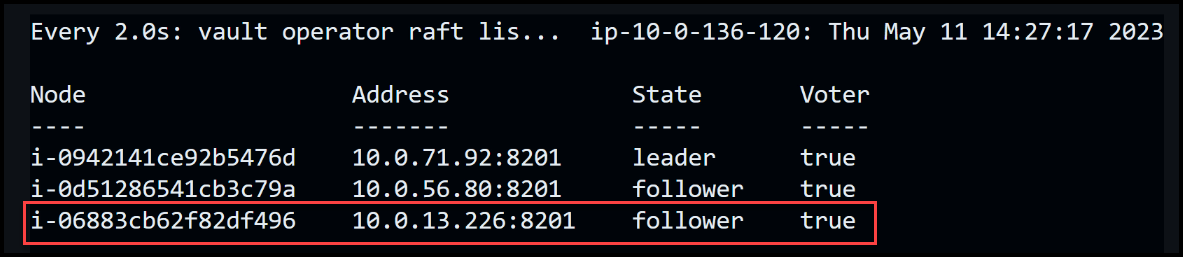
The follower is now a voter
As we give it a few more moments, the transformation occurs seamlessly. The newly added node becomes a fully functional voter, participating in the decision-making processes within the cluster. At the same time, the initial follower node, which served its purpose, gracefully disappears from the cluster. These transitions occur swiftly and reliably, thanks to Vault’s distributed consensus and cluster management mechanisms.
Now, it’s time to move forward with our experiment. As mentioned earlier, our next step involves terminating the leader node, i-0942, and examining the consequences of this action.
Let’s refresh our console and locate the target for termination, i0942. Once identified, we will proceed with terminating this specific node.
By removing the leader node from the equation, we will be able to witness how Vault responds to the absence of an active node. Keep a close eye on the subsequent events as we delve into the behavior and recovery mechanisms of Vault in the face of leader node terminations.
Terminating the Leader Node: Analyzing the Effects
With confidence, we proceed to terminate the leader node, i0942, and observe the consequences of this action.
Terminating the Leader
After initiating the termination process, we refresh our console to confirm that the node has indeed been removed from the cluster. We then direct our attention to the load balancer and notice that it still perceives the terminated node, i-0942, as healthy.
The leader is still healthy
However, as we patiently wait, we anticipate that the load balancer will eventually recognize the unavailability of the node.
As we continue observing, we notice that the load balancer initiates the draining process for the target destination, i-0942. This process signifies the load balancer’s acknowledgment of the node’s unavailability and its efforts to redirect traffic away from the terminated node.

The LB is draining the leader
During this transition period, let’s delve deeper into the system and explore its behavior.
Losing Data for 5 Seconds: An Intermittent Interruption
During the termination of the leader node, a brief interruption occurs within the system. As we closely examine the data flow, we notice that the operation fails momentarily at ID 326. However, it quickly recovers and resumes at ID 332. This temporary disruption lasts for approximately six seconds, causing a data gap for IDs 27 to 31, amounting to a five-second interval.
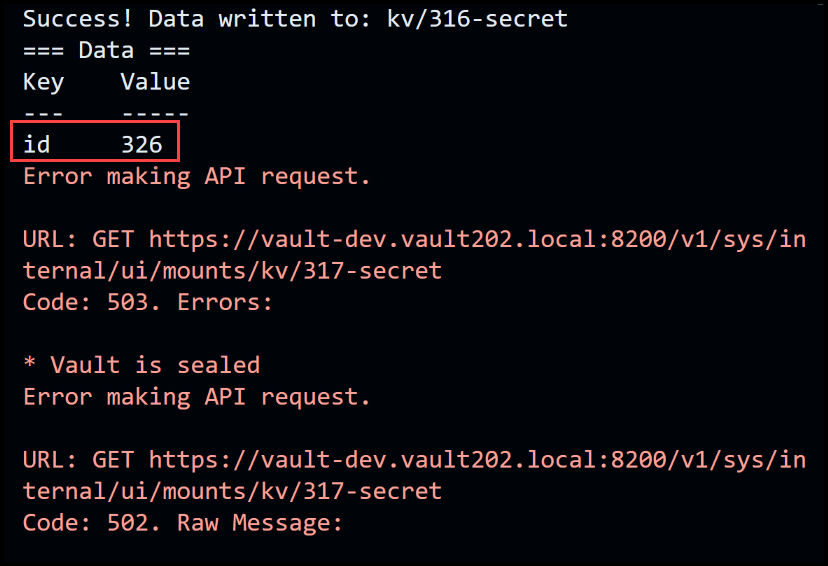
Losing data starting at id 326
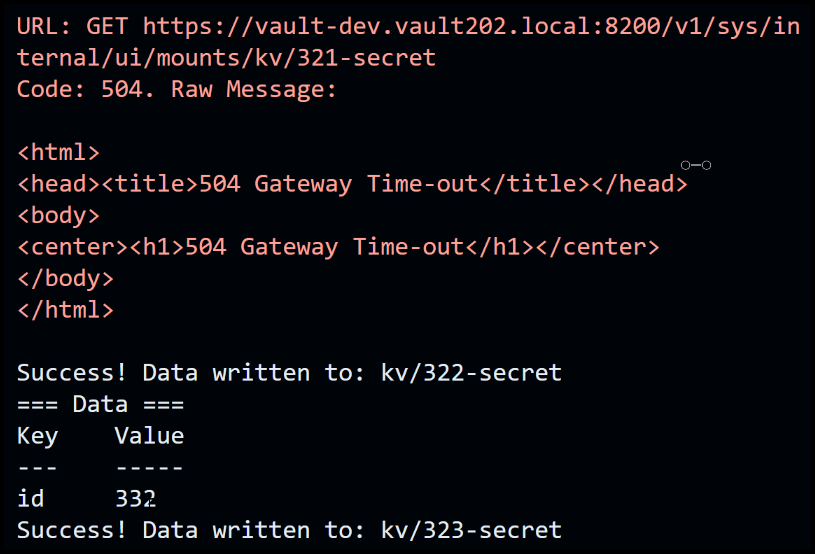
Data resumes at id 326
We observe now a new leader, labeled i-0d512, is elected to take charge of the cluster.
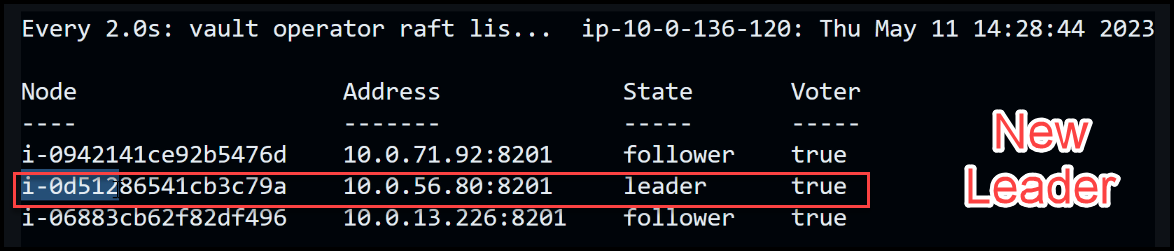
New leader is elected
Upon refreshing the health check, we can observe that the new leader, i-0d512, assumes the role of the healthy node, while the previous leader node is marked as failed. This highlights the resilience of the cluster as it adapts to the dynamic reconfiguration triggered by the termination of the previous leader node.

The Load balancer sees the new leader as healthy
In the background, the auto-scaling group is actively working to generate a replacement node, ensuring the cluster’s stability and maintaining the desired level of redundancy.

The auto-scaling group spins up another new node
It is crucial to acknowledge that while the interruption lasts for a brief period, approximately five seconds, Vault promptly recovers by electing a new leader and restoring the flow of data within the cluster. This showcases the fault-tolerant nature of Vault’s architecture and its ability to swiftly handle leader node terminations while minimizing disruptions to the overall system functionality.
5 Seconds Timeout Explained
To understand the reason behind the 5-second timeout and its impact on our cluster, let’s revisit the load balancer’s health check settings and delve into the advanced configuration options.
The timeout value of 5 seconds, specified in the advanced health check settings, plays a crucial role in determining the health status of our nodes. In this scenario, when we terminated a node, it ceased to respond to the health checks initiated by the load balancer. Consequently, after waiting for 5 seconds, the load balancer detected the absence of a response, leading it to consider the node as unhealthy. During this time the data failed to write and get read from Vault.
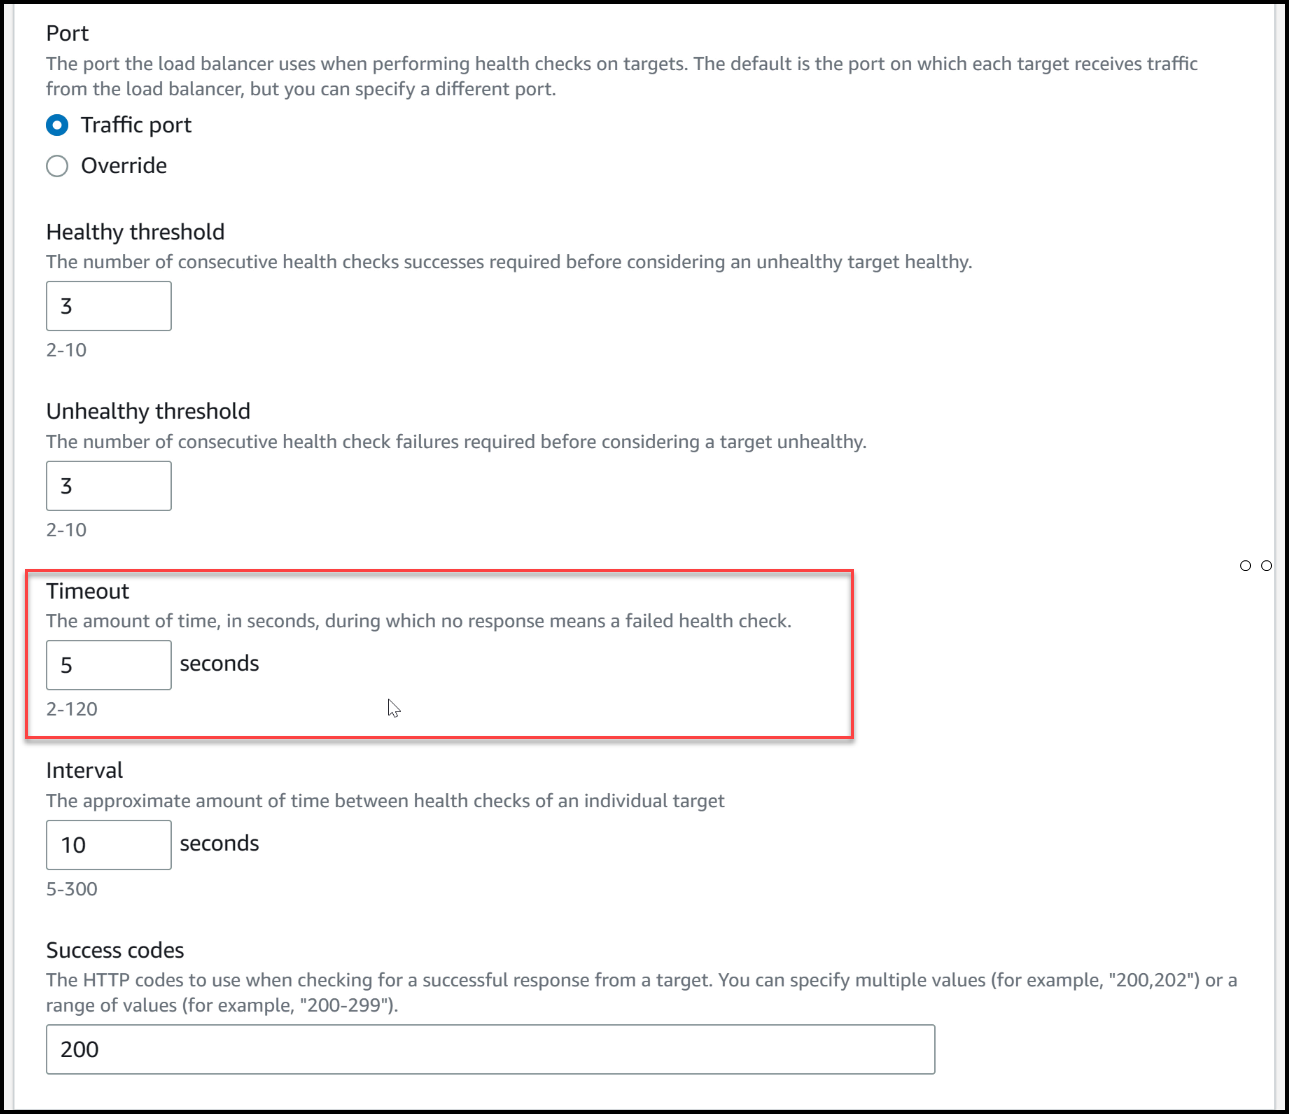
The Load balancer’s advanced settings
Meanwhile, during this 5-second interval, a new leader node was elected in a subsecond interval and started responding with status code 200. As soon as the load balancer identified the presence of a healthy node, it began redirecting traffic to the new leader. This seamless transition ensured the continuity of operations within our cluster.
Let’s proceed to explore further developments and witness the integration of the new node into our cluster, as the auto-scaling group continues to work its magic.
Vault Node added to the Cluster
As we shift our focus back to the cluster, we discover that the auto-scaling group has successfully added a new node, identified as 067, to our Vault cluster. This node is currently in the process of initialization, which allows it to seamlessly integrate into the existing cluster and contribute to its overall functionality.
While we were engaged in previous discussions, the new node completed its initialization and became an active participant in our cluster. As a result, our cluster is now composed of a leader node, and two follower nodes.
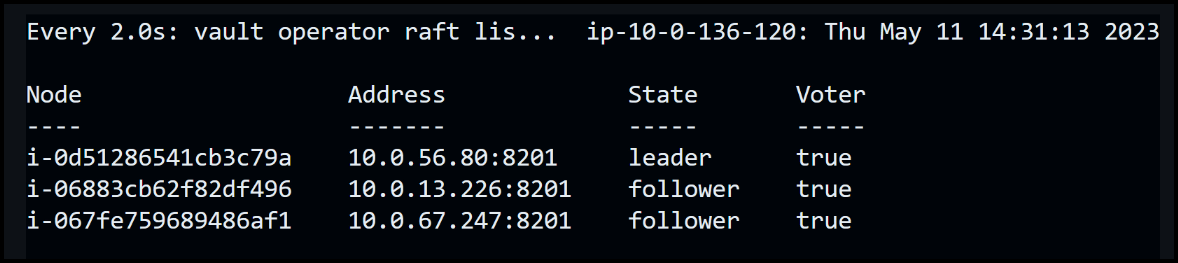
Vault’s Raft final state
Our client applications continue to read and write data without any interruptions or issues. The fault-tolerant nature of Vault ensures that our operations remain smooth and uninterrupted, even in the face of node failures or changes in cluster composition.
Conclusion
By following the steps mentioned in this blog post, you can achieve a highly available HashiCorp Vault Raft cluster, where the data is replicated and synchronized across multiple servers, allowing the service to remain operational even in the event of failures or outages.
It’s essential to recognize the significance of high availability in a Vault cluster. The implementation of the Raft consensus protocol and the auto-scaling capabilities of AWS contribute to the seamless functioning of the cluster.
We hope this demonstration has provided valuable insights into the workings of high availability in a Vault cluster, specifically within the context of the Raft consensus protocol. Stay tuned for upcoming blog posts where we’ll continue to explore Vault’s features and functionalities.
Suggested Reading
- HashiCorp Vault Backup and Restore Raft Snapshots from Kubernetes to AWS S3
- Vault Storage Backend Migration from Consul to Integrated Storage (RAFT)
- HashiCorp Vault Tutorial for Beginners