
Introduction
Video
Below is a video explanation and demo.
Video Chapters
You can skip to the relevant chapters below:
- 00:00 – Introduction
- 01:26 – Whiteboard Setup
- 04:32 – vSphere UI
- 05:49 – Terraform Cloud UI
- 07:39 – Variable Sets New to TFC
- 09:06 – Windows Server AD Domain Joined
- 10:55 – Terraform Main.tf File Walk-through
- 13:15 – Packer Used for the Template
- 14:20 – Closing
Overview
In previous blog posts, we’ve worked with the VMware vSphere provider. I’m still of the opinion that there is a lot of infrastructure automation efficiencies to be realized in on-premises environments running VMware. The appeal of Terraform is that it is cloud/platform agnostic. Once you understand how the logic works, in theory, it should be a relatively painless transition to working with a different provider. If you’re not familiar with what a provider is, think of it as a plugin into the Terraform core that allows you to talk to the API of the cloud/platform you’re provisioning on. These providers don’t necessarily need to be cloud-related. Some examples of these providers are for: Azure, GCP, AWS, VMware vSphere, Datadog, F5 networks, and so on. Many vendors build these providers to facilitate access to their APIs via Terraform.
I did some research and found that there aren’t too many terraform vSphere Windows examples out there. So I decided to create one and demonstrate it. Our aim here is to build a terraform vSphere Windows server 2019 virtual machine and add it to the few terraform vsphere provider examples available. We will also show how to join this VM to an active directory domain during the build process. So let’s get started.
Pre-requisites
The following is required to follow along:
- Terraform
- Terraform Cloud
- Access to a vSphere instance (tested on vSphere v6.7)
Setup
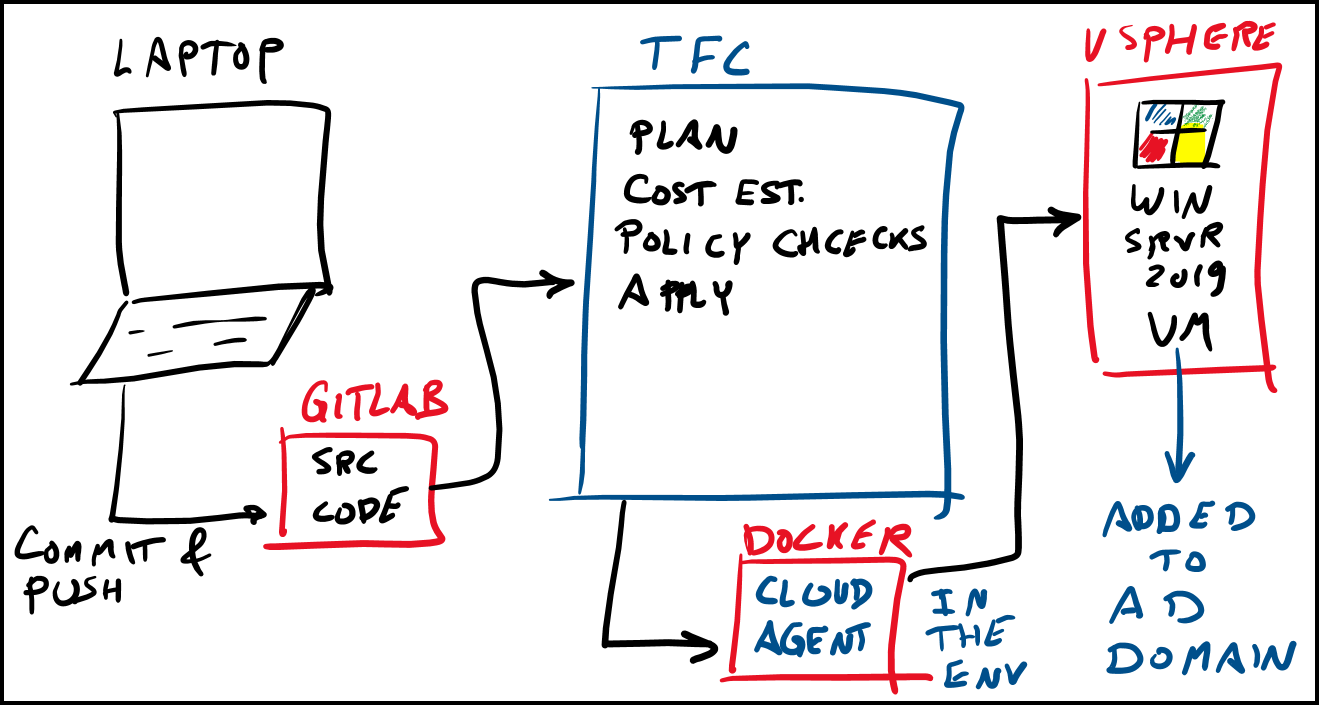
Below is our setup diagram. It is fairly straightforward. We are running Terraform on Terraform Cloud (TFC). GitLab is our version control system (VCS). We are using the VCS workflow in TFC. This allows us to commit and push code into GitLab which will automatically trigger a terraform init, plan, and apply. TFC also can provide cost estimates and run some policy checks. Since we’re provisioning on-prem, cost estimation doesn’t apply. Also, we are not creating policies in this example.
We are running a cloud agent internally in the form of a docker container. This agent polls TFC regularly asking if there is a job ready to provision. Cloud agents are a TFC business tier feature that allows us to provision on-prem without having to open a firewall inbound. You could sign up for a trial or use TFC with local execution in this example.
Setup Diagram
Terraform vSphere Windows Example Configuration
In this section, we will explore the main points in the Terraform configuration. You can get access to the full code here.
Terraform Folder Structure
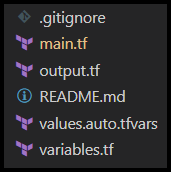
Below is a screenshot of our folder structure. It’s flat, one folder with a few files.
Terraform Initialization
In the main.tf file, we will need vSphere admin user credentials to be defined in the vsphere provider block. Basically a name and password of a vSphere user with access to vCenter to create VMs by cloning templates. These credentials are defined as variables and need to be stored securely in Terraform Cloud (TFC) encrypted at rest. If you are not using TFC and using Terraform CLI open-source or TFC local execution, then you could use a terraform.tfvars file, but make sure you don’t check that into git. My personal recommendation is to use TFC as it stores both the credentials and the state file securely in a central location.
The very first step to using Terraform is to initialize things. So if you are using the CLI, you first need to run the command terraform init to download terraform vsphere provider. If you are using TFC with the VCS workflow, upon a commit and a push, TFC will run terraform init in TFC’s own infrastructure. It will then proceed with the terraform plan and other steps shown in the video demo above.
Terraform Variables
Take a close look at the variables.tf file. You will see all the necessary Terraform variables there. These variables are referenced in the main.tf file. One example of a variable I’m using is a Terraform dns_server_list example and is found in the dns_server_list variable. Notice that we declare the variables in the variables.tf file and assign them in the values.auto.tfvars file. TFC doesn’t allow you to use a terraform.tfvars file. So you need to use a filename with this format: *.auto.tfvars.
Terraform Data Blocks
In addition to variables, we are also making use of the data blocks in Terraform. A data block allows you to retrieve data, whereas a resource block allows you to provision a resource. A couple of examples of data blocks are found in the main.tf file:
- Datacenter block
data "vsphere_datacenter" "dc" {
  name = "Datacenter"
}
Notice the first argument vsphere_datacenter is a reserved keyword used by the vSphere provider. The second one dc is an arbitrary name you can give it and will be referenced in other blocks in your Terraform configuration.
- Datastore block
data "vsphere_datastore" "datastore" {
  name          = "Datastore2_NonSSD"
  datacenter_id = data.vsphere_datacenter.dc.id
}
Notice in this datastore block we are referencing the datacenter block’s IP like this: data.vsphere_datacenter.dc.id
Terraform vSphere Virtual Machine Resource Block
The vsphere_virtual_machine resource block is what actually provisions the Windows Server 2019 VM. The configuration is straightforward and most parameters are referencing variables already defined. We also have the ability to provision multiple VMs in parallel with the count parameter. Terraform saves us time by doing so. This count parameter is referencing the vm-count variable. In my example, I’m only using a vm-count of 1, but you could change this to however many VMs you need to create at the same time. Now let’s take a look at the customization block that allows us to define a few parameters for our VM.
Terraform Customization Block
You can find the entire code here, but let’s focus our attention on the customize block for the Windows VM.
resource "vsphere_virtual_machine" "vm" {
...truncated
customize {
      windows_options {
        computer_name = "${var.vm-name}-${count.index + 1}"
        # workgroup     = "test"
        join_domain           = var.domain
        domain_admin_user     = var.domain_admin_user
        domain_admin_password = var.domain_admin_password
        admin_password        = var.local_adminpass
        # product_key           = var.productkey
        # organization_name     = var.orgname
        # run_once_command_list = var.run_once
        # auto_logon            = var.auto_logon
        # auto_logon_count      = var.auto_logon_count
        # time_zone             = var.time_zone
        # product_key           = var.productkey
        # full_name             = var.full_name
      }
      network_interface {
        ipv4_address    = var.ipv4_addresses[count.index]
        ipv4_netmask    = var.ipv4_netmasks[count.index]
        dns_server_list = var.dns_server_list
        dns_domain      = var.domain
      }
      ipv4_gateway = var.vmgateway
      timeout = 30

    }
...truncated
Notice the 3 parameters below which are essential in joining this VM to the Windows domain:
1. join_domain – Domain used for DNS and Active Directory
2. domain_admin_user – Domain username with necessary privileges to join a computer to the domain
3. domain_admin_password – Domain password with necessary privileges to join a computer to the domain
There are other parameters that you can define such as the product_key to activate Windows. You could also use a workgroup instead of a domain if that’s what you need.
Terraform Clones a Packer Generated vSphere Template
Terraform can be used to clone an existing vSphere template image. We had already created a vSphere template image with another HashiCorp tool called Packer. Packer is a great tool to speed up the creation of VM images. Similar to Terraform, Packer is cloud/platform agnostic and can be used with other clouds such as AWS, Azure, and GCP. Here is a link to learn how to use Packer to Create a Windows Server 2019 image.
Below we use a data block to call on the image already created, then we use a clone block inside the resource block to reference this template and use it to build our VM.
...truncated
data "vsphere_virtual_machine" "template" {
  name          = var.windows_template
  datacenter_id = data.vsphere_datacenter.dc.id
}
...truncated
resource "vsphere_virtual_machine" "vm" {
...truncated
clone {
    template_uuid = data.vsphere_virtual_machine.template.id
...truncated
}
Logging in as an Active Directory User
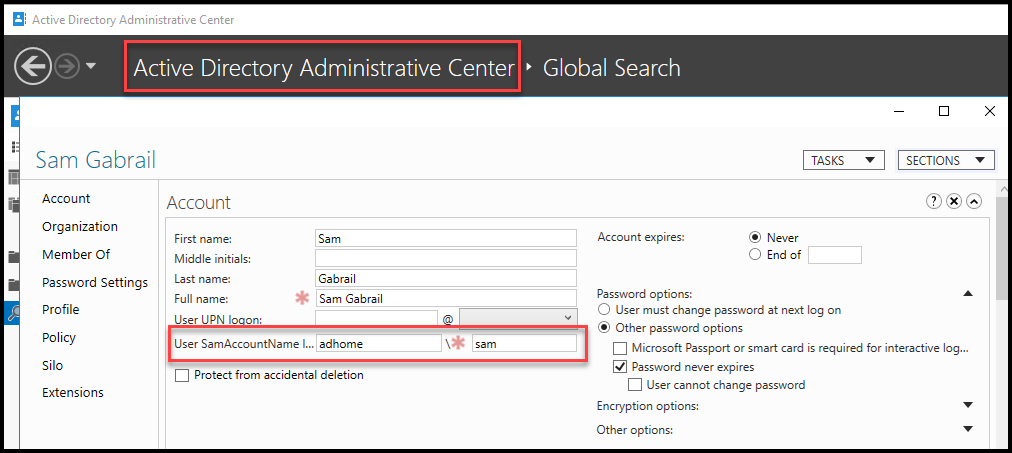
Once Terraform finishes provisioning our VM, we can move on to the next step of testing. Let’s test by logging into the new Windows Server 2019 VM using an already existing active directory (AD) user. Below is a screenshot from my domain controller showing the user sam in the domain adhome.
Active Directory User Profile
After logging into the domain with the following username: adhome\sam let’s take a look at the new Windows 2019 server information:
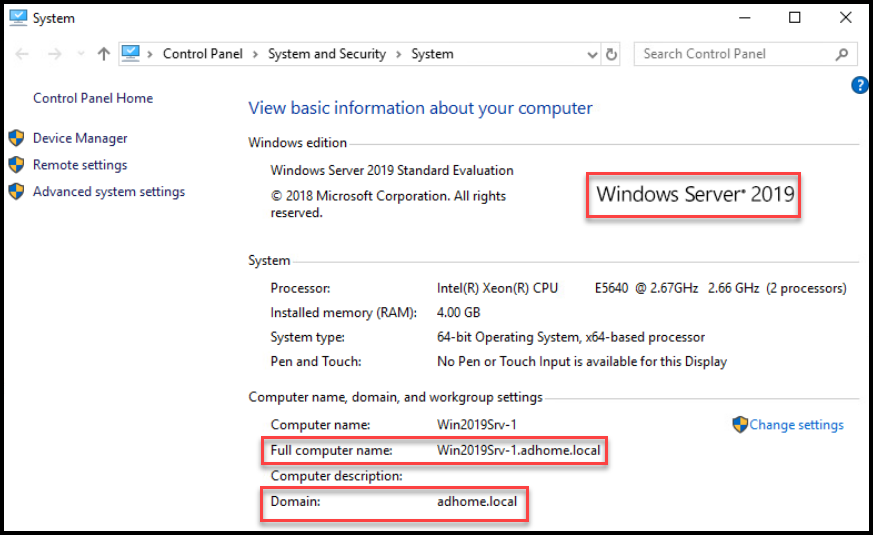
Computer Information Showing the AD Domain
As you can see in the screenshot above, our VM is successfully joined to the domain. Congratulations, you did it!
Conclusion
In this post, we learned how to build a Terraform vSphere Windows Server 2019 VM and join it to an AD Domain. We saw the benefits of using Terraform for infrastructure as code and how the process is well documented in code and repeatable. We were able to customize our VM by configuring the Computer Name, IP address, the Windows domain to join and a few other parameters.
We also used a Windows Server 2019 image that was built with another HashiCorp tool called Packer. Here is the link to learn how to use Packer to Create a Windows Server 2019 image.
If you would like to see a Linux example in VMware vSphere, we also created a post on building a Ubuntu 20.04 image in vSphere. Then another post to use this image to Build a Kubernetes k3s Cluster in vSphere with Terraform and Packer.
References
Suggested Reading
- Terraform Import Example – AWS EC2 Instance
- HashiCorp Packer for VMware Ubuntu Templates and Terraform for building VMs
- HashiCorp Packer to Build a Ubuntu 22.04 Image Template in VMware vSphere
Code
Hi and Welcome!
Join the Newsletter and get FREE access to all my Source Code along with a couple of gifts.