

Introduction
In the world of Kubernetes, ensuring compliance, security, and consistency across your clusters is paramount. This is where the BACK Stack—comprising Backstage, ArgoCD, Crossplane, and Kyverno—comes into play. In previous discussions, we’ve covered Backstage, ArgoCD, and Crossplane, providing a solid foundation for managing and deploying your Kubernetes workloads. Today, we’re diving into the final piece of this stack with a Kyverno tutorial.
Kyverno, which translates to “govern” in Greek, is a policy engine specifically designed for Kubernetes. Unlike other policy engines that require learning a new language, Kyverno allows you to write policies as Kubernetes resources, making it more intuitive for those already familiar with Kubernetes. In this guide, we’ll explore Kyverno’s architecture, delve into its top use cases—validation, mutation, and generation—and finish with a practical demo to solidify your understanding.
Video
Below is a video demonstration.
Video Chapters
- 00:00 Introduction
- 00:36 Agenda
- 02:01 Kyverno Architecture
- 03:01 Top Use Cases
- 06:11 Sponsor – UpCloud
- 06:58 Demo Starts
- 08:04 Validation
- 11:58 Mutation
- 13:35 Generation
- 15:30 Cleanup
What is Kyverno?
Let’s start our Kyverno tutorial with a bit of background. Kyverno is a Kubernetes-native policy engine that allows you to define, validate, mutate, and generate configurations for Kubernetes resources. Unlike other policy engines that necessitate learning new languages (e.g., Rego for Open Policy Agent), Kyverno integrates seamlessly into Kubernetes by using familiar YAML syntax.
Key Features of Kyverno:
- Policies as Kubernetes Resources: Define policies using standard Kubernetes YAML, eliminating the need to learn new languages.
- Resource Management: Kyverno can validate, mutate, or generate Kubernetes resources.
- Security: Verify container images and inspect metadata for enhanced security.
- Resource Matching: Utilize label selectors and wildcards to apply policies across resources.
- Admission Controllers: Kyverno interacts with the Kubernetes admission controllers to enforce policies before resources are admitted to the cluster.
- Config Synchronization: Synchronize configurations across namespaces, ensuring consistency.
- CLI Integration: Use the Kyverno CLI in CI/CD pipelines for policy testing and enforcement.
Kyverno Architecture
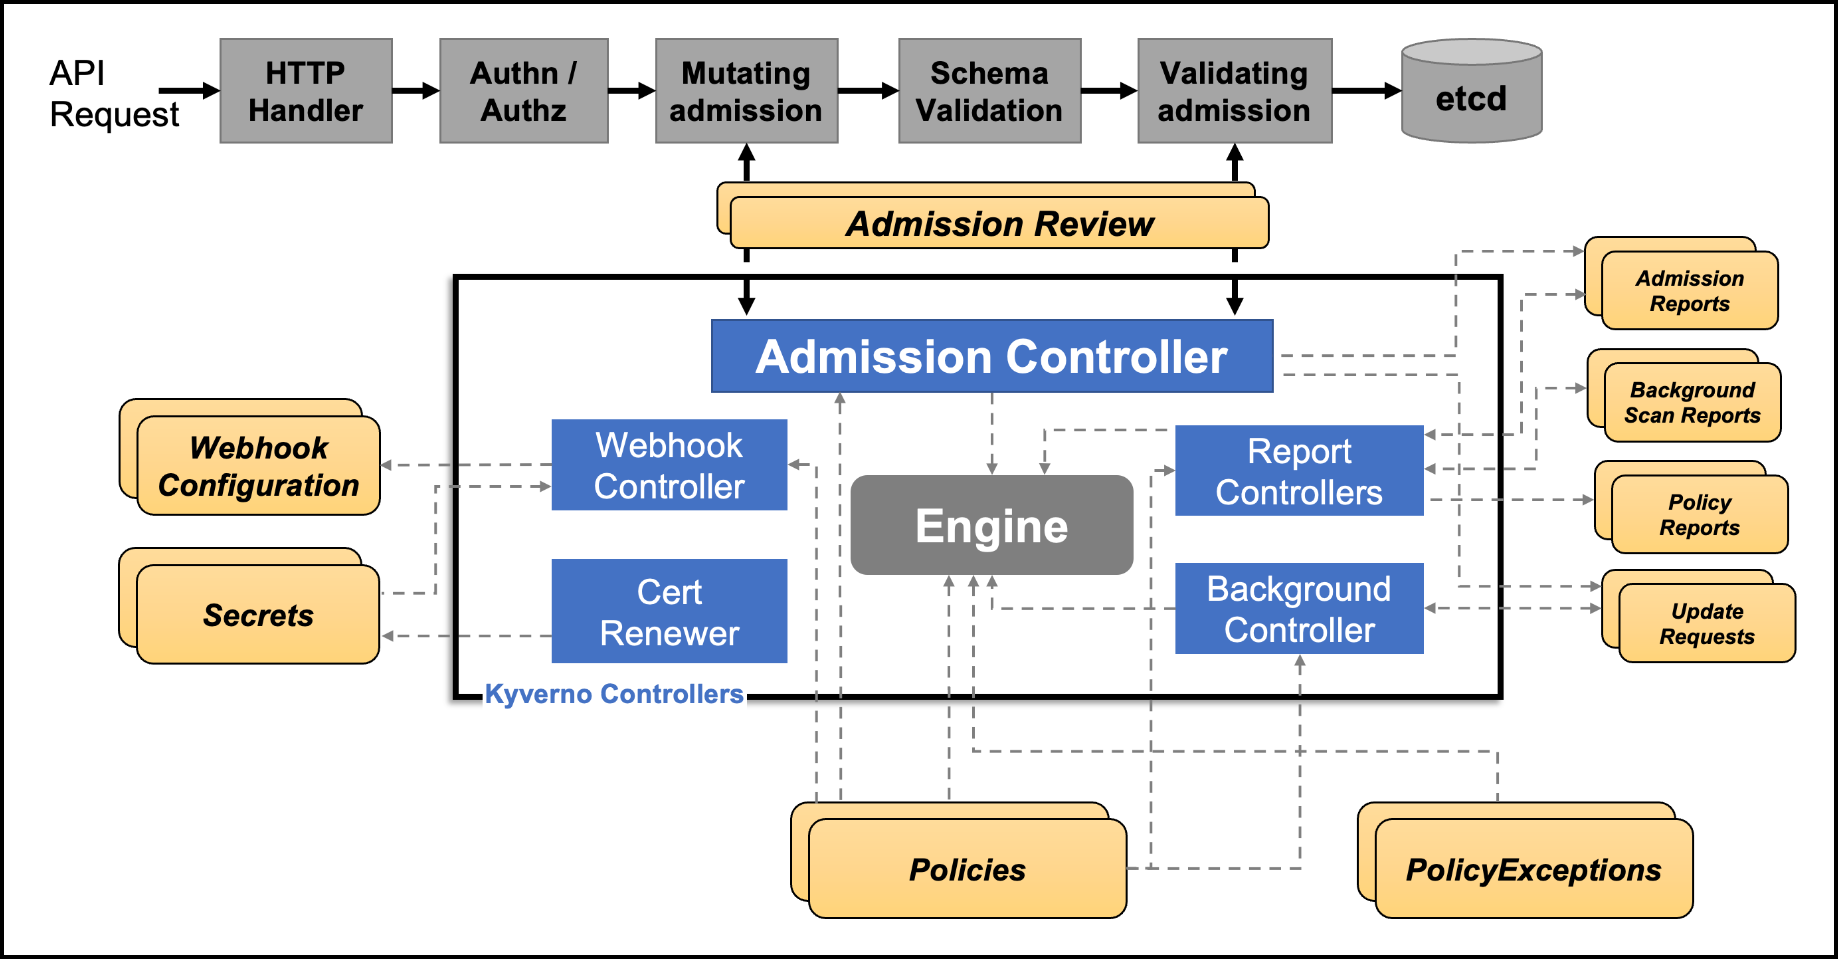
Understanding Kyverno’s architecture is crucial to grasping how it interacts with Kubernetes. When an API request is made to Kubernetes, it undergoes several stages before the resource is finally stored in the etcd database. These stages include authentication, authorization, mutating admission, schema validation, and validating admission. Kyverno integrates at the mutating admission and validating admission stages, where it applies its policies to ensure compliance.
The Workflow:
- API Request: An API request enters the Kubernetes system.
- Authentication & Authorization: The request is authenticated and authorized.
- Mutating Admission: Kyverno can mutate the resource at this stage based on predefined policies.
- Schema Validation: The resource is validated against the Kubernetes schema.
- Validating Admission: Kyverno can validate the resource to ensure it meets policy requirements.
- Admission Review: An admission controller reviews the resource, applying any final policies before the resource is admitted to the cluster.
This integration allows Kyverno to effectively validate, mutate, and generate resources, ensuring that all admitted resources comply with organizational policies.
Top Use Cases for Kyverno
Kyverno’s versatility shines through in its top use cases: validation, mutation, and generation. Let’s explore each of these in detail.
1. Validation
Validation is Kyverno’s most straightforward use case. It involves categorizing resources into two outcomes: compliant or non-compliant. Compliant resources proceed to deployment, while non-compliant resources are blocked.
2. Mutation
Mutation allows Kyverno to dynamically alter resources before they are admitted to the cluster. This feature is particularly useful for automatically adding or modifying labels, annotations, or other configurations.
3. Generation
The generation feature in Kyverno is powerful, allowing users to create new Kubernetes resources dynamically. This can be particularly useful for tasks like cloning secrets across namespaces.
Demo: Installing and Using Kyverno
Let’s now jump into the demo for our Kyverno tutorial. First we will install Kyverno and then apply the validation, mutation, and generation policies discussed above.
Installing Kyverno
Before diving into Kyverno’s capabilities, you need to install it on your Kubernetes cluster. The installation process is straightforward, leveraging Helm for ease of use.
Steps to Install Kyverno
-
Add the Kyverno Helm Repository:
helm repo add kyverno https://kyverno.github.io/kyverno/ helm repo update -
Install Kyverno:
helm install kyverno kyverno/kyverno -n kyverno --create-namespaceThis command installs Kyverno in a dedicated namespace called kyverno. For a production environment, you might consider using a high-availability setup, but for this demo, a standalone installation suffices.
-
Optional: Install Kyverno Policies: Kyverno also offers pre-defined policies that can be installed with:
helm install kyverno-policies kyverno/kyverno-policies -n kyverno
With Kyverno installed, you’re ready to start defining and enforcing policies.
Validation: Enforcing Compliance
Validation is one of Kyverno’s core features, allowing you to enforce policies that define which resources are allowed in your cluster. It operates as a binary decision mechanism—either a resource complies and is allowed, or it doesn’t and is rejected.
For example validation policies can help enforce Kubernetes Pod Security Standards, ensuring compliance and security.
Validation Policy Example
Let’s start by applying a simple validation policy that requires all Pods to have a team label.
validation_policy.yaml:
apiVersion: kyverno.io/v1
kind: ClusterPolicy
metadata:
  name: require-labels
spec:
  validationFailureAction: Enforce
  rules:
  - name: check-team
    match:
      any:
      - resources:
          kinds:
          - Pod
    validate:
      message: "label 'team' is required"
      pattern:
        metadata:
          labels:
            team: "?*"
Applying the Validation Kyverno Policies
-
Apply the Policy:
kubectl apply -f validation_policy.yaml -
Check Available Cluster Policies:
kubectl get clusterpolicyYou should see the require-labels policy listed along with others if you installed additional Kyverno policies.
-
Create a Test Namespace:
kubectl create ns kyverno-policy-tests -
Test the Policy: Try deploying a Pod without the required team label to see the validation in action.no_label_deploy.yaml:
# create an nginx deployment with no labels
apiVersion: apps/v1
kind: Deployment
metadata:
  name: nginx-deployment
  namespace: kyverno-policy-tests
  labels:
    app: nginx
spec:
  replicas: 1
  selector:
    matchLabels:
      app: nginx
  template:
    metadata:
      labels:
        app: nginx
    spec:
      containers:
      - name: nginx
        image: nginx:1.14.2
        ports:
        - containerPort: 80
          name: nginx
        imagePullPolicy: IfNotPresent
        resources:
          limits:
            cpu: "0.5"
            memory: "256Mi"
          requests:
            cpu: "0.1"
            memory: "128Mi"
Deploy this file:
kubectl apply -f no_label_deploy.yamlYou should see an error message indicating that the deployment was blocked because it lacked the required team label.
-
Fix the Deployment: Add the required label and try again.
proper_label_deploy.yaml:# create an nginx deployment with no labels apiVersion: apps/v1 kind: Deployment metadata: name: nginx-deployment namespace: kyverno-policy-tests labels: app: nginx spec: replicas: 1 selector: matchLabels: app: nginx template: metadata: labels: app: nginx team: "platform_engineering" # notice the right label here has team spec: containers: - name: nginx image: nginx:1.14.2 ports: - containerPort: 80 name: nginx imagePullPolicy: IfNotPresent resources: limits: cpu: "0.5" memory: "256Mi" requests: cpu: "0.1" memory: "128Mi"Deploy it:
kubectl apply -f proper_label_deploy.yamlThis time, the deployment should succeed.
-
Check the Policy Report:
kubectl get policyreportYou should see a report indicating that the policy was enforced, and the Pod passed the validation.
For more detailed information, you can describe the policy report:
kubectl describe policyreport <report-name>
Mutation: Dynamic Resource Modification
Mutation allows Kyverno to dynamically modify resources before being admitted to the cluster. This is useful for scenarios where you want to ensure specific configurations, such as adding labels or annotations. Kyverno annotations can be used to provide descriptive metadata for policies, enhancing their effectiveness.
Mutation Policy Example
Here’s an example policy that ensures every Pod has a team label. If a Pod is missing this label, Kyverno will add it automatically.
mutation_policy.yaml:
apiVersion: kyverno.io/v1
kind: ClusterPolicy
metadata:
  name: add-labels
spec:
  rules:
  - name: add-team
    match:
      any:
      - resources:
          kinds:
          - Pod
    mutate:
      patchStrategicMerge:
        metadata:
          labels:
            +(team): bravo
Applying the Mutation Policy
-
Apply the Mutation Policy:
kubectl apply -f mutation_policy.yaml -
Deploy a Pod Without a Team Label: Use the following manifest for a Redis Pod:
redis.yaml:apiVersion: v1 kind: Pod metadata: name: redis-pod spec: containers: - name: redis image: redis:latest ports: - containerPort: 6379Apply it:
kubectl apply -f redis.yaml -
Check the Pod for the Mutated Label:
kubectl get pod redis-pod --show-labelsThe output should show that Kyverno has added the team=bravo label.
-
Test with an Existing Label: Deploy another Pod with an existing team label to see that Kyverno does not override it:
kubectl run newredis --image redis -l team=alphaCheck the labels:
kubectl get pod newredis --show-labelsThe team=alpha label should remain unchanged, demonstrating that Kyverno only adds the label if it’s missing.
Generation: Automating Resource Creation
Generation is one of Kyverno’s most powerful features, enabling the creation of new resources automatically. This is particularly useful for tasks like synchronizing secrets across namespaces.
Generation Policy Example
Consider a scenario where you want to ensure that a Docker registry secret is available in every namespace. Kyverno can automate this process by generating the secret in new namespaces based on a template from an existing namespace. This can help to ensure software supply chain security is adhered to.
registry_secret_policy.yaml:
apiVersion: kyverno.io/v1
kind: ClusterPolicy
metadata:
  name: sync-secrets
spec:
  rules:
  - name: sync-image-pull-secret
    match:
      any:
      - resources:
          kinds:
          - Namespace
    generate:
      apiVersion: v1
      kind: Secret
      name: regcred
      namespace: "{{request.object.metadata.name}}"
      synchronize: true
      clone:
        namespace: kyverno-policy-tests
        name: regcred
Applying the Generation Policy
-
Create a Docker Registry Secret:
registry_secret.yaml:apiVersion: v1 kind: Secret metadata: name: regcred namespace: kyverno-policy-tests type: kubernetes.io/dockerconfigjson data: .dockerconfigjson: eyJhdXRocyI6eyJteWludGVybmFscmVnLmNvcnAuY29tIjp7InVzZXJuYW1lIjoiam9obi5kb2UiLCJwYXNzd29yZCI6IlBhc3N3MHJkMTIzISIsImVtYWlsIjoiam9obi5kb2VAY29ycC5jb20iLCJhdXRoIjoiYW05b2JpNWtiMlU2VUdGemN6QjNjbVF4TWpNaCJ9fX0= -
Apply the Generation Policy:
kubectl apply -f registry_secret_policy.yaml -
Create a New Namespace:
kubectl create ns mytestns -
Check the Secret in the New Namespace:
kubectl -n mytestns get secretYou should see the regcred secret, which Kyverno automatically generated based on the source secret in the kyverno-policy-tests namespace.
Kyverno will also keep this secret synchronized across all namespaces, ensuring consistency. Kyverno can be used to generate resources across various Kubernetes environments, ensuring consistency and security.
Cleanup: Removing Kyverno Resources
After testing, it’s essential to clean up the resources created during the demo to avoid cluttering your Kubernetes cluster. Cleaning up ecosystem resources is important to maintain a healthy environment.
Cleanup Commands
- Delete the Test Namespaces:
kubectl delete ns kyverno-policy-tests kubectl delete ns mytestns - Delete the Policies:
kubectl delete -f registry_secret_policy.yaml
kubectl delete -f mutation_policy.yaml
kubectl delete -f validation_policy.yaml
Kyverno offers a wide array of policies, and cleaning up unused policies is important to maintain a healthy environment.
If you wish to remove Kyverno itself, you can uninstall it using Helm:
helm uninstall kyverno --namespace kyverno
Conclusion
Congratulations! You’ve successfully explored the key features of Kyverno—validation, mutation, and generation—using practical examples. With Kyverno, you can enforce policies, automate resource creation, and dynamically modify configurations, all within the familiar Kubernetes ecosystem. This makes Kyverno an invaluable tool for maintaining governance, security, and operational efficiency in your Kubernetes clusters.
Kyverno is an incredibly powerful tool for managing Kubernetes policies. Whether you need to enforce compliance, ensure security, or automate resource management, Kyverno provides a native, intuitive solution. By integrating seamlessly with Kubernetes and using familiar YAML syntax, Kyverno empowers organizations to maintain control over their clusters with minimal overhead.
Thank you for reading, and I hope this Kyverno tutorial has given you a solid understanding of Kyverno and how it can benefit your Kubernetes deployments. Stay tuned for more in-depth tutorials and guides on managing your Kubernetes infrastructure.
Additional Resources:
Suggested Reading
- What Is Backstage: Your Ultimate Guide To Streamlining Developer Tools
- Powerful Backstage Templates | An EKS & Terraform Example
- Argo CD and HashiCorp Vault: How to Secure Kubernetes Deployments
- Crossplane Tutorial: Easy Steps to Master Kubernetes Clusters
- Crossplane: Unveiling a New Horizon in Cloud Infrastructure Management
- Build an IDP with Backstage, Crossplane, ArgoCD, GitHub Actions, K8s, and vCluster
Code
Hi and Welcome!
Join the Newsletter and get FREE access to all my Source Code along with a couple of gifts.