
Introduction
Hey there, folks! Today, we’re diving deep into the world of Backstage Software Templates. If you’ve ever struggled with setting up new projects, you’re gonna love this. Stick around, and you’ll learn how to save time and keep your codebase consistent. Not only that, you’ll see how to run a GitHub Actions pipeline to generate an EKS cluster via Terraform all from a Backstage Software Template.
Video
Below is a video explanation and demo.
Video Chapters
You can skip to the relevant chapters below:
-
00:00 – Intro with Animation
-
05:29 – Demo Starts
-
09:18 – Detailed Explanation
-
18:18 – EKS Cluster Created
-
19:58 – Final Remarks
Understanding Backstage Software Templates
Backstage software templates are the lifeblood of software projects. Imagine not having to reinvent the wheel every time you start something new. That’s what these templates are here for. They’re customizable, reusable, and incredibly handy. You can now as a Platform Engineer, enable your developers to scaffold new applications while maintaining governance. Side note, have you heard of Cloud Development Environments (CDEs)? Check my blog on Coder.. So let’s unpack what this all means. What is Backstage.io?
Before diving into the specifics of software templates, it’s essential to understand what Backstage is. Developed by Spotify and open-sourced for the broader community, Backstage serves as a developer portal that provides a unified view of all your software documentation, resources, and tooling. It’s a one-stop shop that helps you manage, monitor, and document your software ecosystem, reducing cognitive load and speeding up development.
Key Features of Backstage Software Templates
- Standardization
Software templates allow for the standardization of the code base across multiple projects. By using templates, you can ensure that every project follows best practices, reducing code smells and maintenance costs in the long term. - Extensibility
Backstage is designed to be extensible. This philosophy extends to its software templates, which can be customized to fit your organization’s unique needs. - Version ControlTemplates in Backstage are version-controlled, meaning that teams can adopt new changes progressively without affecting existing projects.
- Multi-step Templating
Backstage supports multi-step templating, allowing you to use different tools and templating languages in your workflow. This ensures that your template can be as simple or as complex as necessary.
- Parameterization
Software templates support parameterization, allowing developers to input specific variables during the creation process, like service names, paths, or any other custom metadata.
- Automatic CI/CD Integration
Backstage seamlessly integrates with various CI/CD solutions, making it possible to automate the entire software delivery process, right from template instantiation.
Core Components of Software Templates
So you’re amped up about Backstage Software Templates. But what makes a template tick? That’s what we’re going to look into in this section. Grab a coffee or your beverage of choice, and let’s go.
Template Metadata: What Is It and Why Does It Matter?
What is Template Metadata?
First off, let’s get into template metadata. Think of it like your template’s DNA or its blueprint. It’s the set of data that outlines what your template is about, what it does, and how it should behave. In Backstage, this is typically configured in a YAML file. Here you specify everything from the template title to service parameters and more.
The Importance of Metadata
Now, why is this so critical? For starters, metadata dictates the template’s behavior in your software catalog. It specifies component metadata such as the service type, ownership, and lifecycle stage, among others. This is crucial for searchability, organization, and governance of your templates within Backstage.
Software Components in Backstage
Understanding Software Components
Alright, next on our list: software components. If metadata is the blueprint, software components are the bricks and mortar of your projects. In Backstage, a software component can be anything from a microservice, a data pipeline, or even a library.
How They Fit in a Template
Software components are usually defined within the template metadata, and they become the primary units that the template will create or modify. You specify these in your YAML file under name properties or core type, depending on what exactly you’re setting up.
The Role of Components in Software Projects
These components are the modular pieces that will make up your entire application or service. They are pivotal in maintaining a consistent architecture across different projects. Also, by defining these in your templates, you ensure that new projects or services spun off from these templates follow the same best practices and architectural guidelines.
Template Input: Making Your Templates Dynamic
Let’s see how to enable our developers to use template inputs.
Form Input Parameters: Let the User Choose!
What Are Form Input Parameters?
Form input parameters, or what you might call ‘plain input,’ are the questions your template asks when someone wants to create a new component or service. Whether it’s the service name, the GitHub username, or even custom fields like environment variables, form input parameters let the user customize the new project to their liking.
Why do They Matter?
Imagine this: You want to create a new microservice, and the template asks you about the scale, the tech stack, and other essentials. These form input parameters then translate into template variables that your template uses to create a personalized instance. Pretty cool, huh?
Template Variables: The Building Blocks of Dynamism
What Are They?
Template variables are, in essence, the placeholders in your template. They get replaced by the actual values that the user inputs. These variables could be anything from the repository location type to log input settings. They’re your tool for making each new project or component uniquely configured.
Where to Define Them?
These variables are generally defined in your YAML file within the template metadata. When the template runs, these variables get populated with the real deal, based on user input or other dynamic sources.
Leveraging Template Variables for Greater Flexibility
The real magic happens when you leverage these template variables across multiple aspects of your software projects. Need to link a new component to an existing repository? Use a template variable for the repo URL. Want to have conditional pull request logic based on the tech stack chosen? Template variables are your best friend here too.
Demo: Building a Nodejs App using Backstage Template
This is where the rubber meets the road, folks. We’re going to build an EKS cluster using Terraform and Terraform Cloud. And guess what? We’re triggering all this with a GitHub Action. The best part is that developers can get this all by filling out the form generated by our template. No need for them to learn Terraform.
Setting Up the Environment
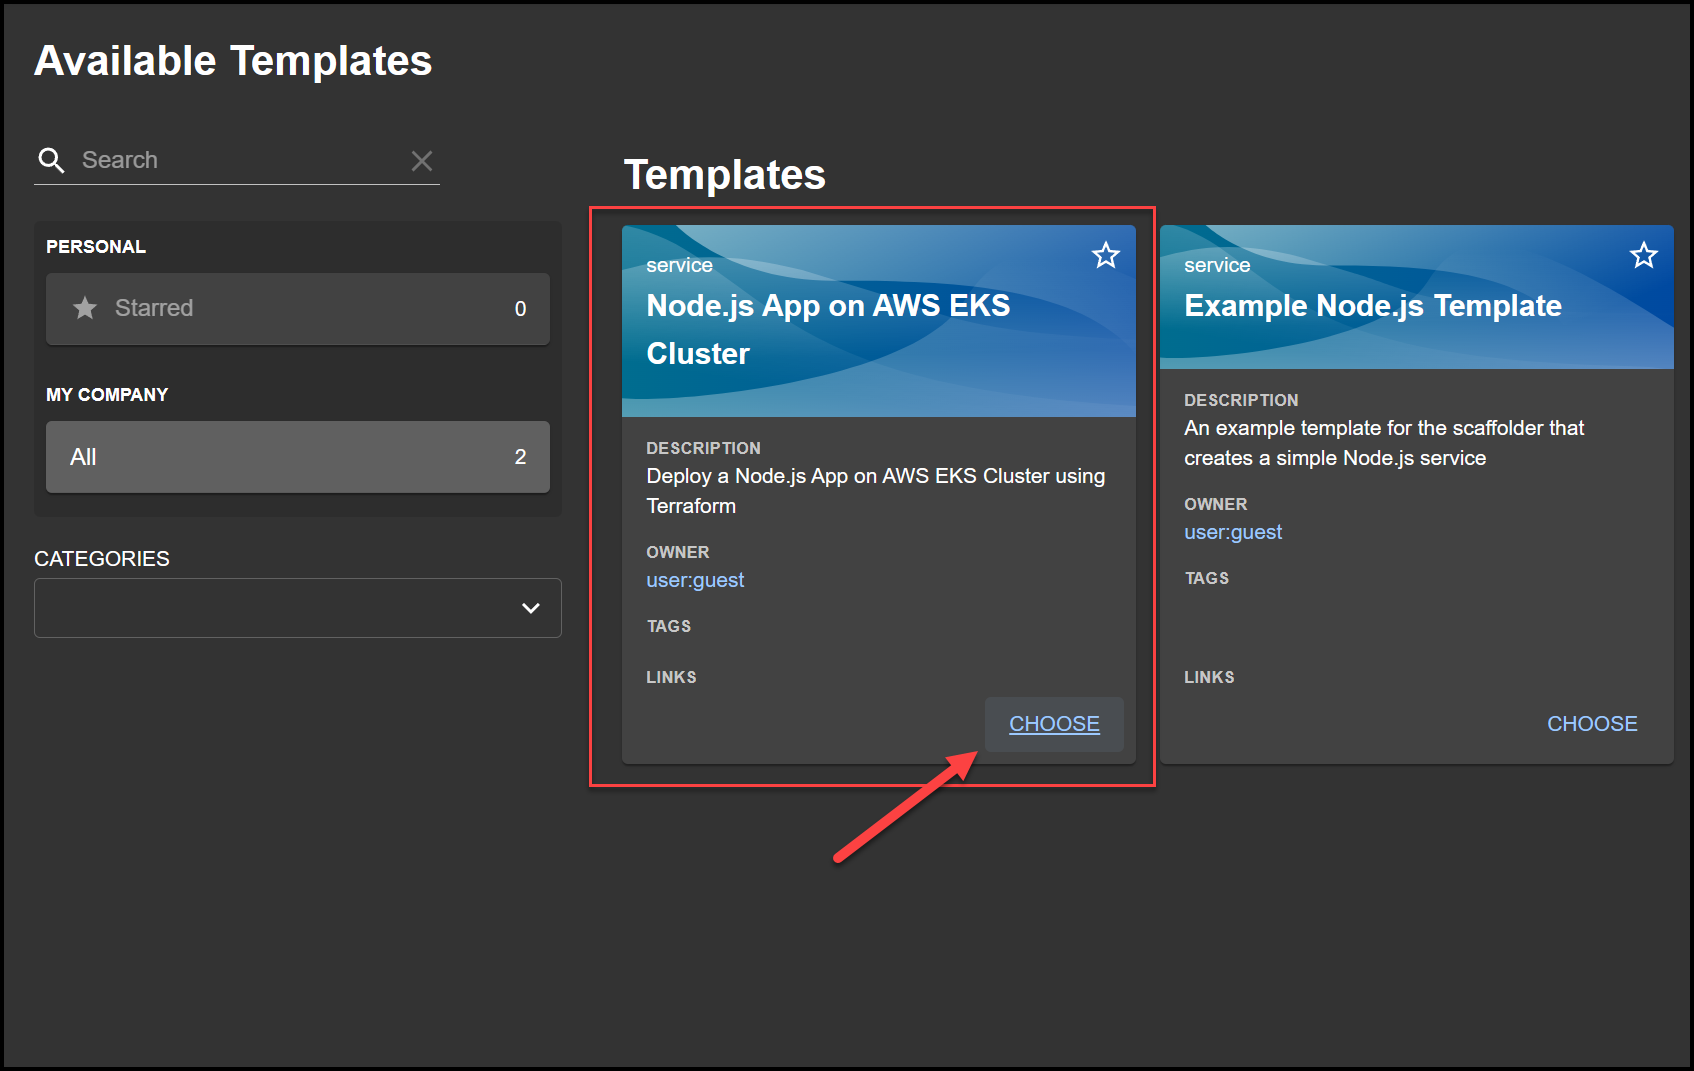
First things first, let’s see the usage from a developer’s perspective. Fire up your Backstage app. Click on Create and you’ll be greeted with various templates you’ve got set up. We’re interested in a specific one that spins up a Node.js app and an AWS EKS cluster using Terraform. Hit that Choose button to get started.
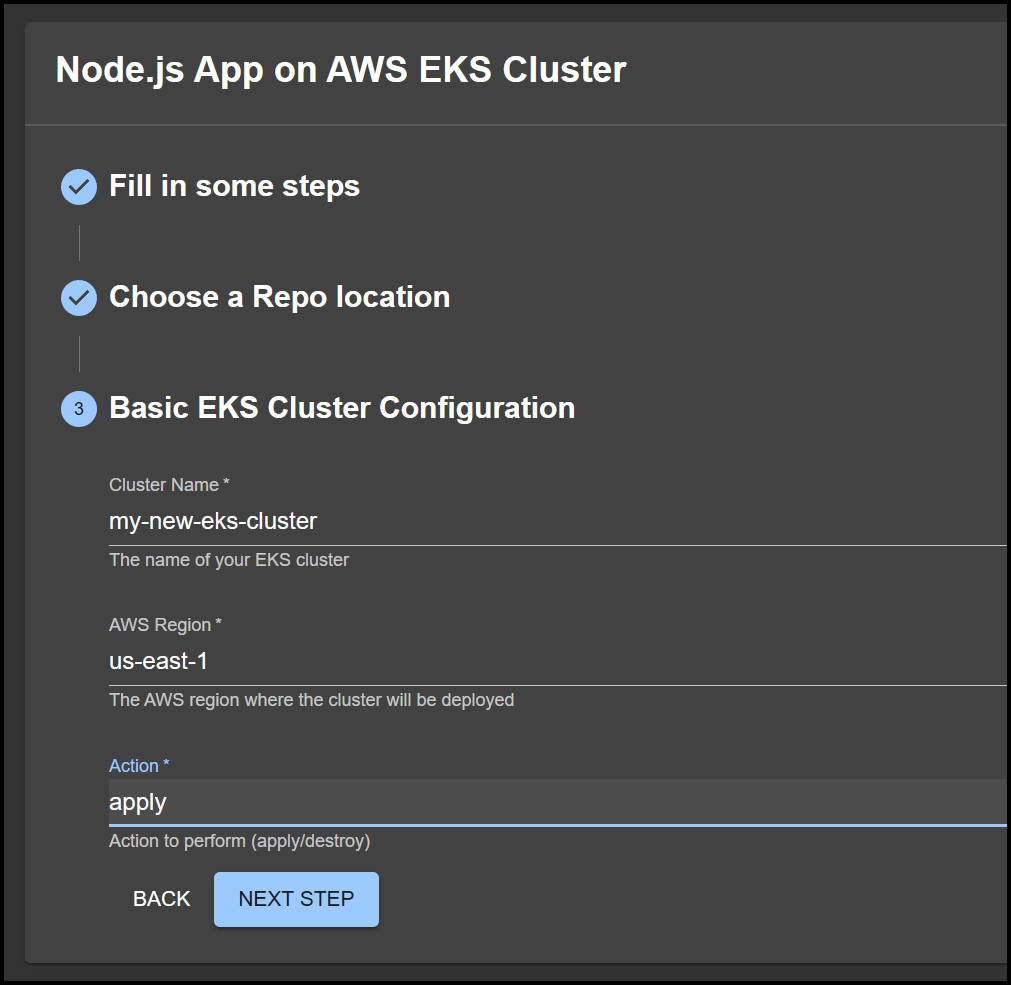
Filling Out the Form
It’s just a simple form to get your app running.
- Name your app (**node-app-eks **for example).
- Choose a repo location and name it the same as your app (node-app-eks).
- Provide your cluster details such as cluster name (my-new-eks-cluster) and AWS region.
Behind the Scenes
After you hit Create, Backstage does all the magic for you. You’ll get:
- A new GitHub repository with essential files (index.js, package.json, and catalog-info.yaml).
- A running GitHub Actions workflow that sets up your EKS cluster.
Checking the Status
Go back to your Backstage UI, you’ll see your new app or component listed there. For curious minds, you can even see the status of your EKS cluster being set up in real-time.
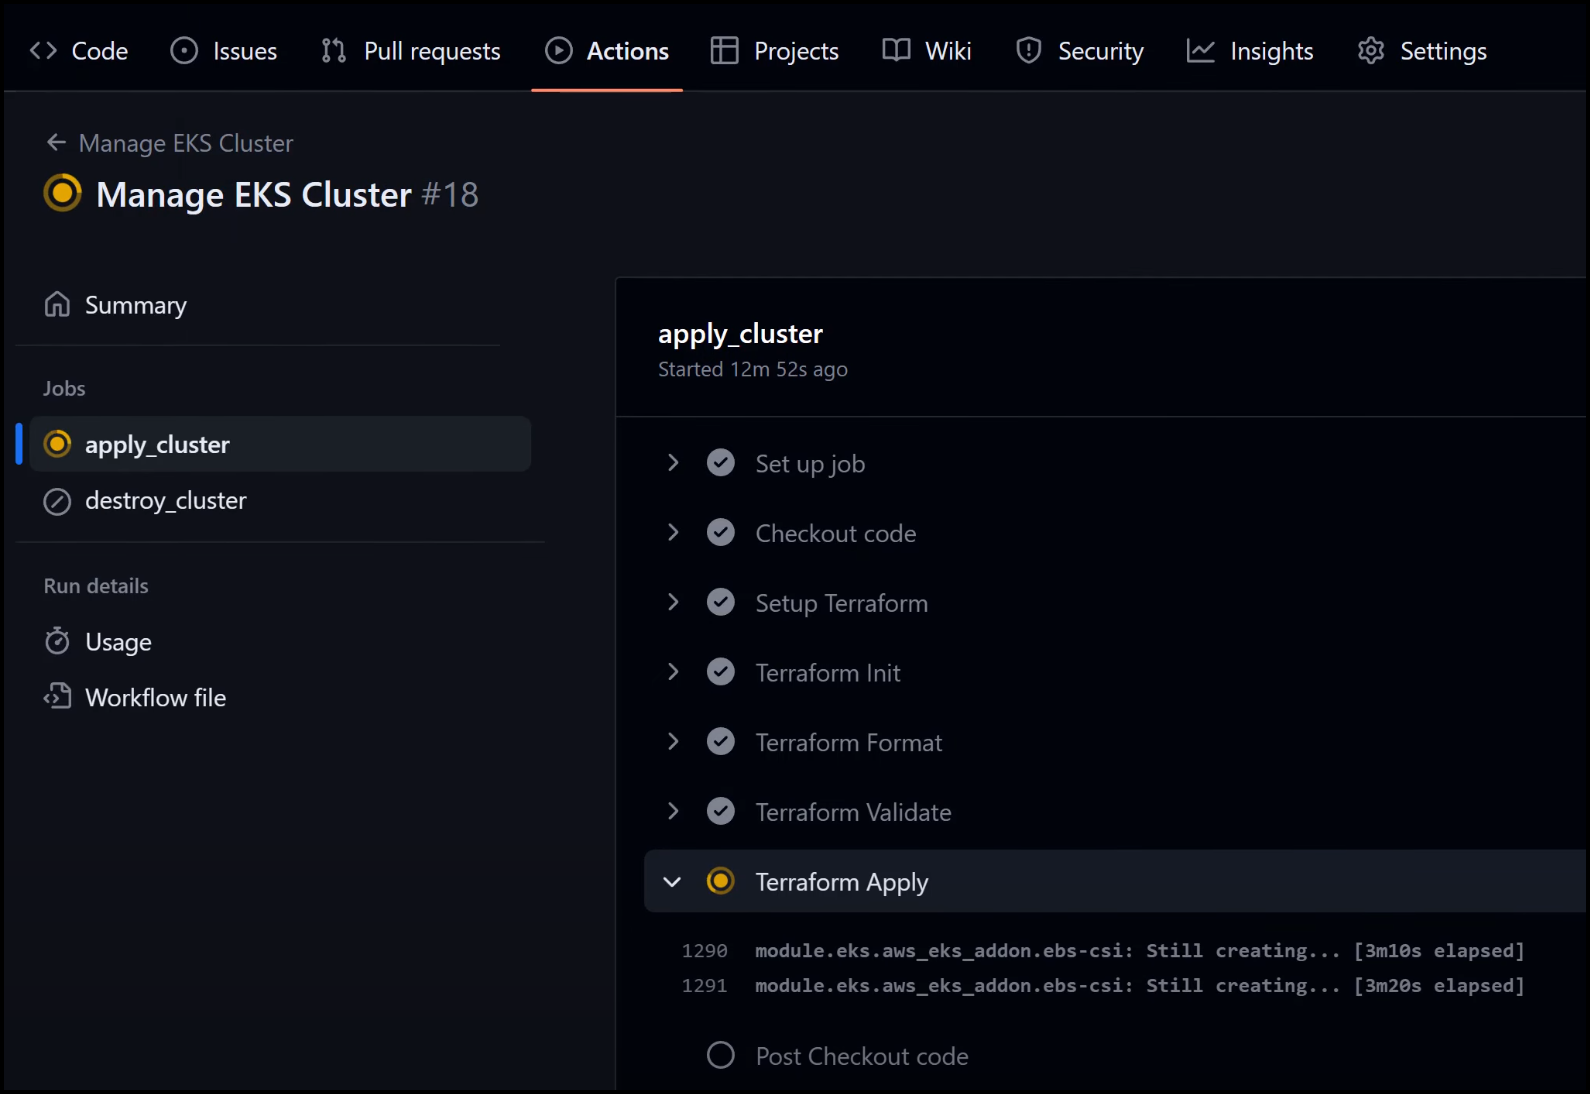
Monitoring the Build Process
From a platform engineer’s perspective, you can also check the GitHub Actions and Terraform Cloud to see how things are progressing.
Deep Dive into the Template Configuration
For those geeking out on how all of this is set up, take a look at the template.yaml file in your Backstage repo. It’s a Kubernetes-like manifest that sets the steps for what happens when you create a new app. Let’s break it up into bite size pieces.
The Metadata: Meet Your Template
metadata:
  name: eks-cluster
  title: Node.js App on AWS EKS Cluster
  description: Deploy a Node.js App on AWS EKS Cluster using Terraform
This is the template metadata. You got your name, title, and description all laid out. It’s the “Hey, look at me! Here’s what I can do!” part of your template.
User’s Choices: The Template Input
parameters:
  - title: Fill in some steps
    required:
      - name
    properties:
      name:
        title: App Name
        type: string
  # ...other parameters
Here’s where input for our template gets real. The user has to fill in a couple of details. The first one is the app name.
More Template Input: Choose Your Adventure
- title: Choose a Repo location
  required:
    - repoUrl
  properties:
    repoUrl:
      title: Repository Location
      type: string
      ui:field: RepoUrlPicker
      ui:options:
        allowedHosts:
          - github.com
Setting the repository location is crucial. Are you using GitHub input or some other repository? No worries, we’ll specify all this here.
Basic EKS Cluster Configuration: Tailor It to Your Needs
- title: Basic EKS Cluster Configuration
  required:
    - clusterName
    - region
    - action
  properties:
    clusterName:
      title: Cluster Name
      type: string
  # ...other properties
You’re not just launching an EKS cluster. You’re customizing that bad boy. You got form input parameters for the cluster name, AWS region, and actions like apply or destroy.
The Steps: Doing the Actual Work
steps:
  - id: fetch-base
    name: Fetch Base
    action: fetch:template
    input:
      url: ./content
      values:
        name: ${{ parameters.name }}
  # ...other steps
This is where the magic happens. These are **scaffolder backend steps, **also known as template actions, that fetch templates, publish to GitHub, and even trigger GitHub actions.
Output: What You Get in the End
output:
  links:
    - title: Repository
      url: ${{ steps['publish'].output.remoteUrl }}
    - title: Open in catalog
      icon: catalog
      entityRef: ${{ steps['register'].output.entityRef }}
After all the magic is done, what do you get? A created repository, a new component registered in your catalog, and a new shiny EKS cluster. Pretty slick. Now let’s bring everything together with our demo.
Below is the complete template.yaml file for you:
# Define the API version and kind of resource
apiVersion: scaffolder.backstage.io/v1beta3
kind: Template

# Template metadata. Here's your intro to what this template does.
metadata:
  name: eks-cluster
  title: Node.js App on AWS EKS Cluster
  description: Deploy a Node.js App on AWS EKS Cluster using Terraform

# The specification for how the template behaves
spec:
  # Who owns this template. Generally, it could be a team or individual
  owner: user:guest
  # The type of service this template deploys
  type: service

  # User-input parameters. Makes your templates dynamic!
  parameters:
    # Ask the user to input some basic app details
    - title: Fill in some steps
      required:
        - name
      properties:
        name:
          title: App Name
          type: string
          description: Unique name for your app
          ui:autofocus: true  # This field gets auto-focused in UI
          ui:options:
            rows: 5  # Number of rows in the input area

    # Ask the user where they want to store the code
    - title: Choose a Repo location
      required:
        - repoUrl
      properties:
        repoUrl:
          title: Repository Location
          type: string
          ui:field: RepoUrlPicker  # A special UI component for selecting repo URLs
          ui:options:
            allowedHosts:
              - github.com  # Allowed hosts for repository

    # Parameters for setting up the EKS cluster
    - title: Basic EKS Cluster Configuration
      required:
        - clusterName
        - region
        - action
      properties:
        clusterName:
          title: Cluster Name
          type: string
          description: The name of your EKS cluster
          ui:autofocus: true
        region:
          title: AWS Region
          type: string
          description: The AWS region where the cluster will be deployed
          enum:
            - us-east-1
            - us-west-2
        action:
          title: Action
          type: string
          description: Action to perform (apply/destroy)
          enum:
            - apply
            - destroy

  # Steps that the template will execute in order
  steps:
    # Fetch the base template
    - id: fetch-base
      name: Fetch Base
      action: fetch:template
      input:
        url: ./content  # Where the base content is stored
        values:
          name: ${{ parameters.name }}

    # Publish the code to a GitHub repo
    - id: publish
      name: Publish
      action: publish:github
      input:
        allowedHosts: ['github.com']
        description: This is ${{ parameters.name }}
        repoUrl: ${{ parameters.repoUrl }}

    # Trigger a GitHub Action to set up the EKS cluster
    - id: github-action
      name: Trigger GitHub Action
      action: github:actions:dispatch
      input:
        workflowId: manage-eks-cluster.yml  # GitHub Action workflow ID
        repoUrl: 'github.com?repo=aws-eks&owner=samgabrail'
        branchOrTagName: 'main'  # The branch to run this action on
        workflowInputs:
          clusterName: ${{ parameters.clusterName }}
          awsRegion: ${{ parameters.region }}
          action: ${{ parameters.action }}

    # Register the new component in the Backstage catalog
    - id: register
      name: Register
      action: catalog:register
      input:
        repoContentsUrl: ${{ steps['publish'].output.repoContentsUrl }}
        catalogInfoPath: '/catalog-info.yaml'  # Where the catalog info is stored

  # Output links to the user after the template execution
  output:
    links:
      - title: Repository
        url: ${{ steps['publish'].output.remoteUrl }}
      - title: Open in catalog
        icon: catalog
        entityRef: ${{ steps['register'].output.entityRef }}
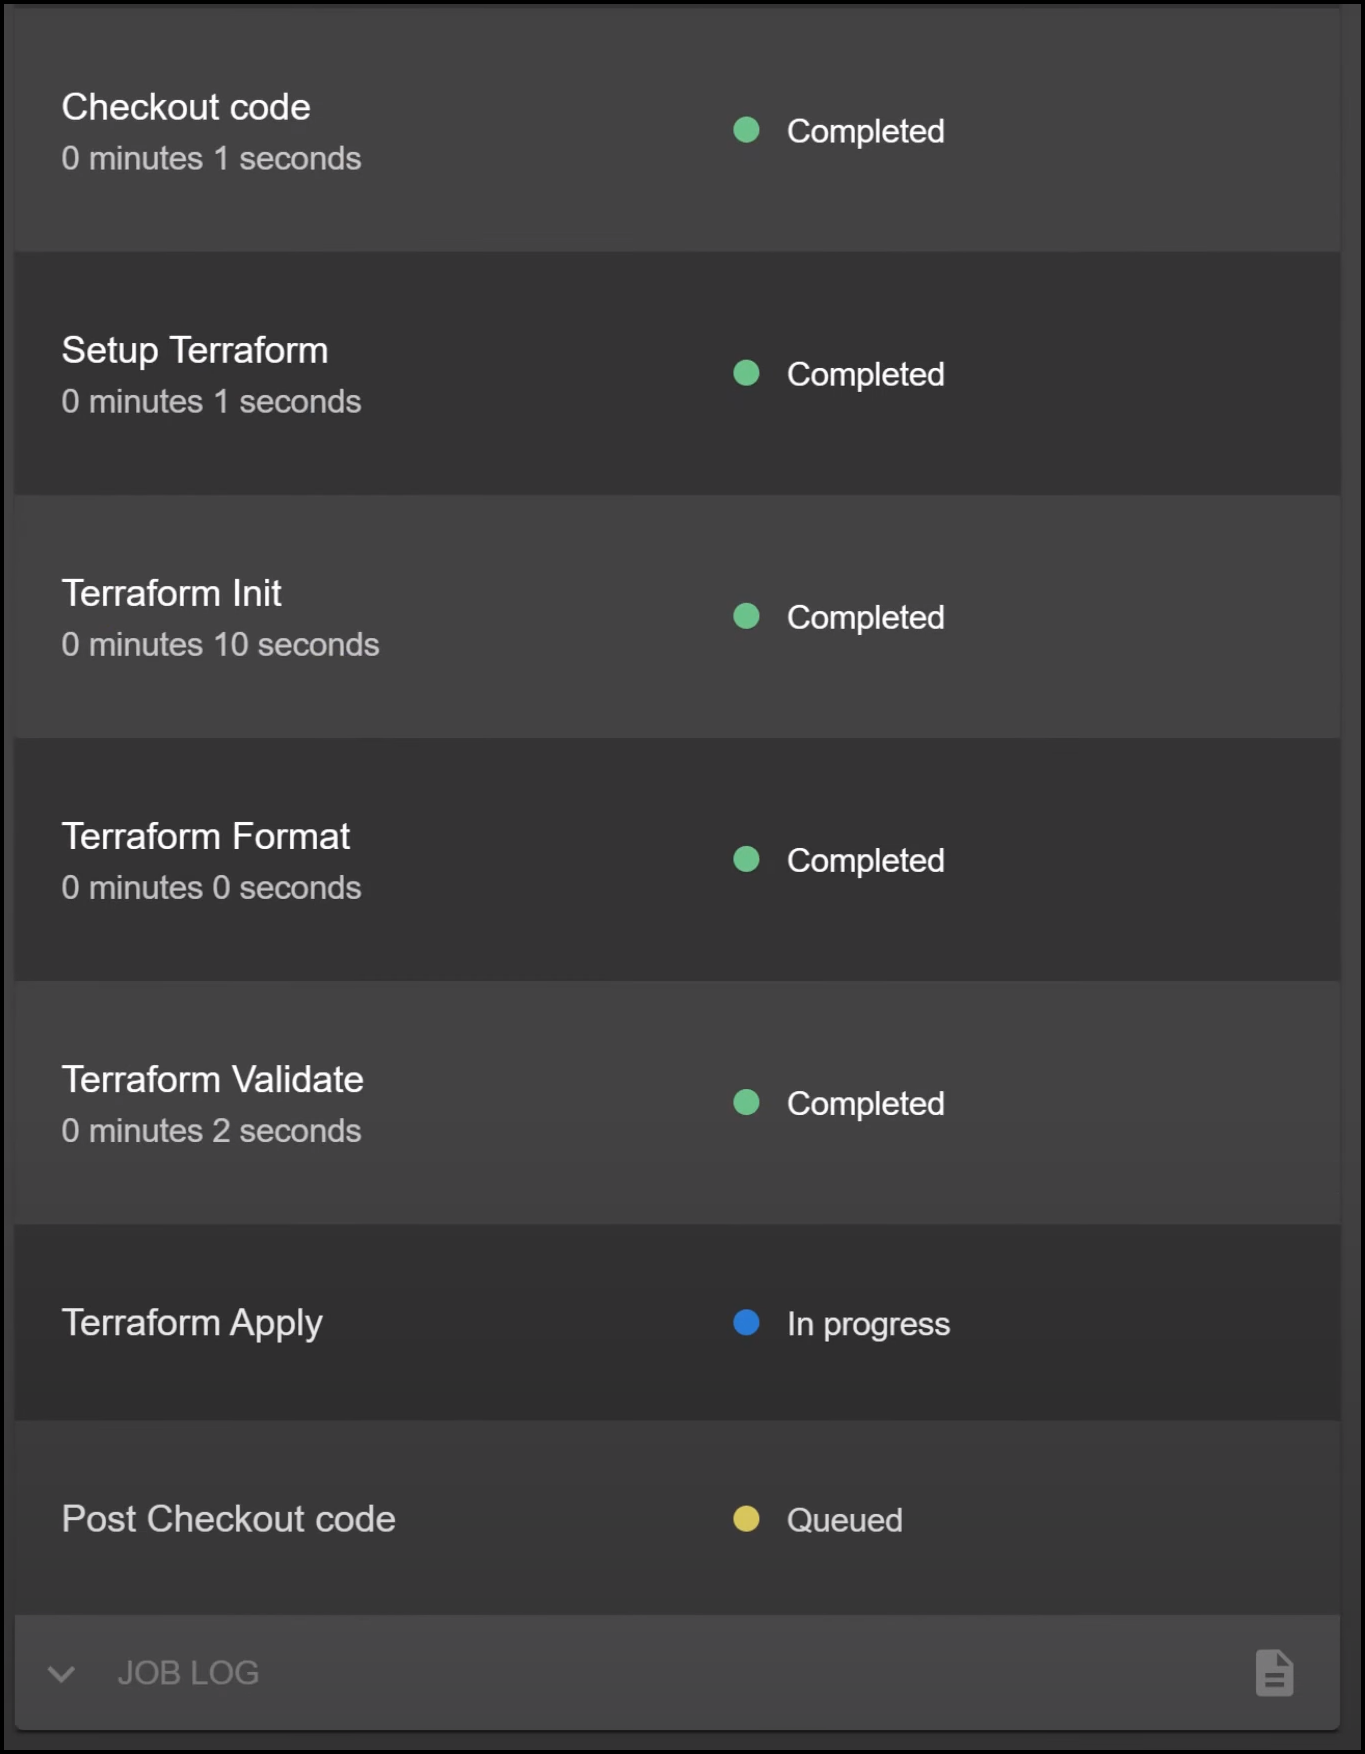
The GitHub Actions Pipeline
How about we take a closer look at the GitHub Actions Pipeline? Notice that the Trigger GitHub Action step dispatches a GitHub action in a different repo. This is a repo that the Platform Engineering team would set up. It’s where the Terraform code to stand up our EKS cluster is defined along with the GitHub Action pipeline. Below is the GitHub Action pipeline file called manage-eks-cluster.yml.
# Define the name of the GitHub Action workflow
name: Manage EKS Cluster

# This workflow is manually triggered using the GitHub Actions UI
on:
  workflow_dispatch:
    # Define inputs that are required for the manual trigger
    inputs:
      clusterName:
        description: 'Name of the EKS cluster'  # What's this input for?
        required: true  # Is it optional or required?
      awsRegion:
        description: 'AWS Region for the cluster'
        required: true
      action:
        description: 'Action to perform (apply/destroy)'
        required: true

# Define jobs to be executed in this workflow
jobs:

  # Job for applying (creating or updating) the EKS cluster
  apply_cluster:

    # Use the latest Ubuntu runner
    runs-on: ubuntu-latest

    # Only run this job if the action input is "apply"
    if: ${{ github.event.inputs.action == 'apply' }}

    # Define the steps for this job
    steps:

    # Step to checkout the code from the repository
    - name: Checkout code
      uses: actions/checkout@v2

    # Step to setup Terraform CLI
    - name: Setup Terraform
      uses: hashicorp/setup-terraform@v1
      with:
        cli_config_credentials_token: ${{ secrets.TF_API_TOKEN }}  # GitHub secret for Terraform Cloud API token

    # Initialize Terraform (downloads providers, etc.)
    - name: Terraform Init
      run: terraform init
      working-directory: Terraform  # Where should this command be run?

    # Step to format Terraform code, ensures it's neat
    - name: Terraform Format
      run: terraform fmt
      working-directory: Terraform

    # Step to validate the Terraform code (syntax, values, etc.)
    - name: Terraform Validate
      run: terraform validate
      working-directory: Terraform

    # Step to apply the Terraform plan
    - name: Terraform Apply
      run: terraform apply -var clusterName=${{ github.event.inputs.clusterName }} -var awsRegion=${{ github.event.inputs.awsRegion }} -auto-approve
      working-directory: Terraform

  # Job for destroying the EKS cluster
  destroy_cluster:

    runs-on: ubuntu-latest

    # Only run this job if the action input is "destroy"
    if: ${{ github.event.inputs.action == 'destroy' }}

    steps:
    - name: Checkout code
      uses: actions/checkout@v2

    - name: Setup Terraform
      uses: hashicorp/setup-terraform@v1
      with:
        cli_config_credentials_token: ${{ secrets.TF_API_TOKEN }}

    - name: Terraform Init
      run: terraform init
      working-directory: Terraform

    - name: Terraform FMT
      run: terraform fmt
      working-directory: Terraform

    - name: Terraform Validate
      run: terraform validate
      working-directory: Terraform

    # Step to destroy all resources defined in Terraform
    - name: Terraform Destroy
      run: terraform destroy -var clusterName=${{ github.event.inputs.clusterName }} -var awsRegion=${{ github.event.inputs.awsRegion }} -auto-approve
      working-directory: Terraform
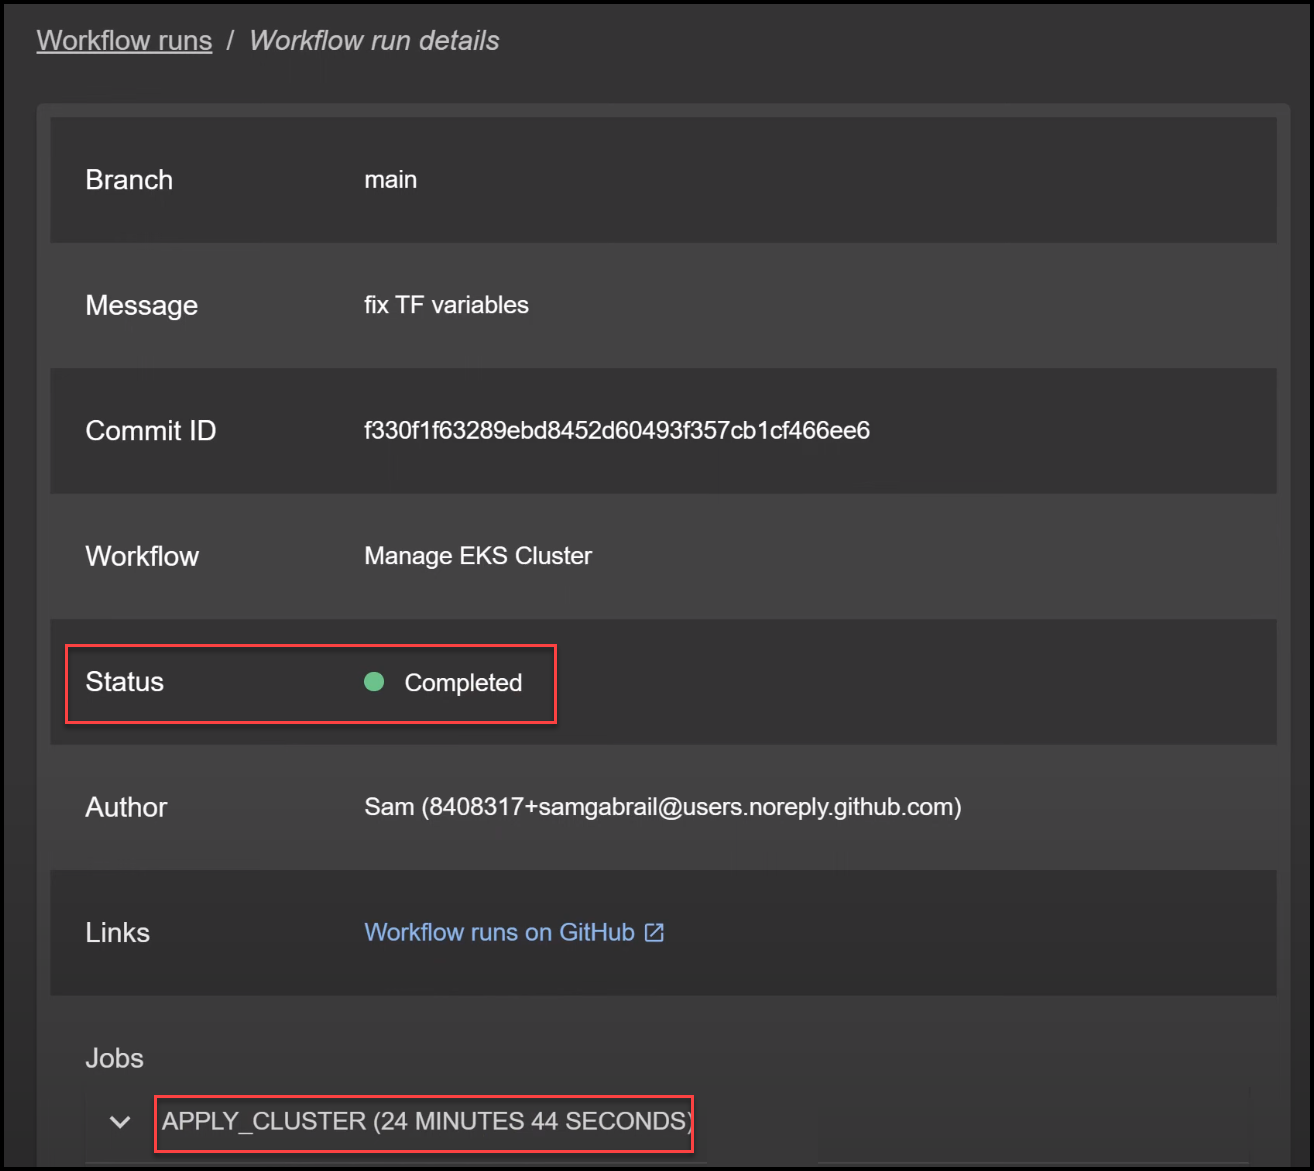
Wrapping Up
Looks like our EKS cluster is up and ready! It took roughly 24 minutes, but imagine the time saved compared to manually setting this up or going through a ticketing system.
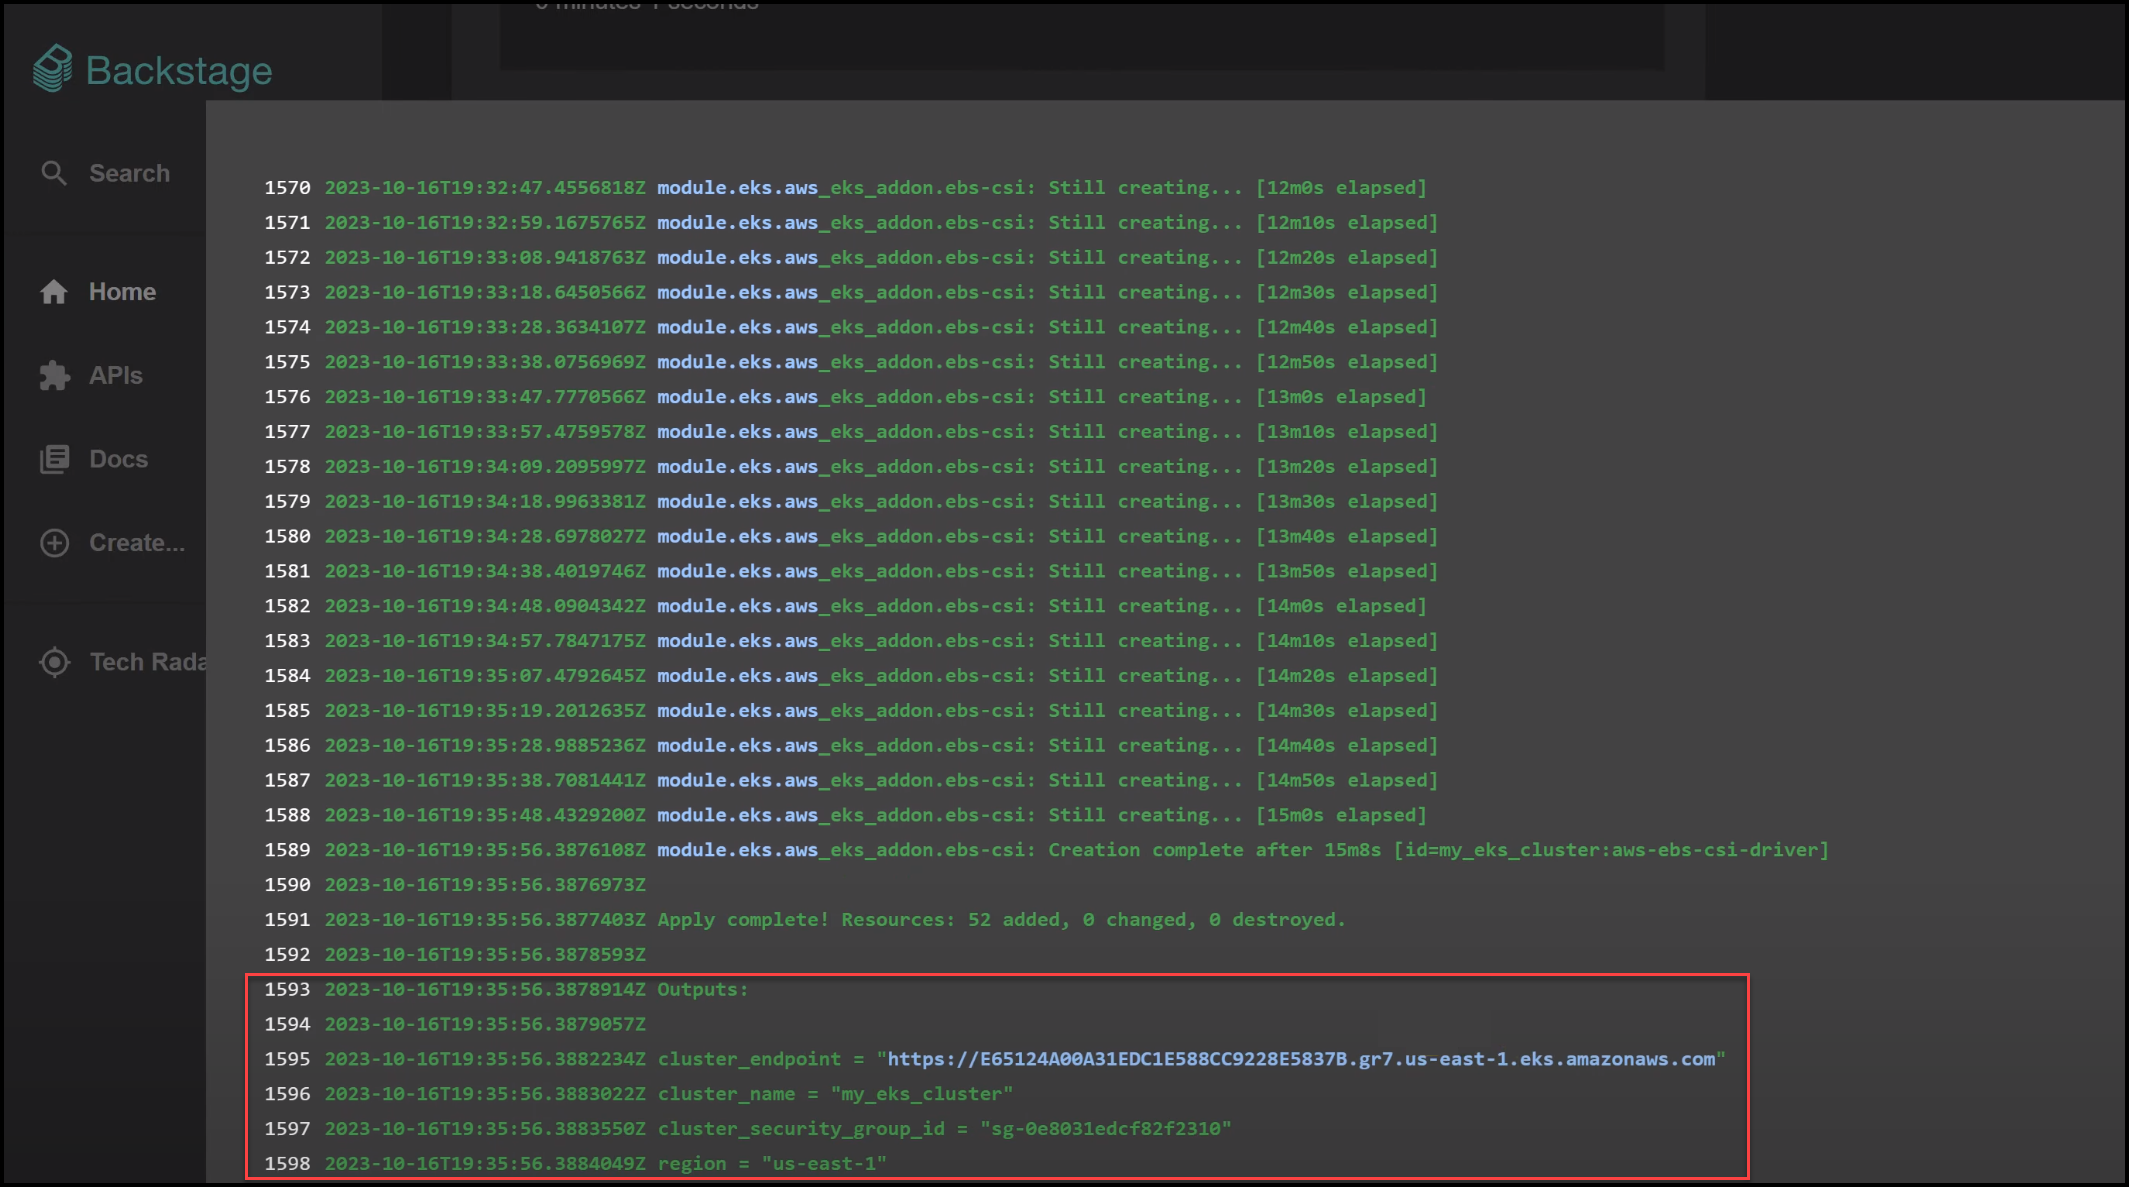
Backstage Output
This is what the developers will see in the Backstage UI without the need to go to Terraform Cloud or GitHub Actions.
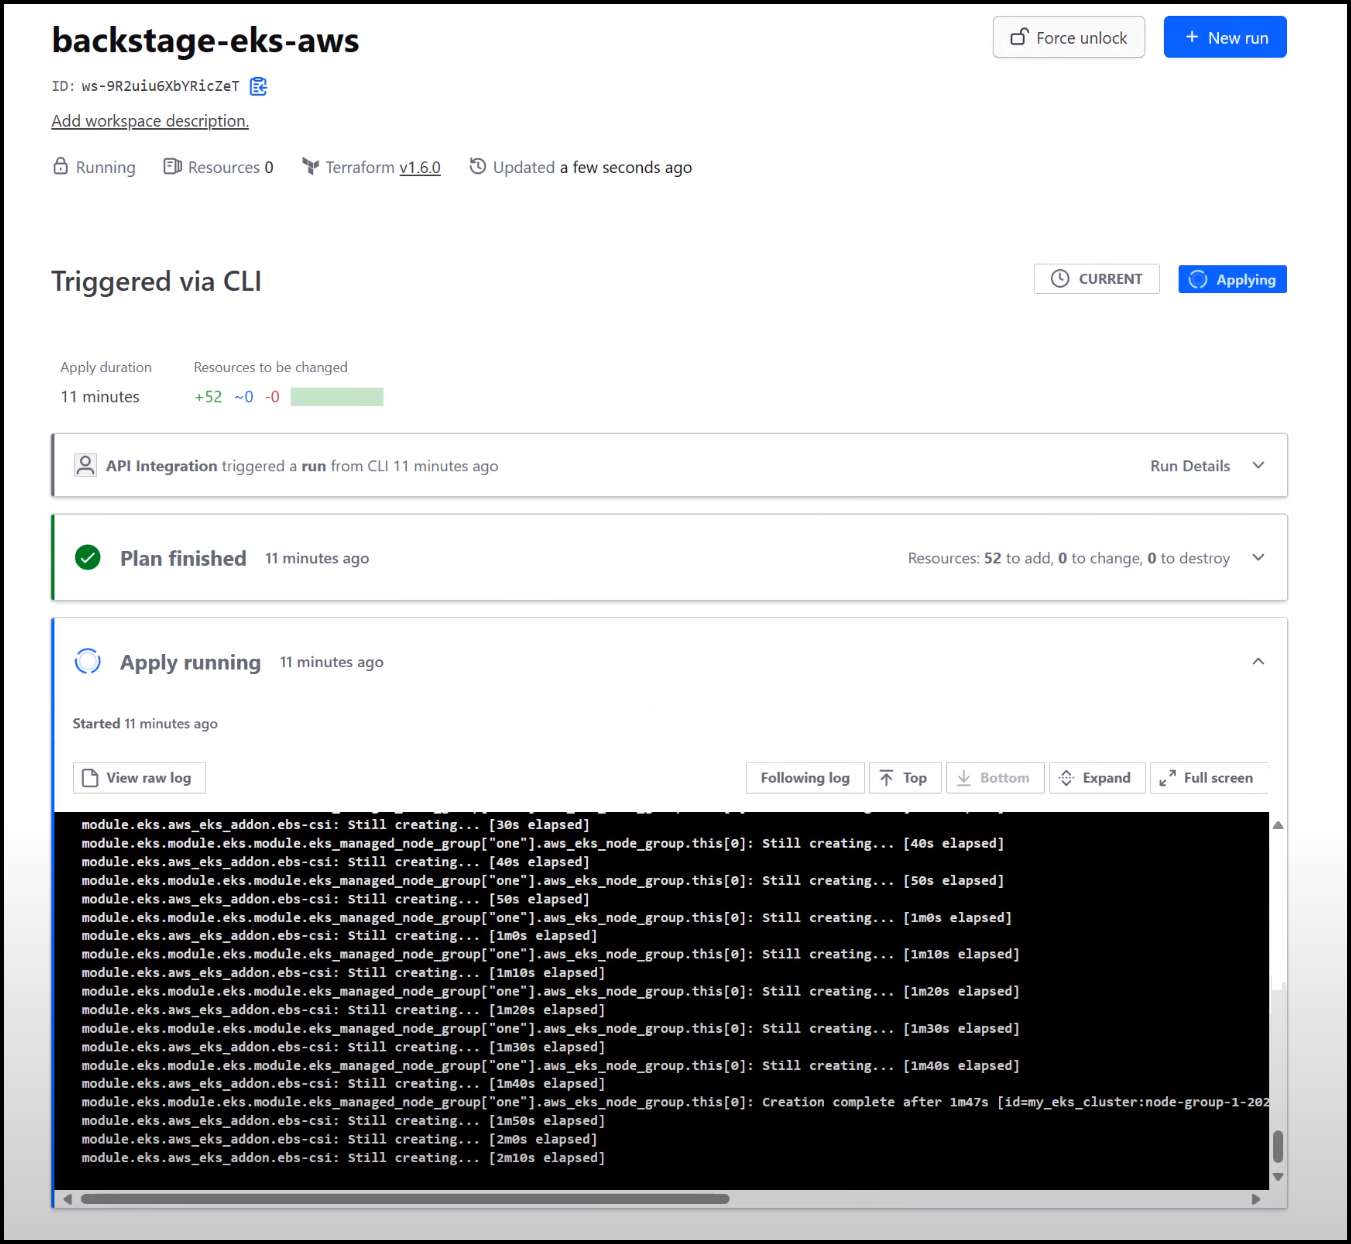
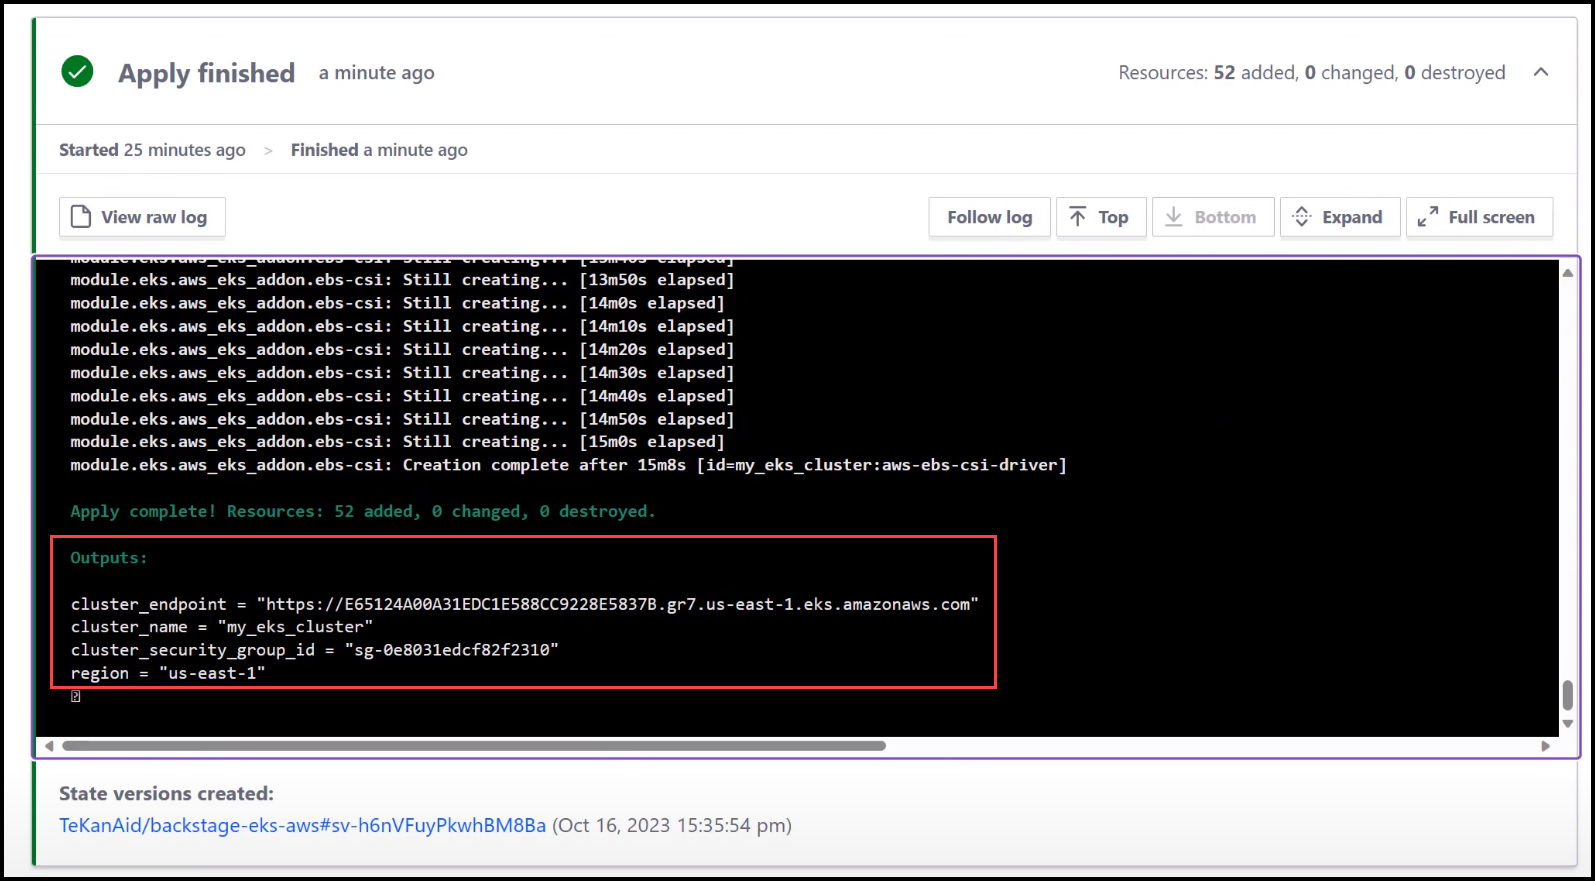
Terraform Cloud Output
This is the view that the Platform Engineers would look at in Terraform Cloud.
Conclusion
Alright, peeps, that wraps up our walkthrough on leveraging Backstage Software Templates in the realm of Platform Engineering. If you weren’t a believer before, I hope you are now. These templates are not just bells and whistles; they’re the unsung heroes that can supercharge your platform engineering efforts.
Think about it—less boilerplate code, more consistency, and way fewer headaches. That’s what Backstage Software Templates bring to the table. They’re your express ticket to a well-architected, easy-to-navigate platform that makes life a heck of a lot easier for everyone involved.
If you’re thirsty for more, you know where to find us. We’ve got video tutorials to walk you through the how-tos, and our TeKanAid Academy courses are always there to take your learning to the next level.
So, don’t sit on the sidelines. Jump in and get your hands dirty with Backstage Software Templates. Trust me, your future self will thank you. 🚀
Additional Resources
Before you go, check out these resources for further learning. From more blog posts to in-depth courses and YouTube videos, we’ve got you covered.
- What Is Backstage: Your Ultimate Guide To Streamlining Developer Tools
- Unlocking Developer Bliss: A First Look At Backstage.io
- Unlock Hidden Perks in Your Backstage Software Catalog
Code
Hi and Welcome!
Join the Newsletter and get FREE access to all my Source Code along with a couple of gifts.