

Introduction
In an increasingly complex development landscape, a seamless experience for developers is not a luxury; it’s a necessity. This article explores how Backstage.io provides a unified platform for building developer portals, enhancing developer experience, and the emerging role of Platform Engineering in this ecosystem. I’ve personally started to dig into the platform engineering space after spending a considerable amount of time working in DevOps. I believe that we have put too much on developer’s plates, and it’s time to ease their pain. In this article, I’ll focus on Backstage.io as a key player in the open-source infrastructure landscape. Join me on this learning path.
Video
Below is a video explanation and demo.
Video Chapters
You can skip to the relevant chapters below:
- 00:00 – Introduction
- 00:51 – Install Backstage
- 04:31 – The Backstage UI
- 07:58 – Create an App via Backstage
- 10:52 – Update the Component
- 12:42 – Backstage Software Template
- 13:14 – Final Thoughts
Why Developer Portals Are Essential
In a development environment where dozens of tools and services are in play, a developer portal serves as the single source of truth. It helps developers find all the services they need without the hassle of navigating through multiple platforms.
Building a developer portal has become a top priority for platform engineering teams aiming to centralize resources, streamline workflow, and ultimately enhance the workflow for coders. A well-designed portal isn’t just another internal tool; it’s an integrated playground for all your infrastructure tooling.
The Role of Backstage in Developer Portals
Backstage.io isn’t just a place to find applications or libraries; it’s a platform that enables developers to integrate seamlessly with your existing tools and services.
It offers a level of customization that allows you to shape the portal according to your specific needs.
Utilizing Backstage.io as an open platform for constructing these portals empowers development teams. A homegrown developer portal built on Backstage offers the efficiency needed to manage services, tackle pull requests, and even orchestrate data pipelines seamlessly. I’m quite happy to work with an open-source product that is a CNCF incubation-level project at the time of writing this article.
Building Developer Portals: The Intersection of Services and Software Catalog
The Evolution of the Developer Portal
Developer portals have evolved far beyond being mere repositories of technical documentation. Today, they serve as robust service catalogs, a centralized hub where developers can discover all the tools and services they need.
Software Catalog as the Nucleus
The software catalog or service catalog in Backstage serves as more than just an inventory. It allows for rich metadata that can be tailored to fit the nuances of your internal software, thereby enhancing discoverability and utilization.
In Backstage, the centralized software catalog acts as the core, offering a uniform overview of all the software and services. By cataloging new projects and existing services along with ownership information, Backstage simplifies the developer’s journey, boosting overall developer productivity.
Backstage Software Catalog: More Than Just a List
A Dynamic Platform
The Backstage service catalog offers more than just a static list. Designed to manage thousands of software components efficiently, it serves as a dynamic platform enabling developers to create, manage, and explore software all in one unified space.
Documentation and Code: Two Sides of the Same Coin
In Backstage, technical documentation isn’t an afterthought but an integrated feature. With Backstage TechDocs, developers can write and store documentation in markdown files, right alongside their code, maintaining high-quality software and documentation concurrently.
Personalizing Developer Experience
Backstage.io offers features like personalized dashboards, making it easier for developers to find the tools and resources that are most relevant to them.
Backstage goes a step further with its software templates and plugins, enabling developers to personalize their workspace according to their needs. From creating new services and projects to managing existing services, Backstage offers flexibility and adaptability, making it an ideal choice for DevOps engineers and other stakeholders.
Backstage Software Templates
A Software Template in Backstage provide a standardized way to scaffold a new project. They allow organizations to define templates for different kinds of software projects, thus ensuring that new projects are set up with best practices, correct dependencies, and optimal configurations right from the start. Here are some key points:
- Standardization: Templates help maintain consistency across multiple projects, making it easier for teams to onboard new members and transition between different projects.
- Automation: With templates, repetitive initial setup tasks are automated, saving time and reducing the scope for errors.
- Customization: Organizations can create their own custom templates tailored to meet specific requirements, whether it’s a microservices architecture, a web application, or a data science project.
Backstage Plugins
Backstage Plugins extend the functionality of Backstage to serve specific needs. Plugins can range from providing database insights, CI/CD build statuses, or even integrating with cloud services. Here are some noteworthy aspects:
- Modularity: Plugins can be added or removed without affecting the core functionality of Backstage, making it modular and scalable.
- Community Contributions: The Backstage community is active, and there are a plethora of open-source plugins available that can be readily integrated.
- Custom Plugins: If your organization has specific requirements not met by existing plugins, you can develop custom plugins and integrate them into Backstage. They are typically written in Typescript. So your team needs to be proficient in Typescript.
Developer Experience (DevEx): It’s All About the Journey
Despite its significance, the DevEx often gets overlooked during the early stages of software development. Backstage aims to restore order to this chaos by offering a single, unified portal where all developer tools and services can be found.
Platform Engineering: The Evolution of DevOps and the Craft of Internal Developer Platforms
The Birth of a New Discipline
As software development evolves, so do its surrounding disciplines. Platform Engineering has emerged as a field focusing on crafting robust internal developer platforms that serve developers efficiently. I’m quite excited to follow this trend and believe it’s not a passing fad. However, to be realistic, I don’t believe it will replace DevOps as DevOps is a culture and not a role. Moreover, it might be an overkill to implement platform engineering at small organizations and startups. Larger organizations stand to benefit the most from platform engineering.
The Role of Platform Engineers
Platform engineers are responsible for maintaining the health of the internal developer portal. They ensure that the tools and services are up-to-date, secure, and performant.
Platform Engineers are the key architects behind these platforms. Their work goes beyond just maintaining developer tools and internal infrastructure; they aim to streamline the entire development process. In Backstage, they can find a platform conducive to these ideals, offering features that make it easier to go from a pull request to a fully deployed service.
Advancements in DevEx
Platform Engineering streamlines the workflow for software engineers by focusing on creating a seamless, user-friendly environment. Backstage, with its range of features like software templates and TechDocs, offers the tools required for such an undertaking.
The Journey So Far
As you probably already know, Backstage was developed by Spotify and later donated to the CNCF. Its flexibility, community-driven enhancements, and adaptability make it a great solution for evolving developer needs. I know quite a few colleagues who have adopted backstage at their organizations and I wanted to give it a try myself. I wanted to see how easy it is to get started and if it really can help build a golden path for developers. Let’s get started with the example below.
Getting Started with a Backstage Example
Now I’m going to start with Backstage from scratch. I’d like to get a feel for the product and the UI, so we’ll start with a very simple example out of the box. Note that I couldn’t get it to work in codespaces, I suspect something to do with port forwarding so I’ve installed it on my local machine. Below are the instructions.
Step 1: Install the App
As per the official documentation, you will need to have Nodejs, Yarn, npx, and git installed on your local machine. I found that at the time of this writing, node 16 or node 18 worked the best.
Start by running the following command:
npx @backstage/create-app@latest
and here is the expected output:
> npx @backstage/create-app@latest
Need to install the following packages:
@backstage/[email protected]
Ok to proceed? (y) y
? Enter a name for the app [required] my-backstage-app

Creating the app...

 Checking if the directory is available:
  checking      my-backstage-app ✔

 Creating a temporary app directory:
  creating      temporary directory ✔

 Preparing files:
  copying       .dockerignore ✔
  templating    .eslintrc.js.hbs ✔
  templating    .gitignore.hbs ✔
  copying       .prettierignore ✔
  copying       README.md ✔
  copying       app-config.local.yaml ✔
  copying       app-config.production.yaml ✔
  templating    app-config.yaml.hbs ✔
  templating    backstage.json.hbs ✔
  templating    catalog-info.yaml.hbs ✔
  copying       lerna.json ✔
  templating    package.json.hbs ✔
  copying       tsconfig.json ✔
  copying       yarn.lock ✔
  copying       README.md ✔
  copying       entities.yaml ✔
  copying       org.yaml ✔
  copying       template.yaml ✔
  copying       catalog-info.yaml ✔
  copying       index.js ✔
  copying       package.json ✔
  copying       README.md ✔
  templating    .eslintrc.js.hbs ✔
  copying       Dockerfile ✔
  copying       README.md ✔
  templating    package.json.hbs ✔
  copying       index.test.ts ✔
  copying       index.ts ✔
  copying       types.ts ✔
  copying       app.ts ✔
  copying       auth.ts ✔
  copying       catalog.ts ✔
  copying       proxy.ts ✔
  copying       scaffolder.ts ✔
  templating    search.ts.hbs ✔
  copying       techdocs.ts ✔
  copying       .eslintignore ✔
  templating    .eslintrc.js.hbs ✔
  copying       cypress.json ✔
  templating    package.json.hbs ✔
  copying       android-chrome-192x192.png ✔
  copying       apple-touch-icon.png ✔
  copying       favicon-16x16.png ✔
  copying       favicon-32x32.png ✔
  copying       favicon.ico ✔
  copying       index.html ✔
  copying       manifest.json ✔
  copying       robots.txt ✔
  copying       safari-pinned-tab.svg ✔
  copying       .eslintrc.json ✔
  copying       app.js ✔
  copying       App.test.tsx ✔
  copying       App.tsx ✔
  copying       apis.ts ✔
  copying       index.tsx ✔
  copying       setupTests.ts ✔
  copying       LogoFull.tsx ✔
  copying       LogoIcon.tsx ✔
  copying       Root.tsx ✔
  copying       index.ts ✔
  copying       EntityPage.tsx ✔
  copying       SearchPage.tsx ✔

 Moving to final location:
  moving        my-backstage-app ✔

 Installing dependencies:
  determining   yarn version ✔
  executing     yarn install ✔
  executing     yarn tsc ✔

🥇  Successfully created my-backstage-app

 All set! Now you might want to:
  Install the dependencies: cd my-backstage-app && yarn install
  Run the app: cd my-backstage-app && yarn dev
  Set up the software catalog: https://backstage.io/docs/features/software-catalog/configuration
  Add authentication: https://backstage.io/docs/auth/
Step 2: Navigate to the Project Directory
Now navigate to the project directory using:
cd my-backstage-app
Step 3: Start the Backstage App
Start the Backstage app using the following command:
yarn dev
This will launch the app and make it accessible via a web browser at `http://localhost:3000`. Here is a screenshot of the UI.
Step 4: Integrate GitHub
My first goal was to see if I could create a template for developers to use when creating a new application. Fortunately, Backstage comes with a default template out of the box, but first, we need to integrate GitHub.
If you open the app-config.yaml file inside the my-backstage-app folder, you will see an integration section as shown below:
integrations:
  github:
    - host: github.com
      # This is a Personal Access Token or PAT from GitHub. You can find out how to generate this token, and more information
      # about setting up the GitHub integration here: https://backstage.io/docs/getting-started/configuration#setting-up-a-github-integration
      token: ${GITHUB_TOKEN}
    ### Example for how to add your GitHub Enterprise instance using the API:
    # - host: ghe.example.net
    #   apiBaseUrl: https://ghe.example.net/api/v3
    #   token: ${GHE_TOKEN}
Since it’s not a good idea to put any kind of secrets into a file that gets pushed into git, I opted to use an environment variable to pass my GitHub personal token into Backstage. You can do the same by running this command:
export GITHUB_TOKEN=your/personal/github/token
Now restart the app by hitting ctrl+c and re-running yarn dev
If you don’t know how to create a GitHub personal token, check out the steps below:
Steps to Create a GitHub Personal Access Token
-
Log in to GitHub: Open GitHub and log in to your account.
-
Access Settings: Click on your profile picture in the top-right corner and select “Settings.”
-
Developer settings: Scroll down the settings page and click on “Developer settings” at the bottom.
-
Personal access tokens: On the left sidebar, click on “Personal access tokens.”
-
Generate Token: Click on the “Generate new token” button at the top right of the page.
-
Token Settings:
- Note: Enter a note to remind you what the token is for, such as “Backstage token.”
- Select Scopes: Check the boxes for the permissions your token needs. For our use case you will need repo and read:org scopes. Read the description for each scope to know what permissions you’re granting.
-
Generate Token: Scroll down and click the “Generate token” button.
-
Copy Your New Token: Your new personal access token will be displayed. Make sure to copy it now. You won’t be able to see it again!
Warning: Keep it Secret, Keep it Safe
- A personal access token is like a password: never share it with anyone.
- Store it securely, and make sure you don’t accidentally commit it in your code.
Step 5: Create a Sample App using a Backstage Template
Now it’s time to finally see how a developer can create the scaffolding for an app from within Backstage using a pre-defined template created by the platform engineering team. As mentioned before this template comes out of the box for creating Node.js apps. You can find it under the examples folder in the my-backstage-app folder.
├── examples
│   ├── entities.yaml
│   ├── org.yaml
│   └── template
│       ├── content
│       │   ├── catalog-info.yaml
│       │   ├── index.js
│       │   └── package.json
│       └── template.yaml
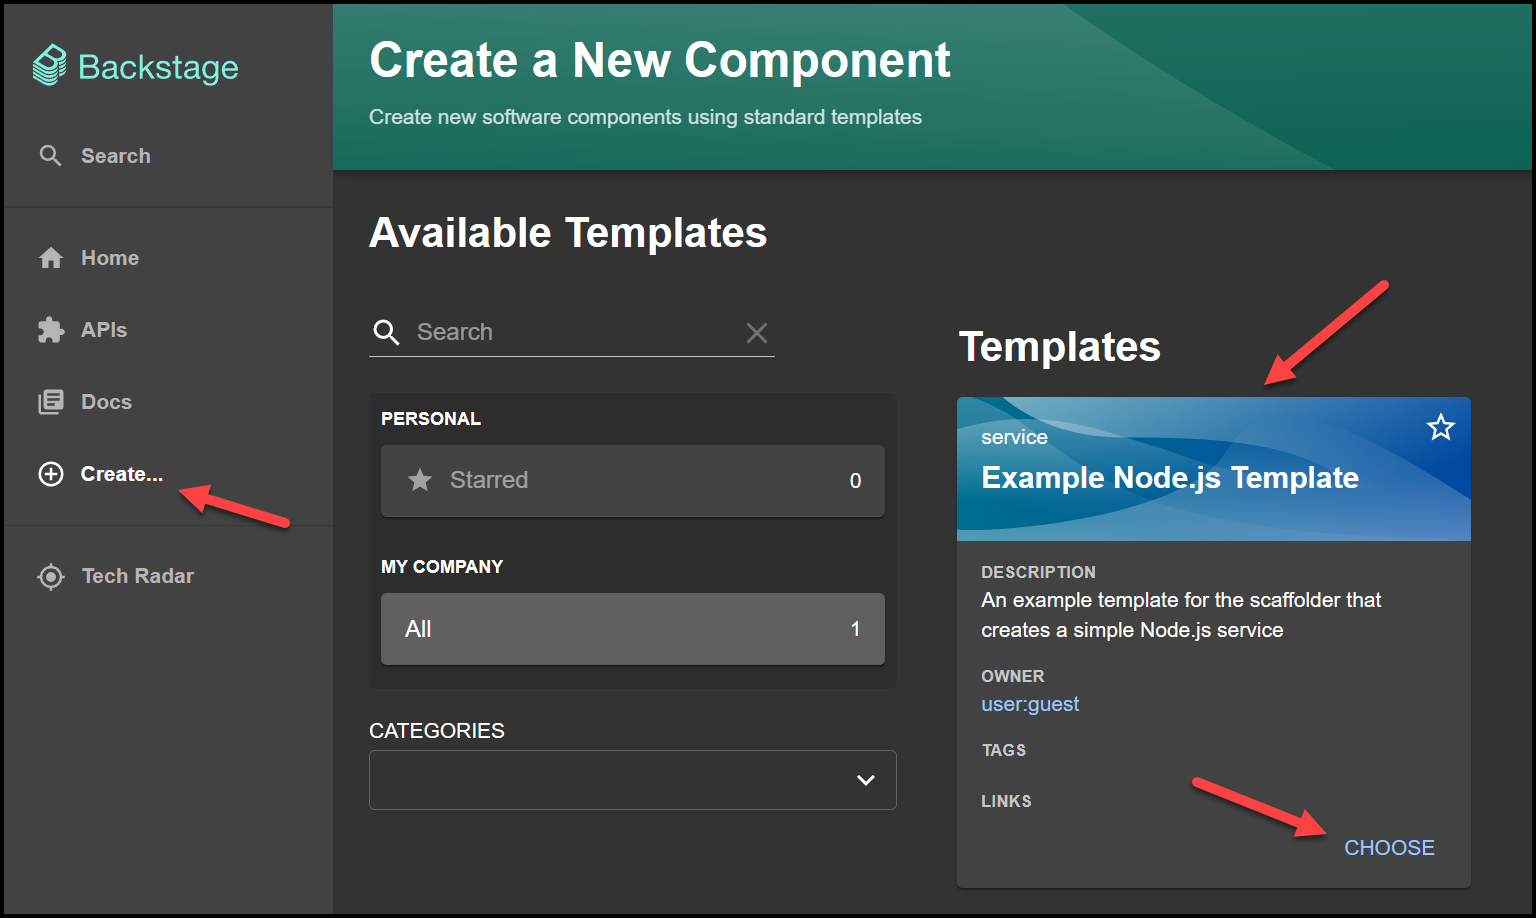
Navigate to the ‘Create’ section and follow the on-screen instructions.
Now give your new app a name and a repo with a repo owner. The repo owner is your GitHub username. In Backstage terms, this app is called a Component. I found that you should call the component the same name as the repo in this case or else you run into an error when registering the component in the software registry.
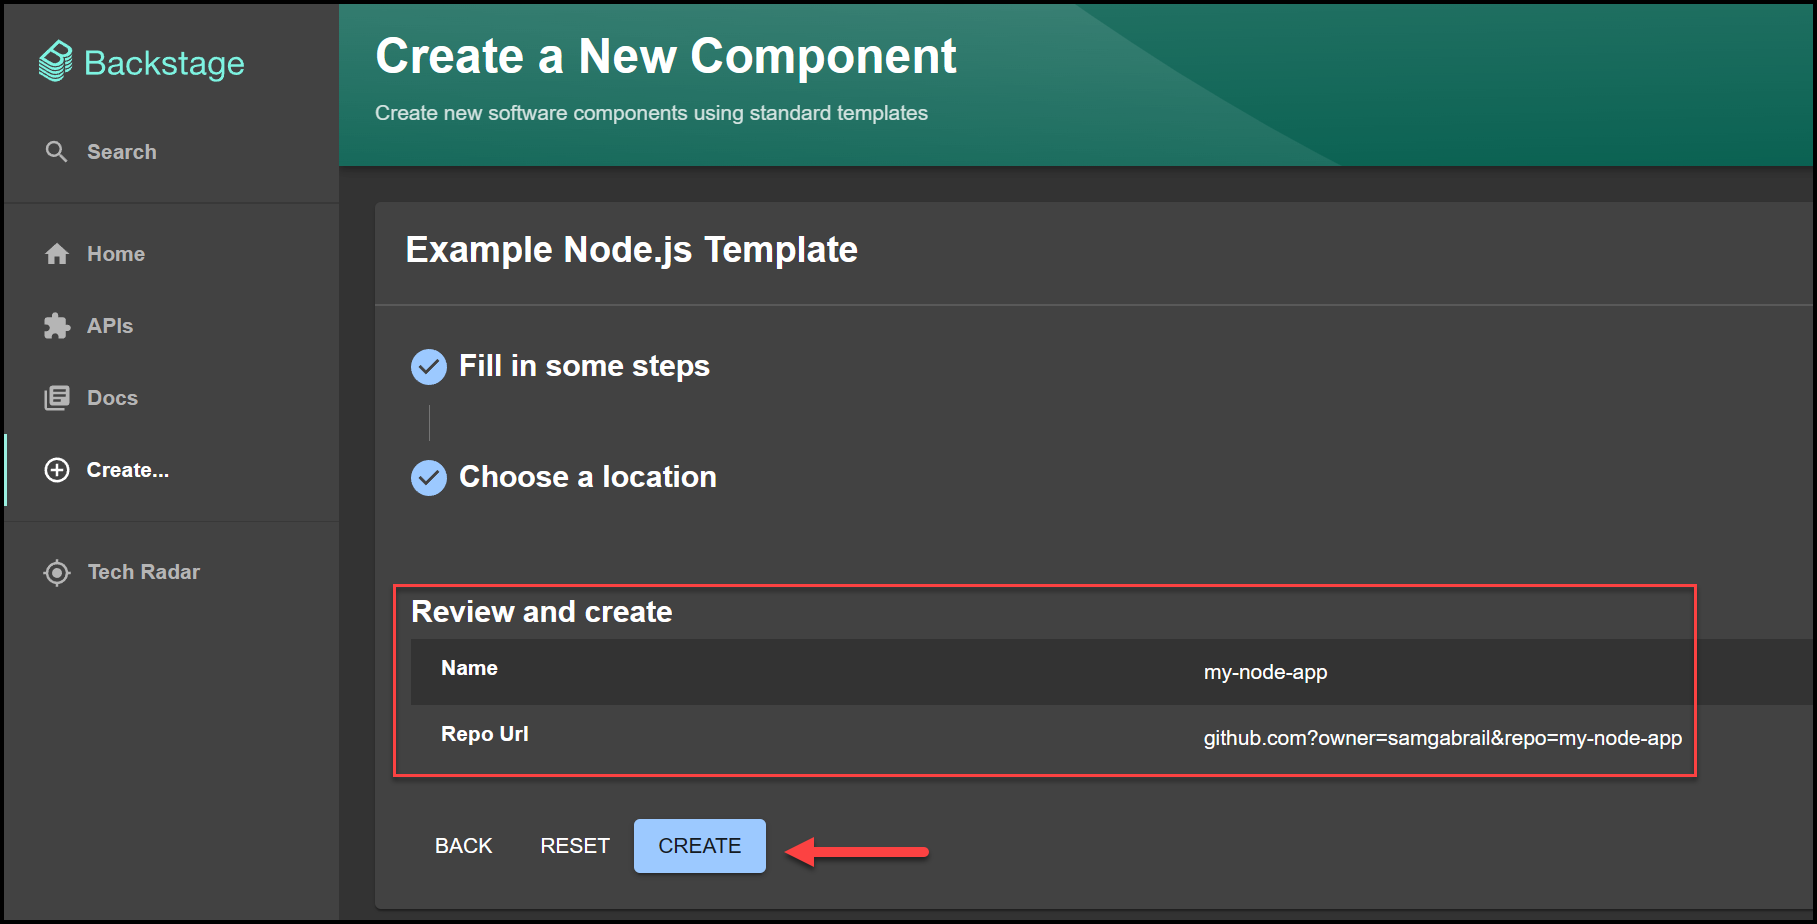
and you should have successfully added your new app/component.

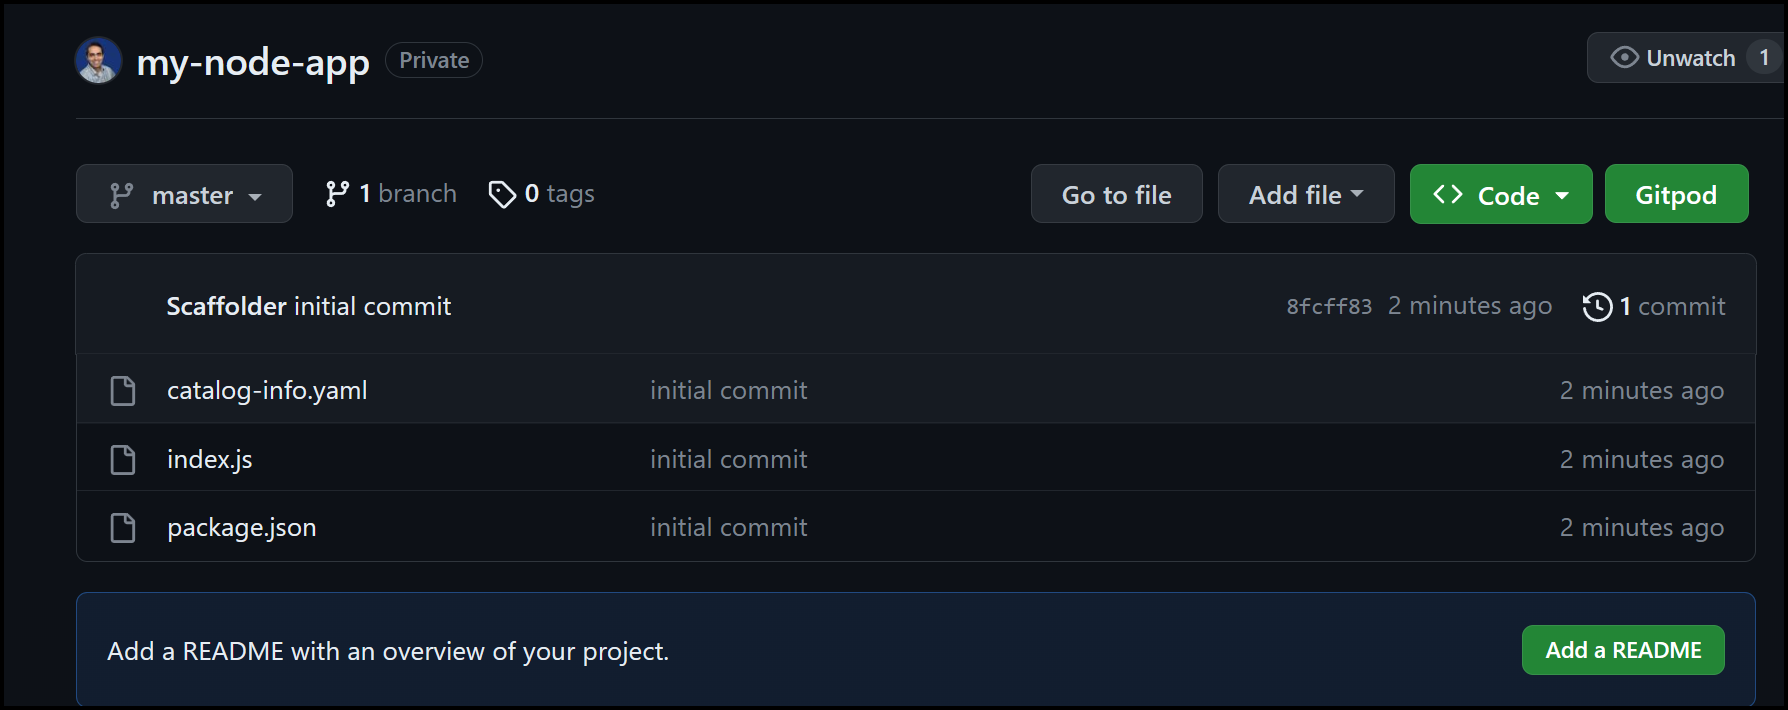
Step 6: Explore the Newly Created Component
This is what the new GitHub repo created by Backstage looks like:
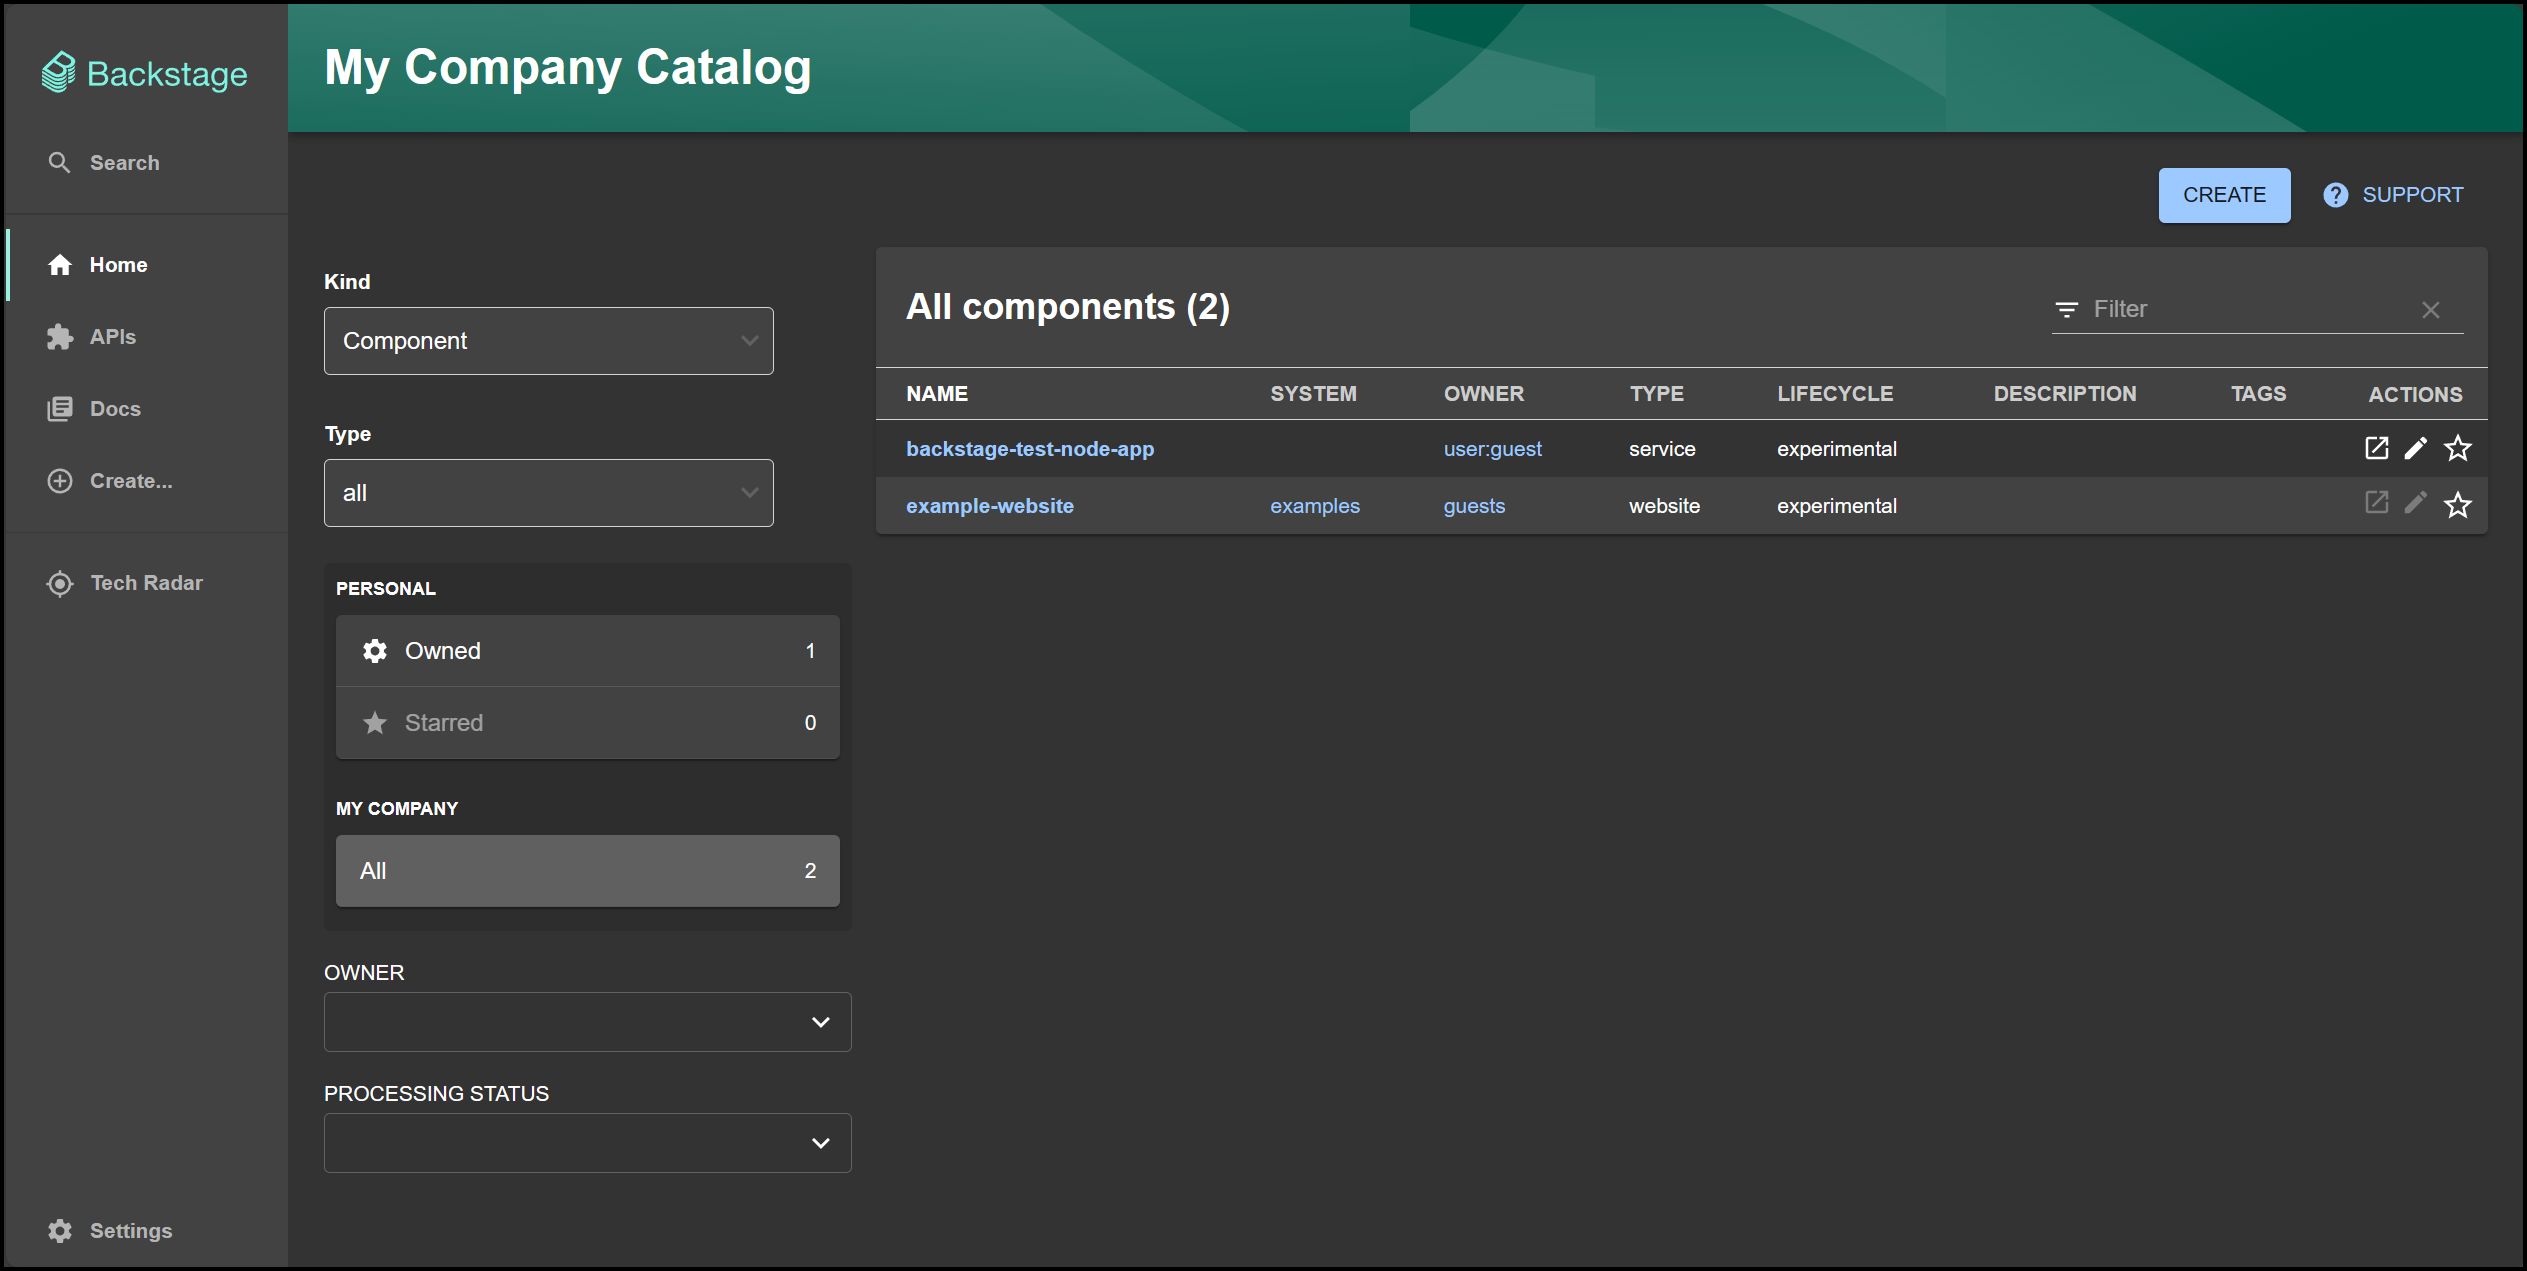
Now we can check out our new service or app or component however you want to call it in our service catalog. Below is a screenshot of it:
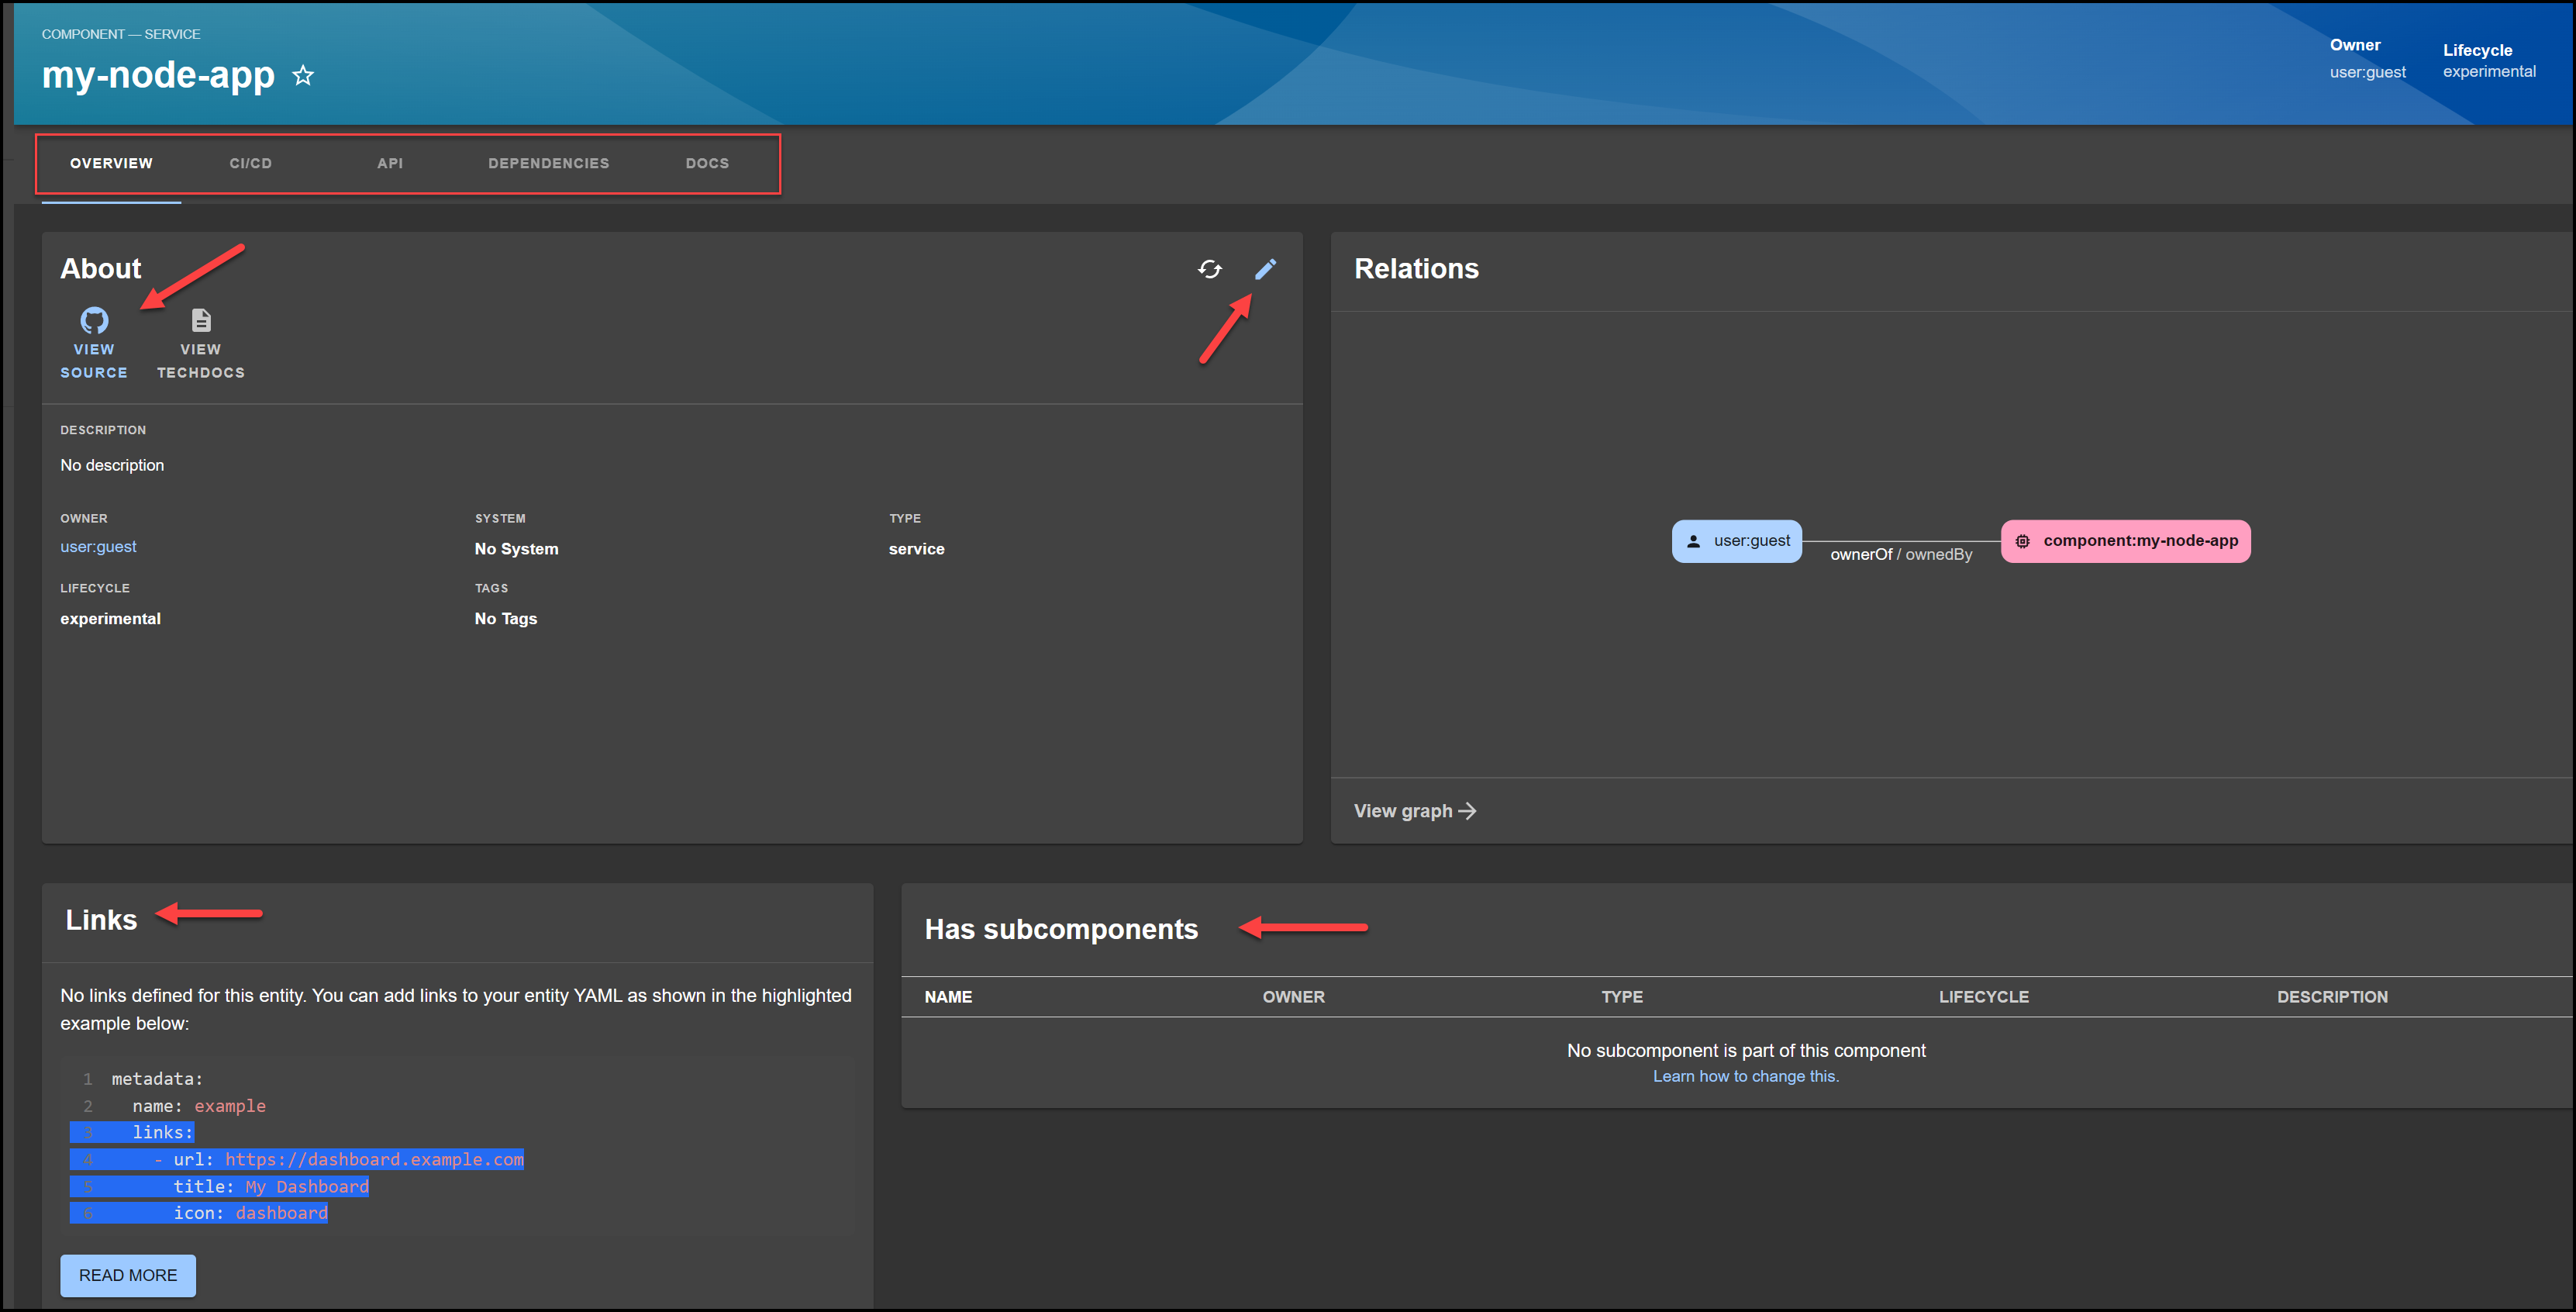
Notice a few things about our new component. There are multiple tabs at the top which are:
- Overview
- CI/CD
- API
- Dependencies
- Docs
We will just take a look at the Overview in this post and explore the rest in subsequent posts.
In the Overview tab, notice the following:
- **View Source: **which takes us back to the GitHub repo
- View Techdocs: which takes us to the docs, but it’s currently disabled.
- Relations: A neat graph that provides a visual representation of the relationships between our component and other entities in our system. This could include services, APIs, packages, libraries, teams, or users. The graph helps in understanding how different parts of your system are connected to each other and how changes to one component might affect others.
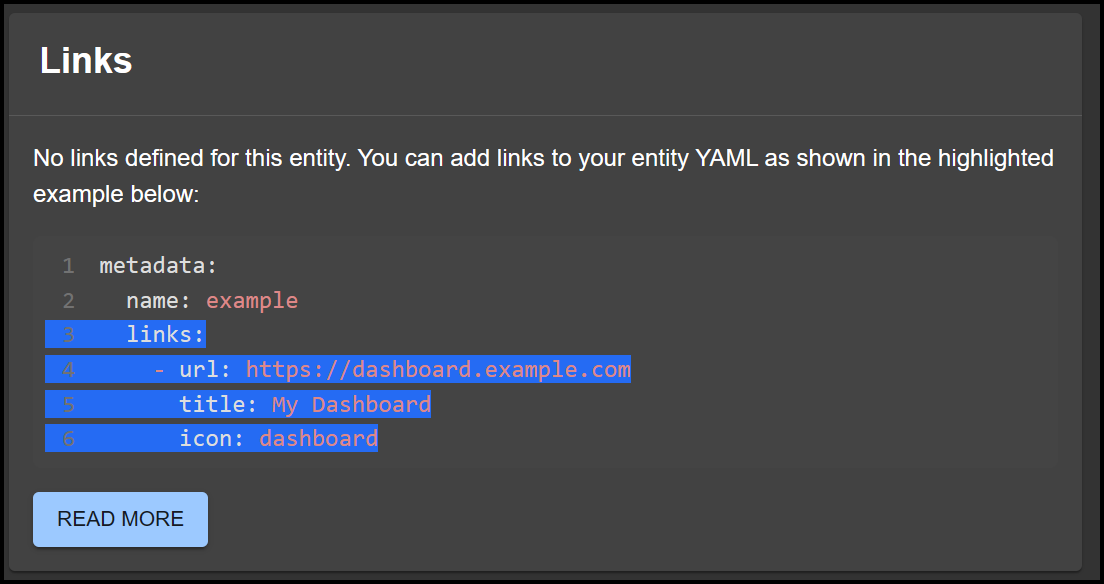
- **Links: **A list of external hyperlinks related to our component. Links can provide additional contextual information that may be located outside of Backstage itself. For example, an admin dashboard or external CMS page. We will make a change here to see what happens.
- **Has subcomponents: **This is used to indicate that a component is made up of one or more smaller components, essentially forming a parent-child relationship between them. This is useful for representing complex systems or services that are composed of smaller, independently managed pieces. For example, you might have a web application component that “Has subcomponents” like a frontend UI component and multiple backend service components for handling business logic, database operations, and so on.
Step 7: Understand the catalog-info.yaml File
The catalog-info.yaml file serves as a metadata descriptor for components and resources in the Backstage catalog. It provides details about the component, such as its name, owner, type, and more. By registering this YAML file in the Backstage catalog, you make it possible to manage and visualize your component in the Backstage interface. It looks incredibly familiar to Kubernetes manifests.
Here’s a brief rundown of some common fields:
-
apiVersion: Specifies the version of the schema for this particular YAML file. Typically, it’s something like backstage.io/v1alpha1.
-
kind: The kind of component this is, like Component, API, Resource, System, etc.
-
metadata: Metadata about the component.
- name: The name of the component.
- description: A brief description of the component.
- annotations: Key-value pairs for additional, optional metadata. For example, the location of the component’s source code.
-
spec: The specification of the component.
- type: The type of the component, like service, library, or website.
- lifecycle: Lifecycle state, like experimental, production, or deprecated.
- owner: The team or entity that owns this component.
- relations: Describes relationships between this component and other entities in the catalog.
Here is the catalog-info.yaml file in our GitHub repo that was created.
apiVersion: backstage.io/v1alpha1
kind: Component
metadata:
  name: "my-node-app"
spec:
  type: service
  owner: user:guest
  lifecycle: experimental
Step 8: Update our Component
Let’s now make a small update to our component by putting an external link in our Links section. Backstage gives us a thing with a button to read more on their documentation site.
Okay, so we can now modify our catalog-info.yaml file by going to our repo, or by simply clicking the pencil icon at the top right corner of the About card. This will allow us to edit the file directly in GitHub. Add the links section to our file as shown below:
apiVersion: backstage.io/v1alpha1
kind: Component
metadata:
  name: "my-node-app"
  links:
    - url: https://dashboard.example.com
      title: My Dashboard
      icon: dashboard
spec:
  type: service
  owner: user:guest
  lifecycle: experimental
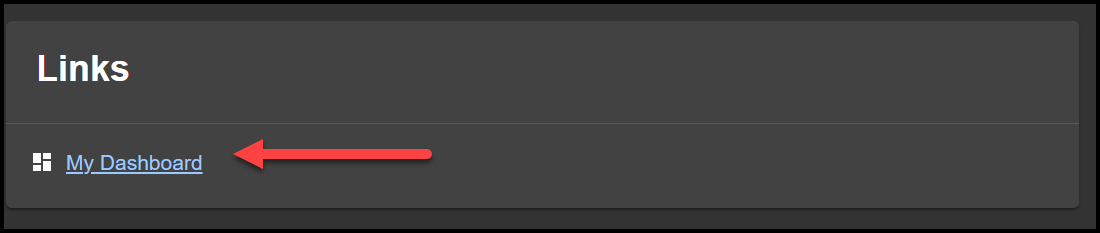
Now commit this to GitHub and refresh the Component page on Backstage to see the link appear:
My First Impressions
I had a great time exploring Backstage, and I hope this blog post has piqued your interest as well. Here are my final thoughts on this introductory exploration of Backstage.
What I Liked:
- Plugin Architecture: I appreciate the thorough thought process that Spotify has put into enhancing the developer experience. The modular design of Backstage, bolstered by its plugin architecture, is particularly compelling.
- Open-Source and CNCF: The fact that Backstage is an open-source project and a part of the CNCF adds a level of credibility and community support.
- **Single Pane of Glass: **One of the key advantages of Backstage is that it consolidates all your tools, services, and documentation into a single, coherent interface, thereby reducing the cognitive load on developers.
- Built-in Best Practices: By providing templates and scaffolding capabilities, Backstage encourages best practices right from the project’s inception. This can improve code quality and speed up the development process. This is a really great aspect that creates guardrails and governance.
- Integrated Technical Documentation: Backstage’s TechDocs feature allows developers to write technical documentation directly within the platform, making it easier to keep documentation and code in sync.
What I Disliked:
-
Complexity:
- Initial Setup: Since I’m not primarily a Node.js developer, I found the initial setup to be a bit cumbersome. A ready-made Docker image for quick demos and tests would have been helpful.
- Customization: While the ability to extend Backstage is one of its strengths, it also introduces complexity. Customizing it to fit specific organizational needs can require a significant amount of effort and expertise. This is just my initial impression from the documentation, and I might revise this view as I gain more experience.
-
Potential for Vendor Lock-in:
- Spotify Ecosystem: Backstage was originally developed by Spotify, and it’s tailored to their specific use cases. While it’s highly customizable, some features seem closely tied to Spotify’s ecosystem, which could potentially lead to a form of vendor lock-in. This is purely speculative, and I welcome differing opinions in the comments below.
Key Takeaways
- The Rise of Platform Engineering: This discipline is revolutionizing the way organizations approach software development, making it more efficient, collaborative, and enjoyable.
- Backstage’s Capabilities: With its wide array of features and plugins, Backstage emerges as a robust tool designed for Platform Engineers.
- Developer-Centric Design: The focus on streamlining workflows places Backstage at the forefront of this evolution, offering an integrated, flexible, and dynamic platform to cater to all your development needs.
Stay tuned for more in-depth posts on Backstage as I continue my exploration!
Suggested Reading
- A Deep Dive into Backstage Software Templates
- Unlock Hidden Perks in Your Backstage Software Catalog
- Powerful Backstage Templates | An EKS & Terraform Example
- 36 Top DevOps Questions to Get You Started in 2023
- Securing the Future – DevSecOps Trends for 2023
Code
Hi and Welcome!
Join the Newsletter and get FREE access to all my Source Code along with a couple of gifts.