

Are you tired of manually clicking through Proxmox’s UI just to spin up a VM? It’s slow, error-prone, and nearly impossible to scale when you need multiple machines. In this comprehensive guide, I’ll show you how to automate Ubuntu 24.04 VM deployments using Terraform Proxmox, building on the template we created in our previous tutorial.
Demo Video
Below is a video demonstration.
In this video, I demonstrate the entire process from start to finish:
- Starting with no VMs
- Using the Ubuntu 24.04 template created in our previous tutorial
- Running our Terraform configuration
- Deploying a fully configured VM in less than 2 minutes
- SSHing into the new VM to verify everything works
- Destroying the VM when we’re done
The entire process takes just a couple of minutes and uses Infrastructure as Code (IaC) principles, compared to the manual approach that could take 5-10 times longer.
Introduction to Terraform and Proxmox
Terraform and Proxmox form a powerful combination for automating virtual machine deployment and management. This integration brings the efficiency and scalability of infrastructure as code to your virtualization environment, whether it’s a home lab or enterprise setup.
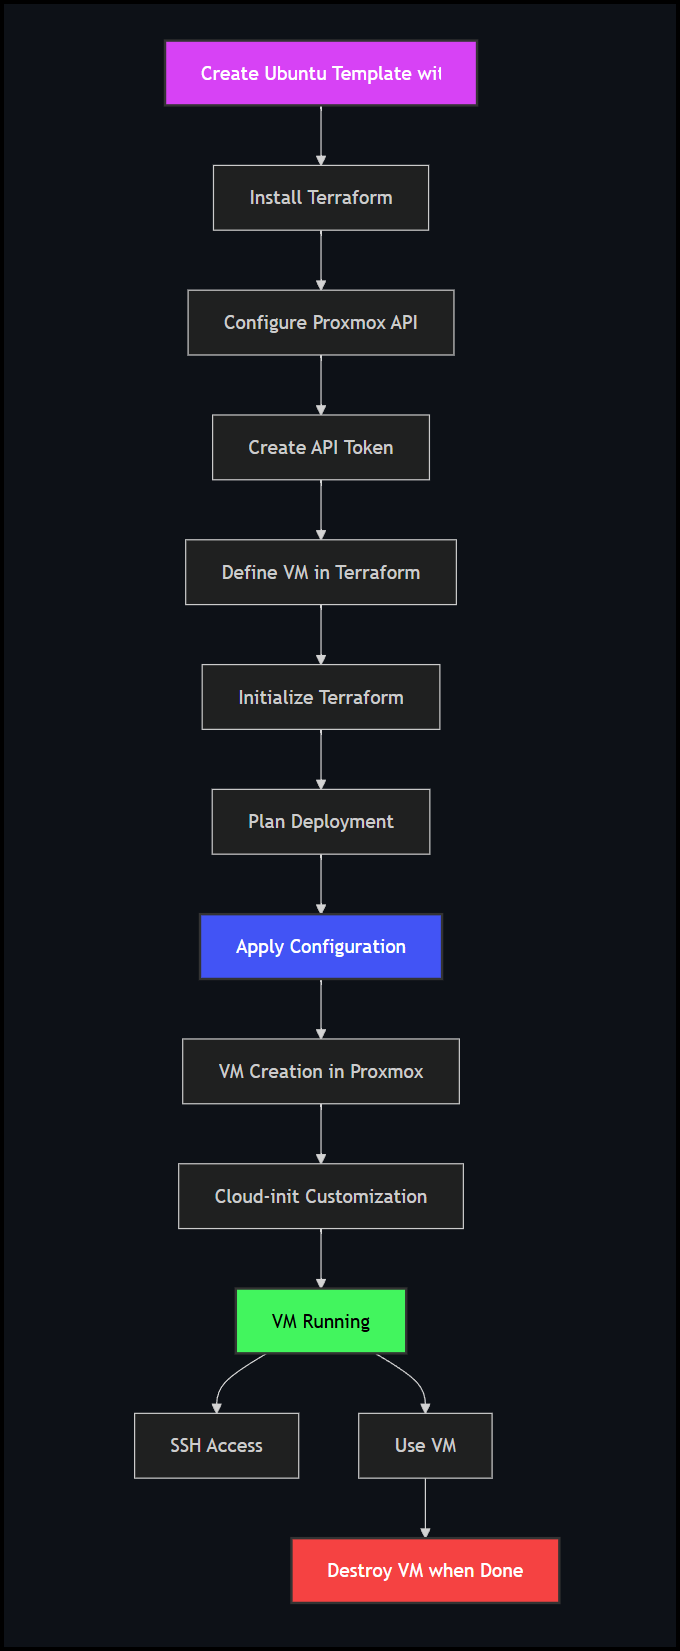
Workflow Overview
The following diagram illustrates the workflow for deploying VMs with Terraform and Proxmox:
About Terraform
Terraform is an open-source infrastructure as code (IaC) tool that enables you to define and provision infrastructure using a declarative configuration language. It allows you to manage various cloud services, virtualization platforms, and other infrastructure through a consistent workflow. With Terraform, you describe your desired infrastructure state in configuration files, and Terraform handles the rest—creating, modifying, or destroying resources as needed.
About Proxmox
Proxmox Virtual Environment (Proxmox VE) is an open-source server virtualization management platform that combines KVM hypervisor and LXC containers, software-defined storage and networking functionality, on a single solution. Its comprehensive API makes it perfect for automation via tools like Terraform.
The Proxmox provider for Terraform bridges these two technologies, allowing you to define VMs in code and have them automatically deployed to your Proxmox server. This approach offers several advantages:
- Repeatability: Deploy identical VMs consistently every time
- Version Control: Track infrastructure changes with Git
- Scalability: Easily deploy multiple VMs in parallel
- Documentation: Self-documenting infrastructure via code
- Reduced Human Error: Eliminate point-and-click mistakes
- Time Savings: Deploy VMs in minutes instead of hours
Setting Up Terraform
Before diving into VM deployment, you’ll need to set up Terraform and configure it to work with Proxmox. Here’s how to get started:
Installing Terraform
For Ubuntu/Debian systems, the process is straightforward:
# Add HashiCorp GPG key
curl -fsSL https://apt.releases.hashicorp.com/gpg | sudo apt-key add -

# Add HashiCorp repository
sudo apt-add-repository "deb [arch=amd64] https://apt.releases.hashicorp.com $(lsb_release -cs) main"

# Update and install Terraform
sudo apt update && sudo apt install terraform
Verify the installation with:
terraform version
You should see output like:
Terraform v1.5.7
Configuring Proxmox API
The magic behind this automation is the Proxmox API, which allows Terraform to communicate with your Proxmox server. Let’s set it up properly:
Using API keys instead of root passwords for authentication is important for managing user permissions and security within Terraform and Proxmox environments. This ensures secure access for managing virtual machines by creating a new user, generating API tokens, and assigning appropriate roles.
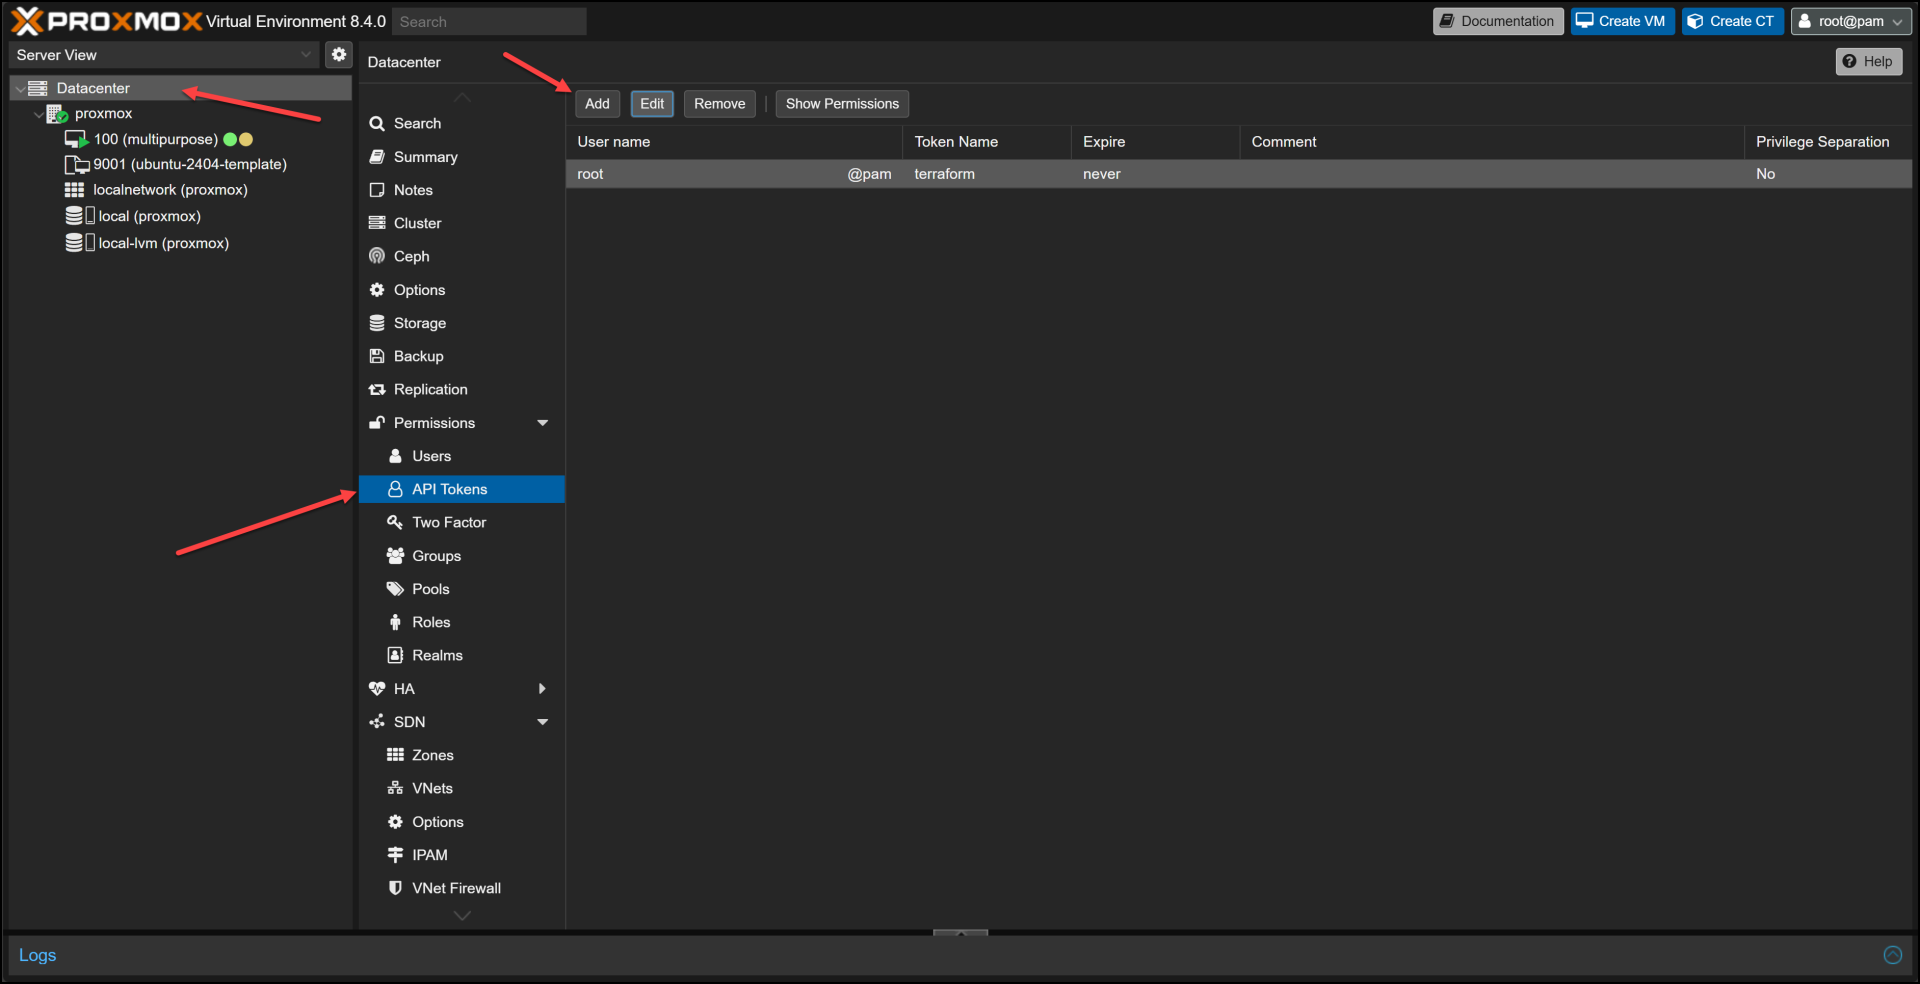
Generating an API Token
API tokens provide a secure way to authenticate with the Proxmox API:
- Navigate to Datacenter → Permissions → API Tokens
- Add a new token for your user
- Decide whether to enable “Privilege Separation” (usually not needed for home labs)
- Save the token ID and secret somewhere secure
This API token will be used in your Terraform configuration to authenticate with Proxmox.
Authentication with Proxmox
Terraform needs to authenticate with your Proxmox server. There are multiple ways to handle this:
API Token Method (Recommended)
The API token approach is more secure and doesn’t require storing your Proxmox password in plain text:
provider "proxmox" {
  endpoint  = "https://proxmox.example.com:8006"
  api_token = "user@pam!token_name=token_secret"
  insecure  = true  # Only for self-signed certificates in home labs
}
In our example, we’re using variables to keep sensitive information out of our main configuration:
provider "proxmox" {
  endpoint  = var.proxmox_api_url
  api_token = "${var.proxmox_api_token_id}=${var.proxmox_api_token_secret}"
  insecure  = true
}
These variables are then defined in separate files:
# terraform.tfvars
proxmox_api_url = "https://192.168.1.95:8006"

# secrets.tfvars (should be kept out of version control)
proxmox_api_token_id     = "root@pam!terraform"
proxmox_api_token_secret = "XXXXXXXXXXXXXXXXXXXXXXXXXX"
Creating a VM with Terraform
Now comes the exciting part – defining your VM in code. Let’s break down the essential components:
Provider Configuration
First, we need to specify which Terraform provider we’re using. For Proxmox, we’ll use the excellent bpg/proxmox provider:
terraform {
  required_providers {
    proxmox = {
      source  = "bpg/proxmox"
      version = "0.77.1"
    }
  }
}
VM Resource Definition
Here’s where we define our VM’s specifications:
resource "proxmox_virtual_environment_vm" "ubuntu_vm" {
  name        = var.vm_name
  description = "Terraform-managed Ubuntu 24.04 VM"
  tags        = ["terraform", "ubuntu"]
  node_name   = var.target_node

  # Use template created by Packer
  clone {
    vm_id = 9001
    full  = true
  }

  agent {
    enabled = true
  }

  cpu {
    cores = var.vm_cores
    type  = "host"
  }

  memory {
    dedicated = var.vm_memory
  }

  network_device {
    bridge = var.network_bridge
  }

  disk {
    interface    = "scsi0"
    size         = var.disk_size
    file_format  = "raw"
    datastore_id = var.disk_storage
  }

  operating_system {
    type = "l26"
  }

  # Cloud-init configuration omitted for brevity...
}
This defines a VM that will be cloned from our pre-created template (VM ID 9001), with customizable CPU, memory, and disk resources.
Cloud-Init Configuration
Cloud-init is a powerful tool for initializing cloud instances, and it works great with Proxmox too. Here’s how we configure it:
initialization {
  ip_config {
    ipv4 {
      address = var.static_ip_address
      gateway = var.gateway
    }
  }

  dns {
    servers = var.dns_servers
    domain  = var.dns_domain
  }

  user_account {
    keys     = [var.ssh_public_keys]
    username = "ubuntu"
    password = var.vm_password
  }
}
This block allows us to:
- Configure networking (DHCP or static IP)
- Set DNS servers and domain
- Inject SSH keys for secure access
- Set user password (though SSH keys are preferred)
Variables for Customization
Instead of hardcoding values, we use variables to make our configuration flexible:
variable "vm_name" {
  description = "Name of the VM"
  type        = string
  default     = "ubuntu-vm"
}

variable "vm_cores" {
  description = "Number of CPU cores"
  type        = number
  default     = 2
}

# And so on...
These variables can then be set in a terraform.tfvars file:
vm_name     = "multipurpose"
target_node = "proxmox"
vm_cores    = 8
vm_memory   = 8192  # 8GB RAM
disk_size   = "100" # 100GB
Executing the Deployment
With our configuration ready, let’s deploy our VM:
Manual Deployment
You can run Terraform commands directly:
terraform init
terraform plan -var-file=terraform.tfvars -var-file=secrets.tfvars -out=tfplan
terraform apply tfplan
Automated Deployment Script
For convenience, I’ve created a build.sh script that handles initialization, planning, and application in one go:
./build.sh
The script also provides options:
- -p or –plan: Only create a plan without applying
- -d or –destroy: Destroy the infrastructure
Demo: From Zero to VM in Minutes
Let me walk you through a real-world deployment to show how fast and efficient this approach is:
- Start State: I have a fresh Proxmox server with the Ubuntu 24.04 template (VM ID 9001) that we created in the previous tutorial.
- Run the Build Script: The script initializes Terraform, creates a plan, and applies it:
- Watch the Magic: Terraform communicates with Proxmox, clones our template, and customizes it according to our specifications. This typically takes about 1-2 minutes, compared to 5-10 minutes for a manual installation.
- Verify the Deployment: In the Proxmox UI, we can see our new VM with the specified resources:
- Name: multipurpose
- CPU: 8 cores
- Memory: 8GB
- Disk: 100GB
- Name: multipurpose
- CPU: 8 cores
- Memory: 8GB
- Disk: 100GB
- Access the VM: Once deployed, we can SSH into our new VM using the injected SSH key:
- Verify Customization: Inside the VM, we can see that it has all the pre-installed packages from our template (Docker, jq, curl, vim, zip, unzip) plus our custom configurations.
- Clean Up: If needed, we can destroy the VM just as easily:
Customizing the VM
One of the greatest advantages of this approach is how easy it is to customize your VMs. Let’s explore some common customizations:
Resource Allocation
Adjusting CPU, memory, and disk resources is as simple as changing variables:
vm_cores  = 8       # Number of CPU cores
vm_memory = 8192    # RAM in MB (8GB)
disk_size = "100"   # Disk size in GB
Networking Configuration
You can use DHCP or configure static IPs:
# DHCP configuration
initialization {
  ip_config {
    ipv4 {
      dhcp = true
    }
  }
}

# Static IP configuration
initialization {
  ip_config {
    ipv4 {
      address = "192.168.1.96/24"
      gateway = "192.168.1.1"
    }
  }
  dns {
      servers = ["8.8.8.8", "8.8.4.4"]
      domain  = "home"
    }
}
User Access
Secure your VM by injecting SSH keys and setting a strong password:
user_account {
  keys     = ["ssh-rsa AAAAB3NzaC1yc2EAAA..."]
  username = "ubuntu"
  password = var.vm_password
}
To create a new user account, you need to define the username, set a strong password, and assign appropriate roles and permissions. This ensures proper system security and functionality.
Deploying Multiple VMs
Scaling from one VM to many is straightforward with Terraform. Here’s how you can deploy multiple VMs:
Using Count
For identical VMs with sequential naming:
resource "proxmox_virtual_environment_vm" "ubuntu_vm" {
  count       = 3
  name        = "${var.vm_name}-${count.index + 1}"
  # Rest of the configuration...
}
Using For_each
I personally prefer for_each for many reasons and you can check out my multiple courses on Terraform to learn more. Here is an example for VMs with different configurations:
variable "vms" {
  type = map(object({
    cores   = number
    memory  = number
    ip      = string
  }))
  default = {
    "web" = {
      cores   = 2
      memory  = 4096
      ip      = "192.168.1.101/24"
    },
    "db" = {
      cores   = 4
      memory  = 8192
      ip      = "192.168.1.102/24"
    }
  }
}

resource "proxmox_virtual_environment_vm" "ubuntu_vms" {
  for_each    = var.vms
  name        = each.key

  cpu {
    cores = each.value.cores
  }

  memory {
    dedicated = each.value.memory
  }

  initialization {
    ip_config {
      ipv4 {
        address = each.value.ip
      }
    }
  }

  # Rest of the configuration...
}
This approach makes it simple to deploy and manage entire environments with different VM specifications.
Troubleshooting Common Issues
Like any automation, you might encounter issues. Here are solutions to common problems:
API Connection Issues
If Terraform can’t connect to your Proxmox server:
- Check that the API URL is correct and accessible
- Verify API token permissions
- For self-signed certificates, ensure insecure = true is set
Clone Failures
If VM cloning fails:
- Make sure the template VM exists and has the correct ID
- Check storage permissions
- Verify the template is not running
Cloud-Init Problems
If cloud-init customizations aren’t applying:
- Ensure the Proxmox VM has the cloud-init drive properly configured
- Check that the qemu-guest-agent is installed in the template
- Verify the cloud-init syntax in your Terraform configuration
Advanced Proxmox Provider Configuration
The bpg/proxmox provider offers many advanced options for fine-tuning your VMs:
Boot Order Configuration
operating_system {
  type = "l26"
}

boot_order = ["scsi0", "ide2"]

ISO files are crucial for booting virtual machines, and specifying the correct ISO file ensures proper configuration and setup.
Serial Console
For better compatibility with some Linux distributions:
serial_device {}
VGA Configuration
For desktop environments:
vga {
  type = "std"
  memory = 32
}
Additionally, VMware can be used as an option for defining the type of graphics adapter, enhancing the virtual machine’s performance and compatibility with various systems.
Conclusion and Next Steps
Deploying Ubuntu 24.04 VMs in Proxmox using Terraform dramatically simplifies and accelerates the process. Instead of clicking through the UI for every deployment, you can define your infrastructure in code and deploy it consistently every time.
This approach saves time, reduces errors, and allows you to version-control your infrastructure. With the basics covered in this guide, you now have a solid foundation for automating your Proxmox infrastructure.
Where to Go From Here
- Kubernetes Cluster: Use this approach to deploy a multi-node Kubernetes cluster
- CI/CD Pipeline: Integrate Terraform into your CI/CD workflow for automated environment provisioning
- Configuration Management: Combine with Ansible for complete VM lifecycle management
- Monitoring Setup: Deploy monitoring agents as part of your VM provisioning
Resources
- Packer Tutorial for Creating Ubuntu 24.04 Templates
- Terraform Documentation
- Proxmox Provider Documentation
Code
Hi and Welcome!
Join the Newsletter and get FREE access to all my Source Code along with a couple of gifts.